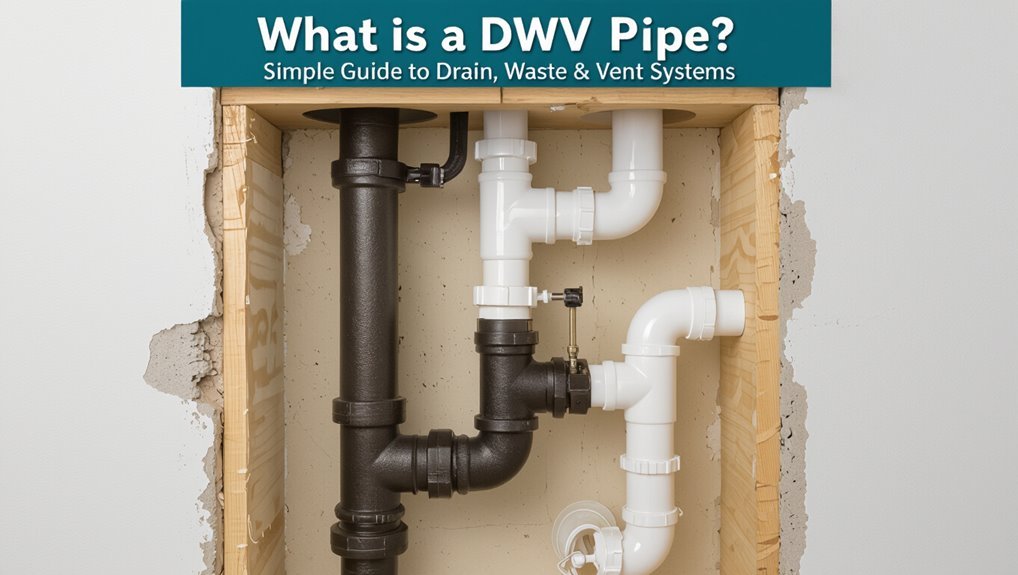
What Is a DWV Pipe? Simple Guide to Drain, Waste & Vent Systems
A DWV pipe is a crucial component of a building’s Drain-Waste-Vent system, responsible for transporting wastewater away from fixtures and allowing air into the system. These pipes facilitate the movement of liquid to a sewer or septic connection through gravity, while vents help maintain pressure balance to safeguard trap seals and prevent sewer gas from entering the building. To avoid backups and odors, it is essential to ensure proper sizing, slope, materials, and the inclusion of cleanouts. Continue reading for practical tips on inspection, common materials, sizing, and guidance on when to call a plumber.
What “DWV” Means and Why It Matters
DWV stands for Drain-Waste-Vent, a plumbing system classification that describes the pipes and fittings responsible for removing wastewater, preventing sewer gases from entering structures, and maintaining proper air pressure to keep traps sealed.
It defines roles: drains convey liquid from fixtures, waste lines direct combined flow to sewers or septic systems, and vents equalize pressure and expel gases.
Understanding DWV clarifies code requirements, material selection, sizing, slope, and access for maintenance.
Proper DWV design reduces backups, odor issues, and health risks while improving longevity.
Awareness aids homeowners, builders, and inspectors in ensuring safe, functional sanitary systems.
How a DWV System Works : Drains, Waste Lines, and Vents
In a typical plumbing network, drains collect fixture discharge, waste lines channel combined flow toward the sewer or septic tank, and vents balance air pressure while allowing sewer gases to escape.
Water from sinks, tubs, and appliances flows into branch drains sized to handle peak loads, merging into larger waste mains that slope to maintain gravity flow. Cleanouts provide access for maintenance.
Vents rise through the structure to the outdoors, preventing pressure differentials that impede drainage. Proper pipe diameter, slope, and joint integrity guarantee efficient transport and prevent backups.
System design follows codes to coordinate capacity, maintenance access, and odor control.
How DWV Vents Stop Trap Siphoning (And Why That Matters)
Properly sized and placed vents prevent the water seal in traps from being pulled out when a fixture drains, a phenomenon known as trap siphoning. Vents admit air to the drainage line, equalizing pressure behind flowing wastewater so negative pressure cannot draw the trap’s water seal dry.
Maintaining that liquid barrier blocks sewer gases and odors from entering the building and preserves sanitary conditions. Without venting, intermittent siphoning allows odor, insect entry, and corrosive gases to damage fixtures and finishes and can disrupt appliance operation.
Correct vent sizing, routing, and connections guarantee reliable trap protection and code compliance for occupant health.
Common DWV Pipe Materials and Where to Use Them
Among the materials commonly used for drain, waste, and vent systems are ABS, PVC, cast iron, copper, and modern engineered plastics, each chosen for specific strengths like corrosion resistance, sound dampening, temperature tolerance, and ease of installation.
ABS and PVC dominate residential DWV for affordability and chemical resistance; ABS handles cold better, PVC tolerates sunlight when protected.
Cast iron suits multi‑story buildings for noise control and longevity despite weight and cost.
Copper appears in limited, high‑temperature applications and refurbishments.
Engineered plastics (e.g., CPVC blends, polypropylene) offer improved jointing, flexibility, and chemical resistance for specialty or retrofit installations.
DWV Pipe Sizes and How to Read Fittings
The section outlines common DWV diameters — from 1¼ inch trap arms to 4 inch stacks — and their typical uses.
It explains how to read fitting markings for material type, nominal size, and pressure or standard codes.
Guidance is provided on matching pipe size to fixtures and fittings to secure proper flow and watertight connections.
Common Diameter Measurements
When selecting DWV pipe and fittings, understanding common diameter measurements is essential to make certain correct fit and flow; these measurements are typically expressed as nominal pipe size (NPS) for rigid pipes and as the outside diameter (OD) or hub size on fittings.
The guide lists typical DWV sizes used in residential and commercial systems, clarifies distinctions between nominal and actual dimensions, and highlights how adapter and coupling choices depend on matching those sizes to maintain proper flow and prevent leaks.
- 1 1/2″ and 2″ for traps and fixture drains
- 3″ for main waste lines
- 4″ for larger stacks and sewer connections
- Metric and PVC OD variations to note
Reading Fitting Markings
In examining DWV fittings, readable markings convey size, material, standard, and pressure or schedule information that installers rely on to match parts correctly.
Stamps and molded codes typically show nominal diameter (inches), material abbreviation (PVC, ABS, cast iron), and standard designation (ASTM, CISPI).
Schedule or SDR numbers indicate wall thickness where applicable; DWV systems often use specific schedules.
Manufacturer name or logo and batch or certification marks (NSF, UPC) verify compliance.
Orientation arrows or flow indicators appear rarely on fittings.
Reading these markings assures compatibility of fittings with system specifications without presuming fixture connections or final layout choices.
Matching Pipe To Fixture
For matching DWV pipe to a fixture, installers must translate fixture outlet sizes and flow requirements into the correct nominal pipe diameter and fitting type.
The process compares fixture tailpieces and trap arms to standard DWV charts, verifies slope and capacity, and selects fittings stamped with size, material, and pressure ratings.
Proper alignment minimizes sags, clogs, and backflow.
Clear identification of fitting markings prevents mismatches between hub, spigot, and adaptor pieces.
Documentation and double-checking measurements reduce rework during rough-in and final connections.
- Consult fixture specifications and DWV capacity tables
- Verify fitting markings and material compatibility
- Match trap arm length and required slope
- Use adapters only when codes permit
Bathroom vs. Kitchen DWV Layouts : Key Differences
The bathroom and kitchen present distinct DWV challenges around fixture trap arrangement, with bathrooms typically grouping multiple traps from sinks, toilets, and tubs while kitchens often center on a single sink trap and dishwasher connection.
Venting requirements differ as bathrooms may require separate vents or relief vents for multiple fixtures, whereas kitchen fixtures can often share a common vent with attention to trap arm lengths.
Waste line sizing also varies: bathroom branches usually use smaller diameters sized for individual fixtures, while kitchen waste lines require larger capacity to handle higher flow and food waste.
Fixture Trap Arrangement
Fixture-trap layouts differ markedly between bathrooms and kitchens due to distinct fixture types, usage patterns, and venting needs. Bathrooms concentrate multiple fixtures—sinks, tubs, toilets—requiring closely spaced traps and trap arms to fit within compact walls and stacks. Kitchens use larger-diameter traps and often dual fixtures (sink, dishwasher) with trap primers or air gaps.
Material choice, cleanout access, and slope differ to handle grease and higher flow in kitchens versus hair and lower volumes in bathrooms. Placement prioritizes odor control, maintenance access, and code compliance.
- Bathroom traps: compact, closely grouped
- Kitchen traps: larger, grease-resistant
- Shared traps: generally avoided
- Cleanouts: more frequent in kitchens
Venting Requirements Differences
How do venting strategies diverge between bathrooms and kitchens? Bathrooms typically require individual fixture vents or common vents for clusters of nearby fixtures to protect traps from siphonage and backpressure, with closer venting distances mandated for lavatories, tubs, and toilets.
Kitchens, centered on sinks and dishwashers, often use combined vents and remote wet vents more liberally, relying on fixture positioning and drainage slope.
Grease, food solids, and higher discharge volumes in kitchens influence trap arm length, vent placement, and access for cleaning.
Codes specify maximum trap arm lengths and vent sizes differently by fixture type, so layout must reflect those distinctions.
Waste Line Sizing
In comparing bathroom and kitchen DWV layouts, waste line sizing hinges on fixture load, solids content, and fixture grouping: bathrooms typically feature multiple low‑volume fixtures (lavatories, toilets, tubs) that allow smaller-diameter branches and predictable cumulative drainage units. Kitchens demand larger trap arms and stacks to handle higher flow rates and food solids from sinks and disposals, often requiring increased pipe diameters and cleanouts.
Code tables assign drainage fixture units (DFUs) and minimum sizes; designers add safety margins for simultaneous use and maintenance access, balancing slope, venting, and trap integrity to prevent siphoning and backups.
- Bathrooms: smaller branches, many fixtures
- Kitchens: larger diameter, solids handling
- DFUs govern sizing and grouping
- Include cleanouts and adequate slope
DIY Checks to Diagnose Clogs, Smells, and Slow Drains
Where does a clog or sewer smell usually start and what can a homeowner quickly check before calling a plumber? The homeowner inspects reachable traps, drains, and vent openings. Check P-traps for water seals, remove and clean strainers, and run water to refill dry traps.
Use a plunger or a hand auger for localized clogs. For odors, pour water and a mild bleach solution into seldom-used drains, and vent stacks should be visually unobstructed on the roof.
Slow drains may respond to mechanical clearing; avoid harsh chemicals that harm pipes. Document findings and try simple fixes before seeking professional help.
When to Call a Plumber: Permits, Reroutes, and Vent Fixes
When a homeowner’s troubleshooting uncovers blocked vents, required reroutes, or work that alters drainage connections, professional intervention is usually warranted because those tasks often trigger permit requirements and carry risks of code violations or sewer backups.
A licensed plumber evaluates vent integrity, determines if a reroute or new vent stack is necessary, and secures permits when structural or public-system ties are affected.
Complex or concealed issues—roof penetrations, cast-iron replacements, or incorrect slope corrections—benefit from trained inspection and diagnostic tools to prevent recurring problems or health hazards.
- Blocked or damaged vent stacks
- Changes that affect discharge paths
- Work requiring municipal permits
- Repeated backups after DIY fixes
Typical Costs: Repairs, Reroutes, and Replacement Ranges
Estimate typical costs by grouping common DWV jobs into repair, reroute, and replacement categories so homeowners know likely price ranges before getting bids.
Minor repairs—clearing clogs, replacing short pipe sections, tightening fittings—typically cost $100–$400.
Moderate repairs and partial reroutes—replacing vents, relocating fixtures within a room, repairing cast iron segments—often run $500–$2,000 depending on access and materials.
Full system replacement or major reroutes that alter layouts or require structural work commonly range $3,000–$10,000 or more for large homes.
Permit, drywall, and finish carpentry add separate fees; obtain multiple estimates and itemized quotes before committing.
Conclusion
In sum, a clear understanding of DWV systems keeps homes healthy and functioning; after all, “an ounce of prevention is worth a pound of cure.” Homeowners should know basic drain, waste and vent roles, common materials, and simple troubleshooting steps, yet recognize when professional help is warranted for permits, reroutes, or vent repairs. Prudent maintenance and timely repairs prevent odors, backups, and costly replacements, preserving comfort and peace of mind.