How to Join Two PVC Pipes Together: Easy DIY Guide for Beginners
To join two PVC pipes together, you can use solvent-weld for permanent, watertight connections, threaded fittings for removable joints, or mechanical couplings for repairs and misalignment. Begin by cleaning and square-cutting the ends of the pipes, then deburr and chamfer them slightly. Next, dry-fit the pipes and mark the insertion depth. If required, apply primer, then use solvent cement according to the manufacturer’s instructions. Insert the pipes fully with a quarter-turn, hold for the recommended tack time, and allow sufficient curing time before applying pressure. Follow this guide for tools, safety tips, and detailed step-by-step instructions.
Quick Decision Guide: Which Joining Method to Pick

Choose the joining method based on pipe size, expected load, pressure, environment, and permanence.
The guide advises solvent cement for standard pressure lines when a permanent, watertight bond is required; primer usage depends on local codes.
Mechanical couplings suit repair, misaligned cuts, or buried runs needing flexibility; select materials rated for temperature and chemical exposure.
Threaded fittings address small-diameter, low-pressure systems but demand proper tape or sealant and risk leaks under vibration.
Compression fittings enable disassembly but may not suit high pressures.
Adhesive tapes or clamps serve temporary fixes only.
Inspect joint ratings, compatibility, and long-term maintenance needs before choosing.
What Kind of PVC Pipe Are You Joining?
After selecting a joining method based on load, pressure, and permanence, identify the specific type of PVC being joined, since material grades and wall thicknesses affect compatibility and required procedures. The builder notes whether pipe is schedule 40, schedule 80, CPVC, or thin-wall irrigation; fittings and adhesives differ. Measure OD and wall thickness, check markings for pressure rating, and confirm solvent compatibility. For repairs, match original material. When in doubt, bring a sample to a supplier. The table below summarizes common characteristics.
| Type | Wall | Typical Use |
|---|---|---|
| Schedule 40 | Medium | Drain/waste |
| Schedule 80 | Thick | High pressure |
| CPVC | Varies | Hot water |
Solvent-Weld vs Threaded vs Mechanical: Pros and Cons
The article compares solvent-weld joints, threaded connections, and mechanical fittings for PVC pipe systems. It notes solvent-welds offer high strength and a smooth interior but are permanent and sensitive to surface preparation and chemistry.
Threaded fittings trade reusability for potential leaks and torque limits, while mechanical options simplify assembly and disassembly but can be bulkier and rely on gaskets or clamps.
Solvent-Weld Strengths And Limits
Weighing joint methods for PVC, solvent-welding fuses pipe and fitting material at a molecular level, producing a continuous joint whose tensile and leak resistance often exceed that of threaded or mechanically clamped connections when properly prepared and cured. Solvent joints perform well under steady internal pressure and resist vibration-induced loosening; they are lightweight, inexpensive, and quick to assemble.
Limits include reduced performance with improper surface prep, contamination, or inadequate cure time; exposure to certain solvents and high heat can weaken bonds. Disassembly is destructive, complicating repairs or reconfiguration. Appropriate for permanent, pressure-rated plastic systems when installed per manufacturer instructions.
Threaded Vs Mechanical Tradeoffs
Compare threaded, solvent-weld, and mechanical PVC joints by focusing on performance criteria—strength, leak resistance, ease of assembly, serviceability, and environmental limits—to decide which method best suits a given application. Each method offers tradeoffs: solvent-weld yields permanent, high-strength, low-leak joints but is hard to disassemble; threaded fittings allow reuse and moderate strength but risk cross-threading and require tape or sealant; mechanical couplings enable quick, reversible connections and accommodate misalignment but can be bulkier and more leak-prone under pressure.
- Solvent-weld: permanent, smooth flow, temperature/chemical limits.
- Threaded: reusable, careful alignment, sealing needed.
- Mechanical: versatile, serviceable, size/pressure constraints.
Tools and Supplies to Gather First
Before beginning any PVC work, the necessary safety gear—gloves, eye protection, and a respirator for solvent use—should be assembled.
Essential hand tools such as a pipe cutter, deburring tool, and adjustable wrench enable accurate cutting and secure fittings.
PVC-specific supplies, including primer, cement, pipe cleaner, and appropriate fittings, complete the checklist for a safe and efficient joinery session.
Necessary Safety Gear
Typically, a quick check of necessary safety gear prevents common injuries and guarantees a smooth PVC-joining job.
Protective equipment reduces chemical, particulate, and impact risks when cutting, priming, and cementing pipe.
The checklist focuses on personal protection and safe handling of adhesives and tools.
- Safety glasses or goggles to shield eyes from debris and solvent splashes.
- Chemical-resistant gloves (nitrile or neoprene) to prevent skin contact with primer and cement.
- A respirator or mask rated for organic vapors and particulates when working in confined or poorly ventilated areas.
Inspect gear for damage and replace worn items before starting work.
Essential Hand Tools
After confirming protective gear and safe handling procedures, attention shifts to assembling the hand tools and supplies required to cut, fit, and join PVC pipe. The list emphasizes versatile, durable items for accurate cutting, deburring, measuring, and securing pieces during assembly. Quality hand tools reduce mistakes and speed work.
| Task | Recommended Tool |
|---|---|
| Cutting | Hacksaw or PVC pipe cutter |
| Measuring & marking | Tape measure and permanent marker |
| Securing & aligning | Clamp or vise |
Include utility knife and deburring tool; a screwdriver set and adjustable wrench are useful for fittings and supports.
PVC-Specific Supplies
Several specialized items make up a basic PVC-specific kit, each chosen to guarantee clean cuts, secure bonds, and long-term joint integrity.
The following supplies assure consistent, code-compliant connections and reduce rework when joining pipes.
- PVC cutter or fine-tooth saw: for square, burr-free cuts.
- PVC primer and solvent cement: matched to pipe type for proper chemical bonding.
- Deburring tool and rag: remove shavings, dry surfaces before bonding.
Additional helpful items include measuring tape, marker, and gloves.
Proper selection and inspection of these supplies prevent leaks and speed installation, especially on pressurized systems.
Measure and Cut PVC Pipe Accurately
When preparing PVC pipe for a joint, precise measurement and straight, clean cuts are essential to guarantee proper fit and leak-free connections.
Measure twice, marking cut lines with a fine-tip permanent marker or pencil, accounting for socket depth when using fittings. Use a tape measure held firmly against the pipe and transfer measurements along a straightedge for consistent alignment.
For cutting, select an appropriate tool—PVC pipe cutter for small diameters, miter saw with fine-tooth blade for larger runs, or a hacksaw with steady, even strokes.
Secure the pipe in a clamp to prevent rotation and make certain a perpendicular cut.
Deburr and Chamfer Pipe Ends
After cutting, the pipe ends are smoothed to remove burrs using a file or deburring tool.
A slight chamfer is then created on the outside edge to ease fitting and prevent damage to the socket.
Finally, the ends are inspected and wiped to guarantee no loose burr residue remains.
Remove Burrs Smoothly
Before joining PVC pipes, any rough edges or flash left from cutting must be removed to guarantee proper fit and a leak-free seal.
The technician uses a deburring tool or utility knife to shave the lip, working around the inner and outer edges.
Light sanding with fine-grit paper smooths remaining irregularities. Clean the surfaces after deburring to remove dust and shavings before dry-fitting.
- Use a round file or purpose-made deburrer for inner edges.
- Rotate the tool evenly to avoid creating ridges.
- Inspect the end with light to confirm a smooth, even finish.
Create A Slight Chamfer
Chamfer the pipe ends a fraction of an inch to ease socket entry and prevent the primer and cement from being scraped away during assembly.
A slight 15–30° bevel on the outside edge removes sharpness and aligns the pipe with the fitting evenly.
Use a utility knife, deburring tool, or fine file, rotating the pipe for a consistent chamfer. Work slowly to avoid reducing the outer diameter excessively.
After chamfering, test-fit the pipe to confirm smooth engagement without forcing.
Proper chamfering minimizes glue displacement, guarantees full insertion depth, and supports a uniform adhesive bond for reliable joints.
Inspect For Burr Residue
Inspect the chamfered ends for any remaining burrs or shavings that could interfere with solvent-weld adhesion. The inspector should run a gloved finger around each pipe end and visually check for thin plastic fragments or irregular edges; even small particles can prevent a full, continuous bond.
Remove debris with a deburring tool, fine file, or sandpaper, then wipe the surface with a clean, lint-free cloth. Confirm the bevel remains smooth and uniform before applying primer and cement.
- Check inside and outside edges for raised slivers.
- Remove residue with controlled, light strokes.
- Reclean and reinspect if any particles persist.
When to Use a Coupling vs a Connector
When joining PVC sections, the choice between a coupling and a connector hinges on alignment, permanence, and pipe size: couplings join two straight runs of the same diameter for a continuous, often permanent splice, while connectors adapt differing diameters, change direction, or allow removable joints such as threaded or mechanical fittings.
A coupling is appropriate for extending a run or repairing a cut when pipes are colinear and identical in size. Use a connector when adapting sizes (reducing/increasing), introducing elbows or tees, or when future disassembly is required.
Selection also depends on pressure rating, material compatibility, and access for installation.
Step-by-Step Solvent-Weld (Glue) Method
How should the pieces be prepared and joined to guarantee a secure solvent-weld?
The method requires clean, dry cuts, chamfered edges, and matching fit. Surfaces must be free of debris and oil.
After fit-checking, apply solvent cement sparingly to both pipe end and fitting socket, then insert with a quarter-turn to spread cement.
Hold until initial set, then allow full cure per product instructions.
- Verify tight, square cuts and dry fit before gluing
- Apply even, thin cement coats to both surfaces
- Insert fully, rotate slightly, and hold until set to prevent push-out
How to Prime PVC Before Gluing
Before applying solvent cement, PVC surfaces must be primed with an appropriate purple or clear primer to soften and clean the plastic, ensuring proper chemical welding.
The practitioner inspects joints, removes dirt and moisture, and marks insertion depth.
Primer is applied to both pipe exterior and fitting interior, using steady strokes until the surface uniformly changes color or slightly softens.
Allow brief dwell time per manufacturer instructions; do not let primer pool.
If multiple coats are specified, apply sequentially.
Work in ventilated areas and wear gloves and eye protection.
Dispose of rags and containers according to local regulations.
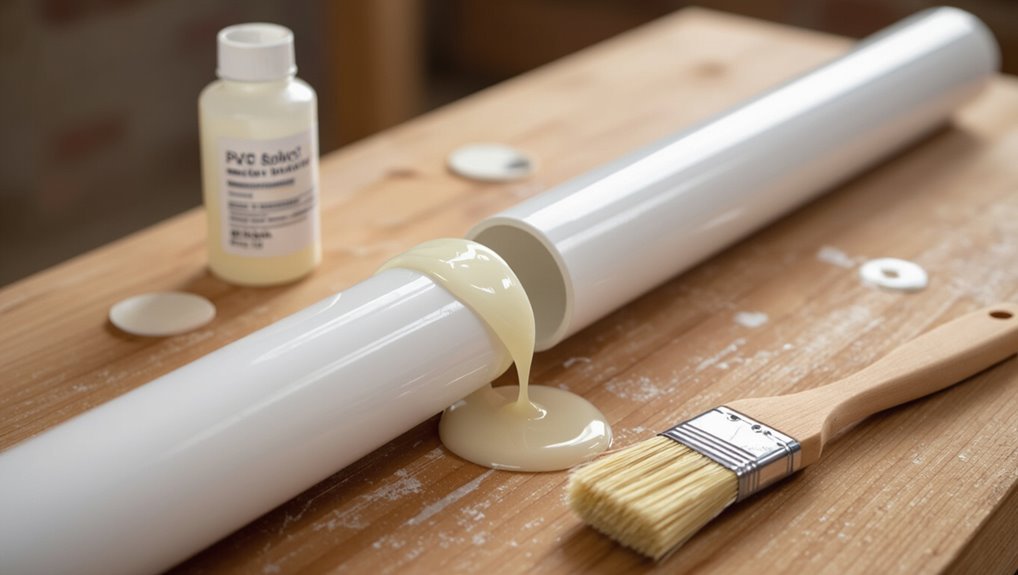
How Much PVC Cement to Apply and Where
Apply a thin, even layer of PVC cement to the primed exterior of the pipe and a slightly heavier coat to the interior of the fitting, covering the joint surfaces fully but avoiding excess that will squeeze out.
The installer should coat only the mating areas: pipe outside and fitting inside.
Excess runs indicate too much cement; wipe immediately with a rag.
Use a brush or applicator provided; small-diameter pipe needs less material than larger sizes.
Make certain continuous coverage without globs.
- Coat pipe exterior and fitting interior evenly.
- Avoid heavy globs that create voids.
- Remove visible excess before assembly.
How Long to Hold a Solvent-Weld Joint
Before applying solvent, the parts should be dry-fitted to confirm alignment and insertion depth.
Solvent must be spread evenly over the mating surfaces to guarantee a uniform chemical weld, and the joint should be held immobile for the manufacturer’s recommended initial set time.
After release, the assembly requires the prescribed cure and handling time before pressure testing or full service.
Dry Fit Time
When joining PVC with solvent cement, the assembled joint must be held steady long enough for the solvent to begin bonding the surfaces—typically between 10 and 30 seconds for schedule 40, longer for larger diameters or cold conditions—until the parts resist light movement without slipping.
Dry fit time refers to practicing alignment and measuring clearances before applying cement; it reduces mistakes and guarantees correct insertion depth. Proper dry fitting prevents excessive repositioning during cure.
Typical considerations include:
- Confirming fit and alignment without adhesive
- Marking insertion depth for consistent assembly
- Checking for burrs or debris that impede seating
Apply Solvent Evenly
Evenly coating both mating surfaces with solvent cement is essential: a uniform, continuous film guarantees proper softening and fusion of the PVC rather than gaps or excesses that weaken the joint.
Once fitted, the assembler should hold the parts together steadily for the manufacturer’s recommended tack time, typically 10–30 seconds for small schedule 40 fittings, longer for larger diameters.
Proper alignment must be maintained during this period to avoid shifting.
Excessive movement compromises the bond.
If the joint resists initial seating, separate and reapply cement rather than forcing.
Use steady pressure and confirm alignment before releasing the hold.
Cure And Handling Time
After assembly, the joint requires a specific tack and cure period to develop sufficient strength for handling and pressure. The installer should hold aligned parts for the tack time—typically 15–30 seconds for small diameters, longer for larger sizes—then allow the solvent to set before moving.
Full cure depends on pipe diameter, ambient temperature, and solvent type; light handling may be safe in an hour, pressure testing often waits 24 hours, and full strength can take 24–48 hours.
- Small diameters: shorter tack, faster handling.
- Large diameters: increased tack and cure times.
- Cold or humid conditions: extend cure intervals.
Curing Time and When to Pressure-Test PVC Joints
Typically, manufacturers specify a set cure time for PVC solvent-weld joints based on pipe diameter, temperature, and humidity, and installers must respect these guidelines before applying pressure. Curing allows the solvent to evaporate and the polymer surfaces to fuse; insufficient cure risks joint failure.
Cooler or more humid conditions lengthen cure times; small-diameter fittings usually cure faster than large ones. A common practice is to wait the minimum recommended dwell time, then incrementally pressurize the system to check for leaks, holding at low pressure for observation before raising to operating pressure. Record conditions and results for verification and safety.
Step-by-Step Threaded PVC Joint Method
Begin by preparing all components: inspect male and female threads for damage, remove burrs or debris with a clean brush, and make certain both parts are dry and free of old sealant.
Apply appropriate thread compound to male threads, avoiding excess that could enter the bore.
Align threads carefully, hand-start to prevent cross-threading, then use a wrench for final tightening — stop once snug plus a quarter turn; over-tightening risks cracking.
After assembly, visually confirm engagement and support the joint to avoid strain.
Allow recommended cure time for the sealant before pressurizing the system.
- Check thread condition
- Hand-start alignment
- Wrench-tighten carefully
How to Wrap PTFE Tape on PVC Threads
The section explains how to select appropriate PTFE tape, emphasizing density and compatibility with PVC.
It then outlines the correct wrapping technique—direction, overlap, and number of turns—to guarantee a tight, leak-free seal.
Finally, it highlights common mistakes to avoid, such as overwrapping, wrapping against the thread direction, and contaminating the tape.
Choosing The Right Tape
Often a thin, white PTFE tape is the best choice for sealing threaded PVC fittings because it resists chemical attack, provides reliable thread lubrication, and fills small gaps without hardening or cracking.
Selection focuses on tape density, width, and suitability for plastic threads. Thicker or gas-rated tapes can be excessive for standard PVC and may impair fit. Alternatives exist for specialty applications, but compatibility and material safety are paramount.
Consider these factors when choosing tape:
- Density/thickness: standard 2–3 mil for plumbing; avoid heavy gas grades.
- Width: match thread size for proper coverage.
- Certification: NSF/ANSI or manufacturer recommendations.
Proper Wrapping Technique
When wrapping PTFE tape on PVC threads, a consistent, snug overlap and direction that follows the thread helix are essential to create a uniform seal without bunching or unraveling.
The technique requires anchoring the tape on the first thread turn, keeping tension while winding clockwise for standard right-hand threads, and covering three to five full turns toward the pipe end.
Smooth the tape into grooves with a finger to eliminate gaps, trim excess flush with the end, and avoid wrapping over the pipe face.
Properly applied tape seats evenly when the fitting is tightened, supporting a leak-resistant joint without excess material.
Common Mistakes To Avoid
Because small errors compound quickly, installers should be aware of several common PTFE tape mistakes that undermine PVC thread seals. Avoiding these mistakes preserves joint integrity and prevents leaks or damage.
- Wrapping against thread direction: tape must be applied clockwise with the threads so it doesn’t bunch when tightened.
- Overlapping excessively or using too many layers: creates bulk that prevents proper thread engagement and can crack fittings.
- Using dirty, oily, or wet threads and failing to stretch the tape evenly: contaminants and uneven application reduce seal effectiveness and promote leaks.
Using PVC Unions for Maintenance Access
For straightforward access to sections of a PVC plumbing system without cutting or solvent-cementing joints, PVC unions provide a removable connection that separates into two halves joined by a threaded nut and compression washer.
They allow rapid disassembly for inspection, cleaning, or component replacement. Selection depends on pipe diameter, pressure rating, and chemical compatibility.
Installation requires clean, square pipe ends, proper gasket seating, and even nut tightening to avoid leaks or distortion. Unions are ideal at equipment interfaces, traps, or frequent-service valves.
They are not designed as structural joints; use appropriate support and follow manufacturer torque and temperature limits for reliable maintenance access.
Joining PVC to Copper, CPVC, and Metal
How can PVC be reliably joined to copper, CPVC, or other metals without compromising system integrity? The procedure requires selecting compatible connector fittings, preparing pipe ends, and ensuring corrosion resistance. Use fittings rated for the materials and service (pressure, temperature). Clean and deburr both pipes; apply appropriate primers or sealants where specified. Support and align to avoid stress at the joint. Consider galvanic isolation when mixing dissimilar metals.
- Use certified connector adapters: PVC-to-copper or PVC-to-CPVC.
- Follow manufacturer instructions for solvent cement, solder, or thread sealant.
- Install dielectric fittings or neoprene gaskets to prevent corrosion.
Using Mechanical (Repair) Couplings
Use a mechanical (repair) coupling when a fast, reliable connection is needed to join or repair PVC to PVC, PVC to other plastics, or mixed-material piping without solvent welding. The coupling seals with rubber gaskets and clamps; installation requires clean pipe ends, correct insertion depth, and torqueed nuts. It suits repairs, mismatched materials, and temporary work. Choose stainless hardware for corrosion resistance and matched diameter for pressure ratings. Test under pressure after installation.
| Feature | Benefit | Note |
|---|---|---|
| Gasket | Leak seal | Replaceable |
| Clamp | Mechanical grip | Torque spec |
| Material | Versatile | Mixed pipes |
| Size | Quick fit | Range available |
Join Flexible PVC (Drip) to Rigid PVC
When connecting flexible drip tubing to rigid PVC, attention to sealing method and mechanical support prevents leaks and kinking; appropriate adapters, clamps, or barb fittings create a secure junction while maintaining flow and pressure integrity. Use a rigid-to-flex adapter or slip-on barb; push tubing fully and secure with a stainless clamp.
Apply primer and solvent cement only on rigid fitting surfaces, not on flexible tubing. Trim tubing squarely and avoid sharp bends near the joint. Test under low pressure, inspect for seepage, then increase pressure gradually. Replace brittle tubing and re-clamp if movement or leaks appear.
- Select correct adapter size
- Use clamp or crimp
- Test gradually
Connect Corrugated Drainage to PVC Pipe
Connecting corrugated drainage to rigid PVC requires attention to fit, support, and sealing because the flexible, ribbed profile does not mate directly with smooth-surface pipe.
A proper adapter uses an adapter coupling sized to the corrugated outside diameter and the PVC nominal size; slip-on adapters, rubber couplers with stainless clamps, or molded adapter fittings work.
Clean and deburr PVC; trim corrugated end square.
Slide the adapter onto corrugated tube, seat the PVC into the smooth side, then tighten clamps evenly.
Add silicone or gasket where recommended to seal.
Provide short unsupported runs and secure joints to prevent separation and water infiltration.
Align Pipes to Prevent Stress and Leaks
Ensuring precise alignment before final fastening prevents undue stress on joints and reduces the risk of leaks over time.
The installer checks mating faces, removes burrs, and dry-fits sections to confirm straight runs and correct angles.
Slight offsets are corrected with proper cutting or using an appropriate fitting; adhesive is applied only after alignment is verified.
Movement at the joint is minimized during cure.
Considerations include pipe diameter, wall thickness, and thermal expansion allowances.
Common mistakes are forcing misaligned pipes, insufficient dry-fit, and overtrimmed sockets.
- Dry-fit and mark alignment
- Use a straightedge or level
- Correct offsets before gluing
Support and Secure Joined PVC Runs
Support and secure joined PVC runs with appropriately spaced mounting brackets and straps to prevent sagging and joint strain.
Make certain pipes remain properly aligned during installation so fittings sit squarely and seals stay effective.
Leave measured gaps at supports to allow for thermal expansion and contraction without stressing the joins.
Mounting Brackets And Straps
When installed at regular intervals, mounting brackets and straps prevent sagging, misalignment, and strain on joints by firmly anchoring joined PVC runs to walls, ceilings, or framing.
Selection depends on pipe diameter, load, and environment; use plastic or metal straps for indoor plumbing, cushioned clamps for vibration-prone areas, and stainless or galvanized hardware for damp locations.
Spacing follows code or manufacturer recommendations to reduce deflection. Secure straps without overtightening to allow minor thermal movement. Fasten into solid backing or use appropriate anchors.
Regular inspection guarantees hardware integrity and joint longevity.
- Choose compatible material and size
- Space supports per specifications
- Allow slight pipe movement
Proper Pipe Alignment
Along straight runs and at fittings, precise alignment keeps joined PVC pipes true, minimizes stress on solvent-welded or mechanical joints, and preserves flow characteristics.
Installers verify pipe ends are square, deburred, and clean before trial-fitting; chamfers are avoided when a snug fit is required.
Use temporary alignment clamps or a laser level to maintain axial continuity while adhesive cures.
Secure runs with properly spaced straps to prevent sag and offset loads.
At changes, make certain centers line up and fittings seat fully without angular strain.
Finally, inspect joints visually and by hand for gaps or misalignment prior to system pressurization.
Allow For Thermal Expansion
Because PVC expands and contracts with temperature changes, runs must be supported and secured to accommodate movement without stressing joints or fittings.
Install supports at manufacturer-recommended intervals, leaving slight slack or use sliding clamps where runs cross expansion zones.
Allow measurable clearance at fixed points and near walls.
Use flexible connectors for long straight runs and design looped offsets if necessary to absorb linear change.
- Install supports that permit axial movement, such as cushioned or slotted hangers.
- Include expansion joints or flexible couplings in long runs.
- Maintain recommended spacing and avoid rigid anchoring at every support point.
How Temperature Affects Cement Curing and Bond
At low temperatures the chemical reactions in PVC cement slow markedly, reducing solvent evaporation and polymer fusion, while high temperatures accelerate solvent loss and can cause premature skinning or weakened joints; consequently, temperature critically influences cure rate, ultimate bond strength, and recommended handling times. Practitioners should follow manufacturer temperature ranges, allow extended set times in the cold, and avoid rapid assembly in heat. Moisture and ventilation also modify curing. Testing a small sample joint before critical installations is prudent. Use appropriate clamping duration and avoid stress until full cure is verified.
| Temperature | Effect |
|---|---|
| Low | Slower cure |
| High | Faster cure, risk of weak bond |
Chemical Exposure: Choose Joints and Materials
When exposed to solvents, acids, bases, or hydrocarbons, PVC piping systems require careful selection of joint types and material grades to guarantee chemical compatibility and long-term integrity. The installer should evaluate fluid chemistry, concentration, temperature, and exposure duration before selecting solvent-weld, mechanical, or flange connections.
CPVC, PVC-U, or chemically resistant liners may be necessary; verify manufacturer chemical resistance charts. Proper gasketing and seal materials (EPDM, FKM, PTFE) further influence performance. Regular inspection schedules detect degradation early. Consult safety data sheets and standards for guidance.
- Assess fluid chemistry and temperature.
- Match joint type to chemical exposure.
- Choose compatible gasket and liner materials.
Match Fitting Sizes, SDR, and Pressure Ratings
Properly matching fitting sizes, SDR (Standard Dimension Ratio), and pressure ratings guarantees joints maintain mechanical strength and leak-tightness under expected loads.
The installer verifies pipe outside diameter and wall thickness against fitting markings; mismatched dimensions cause poor seating or stress concentrations.
SDR correlates diameter to wall thickness, affecting pressure capacity—use fittings rated for equal or higher SDR compatibility.
Pressure ratings on pipes and fittings must meet system maximum working pressure plus safety margin.
For buried or pressurized runs, select components with appropriate temperature derating.
Record part numbers and ratings before assembly to make certain long-term reliability and code compliance.
Fix Imperfect or Cut Pipe Ends Before Joining
Before joining, pipe ends must be true, clean, and free of damage to guarantee a reliable seal and proper fit.
The practitioner inspects cuts for burrs, uneven edges, or crushing; damaged sections are trimmed back to sound material.
A square, deburred end guarantees full socket engagement and consistent glue distribution.
Light sanding removes surface irregularities and cleans the primer area; cloth-wiping clears dust and solvent.
If wall thickness is compromised, replace the segment rather than attempt a repair.
Recommended final checks include fit trial and alignment before solvent application.
- Square the cut with a saw guide
- Deburr and chamfer edges
- Clean and dry surfaces
Indoor vs Outdoor Watertight PVC Joints
For interior installations, watertight PVC joints prioritize solvent welding and cleanroom-like conditions; exterior joints add UV, temperature, and moisture exposure to the durability equation.
Indoor work focuses on dry surfaces, proper primer and cement application, and seating time to guarantee a chemical bond resistant to common household pressures.
Outdoor joints require UV-stable materials, flexible couplings for thermal movement, and additional sealing—such as elastomeric tape or silicone beads—where mechanical stresses or weather intrusion are concerns.
Correct adhesive selection, surface prep, and protection from contaminants remain essential in both cases.
Inspection and periodic maintenance differ by exposure and load.
Safely Join Large-Diameter PVC Pipe
When joining large-diameter PVC, the worker must wear appropriate safety gear and maintain clearances to prevent injury from heavy components and solvent fumes.
Proper supports and lifting equipment should be used to hold sections steady while joints are aligned.
Attention to alignment and support prevents stress on the joint and guarantees a secure, long-lasting connection.
Safety Gear And Clearance
Although working with large-diameter PVC reduces some handling complexity of smaller fittings, safety gear and clearances remain essential: hard hats, eye protection, heavy-duty gloves, steel-toed boots, and high-visibility clothing protect personnel from falling sections and accidental impact, while hearing protection is recommended when power tools are used.
Clear work zones, marked exclusion areas, and unobstructed egress keep teams safe. Inspect PPE before use and replace damaged items. Maintain adequate overhead and side clearance to avoid pinch points during movement. Communicate roles and signals before lifts.
- Verify PPE fit and condition
- Mark and enforce exclusion zones
- Keep pathways and exits clear
Proper Support And Alignment
Following verification of PPE and clearance, attention turns to support and alignment procedures that prevent joint stress and misfit during assembly.
Large-diameter PVC requires continuous support: use adjustable pipe stands, padded rollers, or temporary cribbing to maintain level and prevent sag.
Align pipe ends visually and with straightedges or string lines; confirm angular and axial alignment within manufacturer tolerances.
Secure fittings with clamps or straps before solvent application to avoid movement.
Allow proper deflection for thermal expansion by leaving calculated gaps or using expansion joints.
Inspect supports and alignment after initial curing and periodically during the first 24 hours to confirm stable joints.
Joining Small-Diameter PVC for Irrigation
For small-diameter PVC used in irrigation systems, proper joining techniques guarantee leak-free, durable connections that withstand pressure fluctuations and soil movement.
The practitioner selects tubing rated for irrigation, cleans and deburrs cut ends, and uses compatible fittings. Primer and solvent are applied sparingly where specified; push-fit couplings offer tool-free alternatives for quick repairs. Trenches and clamp placement minimize stress from frost heave or trampling.
- Match pipe and fitting materials and sizes precisely.
- Support runs to prevent sagging and joint strain.
- Test the system at working pressure before backfilling.
Common Solvent-Weld Mistakes and Fixes
Mistakes in solvent-welding small-diameter PVC often stem from rushed surface preparation, incorrect solvent or primer use, and improper joint assembly; each error can compromise bond strength or cause leaks under pressure.
Common faults include dirty or wet surfaces, insufficient primer dwell time, excess or inadequate cement, misalignment, and movement before cure.
Remedies require cutting back to damaged pipe, re-cleaning and drying, properly priming, applying even cement coats, and reassembling with correct insertion depth and twist.
When joints fail after cure, replacing the joint section is safer than patching; testing under low pressure before full service helps confirm integrity.
Fixing Leaks in Threaded PVC Joints
Threaded PVC joints frequently leak due to worn threads, improper thread sealant, or overtightening that cracks fittings. Guidance covers diagnosing source, preparing threads, and applying correct sealant without damaging plastic. Steps prioritize minimal disassembly and testing.
- Inspect threads for burrs or cross-threading; use a soft brush and light emery if needed.
- Reapply thread sealant: PTFE tape wrapped clockwise in 3–4 passes or a compatible pipe dope rated for PVC; avoid excess.
- Reassemble hand-tight plus a quarter turn with a wrench, then pressure-test at low flow for leaks before full use.
If leaks persist, replace the damaged fitting.
Remove Stuck or Fused PVC Fittings
When seized by age, solvent welds, or heat, PVC fittings can resist normal disassembly and require deliberate, controlled techniques to avoid cracking the pipe or damaging adjoining components.
Work begins by cutting fittings flush with a fine-tooth saw, preserving as much pipe as possible.
Apply penetrating lubricant or a heat gun briefly to soften adhesive bonds; avoid excessive heat that warps PVC.
Use a gasket scraper or narrow chisel to rotate and pry the remnant from the pipe, supporting the pipe to absorb leverage.
Clean remaining adhesive with sandpaper and a plastic-safe solvent before installing a replacement coupling or slip joint.
Replace a Damaged Section Without Disturbing Runs
Although limited access complicates repairs, a damaged section of PVC can usually be replaced without disturbing adjacent runs by using short couplings, repair sleeves, and careful cutting to isolate only the affected length. The technician measures the damaged span, marks cut points beyond cracks, and guarantees remaining pipe ends are square and clean.
Appropriate couplings (slip, flexible, or compression) are selected to match diameter and wall thickness. Clean surfaces, primer, and solvent cement are applied per product instructions. Allow proper cure time before restoring flow.
- Cut squarely and remove only the damaged portion
- Use repair sleeves or short couplings
- Match fittings and follow adhesive directions
Test Joined PVC for Pressure and Leaks
Pressurize the repaired section gradually and inspect all joints for leaks and deformation.
The technician increases system pressure in steps, monitoring gauges and visible fittings.
Apply soapy water to joints to reveal pinhole leaks as bubbles form.
Tighten or re-seat couplings if seepage appears; depressurize before adjustments.
Observe for minute movement or cracking under load; any change requires rework.
Maintain pressure for a recommended duration to confirm stability, then cycle pressure to detect intermittent failures.
Record test pressure, duration, and results.
Only return the system to service after no leaks and normal pressure hold are verified.
Follow Local Code and Permitting for PVC Work
Local building codes and permit requirements govern PVC piping repairs and replacements; technicians must verify applicable regulations before beginning work. Compliance guarantees safety, legal responsibility, and inspection access. Confirm whether a permit is needed for alterations, which fixtures are covered, and required inspection stages. Keep documentation and drawings current for inspectors.
- Check municipal plumbing codes, approved materials, and pressure ratings.
- Determine permit application process, fees, and expected inspection timeline.
- Retain receipts, approved plans, and inspector reports for recordkeeping.
Failure to follow local rules can lead to fines, mandated rework, or voided insurance coverage; always follow jurisdictional guidance.
Safer Adhesives, Ventilation, and PPE Tips
The article notes that selecting low‑fume PVC adhesives reduces harmful vapors during assembly.
It emphasizes working in well‑ventilated areas and using local exhaust or fans when possible.
It also recommends gloves, eye protection, and a respirator rated for organic vapors as appropriate PPE.
Choose Low‑Fume Adhesives
Why prioritize low‑fume adhesives when joining PVC? Low‑fume options reduce inhalation risks and odor, improving comfort during indoor projects.
Choices include low‑VOC cements and water‑based primers formulated for PVC. Users should select products labeled low‑odor or low‑VOC and verify compatibility with pipe size and pressure rating.
- Read manufacturer specifications to guarantee chemical compatibility and cure time.
- Prefer fast‑set low‑fume formulas for brief exposure and minimal ventilation demand.
- Store and transport adhesives in sealed containers to limit off‑gassing.
Selecting appropriate low‑fume adhesives minimizes health impact while maintaining bond strength and plumbing integrity.
Wear Proper PPE
Consistently wearing appropriate personal protective equipment (PPE) is essential when using low‑fume adhesives and working in confined or poorly ventilated spaces; gloves, eye protection, and a properly fitted respirator reduce chemical exposure and prevent skin or mucous membrane contact.
The installer should select chemical‑resistant nitrile gloves, splash goggles or safety glasses, and an N95 or organic vapor cartridge respirator when fumes are present. Long sleeves protect forearms from contact. Assure respirator fit and replace cartridges per manufacturer guidance.
Work near open windows or use a fan to increase airflow. Store solvents sealed and dispose of contaminated PPE properly to limit exposure.
Estimate Cost and Time for a Joining Project
When planning a PVC pipe joining project, a clear estimate of materials, labor, and time prevents costly delays and scope creep; accurate estimates combine unit costs for pipe, fittings, solvent cement, and primers with assessments of joint complexity, access difficulties, and curing times to produce a reliable budget and schedule.
The estimator tallies materials, notes required tools, and allows buffer time for drying and unexpected access constraints.
Labor is calculated by skill level and hourly rate. Review local prices and add contingency (typically 10–20%) for overruns.
- Materials: pipe lengths, fittings, adhesives
- Time: cutting, fitting, curing
- Labor: skill and rate
Plan Joints for Future Disassembly and Access
After estimating costs and scheduling, the planner should consider how joints will allow future disassembly and access for maintenance or alterations. The planner should specify locations for removable couplings, access points, and clearances. Use unions, threaded adapters, or mechanical couplings where regular access is needed; solvent-welds remain for permanent runs. Label removable sections and keep spare fittings. Consider tool access and routing to avoid buried permanent joints. Plan for minimal disruption when replacing segments. The table below summarizes common choices and pros.
| Joint Type | Access Ease | Typical Use |
|---|---|---|
| Union | High | Fixtures |
| Threaded | Medium | Temporary runs |
| Solvent | Low | Permanent runs |
Quick Pre-Finish Checklist for Joined PVC Work
Before finishing, the installer runs a concise checklist to verify each joint is secure, accessible, and correctly labeled: confirm socket joints are fully seated and cleaned, threaded connections are sealed and torqued to spec, unions and mechanical couplings are oriented for easy removal, solvent-welds have cured for the recommended time, clearance for tools and spare fittings is available, and removable sections are documented on the piping diagram.
The final sweep covers pressure testing, visual inspection, and labeling. Key quick checks include:
- Verify no visible gaps, excess glue, or cross-threading.
- Make sure test pressure holds and no leaks appear.
- Label removable sections and update the diagram.
Conclusion
Choosing the right PVC joining method depends on pipe type, required strength, and future access. Solvent-welds are permanent and fast; threaded or mechanical fittings allow disassembly. Significantly, roughly 60% of DIY plumbing repairs involve PVC or CPVC parts, so mastering basic cuts, proper solvent use, and safe ventilation pays off for many homeowners. With correct tools, PPE, and planning for future access, simple PVC joins become durable, economical solutions for common projects.