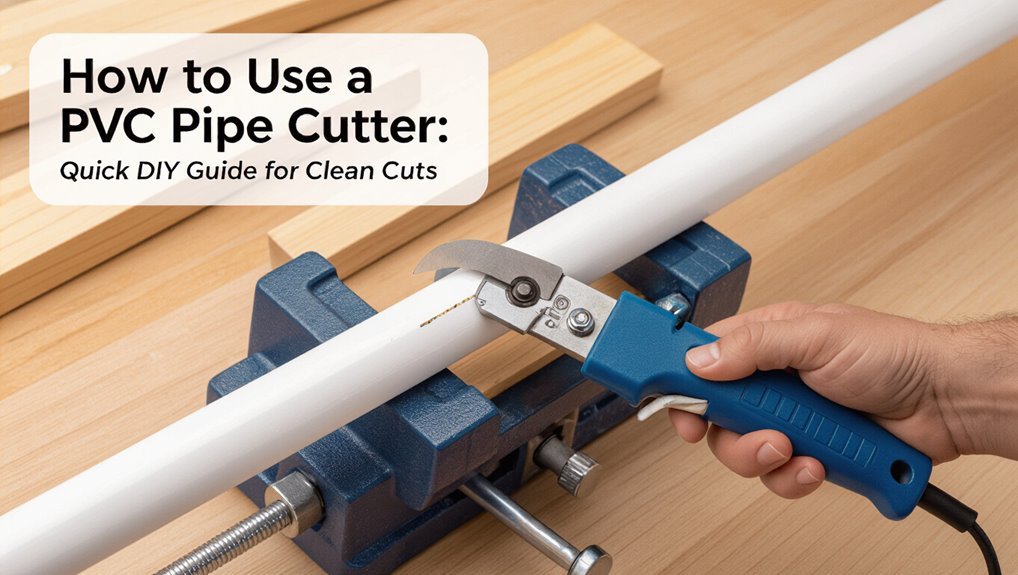
How to Use a PVC Pipe Cutter: Quick DIY Guide for Clean Cuts
To achieve a clean cut on PVC pipe, start by ensuring you have the correct pipe type and outer diameter (OD). Wear cut-resistant gloves and eye protection for safety. Secure the pipe in a stable, padded vise. Mark a full circumferential line and square it off. Center the cutter blade on the mark and apply steady, even pressure using a ratcheting or compound cutter to avoid crushing the pipe. After cutting, remove any burrs, lightly chamfer the edges, and test-fit the pieces before applying solvent or gaskets. For optimal results, follow simple maintenance and troubleshooting tips outlined below.
Quick Steps: Cut PVC Pipe Cleanly in 60 Seconds
Prepare the pipe and tools, then make a single clean cut: measure and mark the PVC, secure it in a vise or clamp, align a sharp PVC cutter or saw at the mark, and slice through with steady, even pressure to avoid crushing or splintering the edge.
The worker removes burrs with a deburring tool or utility knife, checks the end for squareness against a carpenter’s square, and lightly chamfers the inner and outer edges to ease fitting.
Final cleaning with a dry cloth removes dust.
Timing and efficient setup let a competent user complete these steps within about sixty seconds.
Check PVC Type and Size Before Cutting (Pvc Vs Schedule 40/80)
Before cutting, the pipe should be inspected for printed markings that indicate material and schedule.
The outer diameter must be measured to confirm whether it is standard PVC, Schedule 40, or Schedule 80.
The measured size should then be compared to the cutter’s rated capacity to verify a proper fit and safe operation.
Identify Pipe Markings
A quick inspection of the pipe’s exterior reveals essential information: molded or printed markings indicate the material (PVC), the schedule (40 or 80), and the nominal size, all of which determine wall thickness and cutting requirements. The reader notes letters (PVC), numbers (SCH 40/80), and size codes; darker, raised text often signals pressure-rated pipe. Identifying markings avoids mismatches when cutting and joining. Visual checklist:
| Marking | Meaning | Action |
|---|---|---|
| PVC | Material type | Use PVC cutter |
| SCH 40 | Standard wall | Standard feed |
| SCH 80 | Thicker wall | Slower cuts |
| 1/2″, 1″ | Nominal size | Confirm fittings |
Measure Outer Diameter
When checking PVC type and size before cutting, measure the pipe’s outer diameter (OD) with calipers or a tape to confirm whether it matches nominal size and schedule; OD determines the correct cutter and fitting compatibility because schedule 40 and 80 pipes often share nominal sizes but differ in wall thickness and OD for larger diameters.
Record the OD at a clean, unobstructed section, measuring twice around the circumference to catch ovality.
Compare the measured OD to manufacturer tables or markings to distinguish between PVC types.
Accurate OD measurement prevents mismatched fittings, improper seals, and wasted material when preparing cuts.
Match Cutter Capacity
Having confirmed the pipe’s outer diameter, the next step is to match the cutter to the PVC type and schedule to guarantee a clean, safe cut.
The cutter’s capacity should list compatible diameters and material types—standard PVC, CPVC, and pressure-rated Schedule 40 or 80.
Schedule 80 walls are thicker; some ratchet or guillotine cutters may not close fully or may deform the edge.
For large diameters or heavy-wall pipe, select a reinforced ratchet cutter, a manual saw, or a power tool designed for thick plastics.
Verify blade condition and manufacturer recommendations to avoid crushed ends, inaccurate cuts, or safety hazards.
Pick the Right PVC Cutter for the Job
Choosing the right PVC cutter depends on pipe diameter, wall thickness, and the frequency of use.
For occasional small-diameter work, a ratcheting handheld cutter offers clean cuts without heavy expense. For thicker schedules or frequent projects, a heavy-duty compound-action cutter or a miter-style saw provides power and consistency.
For large-diameter pipe, a reciprocating saw or specialized PVC pipe shear suits capacity. Consider blade quality, replaceability, and ergonomics to reduce fatigue and maintain precision.
Budget, storage, and available power sources influence selection. Match tool capability to designated tasks to guarantee efficient, accurate cuts and longer tool life.
Gather PPE and Set a Stable Work Surface
Before cutting, the operator selects appropriate personal protective equipment, including sturdy gloves and impact-rated eyewear, to guard against sharp edges and flying debris.
A stable workbench or clamped surface is prepared to prevent pipe movement and guarantee accurate cuts.
These precautions together reduce injury risk and improve cut quality.
Protective Gloves And Eyewear
Always wear sturdy gloves and impact-rated eyewear when preparing to cut PVC; these basic personal protective items markedly reduce the risk of cuts, abrasions, and eye injuries from flying plastic shards.
Gloves should be cut-resistant, fit well, and allow dexterity to operate the cutter safely. Inspect gloves for tears and replace if compromised.
Eyewear must meet impact standards (ANSI Z87.1 or equivalent), fit securely, and shield from side debris. Cleaning lenses before use maintains visibility.
Both items should be readily accessible during work and removed only after cleanup to avoid transferring plastic dust or sharp fragments to hands or face.
Stable Workbench Or Surface
On a level, sturdy workbench, the PVC pipe should rest at a comfortable height and be firmly supported to prevent rolling or shifting while cutting. The workspace must be clear, well-lit, and free of clutter. Clamps or a vise secure the pipe without deforming it; padding prevents surface damage. Position the cutter perpendicular to the pipe and test stability before applying pressure. A stable surface improves accuracy and reduces accidents. Keep a trash container nearby for offcuts and deburring tools within reach. Regularly inspect the workbench for wear or wobble and repair or replace unstable supports immediately.
| Item | Purpose |
|---|---|
| Clamps | Prevent rolling |
| Vise | Firm hold |
| Padding | Protect pipe |
| Lighting | Improve visibility |
| Trash bin | Collect offcuts |
Measure, Mark, and Square the Cut Line
With the pipe secured, measure the exact cutting location using a tape measure and mark it clearly with a pencil or felt-tip marker; make sure the mark encircles the pipe so the line is visible from all angles.
Next, use a square or combination square to transfer a perpendicular line around the circumference, ensuring the cut will be square to the pipe axis. For larger diameters, wrap a strip of paper or flexible ruler around the pipe, align edges, and mark along the square’s edge.
Recheck measurements from the pipe end and neighboring fittings before cutting to avoid irreversible errors.
Position and Align the Cutter for a Straight Cut
The user makes sure the marked cut line is visible and correctly positioned around the pipe before beginning.
They square the pipe in the cutter’s jaws to maintain perpendicularity.
Finally, the cutter blade is centered on the mark to align the tool for a straight, even cut.
Mark The Cut Line
Measure and mark the cut line clearly before bringing the cutter in contact with the pipe. The worker uses a fine-tip marker and a straightedge to create a visible, single-line guide around the circumference. Marks should be consistent and placed where the final length is required, avoiding overlap with fittings or scored areas.
- Use a straightedge or tape to make certain the line is true.
- Rotate the pipe and mark continuously to maintain alignment.
- Verify measurement once more before cutting to prevent errors.
Clear, continuous marks simplify alignment of the cutter and reduce the chance of off-center or angled cuts.
Square Up The Pipe
After marking the cut line, the operator positions the pipe cutter so its cutting wheel aligns precisely with that mark and the blade sits square to the pipe’s circumference.
The pipe is supported on a flat surface or clamped gently to prevent rotation. The cutter’s jaws are adjusted until contact is even around the pipe; visual checks from several angles confirm perpendicular placement.
Palm pressure holds the tool steady while avoiding lateral tilt. Small test squeezes verify alignment before full cutting.
Proper squaring guarantees an even, burr-free edge and accurate fitting, reducing the need for rework or excessive deburring.
Center The Cutter Blade
With the cutter held steady against the squared pipe, the operator centers the blade so its cutting wheel aligns exactly with the marked line and the blade sits perpendicular to the pipe’s axis.
The hands adjust grip pressure to prevent shifting, confirming alignment by sight and light touch. Small rotations of the tool fine-tune placement until the wheel traces the mark uniformly. Proper centering minimizes burrs and prevents angled or crushed cuts.
Before applying full squeeze, one checks that the pipe remains squarely seated in the jaws and that the blade contact is consistent around the circumference.
- Align visually
- Stabilize grip
- Verify perpendicularity
Cutting Techniques: Ratchet, Single-Hand, and Saw Methods
Choose the cutting method that matches the pipe diameter, material thickness, and available tools: ratchet cutters deliver controlled, low-effort cuts for larger PVC, single-hand cutters excel on smaller diameters and quick jobs, and saws handle thick-walled or nonstandard sizes where hand cutters can’t reach.
Ratchet cutters advance a blade incrementally, reducing user fatigue and producing straighter cuts on medium to large pipes.
Single-hand cutters are fast, portable, and ideal for tight spaces but require steady alignment to avoid crushing.
Saws — hacksaws or reciprocating saws with fine blades — remove material quickly; steady strokes and proper blade selection minimize burrs and heat.
Cut Large PVC Pipe and Schedule 80 Safely
Cutting large-diameter PVC and Schedule 80 pipe requires more force, firmer support, and appropriate blade selection than small residential lines.
One-handed cutters often fail; a ratcheting cutter or power saw with a fine-tooth blade is preferred. Secure pipe in a sturdy vise or saddle clamp, wear eye and hand protection, and score deeply before full cuts to prevent chatter. After cutting, deburr and chamfer the edge for proper fitting.
- Use a reinforced blade rated for thick PVC and ABS schedule materials.
- Support long runs to prevent flex during cutting.
- Proceed slowly, letting the tool do the work.
Cut PVC Pipe at Angles and for Fittings
For angled ends and socket fittings, precise layout and stable clamping guarantee clean joints and proper flow alignment.
Measure and mark the cut line using a protractor or angle guide; scribe a full circumference for consistency.
Secure the pipe in a vise or clamp with padding to prevent crushing.
For straight bevels, use a miter box or adjustable guide to control the cutter angle.
Employ a fine-toothed saw or ratcheting PVC cutter appropriate for the diameter, advancing slowly to avoid chipping.
When cutting for fittings, allow correct insertion depth and leave a small gap for solvent or gasket, maintaining pipe straightness throughout.
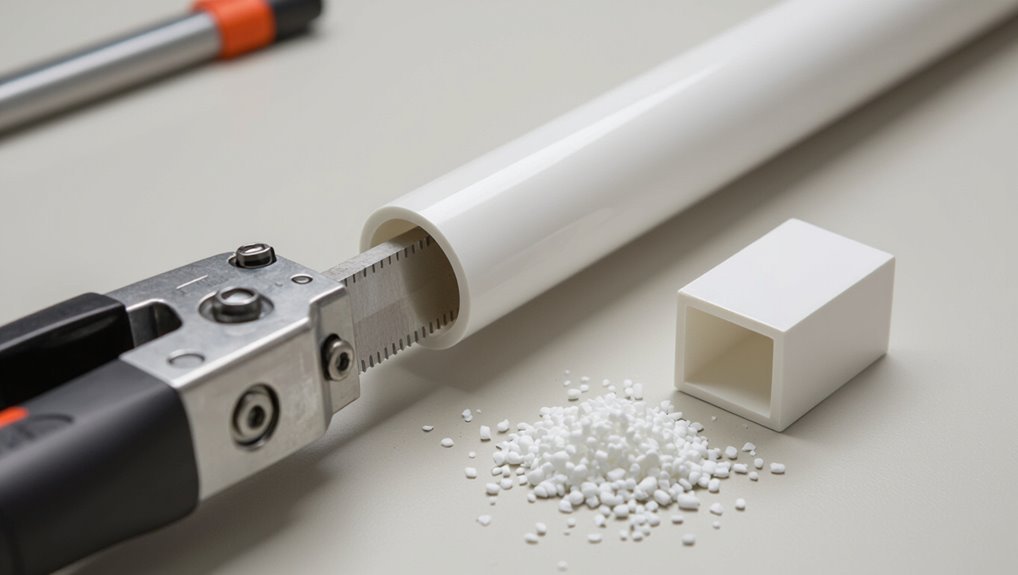
De-Burr, Square, and Test the Pipe End for Fit
After the pipe end has been shaped and the fitting depth marked, the next step is to de-burr, square, and test the end for fit.
The technician removes internal and external burrs with a deburring tool or utility knife, then sands lightly to guarantee a smooth edge.
Squaring is confirmed using a small carpenter’s square or a chamfering file to achieve full contact with the fitting.
Finally, a dry test-fit verifies alignment and seating without adhesive.
- Remove burrs and sharp edges cleanly
- Square the face so it sits flush
- Dry-fit to confirm correct depth and alignment
Troubleshooting: Warped, Crushed, or Rough Cuts
What went wrong when a pipe end emerges warped, crushed, or rough? The cutter, alignment, or technique likely failed. Inspect blade sharpness, clamp stability, and cutting angle. Replace or realign the pipe, trim beyond the damaged area, then re-cut using steady pressure. For crushed sections, square the end with a deburring tool before fitting. If warping recurs, confirm the pipe is supported and the blade isn’t overheating the PVC.
| Problem | Likely Cause | Quick Fix |
|---|---|---|
| Warped end | Heat/too much pressure | Support pipe, slower cut |
| Crushed lip | Misalignment | Re-clamp, trim past damage |
| Rough edge | Dull blade | Score, deburr, recut |
Care and Maintenance to Keep Your PVC Cutter Sharp
Mistakes like warped, crushed, or rough cuts often trace back to blade wear or improper handling, so keeping the cutter sharp and well-maintained prevents recurring problems.
Routine inspection for nicks, loose bolts, and rust preserves performance.
Clean blades after each session; remove PVC residue with a soft cloth and isopropyl alcohol.
Lubricate pivot points lightly and tighten fasteners to maintain alignment.
Replace the blade at first sign of persistent burrs or stretching.
Store the tool dry, away from corrosive chemicals, and use blade guards when idle to prevent damage.
- Inspect blades and hardware monthly
- Clean and lubricate after use
- Replace dull blades promptly
Conclusion
A breeze passes the workshop window just as a perfectly square mark meets the blade — coincidence aligning intent and tool. The cutter bites cleanly, shaving a smooth ring like a moon halo, and the pipe seats true into its fitting. Safety glasses wink in reflected light, the workbench stands steady, and the task folds into the day. With the right cutter, care, and measure, clean PVC cuts arrive almost as if by design.