Prevent Frozen Pipes: Quick DIY Tips to Thaw & Prevent Burst Pipes
To prevent frozen pipes and potential bursts, immediately shut off the valve to the affected fixture or the main water supply. Open nearby faucets to relieve pressure, and gently apply heat from the warm end using a hair dryer, heat tape, or a space heater on a safe surface—never use open flames. Watch for warning signs like frost, no flow, sputtering, or bulging. To prevent future issues, insulate exposed pipes, seal any gaps, and label shutoff valves for quick access. For more detailed step-by-step measures, see the tips below.
What to Do Right Now If a Pipe Is Frozen
When a pipe is suspected to be frozen, act quickly but calmly: shut off the water supply to the affected fixture or the main valve to prevent pressure buildup and potential bursting, open nearby faucets to relieve pressure and allow melting water to flow, and locate the frozen section so controlled heat can be applied safely from the nearest accessible point.
The person assesses risks, avoids open flames, uses a hair dryer, electric heat tape, or warm towels, and insulates exposed piping. If thawing fails or pipes are bulging, they contact a licensed plumber.
Afterward, they check for leaks and restore water gradually.
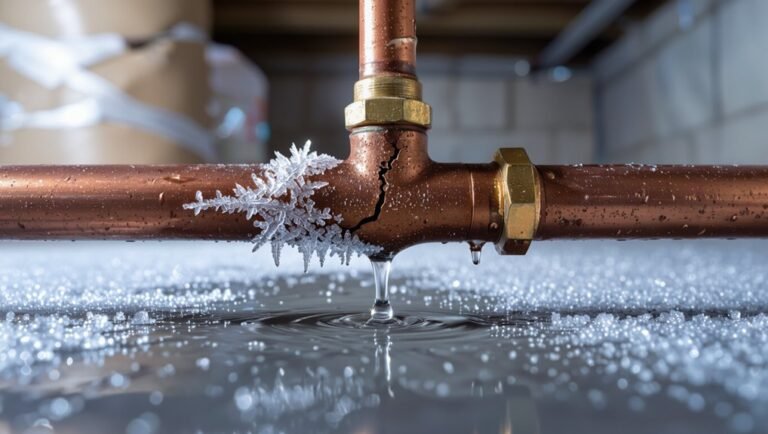
How to Spot Early Signs of Frozen Pipes
Recognize early signs of frozen pipes by watching for reduced or no water flow, unusually cold or frosty-sounding pipes, and localized drops in water temperature at fixtures; these indicators often precede visible damage and allow for timely intervention.
Additional clues include intermittent sputtering, discolored water when flow resumes, and unusual noises such as ticking or creaking as ice expands.
Condensation or frost on exposed piping, especially in unheated areas, signals freezing risk.
Monitor outdoor spigots and interior plumbing near exterior walls.
Regular inspections during cold spells and noting sudden pressure changes help identify problems before fittings split or leaks develop.
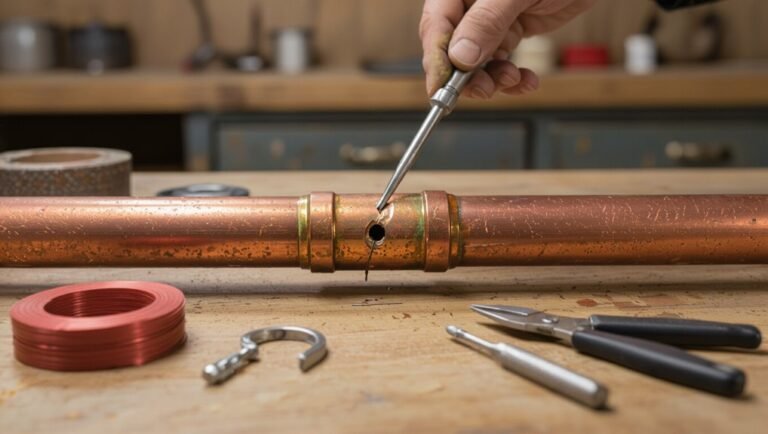
Safe DIY Ways to Thaw a Frozen Pipe Now
Begin thawing a frozen pipe cautiously to prevent bursts and electrical hazards; the immediate priority is restoring controlled flow while avoiding sudden temperature shocks.
Apply heat gradually: use a hair dryer, heat gun on low, or portable space heater aimed along the pipe, moving steadily from the warm end toward the frozen section.
Wrap towels soaked in warm water if tools aren’t available.
Never use open flames.
Open faucets to relieve pressure as ice melts.
Check for leaks as flow resumes.
If pipes are behind walls, warm the room and use infrared heat panels or a professional if access or damage is suspected.
When to Shut Off Your Water (And How to Isolate the Section)
The guidance explains when it is appropriate to turn off water — for example, if freezing has caused visible pipe bulging, active leaks, or prolonged power outages.
It outlines methods for isolating specific fixtures or zones using local shutoff valves and for locating and operating the main shutoff valve.
Practical steps and safety considerations for shutting valves and draining isolated sections are summarized to minimize damage.
When Water Should Be Off
When should water be shut off to reduce the risk of frozen pipes? Water should be off when temperatures stay below freezing for extended periods, when occupants will be absent for days, or if a leak or freeze is detected. Shutting water limits pressure buildup and reduces burst risk. Main shutoffs and localized valves enable targeted stops without full-service interruption. After shutting off, drain exposed lines and open faucets to relieve trapped water. Restore supply only after pipes are confirmed thawed and inspected.
| Condition | Action |
|---|---|
| Prolonged freeze | Shut main or relevant valves |
| Extended absence | Turn off and drain |
| Suspected freeze | Shut off and relieve pressure |
How To Isolate Lines
Locate and label shutoff points before temperatures drop so isolation can be quick and accurate. Identify individual valves for fixtures, exterior spigots, and isolated zones (garage, irrigation).
Test each valve to confirm it turns fully off and on; note type (gate, ball) and access obstacles. Create a simple diagram showing valve locations relative to rooms and the main line.
In an emergency, close only the valve feeding the affected section to limit disruption and reduce pressure on frozen areas. Keep basic tools and a flashlight near valves.
Replace leaky or seized valves proactively to guarantee reliable isolation when needed.
Shutting Off Main Valve
Shut off the main valve promptly if multiple fixtures show signs of freezing, a burst pipe is confirmed, or localized isolation fails to stop water flow; this minimizes flooding and pressure-driven damage.
Locate the main shutoff—typically near the water meter, where the service line enters, or in a basement—then turn clockwise to close.
Notify household members before cutting supply.
After shutting off, open a few faucets to relieve residual pressure and drain lines.
For partial isolation, use interior shutoffs or valve manifolds; document valve positions and label main and branch valves for future quick action.
Call a licensed plumber for repairs.
Temporary Heat Fixes: Space Heaters, Hairdryers, Towels
Temporary, direct heat can restore flow when pipes begin to ice, but each method carries specific risks and limitations.
Recommendations include placing space heaters at a safe distance and on stable surfaces with clearances from combustibles, using hairdryers to warm exposed sections slowly while avoiding open flames, and wrapping pipes with towels to trap heat from nearby sources.
Proper monitoring and adherence to safety guidance reduce fire and injury hazards during thawing.
Safe Space Heater Use
Often used as a quick remedy, portable space heaters can effectively warm specific areas to prevent pipe freezing when applied correctly.
Users should position heaters on stable surfaces, keep them at least three feet from combustibles, and never leave them unattended.
Choose units with tip-over and overheat protection, and plug them directly into wall outlets rather than extension cords.
Monitor room temperature and avoid directing heat at insulation gaps that could cause moisture issues.
Maintain clear access around the heater, follow manufacturer instructions, and turn units off when leaving or sleeping.
Proper use reduces fire risk while providing targeted, temporary heat for vulnerable pipes.
Hairdryer Thawing Tips
Use a hairdryer on the low or medium setting to thaw a frozen pipe gradually, keeping the nozzle several inches away and moving it steadily along the pipe to avoid overheating any one spot.
The person applies controlled heat, starts nearest the faucet, and works toward the colder section.
They monitor for leaks and stop if metal becomes too hot.
Electrical safety is observed: extension cords and wet surfaces are avoided.
If thawing fails within a short time, a professional is contacted.
- Keep steady motion
- Maintain distance
- Start at the faucet
- Watch for leaks
- Avoid water contact
Towels For Heat Retention
After using a hairdryer to warm a frozen pipe, wrapping sections with warm, dry towels can help retain heat and extend thawing time without adding more appliance use. The towels act as insulation, slowing heat loss and allowing residual warmth to continue melting ice. Use clean, dry cotton or terry cloth; avoid synthetic fabrics that trap moisture. Replace towels if they cool or become damp. Do not leave towels near open flames. Monitor the pipe and check for leaks as thaw progresses. Towels are a simple, temporary measure best combined with longer-term insulation.
| Benefit | Action |
|---|---|
| Retains heat | Wrap snugly |
| Extends thawing | Replace when cool |
| Low cost | Use household towels |
| Safety | Keep dry and monitored |
Do NOT Do These: Unsafe Thawing Methods and Limits of DIY
Homeowners should never resort to unsafe thawing techniques that risk personal injury, structural damage, or worsening pipe failure.
The article outlines hazardous methods to avoid and when to call a professional. DIY limits include inability to detect hidden damage and unsafe heat sources.
- Never use open flames or blowtorches on pipes.
- Avoid using high-wattage space heaters too close to combustibles.
- Do not attempt thawing behind finished walls without inspection.
- Refrain from forcing or hammering frozen pipes to free them.
- Skip makeshift electrical rigs or overloaded extension cords.
Recognize signs beyond DIY competence and contact licensed plumbers when uncertain.
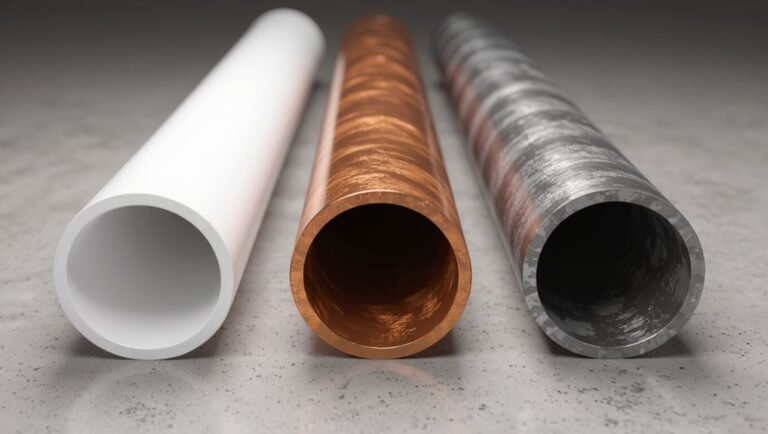
Simple Insulation Upgrades to Prevent Frozen Pipes
By adding targeted insulation to vulnerable water lines, much of the risk of freezing can be mitigated quickly and affordably. Homeowners can install foam pipe sleeves on exposed indoor and crawlspace pipes, wrapping elbows and joints first.
For exterior walls, use foil‑backed insulation or closed‑cell spray foam to reduce cold transfer. Seal gaps where pipes enter the home with caulk or expanding foam to block drafts.
Heat‑tape with thermostat control offers added protection for problem runs. Regular inspection of insulation integrity and replacing compressed or wet material maintains effectiveness. These measures lower freeze risk with minimal expense and effort.
Plumbing‑Specific Winter Prep for Year‑Round & Seasonal Homes
For both year‑round residences and seasonal properties, winterizing plumbing requires a tailored checklist that distinguishes continuously occupied systems from those left dormant; occupied homes focus on maintaining steady heat and monitoring vulnerable runs, while seasonal homes demand thorough drain‑down, line purging, and isolation to prevent freeze damage during long absences.
The approach differs: year‑round occupants prioritize insulation, thermostat strategies, and leak detection; seasonal owners concentrate on complete water removal, valve labeling, and anti‑freeze measures for appliances.
Key actions include:
- Insulate exposed pipes and enclose crawlspaces
- Maintain minimum indoor temperatures
- Drain and purge water lines
- Shut and tag main isolation valves
- Protect outdoor spigots and irrigation
When to Call a Plumber and Low‑Cost Long‑Term Fixes
When should a professional be summoned versus when can a DIY fix suffice? A plumber is needed for visible leaks, frozen sections that won’t thaw, lost water pressure, signs of pipe rupture, or when heating or insulation upgrades require permits.
DIY efforts suit minor insulation, opening cabinet doors, applying safe heat sources, or temporarily draining outdoor lines. Low‑cost long‑term fixes include adding foam pipe insulation, installing heat tape on vulnerable runs, sealing drafts around pipes, and insulating basements or crawlspaces.
Annual inspections by a plumber catch hidden issues early; budgeting small upgrades now prevents expensive emergency repairs later.
Conclusion
When winter’s chill threatens pipes like an army of tiny ice saboteurs, act fast but stay smart: warm the pipe, open the faucet, and know the cutoff. Small, sensible steps—insulation, targeted heat, routine checks—transform panic into preparation. Avoid dramatic, risky fixes; call a pro when unsure. Treat prevention as heroic thrift: a little effort now averts a domestic flood that would otherwise turn toilets into indoor glaciers and budgets into emergency lifeboats.