
How to Drain a Tankless Water Heater: Step-by-Step Flush and Maintenance Guide
To drain a tankless water heater, follow these essential steps: isolate the unit, turn off power and fuel, and attach hoses to the service ports. Use a 1:1 vinegar solution for light mineral buildup or a commercial descaler according to the instructions. Run the pump until the discharge is clear, then flush with fresh water, check for leaks, and reassemble. For optimal performance, perform this maintenance every 6 to 12 months to enhance efficiency and prevent damage. Detailed steps and safety tips are provided below.
What Draining a Tankless Water Heater Means and Why It Matters
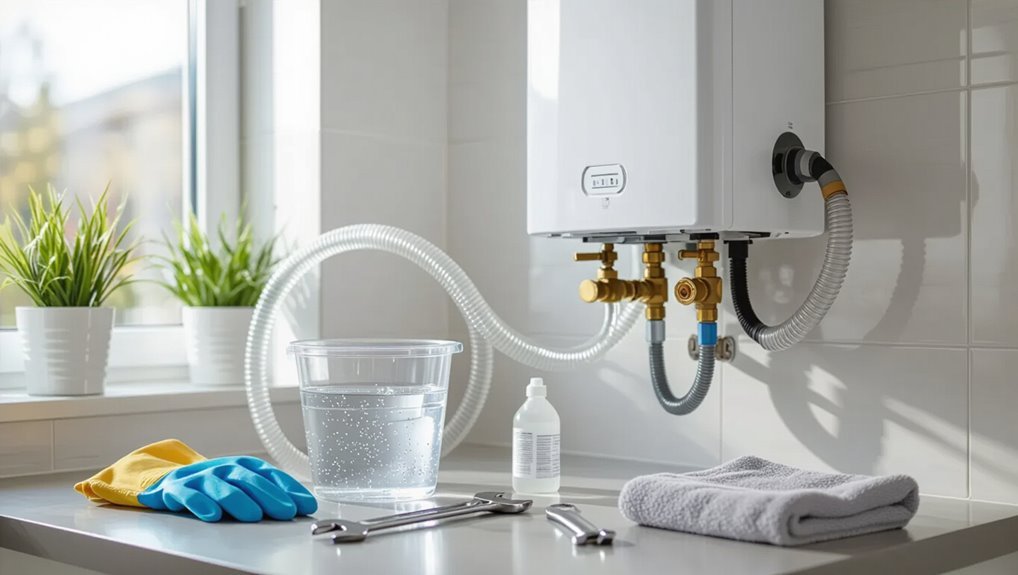
Tankless water heaters heat water on demand rather than storing it, which changes how mineral buildup affects performance.
Over time calcium and sediment can accumulate in heat exchangers and valves, causing reduced flow, scale buildup, and potential component failure.
Regular flushing and a simple maintenance schedule prevent buildup, preserve efficiency, and extend unit lifespan.
How tankless water heaters differ from tank models
A tankless water heater operates on-demand, heating water as it flows through a heat exchanger rather than storing a volume of hot water in a reservoir.
Unlike tank models, it lacks a drainable storage tank, so procedures like how to drain tankless water heater involve flushing the heat exchanger and valves.
Maintenance targets internal passages and scale removal, not emptying stored water.
Common issues caused by mineral buildup and sediment
Many homeowners encounter performance and longevity problems when mineral buildup and sediment accumulate inside a tankless water heater’s heat exchanger and internal valves.
Scaling reduces heat transfer efficiency, causing longer recovery times and higher energy use. Restricted flow triggers error codes, uneven temperatures, and premature component wear.
Severe deposits can cause overheating, burner damage, and cold-water bypass, compromising reliability and increasing repair costs.
Benefits of regular flushing and maintenance schedule recommendations
Flushing a tankless water heater removes scale and sediment from the heat exchanger and internal valves, restoring heat transfer efficiency and proper flow.
Regular flushing extends equipment lifespan, reduces energy use, prevents premature failures, and maintains warranty compliance.
Recommended maintenance: flush every 6–12 months for moderate hardness, quarterly in hard-water areas; inspect filters and inlet screens during each service and replace parts as needed.
Tools, Parts, and Safety Precautions Needed Before You Start
Before starting, the reader should gather essential tools and materials—wrenches, hoses, a pump or bucket, descaling solution—and consider optional accessories or replacement parts like inlet filters, pressure relief valves, and new hoses.
They must perform safety checks for electrical shutoff, gas isolation, and water pressure, and follow precautions to avoid scalding, shocks, or leaks.
If the system is complex, shows corrosion, or the homeowner is unsure about gas or electrical work, a professional should be contacted.
Required tools and materials
A concise checklist of tools, replacement parts, and safety items helps guarantee the flush and maintenance process proceeds smoothly and without damage.
Necessary items include basic hand tools, a pump and hoses for flushing, and protective gear. Assemble and inspect all equipment before starting.
- Adjustable wrench, screwdrivers
- Submersible pump or vinegar flush kit
- Gloves, goggles, towel
Optional accessories and replacement parts
Several optional accessories and replacement parts can simplify maintenance and extend the unit’s lifespan.
Useful items include replacement anode rods, inline sediment filters, and pressure relief valves. Consider spare o-rings and shutoff valves for quick repairs.
Recommended accessories:
- Replacement anode or sacrificial rod
- Inline sediment or scale filter
- Spare o-rings, gaskets, and isolation/shutoff valves
Safety checks and precautions (electrical, gas, and water)
After noting recommended replacement parts and accessories, attention shifts to safety checks and precautions for electrical, gas, and water systems.
Verify power is off at the breaker; shut fuel gas supply and confirm valves are closed; isolate cold-water inlet and hot-water outlet.
Depressurize lines, wear gloves and eye protection, guarantee proper ventilation for gas models, and have a bucket and towels ready.
When to call a professional
When uncertainty exists about any step, or if the unit shows signs of corrosion, persistent leaks, gas smells, electrical faults, or error codes that do not clear, a qualified professional should be contacted.
Technicians handle complex diagnostics, gas line repairs, electrical issues, blocked heat exchangers, or internal component replacement.
Homeowners should also call for annual inspections or if safety devices fail to respond.
Quick Overview: Step-by-Step Drain and Flush Summary
The procedure begins by shutting off power and water, then attaching hoses and opening the unit’s service ports to drain residual water.
Next, a vinegar flush is circulated through the heat exchanger to remove scale, followed by a fresh-water rinse and closing of the service valves.
Finally, the system is refilled, bled of air, and returned to normal operation after verifying no leaks and restoring power.
One-paragraph run-through of the whole process
Begin by shutting off power and water to the unit. Then attach hoses to the cold and hot service valves and open a drain valve or bucket.
Next, open a hot-water tap in the house to relieve pressure. Run a pump or let gravity flush water and any vinegar solution through the heat exchanger until clear.
Close the drain and service valves, remove hoses, restore the main water and power, and check for leaks and normal operation.
Afterward, inspect filters, clean screens, and record the date and any issues for future maintenance.
Detailed Step-by-Step Drain and Flush Procedure
The procedure begins with shutting off power and fuel, then closing the unit’s inlet and outlet valves to isolate the system.
Next, service hoses are attached, a pump and collection bucket are positioned, and the service valves are opened to purge trapped air.
Finally, a recommended concentration of vinegar or commercial descaler is circulated for the specified duration to remove scale.
Step 1 Power and fuel shutoff (electric/gas)
Shut off electrical and fuel sources before any maintenance to eliminate shock, fire, or carbon-monoxide risks.
The technician disconnects power at the breaker and verifies de-energized status with a tester.
For gas units, the technician closes the gas shutoff valve and confirms isolation.
Labels or tags are applied to prevent accidental reactivation.
Proceed only after verification.
Step 2 Close inlet and outlet valves
With power and fuel isolated and confirmed inactive, attention turns to the water connections: the technician closes the cold-water inlet and hot-water outlet valves to isolate the unit.
Both ball valves are rotated fully perpendicular to flow, verified by visual and tactile checks.
Downstream fixtures are left closed. This prevents backflow and pressurization during maintenance, ensuring a contained system for safe draining.
Step 3 Attach hoses and set up pump and bucket
Begin by connecting two garden hoses: one to the heater’s cold-water service port and the other to the hot-water service port, ensuring each coupling is tight and leak-free.
Attach the third hose from the hot service port to a submersible pump placed inside a bucket.
Position the bucket below drain level, secure all clamps, and verify pump power and hose routing before proceeding.
Step 4 Open service valves and purge air
After the hoses and pump are secured, the technician opens the heater’s cold and hot service valves to allow water and trapped air to flow into the hoses. The cold-water valve typically feeds the pump loop while the hot-water valve provides an outlet for air and debris.
The technician then briefly opens nearby fixtures to purge remaining air, watches for steady water flow, and retights connections if leaks appear.
Step 5 Circulate vinegar or descaling solution (how long and concentration)
Circulate a descaling solution through the heater using a pump-driven closed loop that connects the cold service valve to the pump and the pump outlet to the hot service valve; a common recipe is a 1:1 mix of white vinegar and water for light to moderate scale, or a 3:1 water-to-vinegar ratio (weaker) for routine maintenance, while commercial descalers follow manufacturer instructions.
Circulate for 45–60 minutes, monitoring solution temperature and avoiding prolonged exposure that could harm seals; repeat if heavily scaled.
Step 6 Run the pump to flush the heat exchanger
With descaling complete and the vinegar solution having circulated for the recommended time, the pump is next used to flush loosened scale and residual solution from the heat exchanger.
Operate the pump at moderate flow, directing discharge into a bucket or drain.
Monitor clear discharge, inspect inlet/outlet for debris, and run until effluent appears free of particulates and odour, then stop the pump.
Step 7 Rinse and repeat if necessary
Inspect the discharge for clarity and odor, then prepare for an additional rinse cycle if particulates or vinegar smell remain; this involves refilling the pump bucket with fresh water, reconnecting hoses, and running the pump at moderate flow until the effluent is clear and neutral-smelling.
Repeat the process as needed to guarantee all loosened scale and residual solution are removed. Monitor until discharge is consistently clean.
Step 8 Reassemble, remove hoses, restore water, fuel, and power
Reassemble the service fittings and valves in the reverse order of disconnection, ensuring each hose clamp and union is tightened to manufacturer torque specifications; this minimizes leaks and prepares the unit for system restoration.
Remove pump and flushing hoses, sealing or capping open ports.
Gradually restore cold-water supply, open appliance valves, re-enable fuel supply if applicable, and restore electrical power per safety protocols.
Step 9 Check for leaks and test operation
Once power, water, and fuel have been restored, the technician should methodically check all connections, valves, and fittings for signs of leakage.
They should then run the unit through a functional test cycle to confirm proper operation.
The technician should inspect beneath, around supply and output lines, and the relief valve.
Monitor for drips, abnormal noises, error codes, correct temperature, and steady flow before certifying the job complete.
Visual Aids and Diagrams for Common Configurations
The article presents clear visual aids showing the typical valve and hose arrangement for a single-unit residential tankless heater to guide basic draining.
Additional diagrams contrast setups that include bypass kits or built-in service valves, highlighting isolation points and hose connections.
Readers are directed to match their unit to the appropriate illustration before beginning service.
Typical valve and hose setup for single-unit residential systems
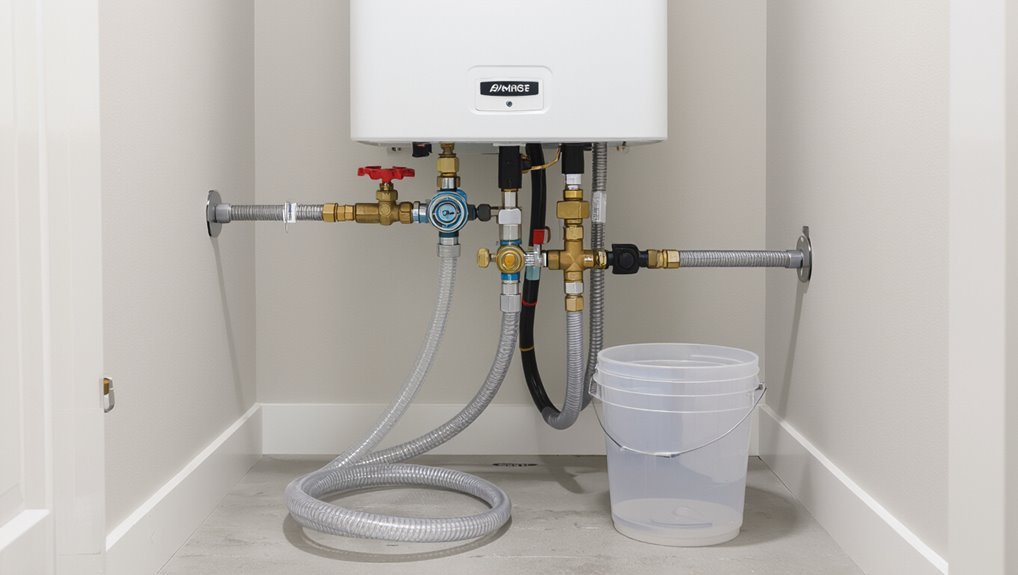
A compact diagram of a single-unit residential tankless water heater typically shows four key service points: a cold-water shutoff and purge valve, a hot-water shutoff and purge valve, a pressure-relief or drain valve, and a hose connection for flushing.
Labels indicate flow direction, isolation valves set closed for service, purge valves opened to route water through a hose to a bucket or drain, and clear hose routing.
Configurations for units with bypass kits or built-in service valves
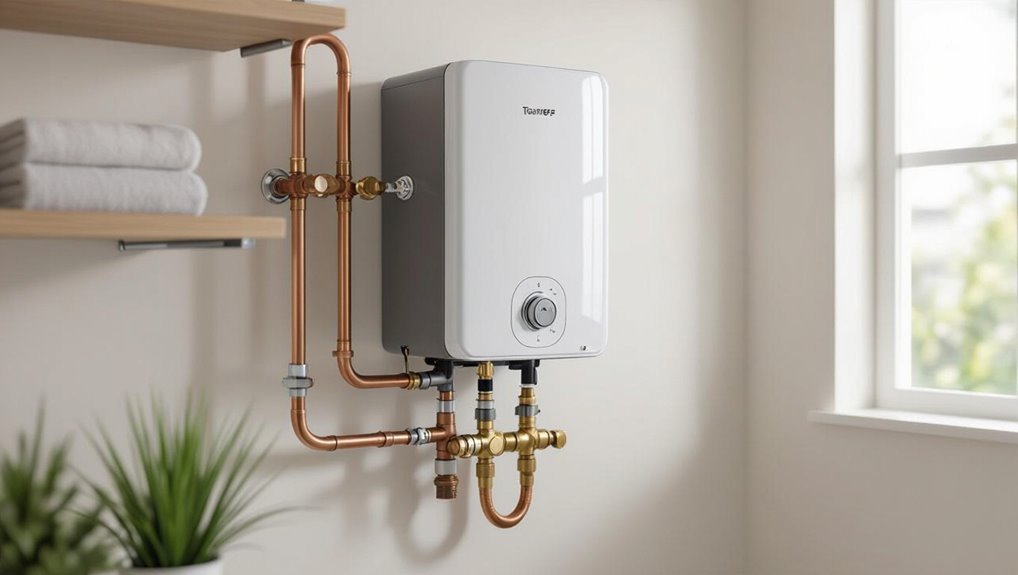
Moving from the single-unit schematic, configurations that include bypass kits or integrated service valves alter valve placement and hose routing to simplify flushing and isolation.
Diagrams show a three-valve bypass loop or built-in service ports with quick-connect hoses. Labels emphasize isolation valves, pump connection points, and untreated inlet/outlet lines.
Notes clarify one-way flow, pressure relief access, and recommended hose lengths for safe, efficient maintenance.
Troubleshooting During and After Flushing
If the pump fails to move fluid or flow is weak, the technician should first check check-valves, hoses, and pump priming before assuming a faulty unit.
Persistent mineral deposits or discolored flushing solution, visible error codes, and their associated diagnostics can pinpoint heat exchanger clogging or sensor issues.
After reassembly, the unit should be inspected under pressure for leaks and tested through a complete run cycle to confirm repairs.
Pump won’t move fluid or low flow issues
Check the pump and connections first when fluid does not circulate or flow is weak during flushing; these symptoms commonly stem from an airlocked pump, clogged inlet screens, closed valves, a seized impeller, or insufficient head pressure from the flushing rig.
Verify valves are open, clear inlet filters, bleed trapped air, inspect and free the impeller, and confirm pump priming and adequate flow rating for the system.
Persistent mineral deposits or discoloration
Persistent mineral deposits or discoloration encountered during and after flushing indicate that scale, rust, or sediment is either not fully removed or is being shed from internal components.
Inspect inlet/outlet filters, heat exchanger, and bypass valves for residual buildup.
Repeat descaling with appropriate solution, extend soak time, and flush until clear.
If discoloration persists, consult a technician to assess corrosion or component replacement.
Error codes and what they indicate
After addressing visible deposits and potential corrosion, attention turns to the unit’s diagnostic codes, which provide targeted guidance on faults encountered during and after flushing. Codes often indicate scale buildup, ignition failure, flow sensor issues, or overheating. Consult the manual for code-specific remedies; reset procedures and service contacts are typically listed.
| Code | Likely cause |
|---|---|
| E1 | Scale buildup |
| E2 | Ignition fault |
Detecting and fixing leaks after reassembly
Inspect the reassembled unit for leaks by systematically examining all joints, valves, and hose connections while the system is pressurized.
If drips appear, tighten fittings incrementally; avoid overtightening. Replace damaged washers, O-rings, or corroded valves.
Reroute or reseat hoses and use thread sealant where appropriate.
After repairs, repressurize and monitor for several minutes to confirm a watertight seal.
Maintenance Tips to Prevent Frequent Flushing
Choosing between a water softener and routine flushing requires weighing upfront cost and ongoing maintenance against scale prevention effectiveness.
Maintenance schedules should be set according to local water hardness and household usage, with harder water and heavier use calling for more frequent attention.
Owners should monitor flow rate, temperature fluctuations, and error codes as early indicators that service or flushing is needed.
Water softener vs. regular flushing: pros and cons
When mineral buildup becomes a recurring issue, owners must weigh the benefits of installing a water softener against committing to a schedule of regular vinegar or descaler flushes.
Each approach reduces scale but does so with different costs, maintenance demands, and potential impacts on appliance performance and local water quality.
Softeners lower scale continuously but add salt/regeneration care and wastewater.
Flushing is cheaper upfront but requires frequent labor and may not prevent all deposits.
Recommended interval by water hardness and usage
Frequency of descaling should be tied to measured water hardness and household demand: soft water (under 7 grains per gallon) typically allows annual flushing.
Moderate hardness (7–10 gpg) merits biannual service, and hard water (over 10 gpg) often requires quarterly descaling or installation of a water softener.
Adjustments should be made for high-use homes, long run lengths, or tankless units serving multiple bathrooms.
- Test hardness annually
- Increase frequency with multiple bathrooms
- Consider softener for consistent protection
Monitoring performance signs that indicate service is due
Although routine intervals provide a baseline, homeowners should rely on observable performance cues to decide when service is necessary.
Decreased flow, fluctuating water temperature, unusual noises, longer recovery times, or error codes signal scaling or component wear. Regularly inspect for leaks and check pressure.
When multiple signs appear, schedule professional service to clean heat exchangers, replace faulty parts, and restore efficient operation.
Common Mistakes to Avoid When Draining a Tankless Water Heater
Common errors when draining a tankless water heater include failing to shut off power or fuel, which can create safety hazards.
Using incorrect chemicals or wrong concentrations can damage components or void warranties.
Insufficient rinsing and improper reassembly often lead to blockages, leaks, or operational failures.
Skipping power/fuel shutoff risks
Failing to shut off power or fuel before draining a tankless water heater can cause serious safety hazards and equipment damage.
Ignoring this step risks electrical shock, gas leaks, accidental ignition, and control board harm from shorting or thermal stress.
Always isolate electricity and shut gas or propane supply, verify zero power, and follow manufacturer procedures to prevent injury and costly repairs.
Using improper chemicals or concentrations
Choose cleaning agents carefully: using the wrong chemicals or overly strong concentrations when flushing a tankless water heater can corrode heat exchangers, damage seals and gaskets, void warranties, and create hazardous residues.
Technicians should follow manufacturer recommendations, use approved descalers at specified dilutions, avoid bleach or acids unless specified, and store and dispose of chemicals per regulations to prevent equipment and safety issues.
Inadequate rinsing and reassembly errors
Rinse thoroughly and reassemble carefully, because inadequate flushing and improper reconnection are among the most frequent causes of lingering chemical residues, clogged passages, and leak-prone fittings after a drain-and-descale procedure.
Technicians should flush until clear water flows, purge air pockets, inspect and replace worn seals, torque fittings to specification, and test for leaks and proper operation before leaving the job.
When to Schedule Professional Maintenance or Replacement
Visible corrosion, frequent interruptions in hot water, or error codes signal the need for a professional inspection.
Homeowners should weigh the cost of a licensed flush or repair against the time and risk of DIY maintenance.
If repair costs approach or exceed replacement and the unit is older, replacement is often the more cost-effective option.
Signs the unit needs professional inspection
When unusual noises, persistent temperature fluctuations, leaks, error codes, or a sudden drop in efficiency occur, the unit should be evaluated by a qualified technician to determine whether maintenance, repair, or replacement is required.
Additional signs include frequent cycling, reduced water flow, discoloration or odor in hot water, visible corrosion, or failed ignition attempts.
Prompt inspection prevents further damage and safety risks.
Cost considerations for professional flushing vs. DIY
Several factors influence whether a homeowner should hire a professional to flush a tankless water heater or perform a DIY service, including the unit’s age, mineral buildup severity, warranty requirements, local labor rates, and the homeowner’s comfort with plumbing tasks.
Typical professional flushing costs vary by region and complexity; DIY saves labor but requires tools, time, and risk awareness.
Compare quotes, warranty terms, and personal skill.
When replacement is more cost-effective than repair
If ongoing repairs, frequent service calls, or escalating parts costs approach or exceed the price of a replacement unit, replacement becomes the more economical choice.
Consider age, efficiency loss, warranty status, and reliability trends.
Persistent diagnostic issues, repeated component failures, or outdated models lacking modern efficiency justify replacement.
Factor labor, downtime, and future energy savings when deciding between continued repairs and installing a new tankless heater.
Recommended Products and Supplies
Recommended products and supplies include trusted descaling solutions and acceptable alternatives, with attention to concentration and compatibility for specific unit materials.
Useful hardware options are pumps, hoses, and service valve kits sized for the heater’s connections and flow requirements.
For model-specific guidance, manufacturers’ manuals and service instructions—available on official websites or included with the unit—should be consulted before purchasing or using any product.
Trusted descaling solutions and alternatives
Select products that balance effectiveness, safety, and compatibility with the heater’s materials and warranty.
Recommended options include citric acid blends, white vinegar, and commercial descalers formulated for tankless units. Use manufacturer-approved concentrations and avoid chloride-based cleaners that may corrode components.
- Citric acid: gentle, effective for moderate scale
- Distilled white vinegar: inexpensive, accessible
- Manufacturer descaler: strongest, warranty-friendly
Pumps, hoses, and service valve kits to buy
A small set of reliable pumps, hoses, and service-valve kits makes routine draining and descaling of a tankless water heater faster and safer.
Recommended items include a compact submersible pump, reinforced chemical-resistant hoses, and a dual shutoff service valve kit with ball valves and fittings.
Choose corrosion-resistant materials and compatible fittings for the unit.
- Compact submersible pump
- Chemical-resistant hoses
- Dual shutoff service valve kit
Where to find manuals and manufacturer service instructions
Where can owners quickly access the specific maintenance steps and parts lists for their tankless water heater?
Manufacturers publish detailed manuals and service instructions online and often include model-specific PDFs, exploded parts diagrams, and troubleshooting flowcharts.
Recommended sources include:
- Official manufacturer website support or downloads section
- Authorized dealer or distributor pages with OEM parts lists
- Certified service center documentation and technical bulletins
Conclusion
After all the heroic explanations about sediment and valves, the tankless unit quietly continues doing its one job: heat water. Having flushed and tightened, the owner can bask in the illusion that maintenance is now a thrilling hobby rather than a necessary chore. Still, when mineral buildup returns exactly as promised, a pragmatic call to routine flushing or a technician will restore comfort—again proving that mechanical reliability prefers steady attention over dramatic interventions.
