How to Winterize Hot Water Heater on an RV: Step-by-Step Guide to Prevent Freezing and Damage
Winterizing your RV hot water heater is essential to prevent freezing and damage, ensuring it remains in good condition during the colder months. This process involves draining the system, bypassing certain components, and using RV-safe antifreeze. For tank systems, you’ll need to shut off the water, power, and propane, then open drains and pressure-relief valves before running antifreeze until it reaches the fixtures. Tankless units require purging and protecting the heat exchangers. Don’t forget to inspect seals, anode rods, and exterior panels. Following proper documentation and disposal procedures also helps protect warranties and the environment. For a detailed step-by-step guide and troubleshooting tips, continue reading.
Why Winterizing an RV Hot Water Heater Matters
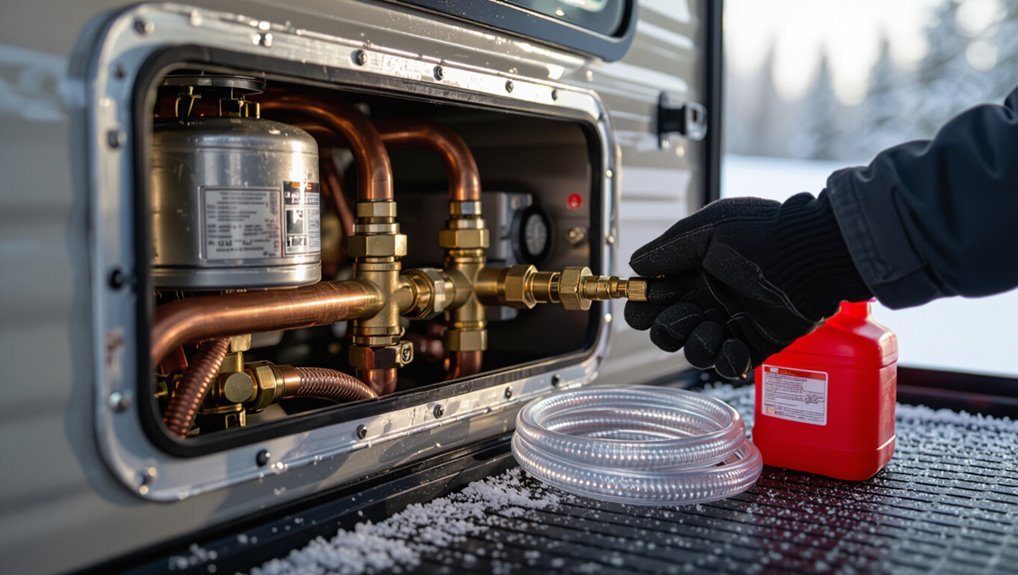
Frozen water can crack tanks, lines, and fittings, leading to costly repairs and potential safety hazards.
Failure to winterize can result in expensive replacements and risks such as leaks or scalding if pressure relief systems fail.
Winterization becomes essential whenever temperatures approach freezing or when an RV will be stored unheated for an extended period.
Risks of Frozen and Burst Components
When temperatures drop below freezing, water trapped in an RV’s hot water system can expand and exert immense pressure on tanks, pipes, valves, and fittings, leading to ruptures and costly damage.
Frozen components can crack, seals can fail, and sediment-laden pockets worsen stress.
Learning how to winterize hot water heater on an rv prevents leaks, preserves system integrity, and reduces repair frequency.
Cost and safety consequences of neglect
Neglecting to winterize an RV hot water heater can lead to expensive repairs and heightened safety risks. Ruptured tanks or burst pipes often require component replacement or professional service, while hidden leaks can cause extensive water damage to cabinetry, flooring, and electrical systems.
Mold growth, corrosion, and failed seals increase long-term restoration costs. Scalding or electrical hazards may also arise from compromised systems, raising liability concerns.
When winterization is essential (climate and storage scenarios)
If temperatures regularly approach freezing or an RV will be stored idle for extended periods, winterizing the hot water heater becomes essential to prevent freeze damage and related failures.
Winterization is necessary in cold climates, during seasonal storage, or when overnight lows dip near 0°C/32°F.
It’s also advised for prolonged disuse, transport through cold regions, or when inconsistent heating risks pipe or tank rupture.
Quick Checklist: Winterize RV Hot Water Heater in Minutes
A concise checklist lists the tools and materials required—basic wrenches, a water heater bypass kit, RV-safe antifreeze, and protective gloves.
It notes estimated time and skill level, typically 30–45 minutes and suitable for someone with basic mechanical ability.
It also highlights key safety precautions, such as shutting off power and water, relieving pressure, and working in a well-ventilated area.
Tools and materials needed
Preparing to winterize an RV hot water heater requires assembling a short list of specific tools and materials to guarantee the job is quick and effective.
Essentials include a non-toxic RV antifreeze jug, a water pump converter kit, basic hand tools and towels. Emotional reassurance comes from preparedness:
- Antifreeze (RV-safe)
- Pump/adapter kit
- Wrenches and rags
Estimated time and skill level
With the tools and materials gathered, the estimated time and required skill for winterizing an RV hot water heater can be quickly assessed.
A basic drain-and-blow procedure takes 15–30 minutes for someone with basic DIY experience. Adding antifreeze steps may extend to 30–60 minutes.
No advanced trades skills are required; attention to instructions and simple hand tools suffice for a typical owner.
Safety precautions before you start
Safety begins with turning off power, closing fuel lines, and relieving pressure to prevent burns, explosions, or chemical exposure.
The technician verifies shore power and battery are disconnected, propane is shut, and water supply is isolated.
Protective gloves and eye protection are worn. Ventilation is confirmed before introducing antifreeze.
Tools and manuals are at hand; gas detectors and a fire extinguisher stay nearby.
Types of RV Water Heaters and How That Affects Winterizing
Different RV water heater types—tank-based units (electric or propane), tankless models, and combination systems with onboard engine heaters—require distinct winterizing steps.
Tank heaters need flushing and antifreeze in the tank and lines.
Tankless units usually require bypass kits and careful antifreeze circulation.
Combination/engine-heated systems demand attention to both the domestic circuit and engine connections.
Knowing the specific system guides selection of fittings, bypass procedures, and any manufacturer-recommended precautions.
Tank-based (electric/propane) water heaters
Tank-style RV water heaters—typically powered by electric elements, propane burners, or both—store and heat several gallons of water in an insulated tank, which creates specific winterizing needs: draining or bypassing the tank, protecting the heating elements and burner assembly, and preventing residual water from freezing and cracking the tank or connections.
Winterizing steps include draining, opening pressure relief, bypassing antifreeze around the tank, and insulating exposed fittings.
Tankless water heaters
Tankless RV water heaters heat water on demand through a compact heat exchanger rather than storing a reservoir, which changes winterizing priorities: rather than draining a tank, procedures focus on purging the heat exchanger, protecting condensate and drain lines, and preventing trapped water in inlet/outlet plumbing and internal components from freezing and damaging the unit.
Winterizing requires bypass valves, low-pressure flushes with antifreeze, and inspecting seals.
Combination systems and onboard engine heaters
Combine both electric/gas and engine-heated elements, combination RV water heaters and onboard engine heaters require winterizing steps that account for multiple heat sources and plumbing paths.
Procedures include isolating and draining each heat source, bypassing the water heater when using antifreeze, flushing engine heat exchangers, and confirming valves and thermostats are secured.
Follow manufacturer guidelines to avoid damage and guarantee complete protection.
Step-by-Step Winterization Process for Tank-Based RV Water Heaters
The procedure begins with draining and depressurizing the fresh water system to prevent freeze damage.
Next, the water heater is bypassed, flushed to remove sediment, and prepared for non-toxic RV antifreeze.
Finally, the tank and lines are refilled with antifreeze, fittings are reassembled and checked for leaks, and antifreeze is run through every fixture.
Drain and depressurize the fresh water system
Begin by relieving all pressure and removing as much water as possible from the RV’s fresh water system to prevent freezing and damage during storage.
Open low-point drains, faucets, and the city water inlet, then run pump briefly to expel residual water.
Empty holding tanks and shore-power connected water heaters per manufacturer directions.
Leave vents open to allow full drainage and air circulation.
Bypass the water heater (why and how)
Bypassing the water heater redirects antifreeze around the tank so glycol circulates only through the plumbing lines, not the storage tank, preventing unnecessary antifreeze use and protecting the heater’s internal components from corrosion.
Install a factory or aftermarket bypass kit, close inlet/outlet valves to the tank, open bypass valves, and confirm flow to faucets using the pump.
Secure valves and label the system.
Flush the heater tank and remove sediment
With the bypass engaged and antifreeze routed around the tank, attention turns to flushing the heater to remove accumulated sediment that can trap moisture and promote corrosion.
Drain the tank fully via the petcock or drain valve, open pressure relief and hot faucets, and flush with fresh water until clear.
Inspect interior access (anode, scum), then close valves and prepare for antifreeze introduction.
Add non-toxic RV antifreeze to the heater and system
Prepare the system for antifreeze by confirming all freshwater supply valves are closed.
The water heater bypass is properly engaged, and the drain and pressure relief valves are shut; this guarantees the pink, propylene-glycol RV antifreeze will be directed through plumbing lines and the heater inlet without contaminating the fresh water tank.
Add the recommended amount of non-toxic RV antifreeze into the heater inlet, following manufacturer dilution and volume guidance.
Reassemble, check for leaks, and run antifreeze through all fixtures
After the antifreeze is added and valves are confirmed closed, components removed earlier (access panel, anode, and drain plug) are reinstalled and tightened to specification.
The system is pressurized briefly and all connections inspected for drips.
Fixtures are opened one by one—hot and cold taps, showers, toilets—until antifreeze appears, confirming circulation.
Any leaks are repaired before completing winterization.
Final system shutoff and storage tips
Finish the job by shutting down and securing the water system to prevent damage during storage.
Close main water valves, turn off water pump and propane, and disconnect shore power.
Drain exterior showers and low points, leave interior cabinet doors ajar to prevent moisture buildup, and place desiccant packs near the heater.
Record the winterization date and inspect seals periodically.
Step-by-Step Winterization Process for Tankless and Electric Heaters
Before beginning, the technician reviews manufacturer-specific recommendations and any warranty requirements for tankless and electric units.
They then outline steps for flushing and draining tankless systems, securing electric elements and control assemblies, and choosing between RV-safe antifreeze or heat tape where appropriate.
Each step emphasizes following maker instructions and safety precautions to prevent damage during freezing temperatures.
Manufacturer-specific recommendations to check first
When preparing to winterize a tankless or electric RV water heater, manufacturers’ guidelines should be consulted first to identify model-specific shutoff procedures, bypass kit requirements, and any temperature or pressure limitations that could affect the process.
The manual may specify electrical isolation steps, sacrificial anode handling, approved antifreeze type/concentration, warranty-impacting actions, and recommended service intervals or dealer-recommended winterization accessories.
Draining and flushing procedures for tankless units
After confirming any model-specific shutdowns and bypass requirements in the manufacturer’s instructions, attention turns to the draining and flushing steps unique to tankless RV water heaters.
Close incoming water, attach hoses to service ports, open valves to circulate non-toxic antifreeze or potable water for flushing.
Run until clear, purge air, then close service ports, remove hoses, and verify no residual liquid remains in heat exchanger.
Protecting electric heating elements and controls
Although tankless and electric RV water heaters lack large, fluid-filled tanks, their exposed heating elements and control electronics remain vulnerable to freeze damage and corrosion during storage. Consequently, winterization must include specific steps to protect wiring, elements, thermostats, and control modules.
Disconnect power, remove or insulate exposed elements, secure and seal control boxes, apply dielectric grease to terminals, and label disconnected connectors for safe reassembly.
Using antifreeze or heat tape alternatives
Having secured and protected electrical elements and controls, attention shifts to preventing freeze damage through either non-toxic RV antifreeze or alternatives to heat tape.
Technicians recommend bypassing the water heater and pumping propylene glycol antifreeze through lines, or installing insulated covers, heated pads, or thermostatic cabinet heaters.
Each option’s compatibility, manufacturer guidance, and environmental safety should be verified before implementation.
Alternative Protection Methods (When Antifreeze Isn’t Preferred)
When antifreeze is not preferred, several mechanical and electrical options can protect an RV hot water heater from freezing.
Heat tape combined with proper insulation can prevent pipe and tank freeze while heated enclosures or cautiously used space heaters offer localized warmth where outlets and ventilation allow.
Maintaining a minimal water circulation and keeping the heater set to a low safe temperature provide additional protection without chemicals.
Heat tape and insulation installation
Protect the RV water heater by applying electric heat tape and wrapping it with insulating material as an alternative to using antifreeze.
The technician secures manufacturer-approved heat tape along pipes and the tank, follows electrical codes, and tests functionality.
Then closed-cell foam or fiberglass insulation is wrapped and sealed with weatherproof tape to retain heat, prevent drafts, and reduce freezing risk during cold spells.
Using heated enclosures or space heaters safely
Although enclosed heating can be effective, using heated enclosures or space heaters for an RV water heater requires strict attention to ventilation, fire safety, and electrical load to prevent hazards and equipment damage.
Use certified low-wattage heaters, thermostat controls, and automatic shutoffs. Maintain clearances, noncombustible barriers, and monitored power circuits.
Regular inspection for moisture, cords, and carbon monoxide risk is essential for safe operation.
Maintaining minimal water circulation and temperature
Several simple strategies can keep an RV water heater and its plumbing above freezing without using antifreeze: maintaining a low continuous circulation with a small pump, setting a modest thermostat on an electric source or trace heating, and regularly cycling warm water through vulnerable runs.
These measures reduce freeze risk while conserving power. Monitor temperatures, insulate exposed lines, and use timers to limit energy use.
Troubleshooting Common Problems During Winterization
When winterizing an RV hot water heater, common issues may include a tank that won’t drain or a stuck valve and persistent leaks after reassembly.
Technicians should also check whether antifreeze is reaching every fixture and address blockages or pump problems if it is not.
Finally, inspections for cold-weather damage—such as cracked fittings, split hoses, or frost marks—help identify repairs before storage.
Heater won’t drain or valve is stuck
Encountering a water heater that won’t drain or a stuck drain valve is a common obstacle during RV winterization and requires prompt, careful action to prevent freeze damage.
First, relieve pressure and heat, then try gentle tapping and penetrating lubricant on the valve.
If still immobile, use appropriate wrenching with caution or remove access panel to manually clear debris.
Replace faulty valves before completing winterization.
Persistent leaks after reassembly
After a stuck valve is freed and the heater is reassembled, persistent leaks can appear around fittings, the drain assembly, or access panel seals, indicating incomplete resealing or damaged components.
Inspect each joint, tighten appropriately, replace worn gaskets or O-rings, and reseal with proper sealant or plumber’s tape.
Verify heater is dry under pressure and test for slow weeps before finalizing reassembly.
Antifreeze not reaching all fixtures
If antifreeze fails to reach every fixture, the most likely causes are blocked lines, closed valves, or inadequate pump pressure.
Technicians should verify all valve positions, open low-point drains, and cycle the water pump while observing flow at each faucet and shower.
Inspect filter screens, trap debris, and clear aerators.
If pressure remains low, test pump operation and consider a higher-capacity pump or manual flushing to complete coverage.
Cold-weather damage signs to inspect
Several visible and functional signs indicate cold-weather damage to an RV water system and should be checked promptly before winterization proceeds.
Inspect for cracked or bulging pipes, split hose fittings, frost heave around external hookups, and corrosion on valves.
Test faucets and shower for reduced flow or air pockets.
Check the water heater for dents, leaks, or a damaged anode rod.
Post-Winter Startup and De-Winterization Checklist
After winter storage, the system should be purged of antifreeze and the bypass valves returned to service before refilling the tank.
The burner, pilot assembly, and electrical components must be inspected and confirmed operational.
Finally, the heater should be run through test cycles while checking carefully for leaks.
Flushing antifreeze from the system
Begin by ensuring the RV is level and the freshwater pump is off; this creates a stable baseline for flushing.
Open all cold and hot taps, drain low points, and run freshwater through lines until clear.
Operate the water heater briefly per manufacturer instructions to purge residual antifreeze.
Check toilets, shower, and external lines.
Inspect for leaks and repeat flushing if pink tint remains.
Reinstalling bypass valves and refilling the tank
Reinstall the hot water heater bypass valves according to the manufacturer’s diagram, ensuring all seals and clamps are seated correctly before refilling the tank.
Close bypasses, reconnect inlet and outlet lines, and tighten fittings.
Partially open cold supply to admit water, vent air via nearby fixtures until steady flow appears.
Monitor for leaks, then fully open supply and restore normal valve positions.
Checking burner, pilot, and electrical functions
With the plumbing back in service and the tank refilled, attention turns to the heater’s heat source and electrical systems to confirm safe operation.
Inspect the gas burner for corrosion, clean debris, and verify the pilot lights reliably.
Check wiring, fuses, and thermostat connections for tightness and damage.
Restore power, observe ignition cycles, and note any unusual smells or noises requiring service.
Test runs and leak inspection
Perform a controlled test run of the water heater and plumbing system to confirm proper operation and reveal any leaks after winter storage.
Open cold and hot taps, operate shower and faucets, and run water pump or shore power heater while observing pressure and flow.
Inspect connections, valves, tank seams, and drain fittings for drips.
Tighten or replace faulty fittings and recheck until dry.
Maintenance Tips to Prevent Future Winter Damage
Routine maintenance helps prevent future winter damage by recommending a scheduled tank flush, periodic inspection of anode rods and valves, and checks of the exterior access panel for leaks or corrosion.
Attention to seasonal storage practices—such as draining systems, adding antifreeze where appropriate, and protecting vents—further reduces risk.
These steps, performed on a regular timetable, extend heater life and minimize winter-related repairs.
Regular tank flushing schedule
A monthly flushing schedule helps prevent sediment buildup and corrosion that accelerate winter damage in an RV water heater.
The owner drains the tank, flushes with fresh water until clear, and rechecks the drain valve for flow.
Routine flushing maintains efficiency, reduces freeze-prone cold spots, and extends heater life.
Document dates and findings to guarantee consistent seasonal preparation.
Inspecting anode rods, valves, and an exterior access panel
Inspect the anode rod, pressure relief valve, drain valve, and exterior access panel for signs of corrosion, leaks, or damage before winter sets in.
Replace a heavily corroded anode to prevent tank failure.
Test the pressure relief valve for proper operation and guarantee the drain valve seals and drains freely.
Confirm the access panel closes securely and the surrounding seals remain intact to keep out moisture and pests.
Seasonal storage best practices for RVs
After confirming the water heater’s components are sound, attention should shift to seasonal storage practices that prevent freeze damage and long-term deterioration.
Drain all tanks fully, leave drains open, and circulate non-toxic RV antifreeze through lines.
Disconnect batteries and tender, ventilate to reduce moisture, use a breathable cover, inspect seals and tires, and schedule periodic checks to catch issues before spring recommissioning.
Cost Comparison of Winterization Options
A cost comparison helps owners weigh the trade-offs between hiring a professional service and buying DIY materials and tools. Below is a quick cost snapshot to frame the choice. Consider time, skill, and long-term savings when deciding.
| Option | Typical Cost Range |
|---|---|
| Professional service | $100–$300 |
| DIY materials & tools | $20–$150 |
Professional service vs. DIY materials and tools
When weighing winterization choices, owners must compare upfront costs, long-term value, and risk exposure between hiring a professional and doing the job themselves.
Professionals charge for labor and expertise but reduce liability, while DIY requires buying specific tools and antifreeze yet can be far cheaper if performed correctly.
Professionals typically cost more upfront; DIY costs include pump, fittings, gloves, and non-toxic RV antifreeze plus time.
Recommended Products and Materials
The section identifies essential items to complete a safe and effective winterization of an RV hot water heater.
Consider these priorities that often determine ease and reliability:
- Approved RV non-toxic antifreeze brands
- Bypass kits, valves, and insulation materials
- Tools for flushing and draining the system
The following discussion evaluates each item’s role and practical recommendations.
Approved RV non-toxic antifreeze brands
Approved RV non-toxic antifreeze brands are formulated specifically for potable-water systems and meet NSF/ANSI 60 or similar standards, ensuring safety for winterizing fresh water lines.
Popular choices include Camco TastePURE, Prestone IG1, and RV GOLD antifreeze; each lists freeze protection temperatures and usage instructions.
Select propylene glycol-based, food-grade formulas labeled for RV potable systems and follow manufacturer dilution and disposal guidance.
Bypass kits, valves, and insulation materials
Install bypass kits and select valves and insulation that match the RV’s water heater model and plumbing layout to protect the system from freeze damage while simplifying winterization and summer bypassing.
Use durable, RV-rated three-way valves, brass or marine-grade fittings, and closed-cell foam or pipe-wrap insulation.
Compact, labeled bypass kits reduce antifreeze use and error risk; verify compatibility and secure fittings to prevent leaks.
Tools for flushing and draining the system
Gather essential tools to flush and drain an RV hot water system efficiently and safely.
Recommended items include a wrench set, screwdriver set, hose adapter and garden hose, bucket, wet/dry vacuum or pump, water pressure regulator, compressed air source or compressor adapter, and thread seal tape.
Protective gloves and safety glasses complete the kit for safe, effective winterization maintenance.
Safety Reminders and Legal/Environmental Considerations
Proper disposal and containment of RV antifreeze are emphasized to prevent environmental contamination and comply with local regulations.
Attention is called to manufacturer instructions and approved procedures, since improper winterizing can void warranties or affect coverage.
Readers are advised to document steps and check insurance policies for any repair or damage exclusions related to winterization.
Proper disposal and handling of antifreeze
Handle RV antifreeze with care to prevent harm to people, pets, and the environment.
Dispose of used antifreeze per local hazardous-waste regulations; never pour it on soil, into storm drains, or septic systems.
Store unopened containers tightly sealed and labeled out of reach.
Use absorbents for small spills and collect contaminated materials for proper disposal.
Consult municipal guidance for recycling or drop-off locations.
Manufacturer warranty implications and insurance notes
Manufacturer warranties and insurance policies can be voided if winterization is performed incorrectly or with non-approved materials.
Owners should follow the RV and water-heater manufacturers’ service instructions exactly. Failure to comply may nullify coverage for freeze damage.
Document actions, use approved products, retain receipts and service records, and consult insurers before DIY winterization to confirm policy requirements and avoid denied claims.
Conclusion
As frost approaches, the RV’s hot water heater becomes a heart that must be gently stilled. Winterizing is a wreath of care—draining, flushing, and protecting—so pipes sleep without cracking under icy breath. By choosing prudence over haste, owners preserve comfort and avoid cold, costly awakenings. Thoughtful maintenance turns seasonal fragility into resilience, ensuring the heater endures until spring’s thaw rekindles journeys and the warm flow of home on the road returns.