How to Use a Drain Cleaning Bladder: Step-by-Step Guide to Clear Clogs Safely
A drain cleaning bladder is an effective tool for clearing soft clogs in pipes by using pressurized water. To use one, select a bladder that matches the pipe diameter, connect it to a garden or pressure washer hose, and insert it past the trap. Gradually apply water pressure until the bladder seats and pulses, helping to dislodge debris. Always monitor for leaks, relieve pressure before removal, and inspect the bladder afterward. For additional safety tips, pressure recommendations, and alternative methods, continue reading.
What a Drain Cleaning Bladder Is and When to Use One
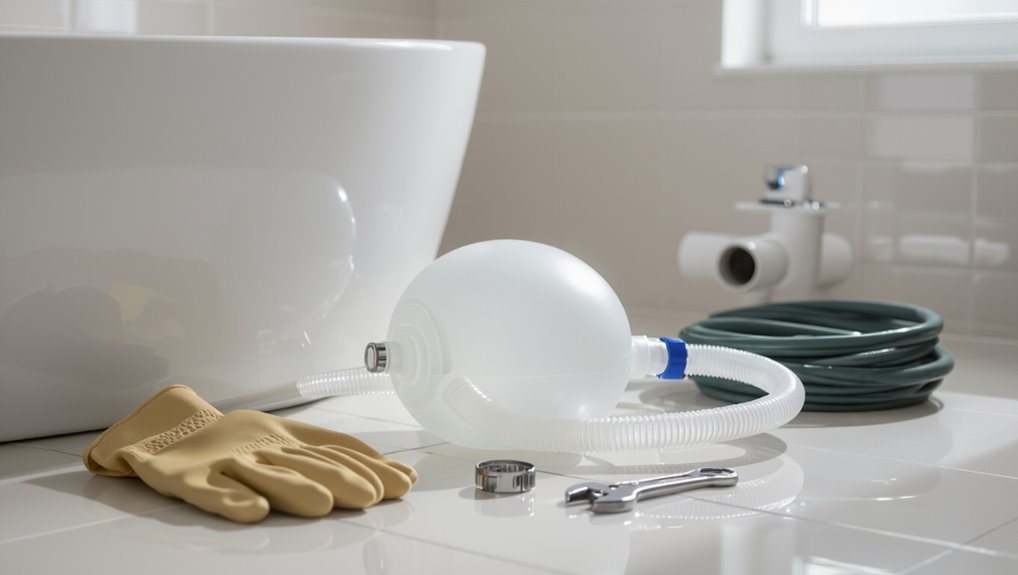
A drain cleaning bladder is a rubber device that inflates inside a pipe and directs pressurized water to clear clogs and flush debris.
They come in various types and sizes—ranging from small attachments for sink and shower drains to larger models for main sewer lines—selected based on pipe diameter and blockage severity.
Bladders are most effective for soft blockages and routine maintenance but are less suitable than mechanical snaking or hydro-jetting for solid obstructions or root intrusion.
How a drain cleaning bladder works
Deploying a drain cleaning bladder involves inserting a rubber balloon-like device into a clogged pipe and inflating it so pressurized water is forced through the blockage, dislodging debris and flushing it downstream.
The device seals against pipe walls; backpressure guarantees focused scouring.
Users learn how to use drain cleaning bladder safely by controlling water pressure, positioning the bladder properly, and monitoring for leaks or loosening.
Types and sizes of drain cleaning bladders
Drain cleaning bladders come in several designs and sizes to match pipe diameters, materials, and blockage types. Single-balloon bladders suit small household drains; multi-chamber or elongated bladders fit larger mains.
Materials vary—rubber, PVC, reinforced composites—affecting durability. Pressure ratings and hose fittings differ, so selection depends on pipe diameter, expected backpressure, and connector compatibility rather than clog composition.
Situations ideal for using a bladder vs. other methods
Recognizes situations where a cleaning bladder outperforms alternatives: long straight runs with soft build-up, hair-clogged bathroom traps, and sewer lines accessible from a cleanout that tolerate pressurized backflow.
It suits non-structural obstructions, shallow blockages near fixtures, and routine maintenance.
It is less appropriate for deep-root intrusions, collapsed pipes, or rigid mineral scale, where augers, hydro-jetting, or excavation are preferable.
Safety Precautions Before You Start
Before using a drain cleaning bladder, the user should gather appropriate personal protective equipment and the necessary tools.
They should inspect the plumbing system—checking access points, shutoff valves, and pipe materials—to verify the bladder is suitable and won’t cause damage.
The user must be aware of hazards to avoid, including chemical interactions with recent drain cleaners, excessive water pressure, and fragile or corroded pipes.
Personal protective equipment and tools needed
Because pressurized water and slippery surfaces present real hazards, the operator should don appropriate personal protective equipment and assemble the correct tools before handling a drain cleaning bladder.
Protective gear and tools minimize injury and damage.
- Safety goggles and face shield
- Chemical- and cut-resistant gloves
- Non-slip footwear
- Adjustable wrench, hose adapters, and bucket
Plumbing system checks to perform first
Several quick system checks should be completed to confirm the plumbing can safely handle the pressure and flow from a drain cleaning bladder.
Inspect visible pipe joints for leaks or corrosion, confirm accessible cleanouts are functional, verify shutoff valves operate smoothly, and make sure downstream fixtures are closed.
Check for recent repairs or weak sections noted by a professional to avoid unexpected failures during operation.
Hazards to avoid (chemical interactions, water pressure, fragile pipes)
Many common hazards can turn a routine drain-bladder job into a dangerous situation, so users must recognize chemical incompatibilities, excessive water pressure, and fragile pipework before beginning.
Confirm no caustic cleaners remain, as reactions can release heat or gas.
Test water pressure at a safe setting, avoid overtightening fittings, and bypass or replace brittle, corroded, or old pipes to prevent ruptures and leaks.
Tools and Materials Required
The section lists the drain cleaning bladder itself, including its inflatable body, tailpipe fittings, and any gasket or seal components needed for a proper connection.
It also covers selecting a compatible garden or pressure washer hose, choosing an appropriate air or water supply and observing the bladder’s maximum pressure rating.
Optional accessories such as a pressure gauge, hose clamps, and adapter fittings are noted for improved control and safety.
Drain cleaning bladder components and fittings
A drain cleaning bladder assembly consists of a resilient inflatable bladder, an inlet hose with secure couplings, a pressure-rated garden hose attachment, and a shutoff or control valve to manage water flow. Each part must match the drain size and pressure specifications to guarantee a proper seal and safe operation.
- Inflatable bladder (various diameters)
- Hose with threaded or quick-connect fittings
- Pressure-rated garden hose adapter
- Shutoff/control valve and check fittings
Compatible hose, air/water source options, and pressure limits
After selecting a bladder and matching fittings, attention turns to the hose, source, and safe operating pressures required to inflate and operate the device. Use reinforced garden or braided air hoses; choose potable water or compressed air sources per bladder rating. Never exceed manufacturer pressure limits; typical ranges: 20–80 psi. Inspect hoses for damage before use.
| Hose Type | Source | Typical Limit |
|---|---|---|
| Garden | Water | 20–60 psi |
| Braided | Air | 30–80 psi |
| Rubber | Water/Air | 20–70 psi |
Optional accessories (pressure gauge, hose clamps, adapters)
Include a few simple accessories to increase safety and compatibility when using a drain cleaning bladder.
A pressure gauge monitors inlet PSI to prevent overinflation; hose clamps secure connections and prevent disconnection under pressure; brass or rubber adapters match various hose and faucet sizes.
Users should choose durable, rated fittings and test assemblies at low pressure before full operation.
Preparing the Drain and Work Area
Before using the drain cleaning bladder, the area should be prepared by clearing visible debris and opening access to the appropriate cleanout.
The technician locates the main cleanout as well as any branch cleanouts and traps to determine the correct insertion point.
Nearby fixtures are shut off and household members are informed to prevent accidental use while the system is being worked on.
Clearing visible debris and accessing the cleanout
Clear any visible debris from the area around the fixture and remove nearby items that could be damaged or obstruct access; this creates a safe, orderly workspace and prevents washed-out mess during testing.
Use gloves and eye protection, clear flooring and countertops, and set absorbent cloths around the drain.
Expose the cleanout cover, loosen fasteners, and keep tools and a bucket within reach.
Locating main cleanout, branch cleanouts, and traps
Where is the main cleanout located and how do branch cleanouts and traps relate to it?
The main cleanout typically sits near the foundation or exterior wall where the house sewer exits.
Branch cleanouts serve individual lines—kitchen, laundry, bathroom—while traps (P‑traps, S‑traps) sit under fixtures to block sewer gas.
Identify each cleanout and trap before using a drain cleaning bladder.
Shutting off nearby fixtures and informing household members
Turn off water to fixtures near the work area and notify household members of the planned maintenance to prevent accidental use.
The operator disconnects or isolates nearby valves, labels shutoffs if needed, and posts a brief notice. This minimizes mess, pressure surges, and unexpected interference.
Confirm all taps remain closed before starting, and keep communication lines open until the job is complete.
Step-by-Step Guide to Using a Drain Cleaning Bladder
The procedure begins with inspecting the drain to select the correct bladder size and confirming secure hose fittings.
The bladder is then inserted and positioned in the pipe before water or air pressure is applied gradually while monitoring progress.
Clearing is achieved by maintaining pressure in controlled intervals and repeating cycles until flow is restored.
Step 1 Inspect the drain and choose correct bladder size
Before inflating a drain cleaning bladder, the user should visually inspect the access point and measure or estimate the pipe diameter to select a bladder that seals snugly without overexpansion.
Check for sharp edges, fittings, or debris that could damage the bladder. Confirm the pipe material and available clearance.
Choose a bladder rated for the pipe size and designated pressure to prevent leaks or bursts.
Step 2 Attach bladder to hose and check fittings
Connect the bladder to the garden hose securely, ensuring the hose threads match the bladder inlet and the connection is hand-tightened plus an extra quarter turn with pliers if needed.
Inspect washers and O-rings for damage, replace if cracked.
Verify the shutoff valve on the hose is closed, then slowly open water to test for leaks at the coupling and along the hose before proceeding.
Step 3 Insert bladder into the pipe and position properly
Gently feed the collapsed bladder into the drain opening until it reaches the obstruction or the desired depth, keeping the hose straight to prevent kinks and ensuring the bladder’s nozzle faces downstream.
Confirm the bladder sits past the trap or at the targeted section, leave slack for movement, and secure the hose outside the drain.
Verify no twists and that access remains clear.
Step 4 Slowly apply water or air pressure and monitor
Begin applying water or air pressure slowly, watching the hose and drain opening for signs of movement or leaks.
Pressure is increased only as the bladder seats; the operator monitors vibration, sound, and connection integrity.
Stop immediately if leaks, unusual noises, or sudden shifts occur.
Maintain a controlled flow to prevent pipe damage and guarantee safe, observable progress toward dislodging the clog.
Step 5 Maintain pressure interval and cycles for effective clearing
Once the bladder is securely seated and initial pressure has dislodged loosened debris, the operator cycles pressure in controlled intervals—typically 10–30 seconds on, followed by 10–30 seconds off—to allow movement of debris and to prevent overheating or overpressurization of the pipe.
The operator watches flow and listens for changes, adjusting intervals and pressure modestly to maintain steady clearing without sudden spikes or continuous high pressure.
Step 6 Relieve pressure safely before removal
After cycling pressure and confirming steady clearing, the operator prepares to relieve pressure before extracting the bladder.
They close the water supply, then open the bleed valve slowly to vent residual pressure, watching for backflow.
Once the gauge reads zero and water flow subsides, they loosen fittings gradually, keeping tools and protective gear in place.
Only then is the bladder safe to handle and remove.
Step 7 Remove bladder and flush the line to confirm flow
Disconnect the fittings carefully and withdraw the bladder from the cleanout or fixture opening while maintaining a steady grip and keeping protective gloves and eye protection in place.
Inspect the bladder for damage, set it aside, and reconnect any caps.
Run water through the line or flush the fixture to verify steady flow.
Note any persistent backups and document condition for further action or professional service.
Signs the Clog Is Fully Cleared and Verification Methods
The operator should watch for clear visual and auditory cues during inflation and flushing—steady water flow, lack of sputtering, and no unusual noises—indicating the bladder has passed the obstruction.
After removal, simple flow tests and a brief camera or mirror inspection can confirm sustained drainage and absence of debris.
If flow remains inconsistent, odors persist, or inspections reveal residual buildup, a professional evaluation is recommended.
Visual and auditory cues during operation
Monitor both sights and sounds closely while the drain cleaning bladder is pressurized and flowing; these cues often indicate whether the obstruction has broken free.
Sudden steady water movement, audible reduction in sputtering or gurgling, and lack of intermittent pressure spikes usually signal clearance.
Bubbling that stops and a consistent hiss or steady flow through the hose also suggest obstruction removal and resumed passage.
Post-cleaning flow tests and inspection methods
Begin post-cleaning checks by running controlled flow tests and visual inspections to confirm the blockage is fully cleared.
Observe steady, rapid drainage without gurgling, backups, or slow sinks.
Flush with increasing volumes to verify consistent flow.
Use a flashlight or inspection camera to confirm pipe interior is free of debris and damage.
Recheck fittings and trap seals for leaks after testing.
When professional inspection is recommended
When should a professional inspection be scheduled after using a drain cleaning bladder?
If slow drainage, recurring clogs, gurgling sounds, sewage odors, or water backing persist after multiple successful bladder attempts, schedule a professional inspection.
Also seek inspection when cameras, unusual noises, visible pipe damage, or concerns about tree root intrusion arise.
Professionals verify clearance with video inspection, pressure testing, and targeted repairs.
Common Problems and How to Troubleshoot Them
Typical issues include a bladder that fails to inflate or hold pressure, a clog that persists after repeated attempts, leaks at connections, and accidental damage to pipes or fittings during use.
Troubleshooting should systematically check equipment integrity, connection tightness, and correct hose and water pressure settings.
If basic fixes do not resolve the problem, professional assessment is recommended to avoid worsening damage.
Bladder won’t inflate or holds no pressure
A drain cleaning bladder that fails to inflate or hold pressure most often signals a leak, improper connection, or insufficient water supply; diagnosing which requires a systematic check of the bladder body, fittings, hose, and valve, as well as verification of inlet pressure and flow.
Inspect for punctures, guarantee tight barbed or threaded fittings, replace damaged hoses, test the valve operation, and confirm adequate tap pressure before reuse.
Persistent clog after multiple attempts
Persistent clogging after several bladder uses indicates the blockage is more entrenched or of a type the bladder cannot clear; resolving it requires reassessing obstruction location, composition, and the chosen technique.
Inspect access points, try a camera or manual auger to identify hair, scale, roots, or collapsed pipe.
If obstruction persists, stop further pressure attempts and consult a professional plumber for targeted mechanical removal or pipe repair.
Leaks at connections or fittings
Many leaks around a drain cleaning bladder occur at hose connections, fittings, or imperfect seals where pressurized water finds the path of least resistance.
Inspect connections, tighten fittings, replace damaged washers or quick‑connects, and re-seat hose barbs.
Use proper-rated clamps and PTFE tape on threaded joints.
Test at low pressure before full operation.
If leaks persist, stop and reassess fittings or replace compromised components.
Damage to pipes or fittings during use
Inspecting for damage is essential before and after using a drain cleaning bladder because pressurized water, abrupt movements, or improperly fitted equipment can crack PVC, deform older metal pipes, or shear fittings.
Users should stop if any distortion, hairline fractures, or loose joints are visible.
Reduce pressure, reposition the bladder, or consult a plumber for compromised pipes; do not continue DIY repairs on damaged systems.
Do’s and Don’ts to Protect Pipes and Maximize Effectiveness
Follow clear guidelines to protect plumbing and guarantee the drain cleaning bladder functions as designed: use the correct bladder size and pressure rating for the pipe, connect fittings securely, and limit inflation pressure to the manufacturer’s recommendation; avoid excessive agitation, repeatedly forcing the bladder through brittle or corroded pipes, and applying pressure near plastic joints or old seals.
- Start with visual pipe assessment
- Match bladder to pipe diameter
- Increase pressure gradually
- Stop if resistance or leaks appear
Maintenance, Storage, and Lifespan of a Drain Cleaning Bladder
After each use, the bladder should be thoroughly cleaned and disinfected to remove debris and bacteria.
It should be stored deflated in a cool, dry place away from sunlight and sharp objects to prevent premature wear.
Visible cracks, persistent leaks, or loss of elasticity indicate it is time to replace the bladder.
Cleaning and disinfecting after use
Rinse the bladder thoroughly with clean water immediately after use to remove debris and residual chemicals; this prevents buildup that can degrade the rubber or clog the valve.
Then disinfect with a mild bleach solution (1 tablespoon bleach per quart water) or EPA-approved cleaner, rinse again, inspect for damage, and allow to air-dry completely before storage.
Dispose of contaminated rinse appropriately.
Proper storage to prevent damage
In storage, a drain cleaning bladder should be kept clean, dry, and protected from sunlight, ozone, sharp objects, and extreme temperatures to preserve the rubber and valve integrity.
Store it loosely coiled in a ventilated container or sealed bag with desiccant, away from chemicals and heavy loads.
Inspect periodically for softening, cracks, or valve damage before reuse and rotate stock to avoid prolonged compression.
Signs it’s time to replace the bladder
Proper storage helps extend a drain cleaning bladder’s service life, but regular inspection will indicate when replacement is necessary.
Indicators include visible cracks, persistent leaks, stretched or misshapen material, weakened seams, or failure to hold pressure. Frequent use with abrasive debris accelerates wear.
If performance declines despite proper cleaning, replace the bladder to avoid burst failures and guarantee safe, effective operation.
Alternatives and When to Choose a Professional
The article compares the bladder to alternatives such as mechanical augers, hydro-jetting, and chemical cleaners, noting differences in cost, effectiveness, and potential risk to pipes.
It highlights that bladders are cost-effective for simple clogs while augers or hydro-jetting may be more effective for stubborn or extensive blockages.
It warns that situations involving recurring clogs, damaged piping, sewer line issues, or complex diagnostics warrant a licensed plumber.
Comparison of bladder vs. mechanical auger, hydro-jetting, and chemicals
Compare a drain cleaning bladder to other methods—mechanical augers, hydro-jetting, and chemical cleaners—by weighing clog type, pipe condition, cost, and risk. A bladder suits soft blockages and fragile lines; augers handle localized obstructions; hydro-jetting clears heavy scale but risks older pipes; chemicals can damage plumbing and should be last resort or professional.
| Method | Best use |
|---|---|
| Bladder | Soft clogs |
| Auger | Local blockages |
| Hydro-jet | Heavy buildup |
| Chemicals | Last resort |
Cost, effectiveness, and risk considerations
When deciding between a drain cleaning bladder and other options, cost, effectiveness, and risk should be weighed together rather than independently.
Bladders are low-cost, effective for soft clogs, and minimize chemical exposure, but may fail on hard obstructions.
Mechanical augers and hydro-jetting cost more yet handle tougher blockages.
Consider pipe condition, clog type, and potential damage before choosing a method or professional help.
Scenarios requiring a licensed plumber
If a drain cleaning bladder fails to clear a blockage or signs of deeper issues appear—persistent backups, multiple slow drains, foul odors, sewage smell, gurgling noises, or visible pipe damage—calling a licensed plumber is advisable.
A professional should handle recurring clogs, deteriorated or collapsed pipes, sewer line problems, tree root intrusion, complex multi-story plumbing, and situations requiring permits, camera inspection, excavation, or safe handling of hazardous sewage.
Quick Reference: Step Checklist and Pressure Guidelines
A concise checklist and clear pressure guidelines help guarantee safe, effective use of a drain cleaning bladder: inspect the bladder and hose for damage, confirm fittings are tight, position the bladder past the clog or at the pipe joint, secure the hose and vent openings, set the water pressure to the manufacturer’s recommended range (typically low-to-moderate for residential lines, higher only for larger commercial pipes), open the water slowly to pressurize the bladder, monitor for leaks or movement, maintain pressure for the specified duration, then shut off the water and depressurize before removal.
- Inspect equipment and fittings
- Set pressure per manufacturer
- Slowly pressurize and monitor
- Depressurize and remove safely
Conclusion
After a brief parade of rubber ingenuity, the drain cleaning bladder emerges as the plucky hero in the battle against sluggish sinks—when wielded with respect, common sense, and the correct hose pressure. It will not, alas, vanquish every clog or mend ancient, fragile pipes. Used properly, it clears ordinary blockages efficiently; misused, it turns plumbing into modern art (leaks and lawsuits included). Choose wisely, or summon a professional.