How to Reset Your Water Heater Pilot Light Safely: Step-by-Step Guide
To safely reset your water heater pilot light, first, ensure your safety by shutting off the gas and power, ventilating the area, and checking for any gas odor. Next, follow these steps: turn the control to the Off position, wait a few minutes, then set it to Pilot. Ignite the pilot while holding the button down, confirm a steady flame, and finally switch to On and restore power. If issues persist, proceed with troubleshooting, repairs, and follow safety tips.
What a pilot light is and why it matters for your water heater
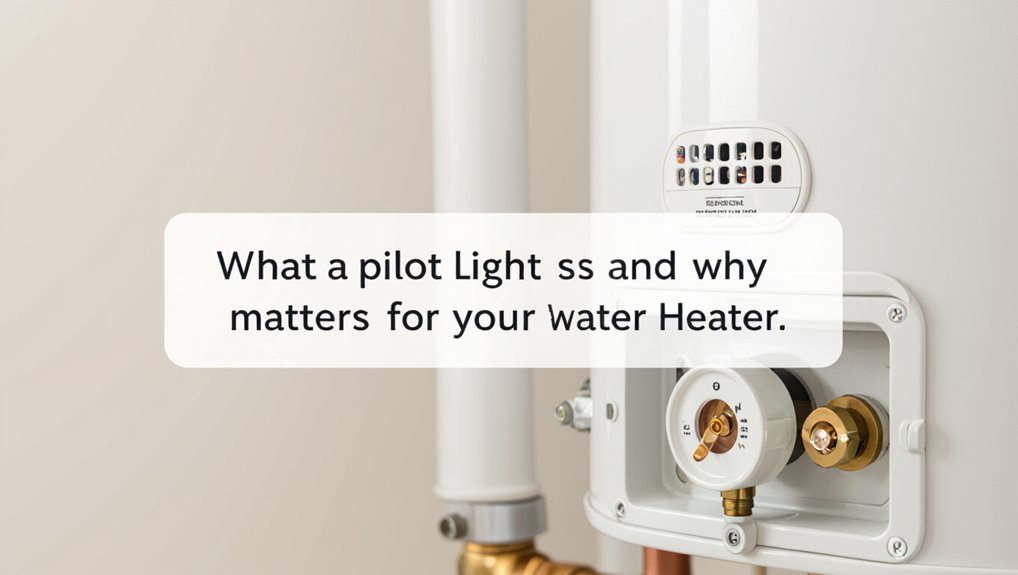
A pilot light is a small, continuously burning flame that ignites the main burner in a gas water heater, controlled by a thermocouple or electronic safety device.
Signs that the pilot is out or malfunctioning include no hot water, a weak or flickering flame, or a unit that won’t stay lit.
A faulty pilot can cause persistent lack of hot water and create safety hazards such as gas leaks or carbon monoxide exposure.
How pilot lights work in gas water heaters
Understands the pilot light as the small, continuously burning flame that ignites a gas water heater’s main burner when heat is required.
It monitors a thermocouple or flame sensor; when hot water is demanded, the pilot lights the main burner, maintaining temperature.
Proper operation relates to safety controls and efficient heating.
The guide explains how to reset water heater pilot light and restore ignition safely.
Signs the pilot light is out or malfunctioning
How can a homeowner tell when a pilot light has gone out or is failing? Signs include sudden loss of hot water, inconsistent water temperature, or the burner failing to ignite.
A weak, yellow, or flickering flame indicates poor combustion. Strange odors near the heater or soot buildup on components may signal malfunction.
Routine checks catch problems early.
Risks of a faulty pilot light (carbon monoxide, gas leaks, no hot water)
Recognize that the pilot light serves as the small, continuously burning flame that ignites the burner on a gas water heater. When it fails or burns improperly, it creates immediate safety and performance hazards.
A faulty pilot can allow incomplete combustion, producing carbon monoxide, permit gas leaks if valves remain open, and cause loss of hot water.
Prompt inspection and professional repair are essential.
Safety precautions before attempting to reset the pilot light
Before attempting to relight the pilot, one should assess whether the issue requires a professional—such as when there is persistent odor, corrosion, or uncertainty about gas controls.
Necessary preparations include wearing basic safety gear, having a long-reach lighter or match, and knowing how to shut off the gas and electrical supply.
The area should be ventilated and checked for gas smells before any work begins, with occupants evacuated and the utility company contacted if a strong odor is present.
When to call a professional instead of DIY
Evaluating risk accurately determines whether a homeowner should attempt relighting the pilot light or call a professional.
If the smell of gas persists, there are repeated ignition failures, visible corrosion, damaged components, or a history of gas-system issues, a licensed technician should be contacted.
Complex valves, uncertain gas supply, or safety-system faults exceed typical DIY scope and require trained inspection and repair.
Required safety gear and tools
Although relighting a pilot light is a routine task for some homeowners, strict adherence to safety gear and properly chosen tools is essential to prevent injury or gas leaks.
Recommended equipment includes safety goggles, flame-resistant gloves, and a long-reach lighter or pilot light igniter. A non-contact gas leak detector or soapy water, adjustable wrench, and flashlight complete the kit; avoid open flames and improvised tools.
How to shut off gas and power safely
Shut off the gas supply and disconnect electrical power to the water heater to eliminate ignition and electrocution hazards before attempting any work.
Locate the gas shutoff valve and turn it perpendicular to the pipe. Switch off the circuit breaker or unplug electric units.
Verify both gas and power are off using labels, tester, or valve position. Do not proceed until confirmed.
How to ventilate the area and detect gas odors
After confirming gas and power are off, the area around the water heater should be ventilated and checked for lingering gas before any ignition attempt.
Open windows and doors, run fans if available, and avoid sparks.
Smell for rotten-egg odor and use a gas detector if possible.
If gas is suspected, evacuate, ventilate further, and call the gas company or emergency services.
Step-by-step guide to relighting a water heater pilot light
The following steps guide the user through relighting a water heater pilot light after confirming the heater is prepared and the gas supply is on.
First, the pilot assembly and control knob should be located, then the control turned to Off with a wait period before switching to Pilot and pressing the knob.
Finally, the pilot is ignited using the built-in igniter or a long lighter while holding the control until the flame stays lit.
Prepare the heater and confirm gas supply
Before attempting to relight the pilot, the technician should cut power to the unit and verify that the area is well ventilated to reduce the risk of ignition and gas buildup.
Next, confirm the gas supply is on at the main valve and that adjacent appliances operate.
Inspect the gas line and fittings for obvious leaks or damage; if detected, stop and contact a qualified professional.
Locate the pilot assembly and control knob
Locate the pilot assembly and control knob on the water heater’s access panel or lower front cover, where the burner, thermocouple, and gas control valve are grouped.
Inspect for labels: pilot, on, off, and pilot lighting positions.
Identify the small metal pilot tube, the igniter or pilot button, and the control knob.
Confirm clear access and adequate lighting before proceeding.
Step 1 Turn gas control to Off and wait
With the pilot assembly and control knob identified, the first safety action is to turn the gas control to the Off position and wait. This shuts the gas supply, reducing ignition risk.
After switching off, allow at least five minutes for any accumulated gas to dissipate and for the area to ventilate.
Monitor for gas odor; if detected, do not proceed and seek professional help.
Step 2 Set control to Pilot and press/hold
Set the gas control knob to the “Pilot” position and press it firmly to allow gas flow to the pilot assembly.
While holding the knob, observe the pilot opening and confirm gas aroma is faint or absent.
Maintain pressure for the manufacturer-specified duration (often 10–30 seconds) so the thermocouple warms.
Release slowly; if the pilot remains lit, return the control to “On”.
Step 3 Ignite pilot using built-in igniter or long lighter
Ignite the pilot by activating the water heater’s built-in igniter or by carefully inserting a long-reach lighter at the pilot opening, keeping the control knob depressed throughout.
Observe for a steady blue flame at the pilot assembly; if sparks or a clicking igniter fail, retry briefly.
If the pilot will not light after several attempts, stop and consult the manual or a qualified technician for diagnosis.
Step 4 Hold button to confirm pilot stays lit, then set to On’
Hold the control knob or pilot button for the full recommended time (usually 20–60 seconds) after the pilot flame appears to guarantee the thermocouple heats and registers the flame;
release the button slowly to confirm the pilot remains lit rather than extinguishing.
If the pilot stays steady, rotate the control from “Pilot” to “On” per the manufacturer’s label.
If it goes out, repeat ignition steps or consult a technician.
Step 5 Restore power and check for normal operation
With the pilot confirmed steady and the control on “On,” power to the heater can be restored so the main burner and thermostat resume normal function.
Reconnect electrical supply or open gas valve per manufacturer instructions.
Observe ignition of the main burner, listen for steady operation, and check hot water production.
Monitor for unusual odors, noises, or leaks. If abnormalities appear, shut down and call a professional.
Troubleshooting common pilot light problems
Common pilot light problems include a pilot that will not stay lit, a weak or yellow flame, the smell of gas after relighting, and frequent outages.
Technicians typically check the thermocouple and replace it if faulty, clean or adjust the pilot assembly to correct flame issues, and instruct occupants to shut off the gas and ventilate the area if a gas odor appears.
Identifying recurring causes—such as draft, dirt, or failing components—guides targeted fixes and when to call a professional.
Pilot won’t stay lit thermocouple checks and replacement
If the pilot light repeatedly goes out shortly after being lit, a failing thermocouple is a frequent cause and should be inspected first.
Visually inspect for corrosion, loose connections, or misalignment with the pilot flame.
Test continuity with a multimeter or replace the thermocouple if readings are out of spec.
After replacement, verify secure fittings and proper flame contact before restoring normal operation.
Weak or yellow pilot flame cleaning or adjustment
A weak or yellow pilot flame indicates incomplete combustion or insufficient gas flow and warrants prompt inspection.
The technician should first shut off gas and power, then clean the pilot assembly with compressed air or a soft brush to remove soot and debris.
Check the pilot orifice for blockage and adjust the gas valve’s pilot screw per manufacturer specs; test flame color and stability after.
Gas smell after relighting shutoff and emergency actions
When a distinct gas odor is detected after relighting the pilot and the gas supply has been shut off, it signals a potentially dangerous leak that requires immediate action.
Evacuate occupants, avoid sparks or flames, and shut off the main gas valve if reachable without reentering.
Call emergency services or the gas utility from a safe location.
Do not relight appliances until inspected and cleared.
Frequent pilot outages possible causes and fixes
Investigate pilot outages by methodically checking common causes—drafts, a dirty or misaligned thermocouple, worn pilot orifice, improper gas pressure, or failing control valves—and address each with the appropriate fix.
Seal drafts, clean or replace the thermocouple, clear or replace the orifice, test and adjust gas pressure with a manometer, and replace faulty control valves.
If uncertainty persists, consult a licensed technician.
When components need repair or replacement
If repeated pilot problems persist, the likely need for component repair or replacement should be assessed.
Common tasks include replacing a failed thermocouple (noting basic steps and typical parts/labor costs), cleaning or replacing the pilot tube and burner, and evaluating whether the gas control valve—or the entire water heater—must be replaced.
Each option carries safety and cost implications that determine whether a homeowner can proceed or should call a qualified technician.
Thermocouple replacement steps and cost considerations
Begin by confirming that the pilot assembly is the source of the malfunction: a faulty thermocouple commonly causes a pilot that lights but will not stay lit.
Turn off gas and power, remove the access panel, disconnect the thermocouple at the gas valve, unscrew and replace with a matching length and thread type, reconnect and test.
Parts typically cost $10–40; professional service adds labor.
Pilot tube and burner cleaning or replacement
After replacing a faulty thermocouple and confirming the valve functions, attention should shift to the pilot tube and burner when the pilot still sputters, burns weakly, or produces an uneven flame.
Debris or corrosion can obstruct flow; cleaning with compressed air and a soft brush often restores performance.
Severely corroded or damaged tubes or burner assemblies require replacement, matching OEM specifications and proper sealing.
When to replace the gas control valve or entire unit
Consider replacement when persistent issues persist despite cleaning and parts-level repairs: a gas control valve or the entire water heater should be replaced if recurring pilot failure, gas leaks, erratic thermocouple readings, or inability to maintain stable pilot or burner operation remain after verifying and replacing accessible components.
Replacement is also advised for extensive corrosion, repeated component failures, outdated safety features, or when repair cost approaches replacement value.
Preventive maintenance to avoid pilot light issues
A concise preventive maintenance routine can reduce pilot light problems before they arise.
The routine should include a regular inspection checklist, a recommended cleaning schedule with basic procedures, and checks of fuel supply and ventilation.
Following these steps helps guarantee reliable ignition and safer operation.
Regular inspection checklist
Regular inspections help prevent common pilot light problems by catching wear, blockages, and component drift before they cause outages.
A concise checklist should include checks of the pilot flame color and stability, thermocouple condition and mounting, gas line connections for leaks, burner orifice cleanliness, venting and flue integrity, and proper clearance and airflow around the unit.
- Confirm steady blue pilot flame without soot
- Inspect thermocouple for corrosion and secure fit
- Check gas fittings with a leak detector or soap solution
- Verify vent pipe is clear, intact, and unobstructed
Recommended cleaning schedule and procedures
Following the inspection checklist, establish a simple cleaning schedule to keep pilot assemblies and surrounding components functioning reliably.
Monthly visual checks, quarterly gentle dusting of the area, and annual detailed service are recommended.
Use a soft brush, compressed air at low pressure, and a lint-free cloth.
Replace corroded fittings promptly.
Document each cleaning and note any irregularities for technician review.
Fuel supply and ventilation maintenance tips
Inspect fuel supply lines and ventilation paths routinely to confirm consistent combustion and prevent pilot outages.
Check connections for leaks, corrosion, or damage and tighten or replace fittings as needed.
Keep vents, flues, and intake openings clear of debris and obstructions.
Guarantee adequate airflow around the heater and schedule professional inspections for gas pressure testing and vent integrity at least annually.
Comparison of relighting methods and tools
Different relighting methods—manual lighter, built-in igniter, and electronic ignition—offer distinct trade-offs in reliability, safety, and cost. The following table summarizes the pros, cons, safety considerations, and typical expense for each option to guide method selection. A brief discussion follows to compare practical implications for homeowners and technicians.
| Method | Pros / Cons | Safety & Cost |
|---|---|---|
| Manual lighter | Pros: low upfront cost, simple; Cons: requires skill, less reliable | Safety: higher burn/explosion risk if used improperly; Cost: minimal tool cost |
| Built-in igniter | Pros: convenient, integrated; Cons: possible mechanical failure | Safety: moderate (safer than manual); Cost: moderate repair/replacement |
| Electronic ignition | Pros: most reliable, automated; Cons: higher initial cost | Safety: lowest risk with proper installation; Cost: highest initial investment |
Manual lighter vs. built-in igniter vs. electronic ignition
How does one choose between a handheld lighter, a built-in piezo igniter, and an electronic ignition when relighting a water heater pilot?
The handheld lighter offers portability and simple sparks.
A built-in piezo produces mechanical sparks without batteries.
Electronic ignitions use batteries or mains for reliable, repeated ignition.
Selection depends on accessibility, compatibility with the unit, and preferred ignition reliability.
Pros, cons, safety and cost for each method
Choosing between a handheld lighter, a built-in piezo igniter, and an electronic ignition hinges on trade-offs in convenience, reliability, safety, and cost. Each method suits different users: lighters are cheap but riskier, piezo offers simplicity with occasional failures, and electronic systems are safest and costliest. Summary table:
| Method | Pros | Cons |
|---|---|---|
| Handheld lighter | Low cost | Higher risk |
| Piezo igniter | Simple, reliable | Wear over time |
| Electronic ignition | Safe, automatic | Expensive |
Quick emergency steps if relighting fails or you detect gas
If relighting fails or a gas odor is present, occupants should evacuate the building immediately and avoid using electrical switches or open flames.
The gas company and a qualified plumber should be contacted promptly, and emergency services called if the smell is strong or anyone feels ill.
Notes about odors, sounds, timing, and any actions taken should be recorded to provide clear information for responding technicians.
Immediate actions to protect people and property
Shut off the gas supply immediately and evacuate everyone from the building if relighting fails or a gas smell is present; secure ignition sources, avoid switches or phones indoors, and open windows once outside.
Account for occupants and pets, keep clear of the structure, and prevent re-entry.
Postpone attempts to isolate appliances until professionals verify safety and the environment is declared safe.
Who to call: gas company, plumber, emergency services
When relighting fails or a gas odor is detected, contact the gas utility immediately and, if there is any sign of an active leak, call emergency services at once.
A licensed plumber should be engaged for non-urgent appliance repair or when the utility confirms no ongoing leak.
Provide location, describe smell and symptoms, follow operator instructions, evacuate if advised, and do not attempt further repairs.
How to document the issue for service technicians
Record clear, concise facts about the failed relight or suspected gas leak to help technicians respond effectively:
note the exact time the relight was attempted and any steps taken,
describe odors (sulfur or rotten-egg smell) and their intensity,
list visible signs such as hissing, soot, flame color, or pilot flicker,
and document symptoms experienced by occupants (headache, nausea, dizziness).
Include appliance model, serial, photos, and contact info.
Signs a professional inspection or replacement is overdue
When pilot-light problems persist, it may signal age-related wear, falling efficiency, or corrosion that warrant professional inspection.
Recurrent failures, unexplained temperature fluctuations, leaking, or loud noises often justify considering replacement rather than repeated repairs.
Homeowners should expect a service visit to include diagnostics, estimated repair or replacement costs, and a clear recommendation based on safety and long-term cost-effectiveness.
Age-related indicators and efficiency losses
Aging water heaters often reveal their decline through measurable signs: rising energy bills, slower recovery times after heavy use, visible corrosion or leaks around fittings, and recurring pilot or ignition failures.
Additional indicators include reduced hot water capacity, sediment buildup noises, and frequent thermostat cycling.
These efficiency losses justify scheduling a professional inspection to assess heat exchanger condition, insulation degradation, and overall cost-effectiveness versus replacement.
Recurrent problems that justify replacement
Several clear, recurring faults indicate a water heater needs professional evaluation or replacement: persistent pilot or ignition failures, frequent leaks or rust around the tank and fittings, steadily declining hot water capacity despite proper settings, and repeated trips of safety devices or the circuit breaker.
Additional signs include foul odors, noisy operation (popcorning or rumbling), visible corrosion, and repeated repair failures signaling systemic component or tank failure.
Typical costs and what to expect from a service visit
If persistent faults or the warning signs described earlier appear, homeowners should expect a professional service visit to include an inspection fee plus charges for labor and any replacement parts.
Typical diagnostic fees range from $75–$150. Service calls with minor repairs often run $150–$400, and full system replacements commonly cost $800–$3,000 or more depending on tank size, fuel type, and local labor rates.
Technicians assess safety, combustion, thermostats, valves, and venting, provide estimates, and recommend repair versus replacement based on age, efficiency, and recurring failures.
Helpful resources and tools for DIYers
A concise list of recommended replacement parts and reputable retailers helps DIYers source the correct components quickly.
Instructional videos and manufacturer manuals are noted as primary references for step‑by‑step procedures and model‑specific guidance.
Local codes and safety regulations are cited so readers can confirm legal and safe practices before attempting work.
Recommended replacement parts and where to buy
For most water heater pilot repairs, essential replacement parts include thermocouples, pilot assemblies, gas control valves, and replacement burner orifices—each chosen to match the heater’s model and fuel type.
Parts can be sourced from appliance parts stores, HVAC suppliers, big-box retailers, or online marketplaces; verify model numbers and compatible specs before purchase.
- Thermocouple
- Pilot assembly
- Gas control valve
- Burner orifice
Instructional videos and manufacturer manuals
After gathering the correct replacement parts and confirming compatibility, consult instructional videos and the water heater’s manufacturer manual to guide safe, accurate repairs.
Clear visuals, step timestamps, and model-specific notes reduce errors. Use official manuals for torque, parts lists, and safety warnings.
Cross-check video techniques with written steps before attempting work.
- Manufacturer troubleshooting section
- OEM parts diagrams
- Step-by-step tutorial videos
- Safety and maintenance tips
Local codes and safety regulations to check
While confirming parts and procedures, the DIYer should also verify local codes and safety regulations that govern water heater repairs and pilot relighting.
They must confirm permit requirements, allowed DIY work, ventilation and combustion air standards, and inspection obligations.
Consult municipal building department, utility provider, manufacturer guidance, and licensed plumber resources.
- Permit and inspection rules
- DIY vs. licensed work limits
- Ventilation and clearance standards
- Gas utility safety requirements
Conclusion
To summarize, the guide reminds readers that a pilot light is a small but essential component; following safety steps and using the right tools usually restores function without drama. If problems persist, repair or replacement by a qualified technician is prudent. In the spirit of practical preparedness — imagine a Victorian tinkerer consulting a smartphone — homeowners gain confidence from clear steps, know when to stop, and appreciate the value of timely professional inspection to avoid larger hazards.