How to Remove a Blanco Sink Strainer Quickly: Step-by-Step Guide
To quickly remove a Blanco sink strainer, start by clearing the area, shutting off the water, and draining any residual liquid. Next, take out the stopper or lift out the basket. Access the retaining clip or threaded locknut beneath the sink, then score and pry away any old putty or silicone. If the fittings are stuck, use a strap wrench or pliers for leverage, and lift the strainer body straight up. Finally, inspect the seals and clean the opening. For tips on tackling stubborn or corroded units, refer to the complete guide.
Quick overview: removing a Blanco sink strainer in minutes
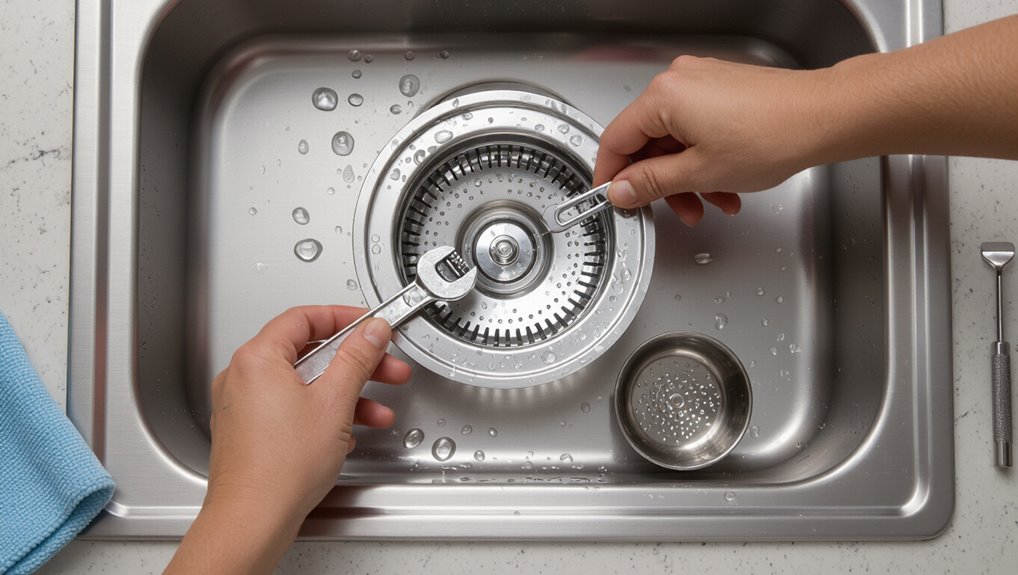
A Blanco sink strainer is the perforated basket and flange assembly that keeps debris out of the drain and may need removal for cleaning, replacement, or plumbing access.
The task typically takes 10–30 minutes depending on corrosion and access. It is of low to moderate difficulty and usually requires basic tools such as a screwdriver, pliers, a wrench, and plumber’s putty or sealant.
What a Blanco sink strainer is and why removal may be needed
Silicone-and-stainless drain assemblies, Blanco sink strainers sit at the mouth of kitchen sinks to catch debris while allowing water to pass through.
They prevent clogs, protect drain fittings, and provide a finished look. Removal is sometimes necessary for cleaning, replacement, or accessing trapped items.
Readers seeking how to remove Blanco sink strainer will follow steps to clear blockages or service the drain assembly.
Estimated time, difficulty, and tools required
Removing a Blanco sink strainer is typically quick and straightforward for those with basic hand tools.
Expect 10–30 minutes for most removals; complex corrosion or access constraints can extend time. Difficulty rates as easy to moderate.
Recommended tools: adjustable wrench, pliers, screwdriver, bucket, rag, penetrating oil, and plumber’s putty or replacement gasket as needed.
Safety gloves advised.
Tools and materials checklist
The article lists what to have on hand before starting the removal.
- Essential tools (wrench, screwdriver, plumber’s putty or sealant)
- Optional tools that speed the job (strap wrench, basin wrench, lubricant)
- Safety gear and workspace preparation (gloves, eye protection, towels to catch water).
Essential tools
A compact set of hand tools and a few consumables will streamline removal of a Blanco sink strainer.
Essential items include an adjustable wrench, channel-lock pliers, a screwdriver (flat or Phillips as needed), plumber’s putty or silicone, a utility knife, a bucket, and work gloves.
These basic tools cover disassembly, seal removal, catching debris, and protecting hands.
Optional tools that speed the job
Building on the basic toolset, several optional items can shorten the task and reduce frustration.
A strap wrench prevents scratches while gripping the strainer basket.
A basin wrench reaches tight tailpiece nuts beneath deep sinks.
A small cordless impact driver speeds stubborn screws.
Silicone lubricant or penetrating oil eases seized threads.
Magnetic pickup retrieves dropped fasteners quickly and efficiently.
Safety gear and workspace preparation
Several essential safety items and a clear, organized workspace are required before attempting sink strainer removal.
The technician should wear gloves, eye protection, and kneepads; use a mask if chemicals or mold are present.
Lay down towels and a waterproof tray to catch parts and water.
Guarantee adequate lighting, a stable stool, and easy access to tools, replacement parts, and a bucket.
Identify your Blanco sink strainer type
The guide outlines common Blanco strainer designs and labels their main parts to aid identification.
It explains simple checks to see whether a strainer unscrews (threaded), lifts out with a clip (snap-in), or is bonded with sealant (sealed).
Clear photos or a brief inspection under the sink help confirm the type before removal.
Common Blanco strainer designs and parts
Identifying a Blanco sink strainer begins with noting its visible features and mounting style: common types include the traditional mesh or perforated basket, the pop-up push-button strainer, and the modern integrated drain system with a twist-and-lock collar.
Components may include the strainer basket, flange, rubber gasket, locking nut, linkage or push mechanism, and decorative cap; materials are stainless steel, chrome, or plastic.
How to determine if your strainer is threaded, snap-in, or sealed
How can one tell whether a Blanco sink strainer is threaded, snap-in, or sealed?
Inspect underside access: a threaded strainer shows a visible locknut and coarse threads when viewed from below.
A snap-in unit lacks a nut and often has spring clips or a bayonet ring.
A sealed (glued or molded) strainer has no removable hardware and resists rotation or upward movement.
Step-by-step removal guide
The following concise sequence outlines the key actions for removing a Blanco sink strainer.
- Prepare the area, shut off water and disconnect plumbing as needed.
- Remove the stopper or basket, release the clip or unscrew the flange.
- Safely break the sealant or remove plumber’s putty and lift out the strainer.
Step 1 Prepare the sink and clear the area
Clear and accessible workspace makes removing a Blanco sink strainer safer and faster.
The area should be emptied of dishes, towels, and clutter. Remove loose items from under the sink and place a bucket or tray for small parts.
Lay down a protective mat to catch debris and protect cabinetry.
Gather basic tools and good lighting before beginning.
Step 2 Turn off water and disconnect plumbing if needed
With the workspace prepared and tools at hand, attention moves to shutting off the water and isolating the drain assembly. The main or under-sink valves are closed to prevent flow.
Residual water is drained by running the faucet briefly. If necessary, the P-trap and tailpiece are loosened and removed with a wrench, catching water in a bucket and noting orientation for reassembly.
Step 3 Remove stopper or basket insert
Next, remove the stopper or basket insert to expose the strainer body. The person lifts out the pop-up stopper or unscrews the basket insert, clearing debris and checking for retained clips or springs.
Gloves protect hands; a cloth prevents scratches. If stuck, gentle twisting and upward pressure loosen parts.
Set removed components aside in proper order for reassembly.
Step 4 Release retaining clip or unscrew threaded flange
After the stopper or basket insert is removed and set aside, access the strainer body beneath the sink to locate the retaining clip or the threaded flange that secures it.
If a C-shaped clip is present, pry it free with needle-nose pliers.
If a threaded flange holds the strainer, use an adjustable wrench or strap wrench to turn the nut counterclockwise until loosened.
Step 5 Break sealant or remove plumber’s putty safely
Begin by protecting surrounding surfaces and wearing gloves and eye protection; breaking the seal between the sink and strainer requires controlled force and a steady grip.
Use a putty knife or thin pry tool to score and lift old plumber’s putty or silicone.
Apply penetrating solvent for stubborn silicone, allow dwell time, then continue gentle prying until the sealant detaches without gouging the sink.
Step 6 Extract the strainer body and inspect mounting hardware
Loosen the mounting assembly and lift the strainer body straight out of the sink to prevent twisting or damaging the flange.
Place the removed strainer on a clean surface.
Inspect the rubber gasket, stainless basket, and mounting nut for cracks, corrosion, or deformation.
Note any missing or worn fasteners.
Photograph components if planning replacement.
Keep all hardware together for reassembly or replacement.
Step 7 Clean the drain opening and check for damage
With the strainer removed, the drain opening should be cleaned and inspected before reinstalling or replacing components.
Debris, old plumber’s putty and mineral buildup are wiped away with a soft brush and mild cleaner.
The sealing surface and flange are examined for corrosion, cracks or warping.
If damage is found, replacement or professional repair is recommended to guarantee a watertight seal and proper function.
Alternative removal methods for stuck or corroded strainers
When a Blanco sink strainer is seized from corrosion or age, several alternative removal methods are available.
Options include applying penetrating oil and gentle heat to break corrosion, using a strap wrench or rubber mallet for added grip and torque, or cutting out and replacing a seized flange when mechanical methods fail.
Each approach carries different risks and tool requirements that should be considered before proceeding.
Using penetrating oil and gentle heat
Apply penetrating oil and controlled heat to free a stuck or corroded Blanco sink strainer, taking care to protect surrounding finishes and plumbing.
Spray a penetrating lubricant around the flange, allow dwell time for penetration, then warm the area gently with a hair dryer or heat gun on low while avoiding seals and plastic.
Reapply as needed and test for movement before attempting removal.
Leveraging a strap wrench or rubber mallet
Use a strap wrench or a rubber mallet as alternative, low‑risk tools to loosen a stuck or corroded Blanco sink strainer.
A strap wrench provides broad, nonmarring grip for gradual turning; apply steady torque counterclockwise.
A rubber mallet delivers controlled taps around the flange to break corrosion seals—avoid metal hammers.
Inspect progress frequently and stop if plumbing or finish shows damage.
Cutting and replacing a seized flange
Cut through the flange carefully to free a seized Blanco strainer when conventional loosening methods fail.
Use a rotary cutter or hacksaw blade, protect the sink with tape, and cut just enough to release the flange.
Remove corroded remnants, clean the opening, and fit a replacement flange with silicone sealant.
- Safety gear first
- Controlled cutting
- Clean, seal, replace
How to handle common problems during removal
When removal proves difficult, the guide outlines steps for situations where the strainer won’t budge and where threads are damaged or stripped.
It also covers preventing and repairing a cracked sink surround or chipped finish.
Finally, it addresses persistent odors or clogs after the strainer is removed and when to call a professional.
Strainer won’t budge
If the Blanco sink strainer refuses to turn, the most likely causes are corrosion, hardened plumber’s putty, or an overlooked locking mechanism. Diagnosing which issue is present before applying force minimizes risk of damaging the sink or drain.
Inspect underside for retaining clips or locknuts. Apply penetrating oil to corroded threads, soften putty with heat or solvent, then use proper tools and steady torque to avoid slipping.
Damaged or stripped threads
Assess damaged or stripped threads carefully before applying force, because improper removal techniques can worsen the damage or crack the sink flange.
If threads are rounded, use a strap wrench or rubber sleeve for grip. Apply penetrating oil, wait, then try turning from beneath with locking pliers on the retaining nut.
If threads fail, consider cutting the strainer body and extracting remnants without stressing surrounding material.
Cracked sink surround or chipped finish
Handle cracked sink surrounds or chipped finishes with care to prevent further damage during strainer removal.
Inspect the area, document cracks, and protect edges with painter’s tape. Use soft tools and gentle leverage; avoid metal prying that widens chips.
If sealant is compromised, apply a compatible epoxy or silicone after removal.
Consider consulting a professional for structural or extensive cosmetic repairs.
Persistent odors or clogs after removal
Encountering persistent odors or recurring clogs after removing a Blanco sink strainer signals trapped debris, lingering biofilm, or a compromised trap seal that require targeted cleaning and inspection.
The procedure includes disassembling the P-trap, flushing with hot water and a mild enzymatic cleaner, scrubbing accessible pipe sections and the sink tailpiece, checking venting for blockage, and resealing connections.
If issues persist, consult a plumber.
When to call a professional
If stubborn corrosion, damaged components, persistent leaks, or multiple failed attempts occur, the homeowner should stop and contact a licensed plumber.
The professional can assess hidden damage, safely remove or replace the strainer, and prevent waste- or sink‑line problems from worsening.
Expect a service call fee plus parts and labor—typically a modest diagnostic charge followed by an estimate for repairs.
Signs you should stop and contact a plumber
Recognize when a DIY approach risks causing further damage or a safety hazard: persistent leaks despite tightening, cracked sink components, corroded or seized strainers that won’t budge, foul odors indicating trapped organic buildup beyond simple cleaning, or visible water damage under the cabinet.
Stop and contact a plumber if attempts to loosen fittings strip threads, tools slip damaging finishes, or sewage backup and mold are present.
Typical costs and what to expect from a service call
When a DIY attempt is abandoned, homeowners should understand the likely costs and scope of a professional service call for a Blanco sink strainer issue.
Typical rates vary: a diagnostic/trip fee $50–$100, labor $70–$120 per hour, parts $10–$60.
Total repairs commonly range $100–$300.
Expect inspection, removal or replacement, seal checks, and brief cleanup; request an upfront estimate.
Preparing for reinstallation or replacement
Next steps focus on selecting a replacement strainer that matches the Blanco sink’s dimensions and drain configuration.
The discussion will cover sealing options—plumber’s putty versus silicone—and when each is appropriate.
A clear reassembly checklist and a simple leak test procedure will conclude the guidance.
Choosing a compatible replacement strainer
Before reinstallation, verify the replacement strainer matches the Blanco sink’s drain opening, mounting style, and material compatibility to secure a proper seal and fit.
Measure drain diameter and flange thickness, check for top-mount or undermount compatibility, confirm thread pitch if applicable, and choose corrosion-resistant materials.
Match trim finish to existing hardware and verify included gaskets or adapters suit the sink’s configuration for straightforward installation.
Proper sealing methods: plumber’s putty vs. silicone
Choose the correct sealant carefully, as plumber’s putty and silicone offer different advantages depending on sink material and installation needs.
Plumber’s putty is pliable, easy to remove, and suits metal or composite sinks but can stain porous surfaces.
Silicone forms a durable, waterproof bond for ceramic, stone, or wet environments, resists mold, and requires cure time.
Match sealant to sink and future serviceability.
Reassembly checklist and leak test
A concise checklist guarantees the Blanco strainer is reinstalled correctly and will remain leak-free: verify gasket condition, clean mating surfaces, apply chosen sealant evenly, seat the strainer squarely, tighten lock nut to manufacturer torque, reconnect tailpiece and trap, and align drain fittings.
After assembly, run a water and dye test, inspect all joints for drips, and retighten as needed.
Preventive maintenance to avoid future difficult removals
Preventive maintenance helps keep a Blanco sink strainer accessible and extends its lifespan.
Recommended actions include:
- Regular cleaning tips
- Corrosion prevention and material choices
- Routinely checking seals and mounting hardware
Following these steps reduces the chance of stubborn buildup and seized fasteners.
Regular cleaning tips
Regular, gentle cleaning greatly reduces buildup around a Blanco sink strainer and eases future removals.
Weekly rinses with warm water and mild dish soap prevent grime. A soft brush removes trapped debris from crevices; avoid abrasive pads.
Periodic use of a baking soda paste lifts residue without harsh chemicals.
Drying the area after cleaning minimizes mineral deposits and odor.
Corrosion prevention and material choices
Keeping a Blanco sink strainer clean also reduces the risk of corrosion, but material choice and targeted protective steps further minimize deterioration that makes removal difficult later.
Opt for stainless steel or high-grade nickel-plated strainers, avoid dissimilar metals that promote galvanic corrosion, apply food-safe lubricant or silicone grease to threads, and rinse acidic residues promptly to prevent pitting and seize-up.
Routinely checking seals and mounting hardware
Inspect the sink’s seals and mounting hardware at set intervals to catch wear or loosening before they complicate future strainer removal.
Periodically tighten mounting nuts, verify gasket integrity, and replace cracked or flattened seals.
Clean threads and apply appropriate lubricant or anti-seize where recommended.
Document inspection dates and actions to track deterioration, enabling timely repairs and preventing stubborn, corroded connections during strainer removal.
Troubleshooting quick reference
A concise troubleshooting quick reference lists common issues encountered when removing a Blanco sink strainer, their likely causes, and immediate corrective steps; it should be organized for fast scanning so a user can identify a symptom and apply the appropriate fix without delay.
| Symptom | Likely Fix |
|---|---|
| Stuck strainer | Apply penetrating oil, tap gently, use strap wrench |
| Leaking after reinstallation | Replace gasket, tighten evenly |
| Corroded locking nut | Soak, use extractor or professional service |
Conclusion
Like a well-practiced sailmaker unpicks a stubborn seam, the guide closes by reminding readers that steady hands and the right tools tame most Blanco strainers. A calm, methodical approach—identify the type, follow clear steps, try gentle alternatives, and know when to call help—turns a frustrating chore into routine maintenance. With simple preventive care, future removals will come as easily as a familiar knot undone, ready for swift reinstallation.