
How to Build an Accessible Bathtub Access Panel: Step-By-Step Guide With Materials and Tips
To build an accessible bathtub access panel, start by selecting a style—removable, hinged, or sliding—and choose moisture-resistant materials like PVC, marine plywood, or metal. This panel will enhance safety and allow for easy maintenance by providing quick access to plumbing shutoffs. Follow these key steps: measure accurately, locate studs and pipes, frame the opening, create a sealed panel with waterproof edges, and use tool-free fasteners. Ensure proper sealing and conduct routine inspections while adhering to local codes. For detailed techniques and tips, refer to the step-by-step instructions provided.
Why an Accessible Bathtub Access Panel Matters
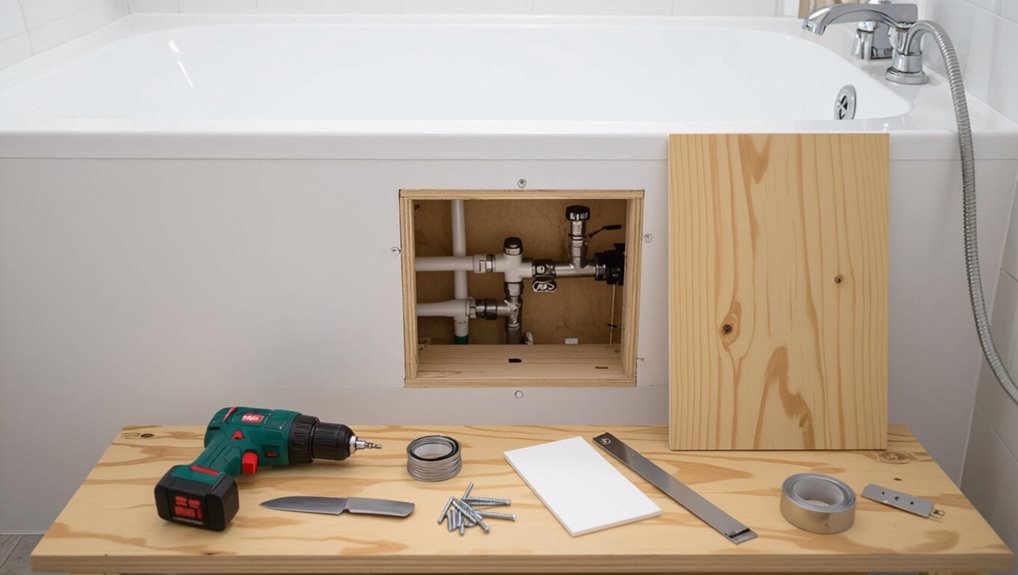
An accessible bathtub access panel reduces safety risks by enabling quick shutoffs and easier emergency repairs while simplifying routine maintenance and compliance with building codes.
It supports aging-in-place and users with mobility limitations by providing reachable service points and accommodating assistive devices.
Typical requirements—clearances, removable panels, and secure mounting—are often missed, so attention to common mistakes like obstructed access or nonstandard dimensions is essential.
Safety, maintenance, and legal considerations
Many homeowners underestimate how quickly a blocked or inaccessible tub access can escalate into costly damage or a safety hazard.
Guidance on how to make an access panel for bathtub should stress proper sealing, fireproof materials, and nonsharp edges.
Routine inspections, prompt leak repairs, and adherence to local building codes reduce liability.
Professional installation and documented maintenance guarantee compliance and homeowner safety.
Accessibility benefits for aging-in-place and mobility limitations
Accessible design directly affects daily independence for older adults and people with mobility limitations; a well-placed bathtub access panel reduces the need for risky contortions, eases installation of grab bars or transfer benches, and shortens repair times that might otherwise require temporary loss of bathing access.
Such panels support safer routine maintenance, enable quicker professional interventions, and preserve dignity by minimizing dependence on caregivers for basic bathing needs.
Typical access requirements and common mistakes to avoid
Ensuring proper dimensions, clearances, and durable fastening is essential for a bathtub access panel to serve its designed users safely and effectively.
Typical requirements include minimum opening size for reach, unobstructed swing or removable panels, non-slip thresholds, and secure yet operable fasteners.
Common mistakes: undersized openings, flimsy closures, inaccessible latch locations, poor sealing causing moisture damage, and ignoring service access needs.
Overview of Access Panel Types and Materials
The section compares removable, hinged, and sliding access panels and how each format affects accessibility and maintenance.
It then reviews common materials—drywall, plywood, PVC, metal, and composite—and their suitability for bathtub surrounds.
Pros and cons for wet environments are summarized, noting durability, moisture resistance, and ease of repair.
Removable vs. hinged vs. sliding panels
Choice of access-panel style affects maintenance ease, space use, and durability.
Removable panels offer full access and simplicity but require storage space when detached.
Hinged panels provide quick, hands-free access and secure closure, though swing clearance matters.
Sliding panels save frontal space and suit tight areas but can limit opening size and need smooth tracks.
Selection balances access frequency, clearance, and security.
Common materials: drywall, plywood, PVC, metal, composite
Materials for bathtub access panels range from lightweight drywall and plywood to durable PVC, metal, and engineered composites, each bringing distinct trade-offs in strength, moisture resistance, finishability, and cost.
Selection depends on installation method, expected access frequency, and desired appearance. Consider weight, fastening, and paintability when planning.
- Durability and weight
- Moisture handling
- Finish and maintenance
Pros and cons of each material for wet environments
Several common panel materials—drywall, plywood, PVC, metal, and engineered composites—offer distinct advantages and drawbacks in wet environments.
Drywall is inexpensive but vulnerable to moisture and mold.
Plywood resists impact but can delaminate unless marine-grade.
PVC is waterproof and lightweight yet less rigid.
Metal is durable and rust-resistant if stainless or coated.
Engineered composites balance strength and water resistance, usually pricier.
Tools and Materials Checklist
The following checklist outlines the basic tools and supplies needed to build an accessible bathtub access panel, including cutters, a drill, a level, and a stud finder.
It also lists recommended materials and hardware such as framing, fasteners, hinges, and sealant.
Optional accessibility add-ons—grab-bar cutouts, tool-free latches, and insulated panels—are noted for projects with enhanced usability requirements.
Required tools (cutters, drill, level, stud finder, etc.)
Before cutting or fastening begins, assemble a concise set of reliable tools and safety gear: a drywall or jigsaw cutter, drill with assorted bits, carpenter’s level, stud finder, tape measure, utility knife, screwdrivers, and protective eyewear and gloves.
Essential ancillary items improve accuracy and safety.
- Marking and measuring: pencil, square, masking tape.
- Cutting and fastening: saw blades, drill bits, screws.
- Safety: dust mask, gloves, eye protection.
Recommended materials and hardware (frame, fasteners, hinges, sealant)
Choose durable, water-resistant materials and hardware sized to the opening and expected use: a rot-resistant wood or PVC jamb for the frame, corrosion-resistant screws and anchors, concealed or magnetic hinges rated for frequent access, and a silicone or marine-grade sealant to prevent moisture intrusion.
Recommended components focus on longevity, corrosion resistance, and secure mounting.
- Frame: PVC or treated hardwood.
- Fasteners: Stainless screws + anchors.
- Hinges/sealant: Concealed hinges; marine silicone.
Optional accessibility add-ons (grab-bar cutouts, tool-free latches, insulated panels)
Consider adding modular accessibility features—grab-bar cutouts, tool-free latches, and insulated panels—to enhance safety, ease of use, and comfort without altering the tub structure.
- Cutouts: Pre-cut or template-marked panels allow secure grab-bar installation and drywall finish continuity.
- Tool-free latches: Push-release or quarter-turn mechanisms permit quick access for maintenance and caregivers.
- Insulated panels: Foam-backed inserts reduce heat loss and dampen noise while remaining removable.
Measuring and Planning Your Access Panel
Before cutting, the installer locates plumbing runs and wall framing behind the tub using probes, inspection cameras, or removing a small study hole.
They then determine an access panel size and placement that provides clear working space for valves and fittings while minimizing visible wall disruption.
Finally, measurements are checked against building codes and the bathtub or fixture manufacturer’s required clearances to guarantee compliant service access.
How to locate plumbing and framing behind the tub
Locating the plumbing and framing behind a bathtub requires precise measurement and careful inspection to guarantee the access panel aligns with pipes, valves, and structural members.
Inspect the adjacent wall cavity, remove trim as needed, and use a stud finder and noninvasive pipe scanner.
Mark visible pipe runs, valve centers, and stud locations. Record clear measurements from fixed reference points for accurate layout and cutting.
Determining optimal panel size and placement for service access
With pipe runs, valve centers, and stud locations marked, the next step is to determine a panel size and placement that provides unobstructed access for maintenance and future repairs.
Measure the largest fixture or valve clearances, allow working space for tools and hands, and align the panel with framing cavities.
Mark centerlines, confirm hinge or removable access, and finalize dimensions before cutting.
Building code and manufacturer clearance considerations
Although accessibility needs are driven by serviceability, compliance with local building codes and manufacturer clearance requirements dictates many sizing and placement decisions for an access panel.
Inspect local codes for egress, fireblocking, and moisture barriers. Consult the tub and plumbing manufacturers for minimum clearance, service space, and warranty conditions.
Document measurements and obtain permits when required to guarantee safe, code-compliant installation.
Preparing the Wall and Work Area
Before any cutting begins, the water supply should be shut off and nearby fixtures and finishes protected with drop cloths or tape to prevent damage.
Cut lines are then marked and stud and plumbing locations verified so the opening avoids structural members and pipes.
Temporary supports for adjacent drywall and a dust containment plan, such as plastic sheeting and a vacuum, should be put in place to keep the work area safe and clean.
Turning off water and protecting surrounding finishes
Shut off the home’s main water supply and then drain the bathtub faucet to eliminate residual pressure and prevent accidental leaks during cutting and framing.
Cover nearby finishes with drop cloths and painter’s tape; use cardboard or rigid panels to protect tiles, fixtures, and flooring.
Place a basin under exposed fittings and keep towels and a shutoff wrench nearby for quick response.
Marking cut lines and checking studs and plumbing locations
Measure and mark the panel location clearly, then verify stud positions and plumbing routes to avoid cutting into structural members or pipes.
Use a stud finder and probe at multiple points, tracing pipes with a small inspection camera or tapping for hollows.
Transfer straight, square cut lines to drywall, double-check clearances for valves and fittings, and plan fastener positions away from utilities.
Temporary support and dust containment strategies
With cut lines confirmed and stud and plumbing locations mapped, temporary supports and dust containment should be established to protect the tub, fixtures, and surrounding finishes.
Install adjustable braces beneath the tub rim or attach a plywood brace to studs to prevent movement.
Seal the work area with plastic sheeting, use zipper doors for access, and deploy a HEPA vacuum or negative-air fan to control debris and dust.
Step-by-Step: Building a Simple Removable Access Panel
The section outlines the practical sequence for creating a removable bathtub access panel, beginning with cutting a safe, clean opening and framing it with moisture‑resistant header and jambs.
It then covers installing a square, secure removable frame and fabricating a reinforced panel door with edge trim and a finished surface.
Finally, it explains fitting tool‑free fasteners or flush latches to guarantee easy, accessible removal.
Cutting the opening safely and cleanly
Start by marking the panel outline on the wall or tub surround, using a straightedge and a level to guarantee square, plumb lines. These guide cuts must be accurate to prevent gaps or damage.
Protect adjacent surfaces with tape, score lines before cutting, and use a fine-tooth drywall or multi-material saw. Cut slowly, remove debris, and check fit frequently to avoid overcutting.
Framing the rough opening with a moisture-resistant header and jambs
Measure the cut opening and prepare moisture-resistant lumber sized to fit snugly as a header and jambs, guaranteeing the frame will support the removable panel and resist humid bathroom conditions.
Install treated or composite pieces cut square to length, dry-fit to confirm alignment, and mark fastener locations.
Seal cut ends with waterproofing primer.
Ascertain the framed opening is plumb and level before proceeding.
Installing the removable panel frame (materials, squaring, fastening)
Install a sturdy removable panel frame using moisture-resistant lumber, corrosion-resistant fasteners, and exterior-grade glue to guarantee longevity in humid bathroom conditions.
Cut jambs and header to fit the rough opening, dry-fit and shim until square, then mark alignment.
Fasten with screws into studs through pilot holes, apply sealant at seams, and verify a flush, even reveal for the future removable door.
Creating the panel door (reinforcement, edge trim, finish)
Constructing the panel door requires a balance of rigidity, a clean edge detail, and a moisture-resistant finish so it sits flush in the frame and endures bathroom conditions.
Use a plywood core with internal battens for stiffness, reinforce corners and cutout areas, apply waterproof edge trim or PVC L‑profile, sand and seal with marine-grade primer and paint or clear waterproof varnish for durable, neat appearance.
Installing tool-free fasteners or flush latches for accessibility
With the finished door trimmed and sealed, attention shifts to selecting and fitting fasteners that allow removal without tools.
Choose recessed flush latches, magnetic catches, or quarter-turn thumb latches rated for damp environments.
Position fasteners for secure hold yet easy grip, mark pilot holes, and mount per manufacturer instructions.
Test repeat removal and reattachment for smooth operation and durable alignment.
Sealing edges and finishing to match bathroom surfaces
Seal the panel edges and finish surfaces to blend with the bathroom and protect against moisture.
Apply waterproof sealant to all seams, wipe excess, and allow full cure.
Sand and prime panel faces, then paint or tile to match surrounding surfaces.
Use mildew-resistant caulk around the opening and a thin rubber gasket for a tight, damp-proof fit that remains removable for access.
Step-by-Step: Building a Hinged or Door-Style Access Panel
The section outlines selecting hinge types and ideal placement to achieve a flush, unobtrusive look.
It then covers proper hinge installation, clearance checks for smooth operation, and the addition of magnetic catches or keyed locks to prevent child access.
Finally, it addresses waterproofing and finishing details specific to hinge-mounted panels to guarantee durability and a clean appearance.
Choosing hinge type and placement for seamless appearance
Because hinges determine both function and finish, selecting type and placement is a critical early decision when building a hinged bathtub access panel.
Choose low-profile concealed hinges for a clean look or decorative exposed hinges for character.
Position hinges to balance weight and access—typically vertically along one side, near jambs, and inset to align flush with surrounding trim for a seamless appearance.
Installing hinges and ensuring smooth operation and clearance
Begin by dry-fitting the panel and hinges to confirm alignment and clearance before committing fasteners.
Mark hinge locations, pre-drill pilot holes, and attach hinges with corrosion-resistant screws.
Verify even gaps around the panel and adjust hinge leaf positioning or use shims if binding occurs.
Operate the door repeatedly, checking for smooth motion and unobstructed swing; tighten fasteners and trim edges as needed.
Adding magnetic catches or keyed locks for child safety
After confirming hinge alignment and smooth swing, attention shifts to securing the panel against unintended opening by children.
Install low-profile magnetic catches or a keyed cam lock rated for moisture exposure. Position catches for firm engagement without misalignment; test operation repeatedly.
Prefer tamper-resistant hardware and stainless or coated finishes to resist corrosion.
Label key location and keep spare off-site for maintenance access.
Waterproofing and finishing hinge-mounted panels
Seal and protect the hinge-mounted panel to prevent moisture intrusion and extend hardware life.
Apply marine-grade silicone around seams, coat edges with waterproofing primer, and use gasket tape between frame and door.
Select stainless or brass hinges and fasteners, then finish surfaces with waterproof paint or epoxy.
Confirm drainage paths and test for leaks before reinstalling trim and hardware.
Alternative: Prefabricated Access Panels and Installation Tips
Prefabricated access panels offer a practical alternative when time, budget, or uniform finishes favor a factory-made solution over a custom-built unit.
Selection hinges on correct sizing and ordering to match the rough opening and surrounding finish, with installers following manufacturer instructions for secure mounting and waterproofing.
Attention to trim, tile-ready flanges, or acrylic-compatible edges guarantees a clean integration with tiled or acrylic tub surrounds.
When to choose a prefabricated unit vs. custom-built
When should one choose a factory-made access panel instead of a custom build?
Prefabricated units suit standard openings, faster installation, budget constraints, and warranty-backed finishes.
Custom builds fit irregular spaces, concealed plumbing, unique aesthetics, or specific materials.
Decision hinges on dimensions, accessibility needs, timeline, skill level, and cost.
Evaluate trade-offs: convenience and uniformity versus flexibility and tailored integration.
Sizing, ordering, and installing factory panels
Measure carefully: accurate dimensions and clearances determine which factory access panel will fit and function.
Inspect surrounding framing, service space, and swing or removeable face access.
Order panels matching finished opening size, wall thickness, and material (plastic, metal).
Verify hinge type, latch location, and fire or moisture ratings.
Install per manufacturer instructions: secure framing, level unit, seal edges, and test operation.
Integrating prefabricated panels with tile or acrylic surrounds
Following careful selection and fitting of a factory access panel, attention turns to integrating that unit with tile or acrylic surrounds so the finished opening is both watertight and visually seamless.
Seal edges with appropriate silicone or waterproof adhesive, set a thin backer or flange for tile, trim acrylic with solvent-safe sealant, and confirm flush alignment.
Test for leaks and adjust fasteners as needed.
Finishing Touches for Durability and Aesthetics
The section addresses final materials and treatments that extend the panel’s lifespan and integrate it visually with the bathroom.
Recommended options include moisture-resistant paints, tile finishes, and trim choices that withstand humidity while matching surrounding surfaces.
It also covers strategies for concealing the panel and adding acoustic or thermal insulation to improve comfort and reduce noise.
Moisture-resistant paints, tiles, and trim options
Select moisture-resistant finishes that balance durability with easy maintenance to protect the access panel area from steam, splashes, and occasional cleaning chemicals.
Recommend mildew-resistant semi-gloss or satin acrylic paint, cement backer board with porcelain or ceramic tile for high-moisture zones, and PVC or composite trim for resilient, rot-free edges.
Specify waterproof caulk and stainless fasteners to guarantee longevity.
Concealing the panel to match bathroom design
Blend functionality with décor by disguising the access panel so it reads as an intentional part of the bathroom’s design scheme rather than an afterthought.
Use matching tile layout, continuous grout lines, or painted panels in the same hue and sheen as surrounding surfaces.
Consider recessed frames, magnetic or flush hinges, and trim that aligns with baseboards or cabinetry for a seamless, refined appearance.
Acoustic and thermal insulation considerations
Consider insulating the access panel to reduce noise transmission and heat loss around the bathtub, focusing on materials and installation methods that preserve serviceability.
Use closed-cell foam board or mineral wool for thermal and acoustic performance, ensuring moisture resistance. Seal edges with silicone or foam tape to prevent drafts.
Avoid compressing insulation; allow removable access. Verify materials meet bathroom fire and vapor barrier requirements.
Accessibility Enhancements and Universal Design Features
The section outlines practical accessibility enhancements and universal design features for the access panel.
It covers tool-free and quick-release mechanisms, ergonomic handle placement with low-threshold operation, and clear labeling, lighting, and visual contrast to aid users with limited mobility or vision.
These elements prioritize safety, independence, and ease of maintenance.
Tool-free access mechanisms and quick-release systems
Incorporating tool-free access mechanisms and quick-release systems drastically shortens the time and effort required to reach plumbing and electrical components behind a bathtub panel.
Magnetic catches, spring-loaded latches, and push-to-release pins enable one-handed removal without tools. Removable panels with captive fasteners prevent loss, and keyed quick-release options provide security.
Durable materials and simple alignment features guarantee reliable, repeatable operation for maintenance and emergency access.
Ergonomic handle placement and low-threshold operation
Position handles within easy reach and at heights that accommodate seated and standing users to maximize independence and safety.
Mount lever-style handles 34–48 inches from the floor, offset for knee clearance, and guarantee one-handed operation.
Incorporate low-threshold sills or beveled edges to allow smooth rolling or stepping access.
Use durable, non-slip finishes and test clearances for mobility aids and caregiver assistance.
Labeling, lighting, and visual contrast for easier use
Clear, consistent labeling combined with focused lighting and high-contrast finishes makes an access panel safer and easier to use for people with low vision, cognitive differences, or in dim bathroom conditions.
Use tactile and large-print labels, directional arrows, and contrasting edging. Install adjustable task lighting or motion-activated LEDs.
Choose matte, high-contrast colors for frames and handles to improve legibility and reduce glare.
Common Problems and How to Fix Them
Common failures such as panel warping, sticking, or sagging are identified and corrected through simple diagnosis and targeted repairs.
Preventing water intrusion and mold requires proper sealing, drainage, and ventilation methods.
If access is too small, options for safe enlargement or modification are presented with structural and code-conscious guidance.
Panel warping, sticking, or sagging diagnosis and repair
Inspecting an access panel for signs of warping, sticking, or sagging begins with a systematic visual and tactile check: look for bowed edges, gaps around the frame, paint cracking, or uneven contact when opening and closing.
Then gently feel the panel for soft spots, hinges binding, or resistance that indicates moisture damage, loose fasteners, or misalignment.
Tighten or replace fasteners, shim or plane edges, realign hinges, and replace compromised panel stock promptly.
Water intrusion and mold prevention fixes
Prevent water intrusion and mold by identifying and sealing entry points, improving drainage, and using moisture-resistant materials; small leaks or poor ventilation left unchecked rapidly lead to mold growth and structural decay.
Inspect joints, caulking, and pipe penetrations; replace damaged sealant, add flashing or backer rod, and slope surfaces for runoff.
Install ventilation, use mold-resistant drywall and paints, and monitor humidity regularly.
Access too small’ options to enlarge or modify safely
After addressing leaks, ventilation, and moisture barriers, attention turns to access panels that are too small to service valves, trap assemblies, or piping.
Options include enlarging the opening by cutting drywall or backing, installing a larger trim-access frame, or creating a removable section with plywood or access door kits.
Guarantee studs, insulation, and waterproofing remain intact; label and fasten for secure, reversible service.
Maintenance Checklist and Inspection Schedule
A concise maintenance checklist should include periodic checks for leaks, verification of fastener integrity, and assessment of sealant condition to prevent water damage.
Seasonal tasks—such as re-sealing joints before winter and clearing debris in spring—help preserve access panel function.
A schedule for routine inspections and clear criteria for when to call a professional will guarantee timely repairs and safety.
Periodic checks for leaks, fastener integrity, and sealant condition
Establish a regular inspection routine that targets three critical areas: leaks, fastener integrity, and sealant condition.
Inspect joints and plumbing connections for moisture, staining, or drips.
Verify screws, hinges, and panel anchors remain tight and corrosion-free.
Assess caulk and gasket lines for cracks, gaps, or peeling; replace or reapply compatible sealant promptly.
Log findings and corrective actions.
Seasonal maintenance tasks and when to call a professional
Periodic checks for leaks, fastener integrity, and sealant condition set the foundation for a seasonal maintenance plan that keeps an access panel reliable throughout the year.
Quarterly cleaning, hinge lubrication, and re-sealing as temperatures change prevent deterioration.
Inspect insulation before winter.
Call a professional when persistent leaks, mold, structural damage, or inaccessible plumbing connections are discovered to guarantee safe, code-compliant repairs.
Cost Estimates and Timeframes
A concise cost breakdown compares DIY material expenses by panel type—removable, hinged, or magnetic—and highlights where premium finishes or hardware raise the total.
Typical project time estimates are given for each approach, from a single afternoon for a simple magnetic panel to a day or more for a framed hinged installation.
This section frames expected budgets and timelines to help readers choose the most suitable method.
DIY cost breakdown by material and panel type
Calculate expected expenses by breaking costs into materials, panel type, and labor-equivalent time. A simple MDF panel with hinge kit: low material cost, moderate finish cost. Acrylic or PVC: higher material cost, water-resistant. Removable framed door: mid-range framing plus hardware.
| Panel Type | Estimated Material Cost |
|---|---|
| MDF | $20–$60 |
| Acrylic/PVC | $50–$120 |
Typical project time estimates for each approach
Typical bathtub access panel projects range from quick one-hour fixes to multi-day installations depending on materials and complexity.
Simple removable panels using prefinished plastic or magnetic covers: 1–2 hours.
Framed drywall or tile-compatible panels with trim: half to full day.
Custom recessed or plaster repairs, waterproofing, and tiling: 1–3 days.
Allow extra time for drying, curing, and inspections.
Quick Comparison: DIY vs. Hiring a Professional
The choice between DIY and hiring a professional hinges on project scope and the risks involved: simple panel installs may suit a skilled homeowner, while complex framing, waterproofing, or access to plumbing call for a licensed contractor.
Professionals reduce liability and guarantee code compliance, so they are recommended when structural changes or concealed systems are affected.
When seeking a contractor, request proof of license and insurance, itemized quotes covering materials and labor, and references or recent project photos.
Scope, risks, and when professional help is recommended
When planning an accessible bathtub access panel, homeowners should weigh the project’s scope against the potential risks and their own skill level to decide between a DIY approach and hiring a professional.
Simple framing, cutting, and sealing suit confident DIYers.
Complex plumbing, load-bearing modifications, waterproofing failures, or code compliance issues warrant professional intervention to guarantee safety, durability, and liability protection.
How to vet contractors and what to ask for in a quote
How should a homeowner evaluate potential contractors and compare bids for an accessible bathtub access panel?
Homeowners should check licenses, insurance, references, and recent work photos.
Request itemized quotes listing materials, labor, timeline, permits, warranty, and change-order policy.
Compare total costs and scope, verify subcontractors, and confirm accessibility experience.
Prefer written contracts and clear communication before hiring.
Helpful Templates and Measurement Guides
The article provides standard panel dimension templates tailored to common bathtub configurations to streamline planning and cutting.
It also offers a concise, quick-reference installation checklist designed for on-site use to verify measurements, fastening points, and accessibility clearances.
Together these resources aim to reduce errors and save time during installation.
Standard panel dimension templates for common bathtub setups
Standard-sized templates streamline planning by providing clear starting dimensions for the most common bathtub access panels—alcove tubs, freestanding units, and whirlpool models.
Measurements focus on clearances, service access, and mounting flange placement. Use templates as a baseline and confirm on-site.
- Alcove: 18″ x 24″ typical
- Freestanding: 12″ x 18″ typical
- Whirlpool: 20″ x 30″ typical
Quick-reference installation checklist for on-site use
Following the template examples, a compact on-site checklist condenses measurements, clearance checks, and mounting steps into a single page for quick reference.
It lists verified dimensions, required tools, fasteners, and tolerance limits. It prompts safety and access verification before sealing and records final measurements and photos for client sign-off.
- Measure and mark
- Verify clearances and fixtures
- Mount, seal, document
Conclusion
An accessible bathtub access panel improves safety and maintenance ease, reducing injury risk. One interesting statistic: homes with readily accessible plumbing access can cut repair time by up to 40%, lowering labor costs and disruption. By selecting the right panel type, measuring accurately, and following a clear maintenance schedule, homeowners guarantee long-term functionality and cost savings. Whether DIY or professional, thoughtful planning yields a durable, accessible solution that supports safer bathroom use and quicker repairs.
