How to Bleed a Radiant Heat System: Step-by-Step Guide for Quiet, Efficient Heating
How to Bleed a Radiant Heat System: A Quick Guide
To effectively bleed a radiant heat system, which helps eliminate trapped air for optimal floor heating and quiet operation, follow these steps:
- Power Down: Turn off the circulators and let the system cool down.
- Check Boiler Pressure: Ensure the boiler pressure is at the recommended level.
- Start at the Manifold: Begin with the manifold farthest from the boiler.
- Bleed the System: Open the manual bleeders slowly. Allow water to flow steadily before closing.
- Move Toward the Boiler: Repeat the bleeding process loop by loop, working your way back to the boiler.
- Restart the Pump: Turn the pump back on and listen for any unusual noises.
- Use Automatic Vents: If needed, utilize automatic vents and purge any stubborn zones.
For additional steps, troubleshooting tips, and maintenance guidance, continue following the outlined procedures.
How to Bleed a Radiant Heat System for Quiet, Efficient Heating
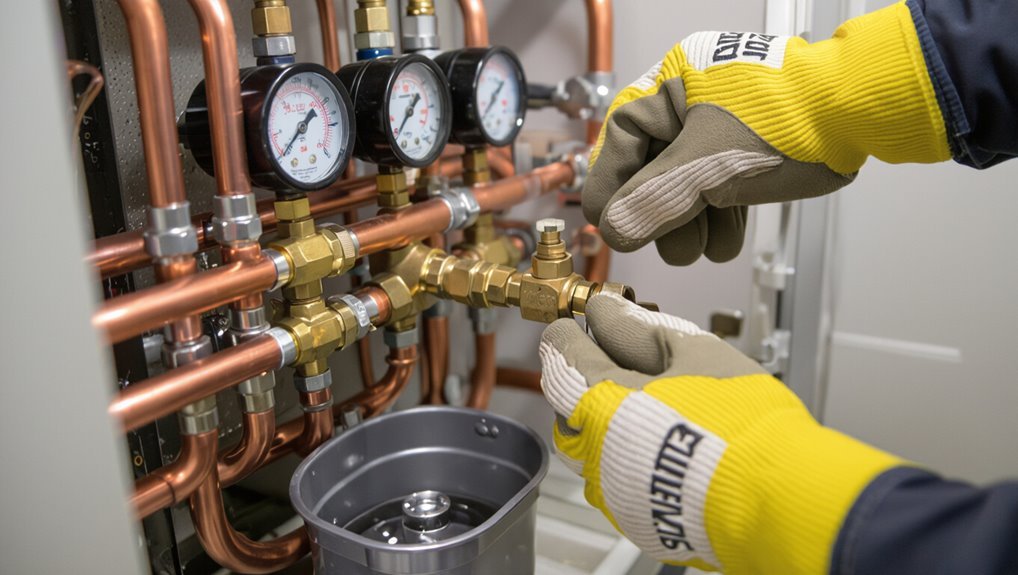
Bleeding is required when air collects in radiant heating circuits, causing uneven heat distribution and noise.
Common signs of trapped air include gurgling or banging sounds, cold spots on the floor, and reduced system responsiveness.
Regular bleeding reduces noise, restores efficiency and heat output, and helps extend the system’s service life.
When and why bleeding is necessary for radiant heating systems
When does trapped air become a problem in a radiant heating system, and why must it be removed?
Trapped air reduces flow, causes uneven warmth, and increases pump noise and wear.
Regular bleeding restores efficiency, prevents corrosion from oxygen pockets, and maintains system balance.
Learning how to bleed a radiant heat system guarantees ideal heat transfer, lower energy use, and longer equipment life through timely maintenance.
Signs your radiant system has trapped air
Listen for gurgling, knocking, or banging from pipes and manifolds—audible disturbances are often the first indicator of trapped air.
Other signs include uneven room temperatures, slow or cold zones near floor loops, fluctuating boiler pressure, and sputtering at manifolds or valves.
Visible air pockets or bubbling in sight glasses and increased pump noise also signal air entrapment requiring prompt bleeding to restore proper flow.
Benefits of regular bleeding (noise reduction, efficiency, longevity)
Regular maintenance of a radiant heat system yields clear benefits: reduced noise, improved efficiency, and extended equipment life.
Periodic bleeding removes trapped air, stopping gurgling and uneven heating.
System circulation improves, lowering fuel or electricity use and shortening warm-up times.
Reduced strain on pumps and boilers decreases repair frequency and prolongs component lifespan, delivering predictable performance and lower operating costs.
Safety Precautions and Tools Required
Before beginning any bleeding procedure, the operator should verify power is off, boiler pressure and temperature are within safe limits, and the system has cooled sufficiently.
A concise checklist of tools and materials—bleeder key, wrench, bucket, towels, and protective gloves—should be assembled and inspected.
If leaks, persistent air problems, or unfamiliar controls are encountered, a licensed HVAC or boiler professional should be contacted.
Safety steps before starting (power, boiler pressure, temperature)
A few essential safety checks must be completed before bleeding a radiant heat system.
First, isolate electrical power to circulating pumps and control circuits to prevent activation.
Verify boiler pressure sits within manufacturer-recommended range to avoid overpressure discharge.
Allow the system to cool to a safe temperature to prevent scalding.
Confirm visible valves and gauges are intact and readable before proceeding.
Tools and materials checklist
With safety checks complete, the next step is to gather the tools and materials required for bleeding the radiant heat system.
The technician collects items that guarantee control, cleanliness, and confidence during the procedure.
- Adjustable wrench and radiator key — steady, precise control.
- Bucket and rags — containment, calm.
- Hose for drain valve — orderly, mess-free.
- Pressure gauge and towel — verification, reassurance.
When to call a professional
When should a homeowner call a professional? A technician is recommended if bleeding yields no pressure recovery, leaks appear, valves are seized, multiple zones are affected, or air recurs quickly.
Also call a pro for unfamiliar manifolds, boiler adjustments, or when safety equipment is absent.
Professionals guarantee proper diagnostics, pressure testing, leak repair, and compliance with codes, minimizing risk and system damage.
Preparation Steps Before Bleeding
Before beginning, the technician identifies manifolds, zones, and the locations of air vents to establish which lines require attention.
They locate both automatic air vents and manual bleeder valves, verify boiler pressure and the expansion tank condition, and isolate the relevant zones.
A helper is gathered to operate controls and monitor changes while the bleeding procedure proceeds.
Identifying manifolds, zones, and air vents
A clear map of the system helps prevent errors: locate each manifold, trace its connected zone circuits, and identify the air vents serving those zones.
Document zone names, supply and return pipe runs, actuator locations, and any isolation valves.
Note vent positions relative to high points and accessible panels.
This inventory clarifies which circuits require attention and reduces trial-and-error during bleeding.
Locating automatic air vents and manual bleeder valves
Several key components must be located and inspected to guarantee efficient air removal: automatic air vents typically sit at high points on manifolds, near boiler tops, or on supply headers.
Manual bleeder valves are commonly found at individual radiators, at the end of each zone loop, or on riser/return connections.
Document locations, confirm valves operate freely, and note access constraints before starting bleeding.
Checking boiler pressure and expansion tank condition
With valve locations recorded and operation confirmed, attention turns to boiler pressure and the expansion tank to guarantee the system can accept released air without pressure faults.
The technician verifies the gauge reads within manufacturer range, inspects the tank for corrosion or leaks, checks diaphragm precharge (when applicable), and notes any pressure drift.
Correct pressure and a healthy expansion tank prevent overpressurization during bleeding.
Isolating system zones and gathering a helper
Before any valves are opened, the technician isolates individual zones to confine air and water movement. Then, he arranges for a helper to operate zone controls and monitor manifolds during bleeding.
The helper cycles thermostats, watches pressure and flow indicators, and signals when air clears.
Isolation limits system disturbance, simplifies venting, and prevents cross‑flow, ensuring efficient, controlled purging of trapped air.
Step-by-Step Bleeding Procedure
First, the system temperature is lowered and the circulation pump is turned off to prevent flow during initial work.
The technician then begins at the manifold farthest from the boiler and opens each manual bleeder valve slowly, purging until consistent water flow appears before closing the valve.
This process is repeated for each loop, moving progressively toward the boiler.
Step 1 Lower system temperature and turn off circulation pump
Reduce the boiler temperature to a safe, low setting and shut off the circulation pump to prevent hot-water flow during bleeding.
This isolates zones, minimizes scald risk, and stabilizes pressure. Allow the system to cool briefly.
Verify electrical isolation of the pump per manufacturer instructions. Confirm gauges read normal and note baseline pressure before opening any air vents or drain valves to begin bleeding safely.
Step 2 Start at the manifold furthest from the boiler
With the system cooled and the pump off, bleeding should begin at the manifold farthest from the boiler to push trapped air toward the return.
The technician inspects each circuit identifier, confirms valves are set for isolation, and prepares a container and cloth.
Work proceeds methodically from the most distant ports inward, noting any gurgling or irregular flow for later verification before restarting circulation.
Step 3 Open manual bleeder valves slowly to release air
Technicians should open each manual bleeder valve slowly, turning no more than a quarter to a half turn at a time to allow trapped air to escape without causing a sudden rush of water.
They should monitor for sputtering or hissing, catch discharged liquid with a rag or container, and proceed sequentially across each loop.
Close a valve once steady liquid, not air, emerges.
Step 4 Purge until consistent water flow appears, then close valve
After each bleeder valve has been opened slowly and the initial sputtering stops, the operator should continue to purge each loop until a steady, uninterrupted stream of water flows from the valve.
Once consistent flow appears, close the bleeder firmly to prevent air re-entry.
Confirm flow stability, wipe connections, and monitor pressure for any sudden drops before proceeding to the next procedural step.
Step 5 Repeat for each loop, moving toward the boiler
Proceed systematically along the manifold, repeating the purge on each loop and working toward the boiler so that trapped air is driven out in a controlled sequence.
The operator opens, purges, and closes each loop valve in turn, watching for steady water flow and absence of sputtering.
Prioritize longest or highest loops first, logging progress and ensuring valves fully reseat before advancing.
Step 6 Restart pump, run system, and recheck for noises
With the manifold loops bled toward the boiler and each valve confirmed closed, the pump is restarted to restore circulation and allow the system to reach normal operating conditions.
The installer listens for gurgles or hammering while flow resumes, noting any persistent noise.
If sounds persist, brief purging cycles at individual loop vents may be repeated until smooth, steady flow and quiet operation are achieved.
Step 7 Restore boiler pressure to recommended level and check for leaks
Restore the boiler pressure to the manufacturer’s recommended setting using the system fill valve and pressure gauge.
Then inspect all joints, fittings, and access points for leaks.
After topping to correct pressure, monitor the gauge for stability and observe visually while the system cycles.
Tighten any loose connections, wipe away drips, and recheck after a short run to confirm no pressure loss or active leaking.
Bleeding Automatic Air Vents and Specialty Components
Automatic air vents, typically mounted at high points on manifold headers and near zone returns, passively expel trapped air to maintain system efficiency.
The text will cover how to clean, replace, and fine-tune these vents to guarantee reliable operation.
It will also address handling thermostatic air separators and air scoops, which capture and remove larger volumes of entrained air.
How automatic air vents work and where they’re installed
Installations of automatic air vents rely on a simple float-and-valve mechanism that expels trapped air while preventing coolant loss: as air accumulates in a high point, it displaces fluid, lowering a float and opening a small valve to release the air until the fluid level rises and reseals the valve.
Vents mount at system high points, on manifolds, near boilers, and atop radiators or branch lines to guarantee continuous air removal.
Cleaning, replacing, and adjusting automatic vents
Begin by isolating the vent and depressurizing the local section of the system to guarantee safe access.
With the system cooled and drained below the vent level, the service technician can inspect for mineral deposits, corrosion, or debris that impede the float mechanism.
Clean with a soft brush, flush, or replace faulty vents, verify sealing washers, and adjust sensitivity or orientation per manufacturer specifications.
Dealing with thermostatic air separators and air scoops
Several components—thermostatic air separators and air scoops—play distinct roles in removing entrained air from radiant heat systems and require different service approaches.
Thermostatic separators collect and vent microbubbles automatically; inspect for buildup, verify thermostats, and replace diaphragms if failing.
Air scoops deflect larger bubbles to vents; guarantee correct placement, secure piping, and clear any sediment to maintain efficient separation.
Troubleshooting Common Problems
Persistent gurgling or knocking after bleeding, elusive air pockets, and pressure loss signal that bleeding did not fully resolve circulation issues.
The technician should inspect for stubborn trapped air, assess system pressure trends, and check for leaking valves, corroded fittings, or blocked loops.
If these checks do not identify the fault, escalate to flow balancing or component replacement.
Persistent gurgling or knocking after bleeding
A faint gurgle or occasional knock after bleeding often indicates trapped air or uneven water flow within the system rather than a failed bleed; diagnosing it requires checking high and low points, flow rates, and valve seating to pinpoint the source.
Inspect manifolds, purge valves, pump speed and return temperatures.
Tighten loose fittings, confirm correct pump direction, and retest zones sequentially until noise stops.
Difficulty locating trapped air or stubborn air pockets
Locating stubborn air pockets often proves tricky because bubbles can migrate to hidden high points, manifolds, or within underfloor tubing where access is limited.
Technicians should isolate zones, use flow meters, and run systems slowly while listening and feeling for cold spots.
Temporary vent fittings, sectional flushing, or injecting water at higher pressure can dislodge pockets.
Document locations for future access and preventive routing.
Pressure loss during or after bleeding
Once trapped air has been addressed, attention shifts to pressure loss during or after bleeding, a common sign of leaks, improper venting, or system fill issues.
The technician checks the expansion tank, pressure gauge, and fill valve for faults, confirms correct system pressure after bleeding, and watches for gradual drops indicating hidden leakage or poor isolation.
Record readings and repeat controlled fills as needed.
Leaking valves, corroded fittings, or blocked loops
Inspecting valves, fittings, and individual loops isolates common causes of persistent system issues: leaking valves allow pressure loss and uneven heating, corroded fittings create slow leaks and flow restrictions, and blocked loops prevent proper circulation to zones.
Technicians should pressure-test sections, tighten or replace faulty valves and fittings, flush or mechanically clear obstructed loops, and retest to confirm restored flow and stable pressure.
System Maintenance to Prevent Future Air Problems
A regular inspection schedule with a seasonal checklist helps catch early signs of air intrusion before symptoms appear.
Consistent attention to system pressure and correct expansion tank settings, along with periodic flushing and appropriate chemical treatment, minimizes corrosion and sludge that trap air.
Consider mechanical upgrades—pump speed control and deaerators—to reduce air entrainment and improve long‑term reliability.
Regular inspection schedule and seasonal checklist
Although routine checks may seem tedious, establishing a clear inspection schedule and seasonal checklist is essential for preventing air accumulation and ensuring consistent performance of a radiant heat system.
A concise plan reduces surprises, preserves comfort, and prolongs component life. Recommended monthly and pre/post-season tasks include visual inspections, tubing checks, manifold tightening, and thermometer verification.
- Visual inspections
- Tubing integrity
- Manifold connections
- Thermometer calibration
Maintaining proper system pressure and expansion tank settings
Maintain correct system pressure and expansion tank settings to minimize air ingress and guarantee the radiant system operates within its designed parameters.
Technicians should verify static and operating pressures, adjust fill valves, and confirm expansion tank precharge matches system cold pressure.
Address leaks, faulty pressure regulators, or waterlogged tanks promptly.
Consistent monitoring prevents vacuum conditions and reduces recurring air entrapment, preserving circulation and component lifespan.
Flushing and chemical treatment to reduce corrosion and sludge
Beyond pressure settings and expansion tank checks, periodic flushing and targeted chemical treatment address the internal conditions that invite air and impair circulation.
Flushing removes accumulated sludge, rust particles, and biofilm that trap bubbles. Corrosion inhibitors and sequestering agents stabilize metals and prevent particulate formation.
Regular water analysis guides dosing and frequency, preserving heat transfer, reducing noise, and minimizing future bleeding requirements.
Upgrades that reduce air entrainment (pump speed control, deaerators)
Consider retrofitting systems with components that actively reduce air entrainment: variable-speed pump controls and deaerators address the two main sources of entrained air—turbulent flow and dissolved/gaseous release—by smoothing flow rates and removing air before it circulates.
Variable pump control reduces pressure swings and cavitation; inline or tank deaerators vent collected air.
Both lower maintenance, improve heat transfer, and reduce noisy operation and frequent bleeding.
Quick Reference: Bleeding Checklist and Timeline
A concise checklist and timeline guide frames the bleeding process from safety setup to follow-up checks.
It lists pre-bleed safety and prep tasks, clear step-by-step actions during bleeding, and post-bleed verification with ongoing monitoring.
This quick reference helps guarantee efficient, safe, and lasting results.
- Prepare: confirm power, isolate zones, and gather tools.
- Act: bleed radiators/loops in sequence, watch pressure and flow.
- Verify: confirm pressure stability, temperature balance, and leak-free joints.
- Monitor: recheck system over the next 24–72 hours and after first heat cycle.
Pre-bleed safety and prep tasks
Safety and preparation set the stage for an effective bleed: the technician should verify system pressure, shut off power to pumps and boilers, isolate zones as required, and gather necessary tools (bleeder keys, hose, bucket, pressure gauge, and personal protective equipment).
Confirm adequate drainage paths, review manifold and valve diagrams, label zones, guarantee stable footing and ventilation, and note baseline pressure and temperature readings before proceeding.
Step-by-step action items during bleeding
Begin by confirming isolation of the target zone and de-energized circulation equipment.
Open bleed valves sequentially from farthest loop toward manifold, venting until steady water appears. Close each valve tightly.
Monitor pressure gauges; top up system briefly if pressure drops below setpoint. Repeat for all zones.
Record time, valve IDs, and any unusual air flow or sputtering during the process.
Post-bleed verification and ongoing monitoring
Once bleeding is complete, the technician verifies system integrity and establishes a monitoring timeline to confirm air removal and pressure stability.
They check manifold temperatures, inspect for leaks, and record baseline pressure and flow readings.
Follow-up checks occur at 24 hours, one week, and one month.
Any pressure drift or uneven heat triggers targeted re-bleeding, valve adjustment, or pump inspection.
Documentation is filed.
Cost, Time Estimates, and When to Hire a Pro
Typical DIY bleeding of a residential radiant heat loop commonly takes 30–90 minutes and costs under $50 for basic tools and supplies, while more complex systems can require several hours and modest parts expenses. Signs that a professional is warranted include persistent cold spots, recurring pressure loss, or visible leaks; technician visits typically range from $150–$400 for diagnostics and small repairs, rising for major system work. The table below sketches common scenarios and emotional reactions to help readers weigh time, cost, and when to call a pro.
| Scenario | Typical DIY Time/Cost | Expected Professional Cost |
|---|---|---|
| Single stuck loop, minor air | 30–60 min / <$50 | $150–$250 |
| Multiple loops, recurring issue | 1–3 hrs / $50–$150 | $250–$400 |
| Leaks or pressure instability | Hours / parts vary | $300+ (possible system repair) |
Typical DIY time and cost ranges
Estimating time and cost for bleeding a radiant heat system depends on system size, access to manifolds and purge points, and whether valves or pumps need replacement.
A single-zone job often takes 30–90 minutes and costs under $20 for basic tools and hose.
Multi-zone or hard-to-access systems may require 1–3 hours and $20–100 for fittings, adapters, or temporary flush supplies.
Signs that professional service is required and expected costs
Many homeowners can handle routine bleeding, but certain signs indicate a professional is needed: persistent cold spots after bleeding, repeated pressure loss, noisy or cavitating circulator pumps, visible leaks or corrosion, air that returns shortly after purging, or inaccessible manifolds and buried piping.
Professionals diagnose, repair leaks, replace valves or pumps, and flush systems. Typical service costs range $150–$800; major repairs or boiler work may exceed $1,000.
Conclusion
Quiet radiators and steady warmth follow care and attention, yet the hum of progress often begins with a small hiss. By bleeding a radiant heat system methodically—balancing caution with confident steps—air gives way to circulation, and inefficiency yields to comfort. Regular maintenance turns reactive fixes into routine calm, so what was once noisy and unpredictable becomes dependable and silent, proving that simple, deliberate acts restore both performance and peace of mind.