How to Install Plumbing for a Dishwasher: Step-by-Step Guide for DIY Success
Installing plumbing for a dishwasher can be done effectively by following a few key steps. Start by planning the cabinet space, checking for electrical and water access, and gathering the necessary tools and fittings. The installation process involves adding a shutoff valve, connecting a braided supply line with a seated washer, and directing a drain hose to a disposal, tailpiece, or standpipe, ensuring a high loop or air gap. Always remember to shut off water and power before starting and test for leaks afterward. For detailed step-by-step instructions, troubleshooting tips, and cost estimates, continue reading.
Overview of Installing Dishwasher Plumbing
This section outlines what the guide covers and who it is designed for, lists the basic tools, materials, and typical time needed, and highlights essential safety steps and when to call a professional.
It is aimed at competent DIYers comfortable with basic plumbing and electrical precautions.
Expected tools include wrenches, tubing cutters, and a multimeter; allow 2–4 hours for a standard installation and stop to contact a licensed plumber or electrician if gas lines, major drain work, or uncertain wiring are encountered.
What this guide covers and who it’s for
Although some familiarity with basic household plumbing speeds the process, the guide is written to take a reader from planning through final connections for a typical residential dishwasher.
It explains how to install plumbing for dishwasher, scope limits, safety considerations, permit awareness, common installation scenarios, and troubleshooting basics.
Designed readers are competent DIYers, homeowners, and those evaluating professional help.
Expected tools, materials, and typical time required
A handful of tools and a short list of materials are typically all that stand between an installer and a finished dishwasher hookup.
Typical tools and parts, plus time estimates, help plan the job efficiently.
- Adjustable wrench, screwdriver set, slip-joint pliers
- Dishwasher supply line, drain hose, shutoff valve, clamps
- Teflon tape, hose bib adapter
1–3 hours for standard installs, longer for modifications.
Safety precautions and when to call a professional
When working on dishwasher plumbing, safety precautions reduce risks of water damage, electric shock, and injury; installers should always shut off the water supply and power at the breaker before disconnecting or connecting lines.
Verify circuit lockout, wear gloves and eye protection, test for leaks, and use proper fittings.
Call a licensed plumber or electrician for complex hookups, unknown piping, or persistent leaks beyond basic troubleshooting.
Quick Answer Can you install dishwasher plumbing yourself?
A competent homeowner can install most dishwasher plumbing and expect a functional result, though complexities like gas lines, old wiring, or nonstandard fittings can limit a successful DIY outcome.
Simple installs—standard hookups, accessible shutoffs, and basic tools—are appropriate for DIYers with plumbing experience.
A licensed plumber is recommended for uncertain layouts, code compliance, or any work involving electrical, gas, or major remodels.
Short outcome summary and common limitations
Most homeowners can install dishwasher plumbing with basic tools and moderate DIY skill, completing supply and drain connections in a few hours while following local codes.
Typical outcomes: functional, code-compliant installations and cost savings.
Common limitations: awkward under-sink access, old or unusual fittings, inadequate water pressure, and uncertain electrical or permit requirements.
Minor leaks and trapping issues are the most frequent DIY problems.
When DIY is appropriate vs. when to hire a plumber
Assess whether a homeowner can install dishwasher plumbing by weighing skill level, tools, and local code requirements.
DIY suits experienced DIYers comfortable with basic plumbing, shutoffs, drain connections, and soldering or compression fittings.
Hire a plumber if codes require permits, gas or complex rerouting exists, water damage risk is high, or confidence and proper tools are lacking.
Professional work minimizes leak and permit issues.
Understanding Dishwasher Plumbing Basics
A basic dishwasher plumbing overview outlines the essential components: a cold water supply, drain line, air gap or high loop, and an accessible shutoff valve.
It also notes typical household connection standards and the common locations where fittings and hoses attach.
Readers are reminded to check local plumbing codes and permit requirements before beginning work.
Key components: water supply, drain, air gap/loop, shutoff valve
Proper dishwasher plumbing depends on four essential components: a potable hot-water supply, a drain connection, an air gap or high loop to prevent backflow, and an accessible shutoff valve.
The water inlet feeds detergent and cleaning cycles; the drain evacuates wastewater; the air gap or high loop blocks contamination; the shutoff valve isolates the appliance for maintenance or emergencies, ensuring safe operation.
Typical household plumbing connections and standards
When installing a dishwasher, typical household plumbing follows standardized connections and codes that verify water supply, drainage, and backflow protection work together safely.
Supply lines usually use 3/8″ or 1/2″ compression fittings to a shutoff valve; drain lines tie into sink drains or disposer inlets with trap adapters.
Air gaps or high loops prevent backflow; fittings and materials must be compatible and accessible for maintenance.
Local code considerations and permits
Because municipal requirements vary, installers must check local plumbing codes and permit rules before beginning a dishwasher hookup.
Authorities may require permits, licensed tradespeople, specific materials, air gap or high-loop installations, and connection methods to approved drain and water lines.
Failure to comply can void warranties, trigger fines, or require corrective work.
Confirm inspections, documentation, and contractor licensing prior to starting.
Pre-Installation Planning
Before any work begins, measurements should be taken to confirm the space and dishwasher specifications fit the planned opening.
The locations of the hot water inlet and drain access must be identified and mapped relative to the appliance.
Appropriate fittings and connectors are selected and organized into a concise parts checklist to guarantee no components are missing.
Measuring space and confirming dishwasher specifications
A quick, accurate measurement of the available cabinet opening and adjacent clearances guarantees the chosen dishwasher will fit and function without surprises.
Measure width, height and depth; note toe-kick, countertop overhang, and door swing.
Compare dimensions to manufacturer specifications including required clearance for ventilation, insulation thickness, and panel or trim.
Confirm electrical and cabinet mounting requirements before purchase.
Locating inlet water and drain access points
When planning the dishwasher hookup, locate both the cold-water inlet and the drain outlet relative to the cabinet opening so that fittings, hoses, and valves reach without kinking or excessive run length.
Identify existing shutoff valves, branch lines, and the sink trap connection.
Note cabinet interior clearances, wall or floor access panels, and any obstructions.
Mark locations for straightforward routing and future maintenance.
Choosing the right fittings and connector types
Although site conditions dictate final choices, selecting the correct fittings and connectors centers on matching pipe type, thread standards, and pressure ratings to the existing plumbing while minimizing potential leak points.
The installer evaluates copper, PEX, or PVC compatibility, chooses compression, flare, or push-fit joints accordingly, and confirms thread type (NPT or BSP).
Hose connections require reinforced, crimped, or braided options rated for dishwasher use.
Creating a parts checklist
With fittings and connector types confirmed, the installer compiles a concise parts checklist to guarantee all components are on hand before work begins.
The list prioritizes compatibility, quantity, and tools, reducing delays and returns. Essential items and optional extras are noted, along with verification steps and measurements.
- Supply line and shutoff valve
- Drain hose and clamp
- Compression fittings and adapters
- Teflon tape and wrench
Step-by-Step Installation of the Water Supply Line
The installer first shuts off the main or fixture supply, drains the line, and readies the supply tubing for connection.
Next, an angle stop or a dedicated shutoff valve is installed or tied into the existing valve to provide an accessible shutoff for the dishwasher.
Finally, the water inlet hose is attached to the dishwasher and fittings are checked and pressure-tested to confirm the supply side is leak-free.
Shutting off water and preparing the supply line
Before any fittings are touched, the water must be shut off and the supply line prepared to prevent leaks and comply with local codes.
Confirm main or branch shutoff, drain residual pressure by opening a nearby faucet, and place a bucket under the work area.
Inspect supply tubing for corrosion or kinks, cut to length squarely, deburr edges, and clean threads before proceeding.
Installing or connecting an angle stop or dedicated shutoff valve
Install an angle stop or dedicated shutoff valve at the prepared supply line to provide a reliable, code-compliant isolation point for the dishwasher.
Select a valve matching pipe type and size, apply appropriate fittings or compression nuts, and tighten securely.
Confirm valve orientation allows full shutoff access.
Leak-test the connection under low pressure before finishing cabinet reassembly and restoring normal water service.
Attaching the water inlet hose to the dishwasher
Begin by positioning the dishwasher so the water inlet port is accessible and the supply line can reach without kinks.
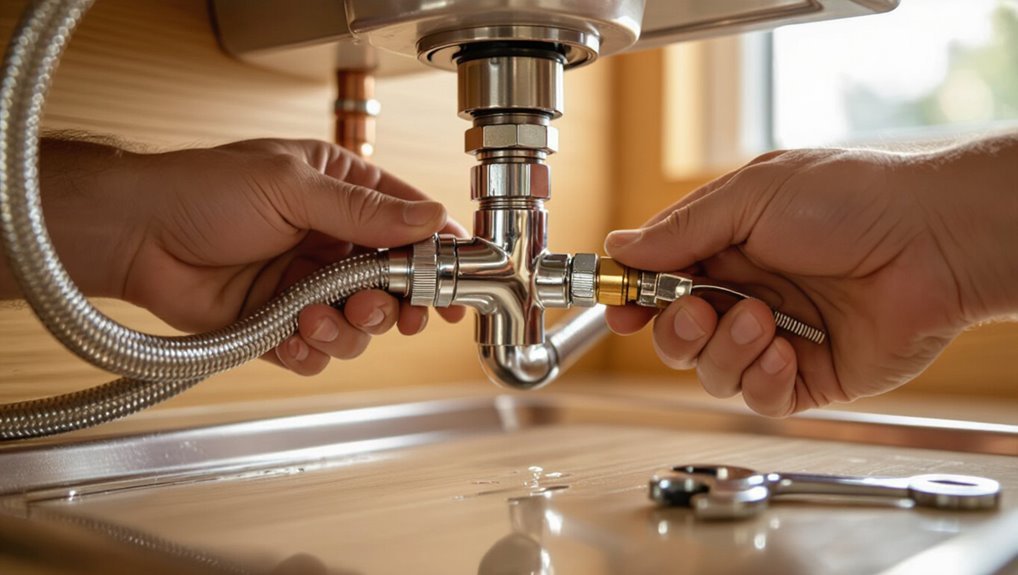
Thread the braided hose’s nut onto the dishwasher inlet fitting by hand, then tighten with an adjustable wrench a quarter to half turn beyond finger-tight.
Confirm the hose’s rubber washer seats correctly.
Route the hose to avoid sharp bends and secure it with brackets as needed.
Testing for leaks on the supply side
Turn on the water supply slowly and observe the inlet connection and supply shutoff for any signs of moisture or dripping.
Inspect all fittings, compression nuts, and hose crimps.
Run water under normal pressure for several minutes while feeling joints with a dry paper towel.
Tighten slightly if a hairline leak appears; replace faulty components if leakage persists.
Record observations and retest.
Step-by-Step Installation of the Drain Line
The next section outlines the practical steps for installing the dishwasher drain line, including whether to connect to a garbage disposer, a sink tailpiece, or a dedicated standpipe.
It covers requirements for an air gap versus a high loop and the correct method of attaching the dishwasher drain hose to the chosen connection, plus techniques for routing and securing the hose to minimize clogs.
Finally, it describes how to test the drain for proper flow and to check all fittings for leaks.
Options for drain connection: disposer, tailpiece, or standpipe
When installing a dishwasher drain line, three common connection methods are used: a garbage disposer inlet, the sink tailpiece, or a dedicated standpipe with a trap.
Each offers trade-offs: disposer inlets require knockout removal and check valve compatibility; tailpieces are simple but may need adapter fittings; standpipes provide code-friendly elevation and isolation.
Choose based on existing plumbing layout and accessibility.
Installing an air gap vs. high loop (code considerations)
After selecting the drain connection—disposer, tailpiece, or standpipe—the installer must decide between fitting an air gap or routing a high loop to prevent wastewater backflow.
Local codes may mandate an air gap; where permitted, a high loop secured under the countertop is acceptable if it rises above the dishwasher’s drain outlet.
Documentation, inspections, and durable fittings guarantee compliance and long-term reliability.
Connecting dishwasher drain hose to disposal or drain
Although attention to alignment and sealant is essential, connecting the dishwasher drain hose to the disposal or household drain proceeds through a concise sequence:
remove the knockout plug, attach the hose to the disposal inlet or tailpiece using the provided clamp, tighten securely, check that the hose rises to the required high point or air gap, then run a brief water test to confirm a leak-free connection.
Securing and routing the drain hose to prevent clogs
With the drain hose secured to the disposal or tailpiece, attention shifts to routing and fastening the line so that debris drains smoothly and backups are avoided.
The hose should rise into a high loop under the countertop, be clipped every 12–18 inches, avoid kinks and sharp bends, and remain clear of heat sources.
Use smooth clamps and inspect connections visually.
Testing for proper drainage and leaks
Begin by running a controlled water test to verify the drain line’s flow and inspect all fittings for leaks.
Observe water exit time, watch for dripping at connections, and check the air gap and trap for proper siphon prevention.
Operate a short wash cycle to confirm continuous drainage.
Tighten or reseal any leaking joints, then retest until flow is steady and leak-free.
Electrical Considerations Related to Plumbing Installation
Plumbing placement must account for the existing electrical hookup to guarantee the dishwasher’s cord or hardwired connection reaches without crossing or stressing lines.
Technicians should verify the dedicated circuit, outlet type, and amperage before finalizing drain and supply routing.
Work near electrical components only after power is shut off, connections are secured, and local codes and safety practices are followed.
Relationship between plumbing placement and electrical hookup
Although water lines and drains are distinct systems, their proximity to electrical circuits directly affects the dishwasher’s safe and code-compliant hookup.
Installers must plan plumbing placement to maintain required clearances, prevent moisture exposure to outlets and junctions, and allow routing for the appliance’s power cable or hardwired connection without interference.
Proper placement minimizes risk of short circuits, corrosion, and complicating future maintenance access.
Basic checks for power supply and cord/ hardwired options
With the location of water and waste lines set, attention shifts to verifying the electrical supply and choosing between a cord-and-plug connection or a hardwired setup.
Confirm circuit amperage, dedicated breaker, and grounding. Measure outlet position relative to appliance.
For corded models, guarantee proper length and strain relief; for hardwired, verify junction box placement and conduit access.
Check local code for permitted options.
Safety tips for working near electrical components
Several essential precautions reduce the risk of shock and fire when working near electrical components during dishwasher installation.
The installer should turn off and lock out the circuit, test for absence of voltage, and use insulated tools and personal protective equipment.
Keep water away from junctions, secure wiring with proper connectors, follow local codes, and consult a licensed electrician for any uncertain or complex electrical tasks.
Common Problems During Installation and How to Fix Them
Common installation problems include leaks at fittings, poor drainage or backups, absence of incoming water, and loose or vibrating hoses.
For each issue, the text outlines simple diagnosis steps and practical fixes—tightening or replacing fittings, clearing or rerouting drains, testing shutoff and supply lines, and securing hoses with clamps or straps.
The following sections present concise troubleshooting procedures and preventative tips for each fault.
Leaks at fittings: diagnosis and solutions
Diagnose leaks at fittings by first isolating the supply and drain connections and inspecting each joint for visible gaps, corrosion, or loose fittings; this focused approach quickly identifies whether the issue is mechanical (loose thread, damaged compression ring) or material (cracked fitting, degraded washer).
Tighten or replace faulty nuts, re-seat or swap washers, apply plumber’s tape to threaded joints, and retest under pressure.
Poor drainage or backups: causes and fixes
Poor drainage or recurring backups often stem from blockages, improper hose routing, or incorrect installation of the drain connection. Identifying the root cause requires inspecting the dishwasher’s internal filter and drain pump, the sink trap and garbage disposal connection, and the drain hose path for kinks, sags, or high loops that violate local code.
Clear debris, secure fittings, replace damaged hose, and re-route to maintain an appropriate high loop or air gap.
No water entering the dishwasher: troubleshooting steps
When a dishwasher fails to fill, the installer should methodically check water supply and control components to determine the cause. Common culprits include a closed or kinked supply valve, a blocked inlet screen, a faulty water inlet valve, or electrical faults preventing valve activation.
Inspect valve position, supply hose, inlet filter, and wiring to the solenoid. Test valve continuity and replace defective parts as needed.
Loose or vibrating hoses: securing tips
Secure hoses promptly to prevent noise, wear, and leaks caused by vibration and movement during dishwasher operation.
The installer should route hoses away from sharp edges, secure them with clamps or zip ties at regular intervals, and use rubber grommets where they pass through cabinetry.
Check fittings for tightness, replace brittle hoses, and test during a cycle to confirm stability and silence.
Tools, Parts, and Materials Reference
The section lists essential tools—wrenches, pliers, tubing cutters, and a basin wrench—needed for dishwasher plumbing.
It then itemizes common replacement parts and fittings, noting each part’s typical use (inlet hoses, valves, trap adapters, and clamps).
Finally, it recommends materials by connection type, such as braided stainless for supply lines, PVC or ABS for drain runs, and brass or chrome-plated fittings for threaded joints.
Essential tools list
A small but well-chosen toolkit guarantees the dishwasher plumbing job proceeds safely and efficiently.
The list focuses on functionality and durability, offering essential hand and measuring tools for cutting, fastening, sealing, and testing connections without excess.
- Adjustable wrench and slip-joint pliers
- Tubing cutter or hacksaw with blade
- Pipe thread sealant or PTFE tape
- Tape measure and level
Common replacement parts and fittings with brief uses
Common replacement parts and fittings for dishwasher plumbing each serve specific roles in ensuring watertight connections, proper drainage, and reliable water supply. Common items include hoses, clamps, valves, gaskets, and fittings with concise uses listed below.
| Part | Brief Use |
|---|---|
| Supply valve | Controls water flow to appliance |
| Drain hose | Directs wastewater to disposal or tailpiece |
| Hose clamp | Secures hose to fittings |
Recommended materials by connection type
Moving from parts and their uses to the materials best suited for each connection type clarifies which items provide durable, code-compliant joints and which are acceptable for temporary repairs.
For supply lines use braided stainless steel; for rigid runs use copper or PEX with crimp fittings; for drain connections use PVC or ABS with solvent welds; use stainless clamps and thread sealant tape for threaded joints.
Time-Saving Tips and Best Practices
Before starting the installation, the installer clears the workspace and pre-assembles fittings and hoses to save time and reduce mistakes.
Attention to hose routing and secure clamps prevents leaks and future repairs.
Regular seasonal checks and simple maintenance, such as inspecting seals and clearing strainers, extend the plumbing’s service life.
Preparing the work area and pre-assembling components
Clear organization and a staged approach to assembling parts dramatically reduce installation time and errors.
The installer clears workspace, labels fasteners, and groups fittings by function. Pre-assembling brackets, supply lines, and trap adapters on a bench verifies fit and identifies missing tools.
Protective coverings shield cabinets and floors. A checklist guarantees all components and sealants are ready before beginning on-site connections.
Preventing future problems with proper hose routing and clamps
With the workspace organized and components pre-assembled, attention shifts to routing hoses and selecting clamp locations to prevent leaks and premature wear.
Hoses should follow smooth, supported paths avoiding kinks, heat sources, and contact with sharp edges. Secure clamps at straight sections and near fittings, using corrosion-resistant types and correct torque.
Leave gentle slack for movement and check clearances before finalizing connections.
Seasonal and maintenance tips to prolong plumbing life
Schedule regular inspections and simple seasonal tasks to extend the dishwasher plumbing’s lifespan and reduce emergency repairs.
Inspect hoses, clamps, and fittings each season for wear, leaks, or corrosion. Flush the air gap and strainers, clear debris from drain lines, and run a maintenance cycle with vinegar or manufacturer-approved cleaner.
Replace aged hoses every 5–7 years and address minor issues promptly to prevent failures.
Aftercare: Testing, Maintenance, and Troubleshooting Checklist
A concise checklist guides the final verification steps after plumbing a dishwasher, including leak tests, drain and supply flow checks, and a full cycle run.
It also outlines a routine maintenance schedule for hoses, filters, and valves to prevent common failures.
Clear indicators are provided for when to call a professional inspection, such as persistent leaks, unusual noises, or repeated drainage problems.
Step-by-step final tests to perform after installation
Why verify each connection and function before closing the cabinet? A final checklist guarantees leak-free, operational installation and prevents hidden failures.
- Run a full wash cycle, observe for leaks and proper drainage.
- Check water supply valve, hoses, and clamp tightness.
- Inspect electrical connections for heat and secure grounding.
- Confirm door seal integrity and correct detergent dispenser operation.
Routine maintenance schedule for dishwasher plumbing
After completing final tests and confirming a leak-free, properly functioning installation, a simple routine maintenance schedule keeps dishwasher plumbing reliable and prevents common failures.
Inspect hoses and connections monthly, clean filters and strainers biweekly, flush the drain with hot water monthly, check the air gap and inlet screens quarterly, and tighten fittings or replace worn parts annually to avoid clogs and leaks.
When to schedule a professional inspection
When should a professional inspection be scheduled following dishwasher installation and routine maintenance?
A qualified technician should be called after initial installation, post-repair, or if persistent leaks, clogs, unusual noises, or electrical issues occur.
Schedule yearly inspections for older units or every two years for newer models.
Immediate inspection is advised when water damage, mold, or unexplained utility spikes appear.
Variations and Special Scenarios
When standard hookups are not available, the installer outlines options for running new supply and drain lines or using remote pump and water connection kits.
Special guidance is provided for interfacing with older plumbing systems, including evaluating pipe materials, pressure, and code compliance.
Notes also cover multi-dishwasher layouts and commercial-grade requirements such as larger drains, dedicated circuits, and higher-capacity water supplies.
Installing plumbing for a dishwasher without existing nearby hookups
If a dishwasher must be installed where there are no nearby water or drain hookups, the job requires planning to extend supply, drainage, and electrical services in compliance with local codes and the appliance manufacturer’s requirements.
Assess routing options: tap a nearby cold-water line with a shutoff, run a P-trap and high-loop or air gap to an accessible drain, and route dedicated electrical wiring or a junction per code.
Connecting to an older home’s plumbing system
Several older homes present unique plumbing challenges that require careful assessment before tying in a dishwasher.
Inspect pipe material, diameter, and corrosion; verify water pressure and presence of lead or galvanized lines.
Locate nearest drain and shutoff valves; consider adapter fittings, dielectric unions, or repiping sections.
Confirm trap configuration and air gap requirements.
When uncertain, consult a licensed plumber to guarantee code compliance and reliability.
Multi-dishwasher or commercial-grade installation notes
After evaluating older-home plumbing, attention shifts to installations that service multiple dishwashers or commercial-grade units, which demand higher water flow, larger drain capacity, and robust electrical and ventilation arrangements.
Specify dedicated hot-water risers, larger-diameter supply and waste lines, grease traps where required, and commercial-grade solenoid valves.
Follow local codes for water heater capacity, backflow prevention, and licensed-inspector approvals before operation.
Cost Estimates and Time Breakdown
Typical DIY costs are broken down by component—hoses and fittings ($10–$50), valves and shutoffs ($15–$80), drain lines and connectors ($10–$60), and tools or sealants as needed—providing a quick sense of budget ranges.
Estimated time per major step is summarized to set expectations: prep and access (15–45 minutes), mounting and water connection (30–60 minutes), drain hookup and testing (20–45 minutes).
Together these cost and time estimates help the reader plan materials, schedule, and whether to hire a pro.
Typical DIY cost by component and common price ranges
A basic breakdown of DIY dishwasher-plumbing costs lists each required component with its usual price range and an estimated installation time, enabling homeowners to budget and plan more accurately.
| Component | Typical Price | Notes |
|---|---|---|
| Supply line | $5–30 | Flexible braided hose |
| Drain kit | $10–40 | Includes tailpiece/air gap |
| Shutoff valve | $10–50 | Angle or saddle valve |
| Miscellaneous | $5–25 | Clamps, tape, connectors |
Estimated time for each major step
One to two hours is a reasonable expectation for a straightforward dishwasher plumbing install, with each major step—shutoff and supply hookup, drain connection, mounting and leveling, and final testing—allocated specific time blocks so homeowners can schedule work and anticipate contingencies.
Typical breakdown:
- shutoff/supply 15–30 minutes
- drain hookup 20–30 minutes
- mounting/leveling 15–30 minutes
- testing and adjustments 15–20 minutes.
Resources and Reference Links
The article directs readers to consult manufacturer manuals and any model-specific notes for installation details and warranty considerations.
It also lists reputable suppliers for hoses, valves, and fittings, with tips on comparing material, size, and pressure ratings.
Links to parts retailers and official documentation are provided for quick access.
Useful manufacturer manuals and model-specific notes
Manufacturer documentation remains the definitive source for dishwasher-specific installation details, including inlet and drain fitting sizes, recommended torque settings, electrical requirements, and warranty conditions.
Technicians and DIYers should consult manuals and model notes for exceptions, required tools, and troubleshooting tips.
- Model-specific installation diagram
- Parts lists and part numbers
- Special clearances or mounting notes
- Error codes and service procedures
Where to buy parts and how to compare fittings
Finding reliable sources for dishwasher parts and comparing fittings requires knowing where OEM, aftermarket, and specialty components differ in quality, compatibility, and price.
Parts can be sourced from manufacturer dealers, big-box stores, plumbing supply houses, and reputable online retailers.
Compare thread types, sizes, material (brass, stainless, plastic), ratings, and return policies.
Prioritize compatibility, warranty, and verified reviews when choosing fittings.
Conclusion
Installing dishwasher plumbing can feel like delicate choreography: the quiet precision of measuring and tightening meets the sudden splash of an unexpected leak. With planning, correct fittings, and patient testing, a DIYer transforms bewildering pipes into a reliable routine. The contrast between initial hesitation and final, humming appliance highlights skill gained through modest effort. Ultimately, careful preparation and sensible troubleshooting turn potential chaos into everyday convenience, proving small risks can yield lasting rewards.