How to Flush a Toilet With a Bucket of Water: Step-By-Step Guide for Emergencies
How to Flush a Toilet With a Bucket of Water: Step-by-Step Guide for Emergencies
In an emergency where your toilet won’t flush, you can manually flush it using a bucket of water. Simply pour 1.5–3 gallons of clean, room-temperature water into the toilet bowl to create a siphon that pushes waste through the trap. Aim for the center of the bowl from waist height and pour quickly without splashing. If the water rises or sewage backs up, stop immediately. Remember to wear gloves, disinfect afterward, and repeat if necessary. Further instructions detail techniques, troubleshooting, and safety tips.
What to Do When You Can’t Use the Toilet Flush: Quick Solution Overview
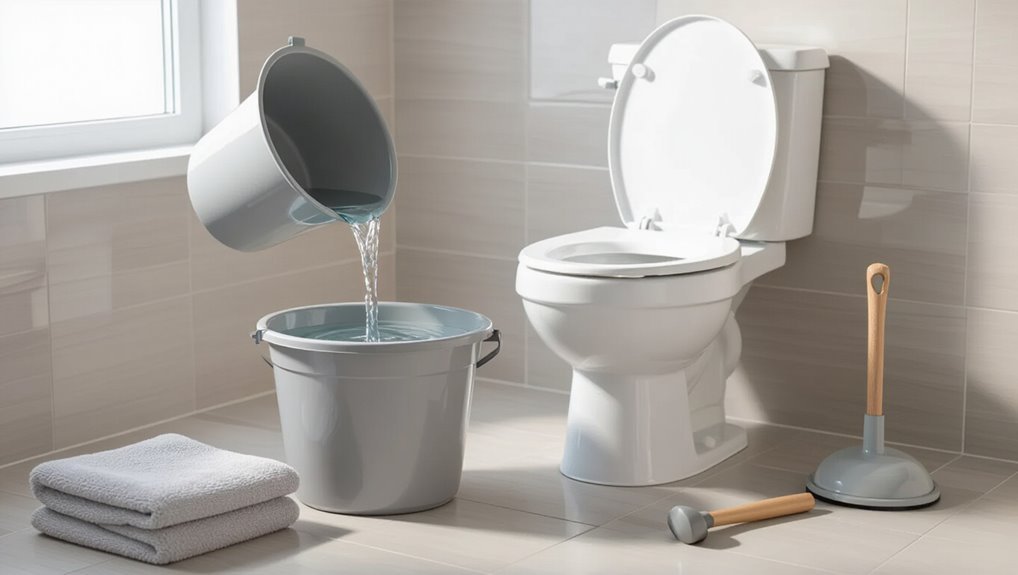
When the toilet tank or handle fails, a quick method is to pour a bucket of water briskly into the bowl to create a flushing siphon.
This approach is appropriate when the drain is clear and the supply valve cannot be used, and it is unsafe if the bowl is already overflowing or sewage is backing up.
Use only enough force to mimic a normal flush and stop if water levels rise.
One-sentence method to flush with a bucket of water
Pour a bucket of water into the toilet bowl in one swift, steady motion aimed at the rim to create enough force to push waste down the trap and complete the flush.
The concise how to flush a toilet with a bucket of water method relies on speed and volume: pour rapidly from waist height, target the bowl’s rim, and use roughly 3–6 gallons to guarantee adequate flow and siphoning.
When this method is appropriate and safe
After explaining the rapid-pour technique, the discussion shifts to situations where that method is appropriate and safe. It suits temporary outages, low-flow toilets, and single-person households when plumbing access is obstructed. Avoid use if sewage backs up, leaks exist, or fragility is suspected. Use precautions: moderate volume, steady pour, and protective gloves.
| Appropriate | Unsafe | Precautions |
|---|---|---|
| Power outage | Backflow | Gloves |
| Low-flow | Cracks | Moderate pour |
| Short-term | Overflow risk | Steady pour |
| Single user | Structural damage | Test small amount |
Why a Bucket Flush Works: Basic Principles
The article explains that a toilet flush relies on creating a siphon in the trapway and maintaining a water seal that prevents sewer gases from entering the bowl.
A sudden input of water from a bucket can provide the necessary volume and speed to push bowl water over the trap rim and initiate the siphoning action.
The effectiveness depends on delivering enough water quickly to overcome the trap seal and sustain the flow long enough for the siphon to draw the contents away.
How toilet siphoning and trap seals function
A rapid rush of water into the bowl initiates a siphon that pulls waste and water through the trap and into the drain. This siphon forms when the incoming volume raises bowl water level enough to overflow the trap and start continuous flow toward the sewer.
The trap seal maintains a water barrier preventing sewer gas backflow. Siphoning clears the bowl until air breaks the flow and reseals the trap.
Water volume and speed needed to trigger a flush
Having explained how siphoning and the trap seal operate, attention turns to the specific water volume and flow rate required to initiate that siphon.
A sudden, sufficient pulse of water—typically 1.5–3 gallons delivered rapidly—raises bowl water above the trap crest and forces flow into the siphon tube.
Speed matters: a quick surge creates low pressure and continuous flow, whereas slow pouring fails to start siphoning.
Tools and Materials You Need
A stiff-sided bucket of about 2 to 3 gallons is recommended, with roughly that volume of water used per flush to generate sufficient force.
Optional items include disposable gloves, a toilet brush for any residual waste, and a measuring container to guarantee the correct water amount.
These tools keep the process efficient and sanitary.
Recommended bucket size and water amount
One 2- to 3-gallon (7.5–11 L) bucket provides the ideal balance of volume and manageability for flushing most household toilets; it holds enough water to create the necessary rush without becoming too heavy to lift safely.
For a single effective flush, pour roughly 1.5–2 gallons (5.5–7.5 L) sharply into the bowl. Larger toilets may require up to 3 gallons.
Optional items to have on hand (gloves, brush, measuring container)
Several small accessories can make a bucket flush safer and more effective: disposable gloves protect hands from bacteria and cleaners, a toilet brush helps dislodge debris before flushing, and a calibrated measuring container guarantees the correct volume of water is poured.
Additionally, keep a spare bucket, antibacterial wipes, and a small towel to control spills and maintain hygiene during emergency flushing.
Step-by-Step Guide to Flushing a Toilet with a Bucket of Water
The procedure begins with preparing an appropriate bucket of water—right temperature and volume—then ensuring the bowl is clear and at a suitable level.
The person should stand behind the toilet, aim for the bowl’s center, and apply the correct pour technique—speed, angle, and force—to create a flushing surge.
If the bowl does not clear, they should repeat the pour or adjust volume and technique until the trap is emptied.
Step 1 Prepare the bucket and water (temperature, volume)
Gather a sturdy bucket and fill it with clean water at room temperature or slightly warm; extremely hot water can damage porcelain and seals, while cold water works but may require a larger volume for an effective flush.
Use a 3–5 gallon (11–19 L) bucket when possible. Confirm water is free of debris and estimate volume to provide a forceful single pour.
Step 2 Remove obstacles from the bowl and check water level
Clear the bowl of any visible debris or objects, then visually confirm the water level before pouring—the bowl should be near normal flush height, not overly full or nearly empty.
Remove floating items or tissue with a gloved hand or tool, and guarantee no large solids block the trap.
Adjust bucket volume or wait for refill if level is too low or high before proceeding.
Step 3 Stand behind the toilet and aim for the bowl’s center
Stand directly behind the toilet at a comfortable distance so the throw reaches the bowl without overextending the arm.
The person aligns the bucket aiming toward the bowl’s center to target water flow, minimizing splatter and ensuring effective displacement.
Feet remain steady, torso slightly leaned; the non-throwing hand steadies the bucket.
Eyes focus on the target to maintain consistent placement.
Step 4 Pour technique: speed, angle, and force
Begin the pour with a brisk, steady motion so water enters the bowl in a single, forceful stream; this creates the necessary rush to trigger siphoning.
Aim slightly toward the rear of the bowl, maintaining a consistent angle. Use enough speed to produce a continuous flow but avoid splashing.
Pause briefly after each pour to assess water movement before repeating if needed.
Step 5 What to do if the bowl doesn’t clear on first try
If the bowl remains partially filled after the initial pour, proceed methodically to avoid overflows or splashing:
Wait a minute to let water settle, then pour a smaller, controlled volume with the same swift arc.
If blockage persists, repeat once or twice. Avoid aggressive splashing.
If inadequate after several attempts, stop and consider alternate removal methods or seeking assistance.
Step 6 Sanitation steps after flushing manually
After confirming the bowl has cleared or deciding to stop further attempts, attention should turn to sanitation to prevent odors, stains, and contamination.
Wear gloves, flush again if possible, add a disinfectant or diluted bleach, and scrub visible residue with a toilet brush.
Wipe surrounding surfaces, dispose of gloves and cleaning materials safely, and wash hands thoroughly with soap and water.
Troubleshooting Common Problems
The section addresses common issues that can arise when flushing with a bucket, starting with a bowl that remains full or only partially drains and outlining likely causes and straightforward fixes.
It also covers gurgling sounds, slow drainage, and signs of a developing clog with emergency responses to try before risking overflow.
Finally, guidance is given on when efforts should stop and a plumber should be contacted to prevent damage or health hazards.
Bowl remains filled or partially drains causes and fixes
Although a partially drained or persistently full bowl often signals a blockage, several other issues can produce similar symptoms and require different fixes.
Check the trap seal for siphon issues, confirm venting is clear to prevent airlock, and inspect the fill valve and overflow for improper tank levels.
Adjust float, clear vent obstructions, or call a plumber if internal drain damage is suspected.
Gurgling, slow drain, or possible clog emergency responses
When a toilet gurgles, drains slowly, or shows signs of an imminent clog, prompt but measured actions can prevent overflow and worsening blockages; first isolate water flow by turning off the shutoff valve.
Then assess whether the issue is confined to the fixture (slow sink or tub drains suggest a local clog) or affects multiple drains (indicating a main sewer or vent problem).
Use a plunger or closet auger to clear localized clogs; pour water cautiously from a bucket to test flow.
When to stop and call a plumber
If basic measures—turning off the shutoff valve, using a plunger or closet auger, and carefully pouring water—fail to restore normal flow or the problem recurs, it’s time to stop and call a professional.
Persistent backups, sewage odors, water leaking from seals, recurring clogs, or visible damage require licensed plumbers to diagnose blockages, venting issues, or faulty components to prevent sanitation hazards and further property damage.
Safety and Hygiene Considerations
When using a bucket to flush, care should be taken to pour steadily and low to minimize splashing and contamination of surrounding surfaces.
The method should also avoid aggressive pouring or excessive weight on the bowl rim to protect the toilet seal and plumbing from damage.
Afterward, affected surfaces and hands should be thoroughly disinfected to reduce infection risk.
Avoiding splash and contamination
Minimize splash and exposure by pouring the bucket water steadily and directly toward the bowl’s center, aiming for a smooth, continuous stream that displaces waste without violent turbulence. Wear gloves, stand back, and avoid breathing over the bowl. Clean surfaces afterward with disinfectant. Use minimal force and controlled volume to reduce aerosols.
| Action | Reason | Tip |
|---|---|---|
| Steady pour | Less splash | Aim center |
| Gloves | Barrier | Remove carefully |
| Distance | Reduce aerosols | Stand slightly back |
| Disinfect | Kill contaminants | Wipe surfaces |
| Small volume | Controlled flow | Repeat if needed |
Protecting the toilet seal and plumbing from damage
Protect hand-tight seals and plumbing by pouring water with steady, moderate force to avoid sudden pressure spikes that can dislodge the wax ring, loosen flange bolts, or stress trap connections.
Inspect for leaks afterward, stop if seepage appears, and avoid aiming directly at vulnerable joints.
Use moderate volumes per pour and let the bowl clear between pours to reduce strain on the drain system.
Disinfecting surfaces and hands afterward
After flushing with a bucket, disinfecting both the toilet surfaces and hands reduces the risk of transmitting pathogens from splashes or contact with contaminated areas.
Use an appropriate disinfectant on seat, handle, rim, and surrounding surfaces, following product contact time. Wear disposable gloves if available.
Wash hands thoroughly with soap and water for at least 20 seconds; use hand sanitizer if soap is unavailable.
Alternative Emergency Toilet-Flush Methods
When a full bucket is unavailable, the guide suggests repeatedly pouring smaller containers of water to produce enough flow for a flush.
It also notes that carefully using a plunger can help move water and waste when water volume is low.
If plumbing is completely inoperative, a trash can liner or disposable bag may be used to contain waste for removal and disposal.
Using a smaller container repeatedly
Using a small cup or jug repeatedly can provide an effective emergency flush when a full bucket is unavailable; the technique relies on delivering several quick, forceful pours into the bowl to create the siphon effect rather than a single slow pour.
- Quick pours build momentum and urgency.
- Steady rhythm reduces mess and anxiety.
- Remaining calm guarantees efficient, respectful cleanup.
Using a plunger to assist manual flushing
A plunger can provide the extra force needed to initiate or reinforce the siphon during a manual flush, especially when water volume is marginal or the bowl contains stubborn debris.
Position the cup over the outlet, seal firmly, and push and pull rhythmically without breaking the seal.
Combine with a single decisive bucket pour; repeat a few times if necessary to clear waste and restore normal flow.
Using a trash can liner or disposable bag to carry waste if plumbing fails
Place a sturdy trash can liner or disposable bag beneath the toilet seat to collect waste directly if the plumbing fails, ensuring it is secured around the bowl rim or tied to prevent slippage. Use absorbent material inside, seal after use, and dispose per local rules. Wear gloves and sanitize the seat and hands afterward.
| Tip | Action |
|---|---|
| Line | Add absorbent |
| Seal | Tie securely |
Preventive Measures to Avoid Future Manual Flushes
Regular maintenance—such as periodic inspections of the trap, tank components, and drain lines—helps prevent clogs that lead to manual flushing.
Clear guidance on what not to flush (wipes, sanitary products, grease, and excess paper) reduces emergency blockages.
Keeping a simple emergency kit with a plunger, gloves, a bucket, and basic drain-cleaning supplies prepares occupants for brief plumbing failures.
Regular maintenance tips to prevent clogs
Routine upkeep prevents most situations that force manual flushing.
Inspect tank components monthly, repair leaks, and adjust the fill valve for proper water level.
Use a mild cleaner to remove mineral buildup and wipe rim jets.
Run a plunger briefly after slow drains.
Schedule annual professional inspections for older systems to catch worn parts before they cause clogs or failures.
What not to flush to reduce emergencies
Preventive maintenance reduces most plumbing failures, but user habits also have a large impact on emergency needs. Avoid flushing wipes, sanitary products, cotton swabs, dental floss, cooking grease, and excess paper. Dispose solids and non-degradables in trash to prevent blockages and manual flushing.
| Do not flush | Examples |
|---|---|
| Fibrous items | Wipes, cotton |
| Hygiene products | Tampons, pads |
| Grease | Oils, fats |
| Miscellaneous | Floss, diapers |
Preparing an emergency kit for plumbing failures
While small repairs and quick fixes can sometimes restore normal flushing, preparing a compact emergency plumbing kit guarantees users can handle common failures safely and without delay.
Essentials include a wrench, rubber gloves, plumber’s tape, a sealant, and a spare flapper.
Emotionally reassuring items:
- A flashlight for calm focus
- Protective gloves for dignity
- A simple instruction card for confidence
Quick Reference Checklist for Flushing with a Bucket
A concise step-by-step checklist guides users through flushing a toilet with a bucket of water.
It lists required items, the proper water volume and pour technique, and safety or hygiene reminders.
The checklist is designed for immediate reference during an outage or plumbing failure.
Step-by-step checklist for immediate use
Use a sturdy bucket filled with cold water and follow each step in order to produce a reliable flush.
The user reads a terse checklist for urgent action: aim for center, pour swiftly, wait.
Emotions: urgency, relief, control.
- Aim at bowl center.
- Pour forcefully in one motion.
- Wait, repeat if necessary.
Conclusion
When indoor plumbing fails, one can rely on a bucket to restore flow and dignity with surprising ease. The swift plunge of water mimics a flush, akin to a medieval courier suddenly tapping a touchscreen—an anachronistic image that highlights ingenuity across eras. Following simple steps, maintaining hygiene, and keeping basic supplies on hand guarantees readiness. With practice, the bucket method becomes a dependable, low-tech fix until full repair is possible.