How to Fix a Leaking Dishwasher Water Line: Step-by-Step Repair Guide
To fix a leaking dishwasher water line, start by shutting off the water and power supply. Inspect the supply and drain hoses, fittings, and valves for any signs of damage or corrosion. Tighten any loose fittings or replace damaged hoses and seals as needed. After making repairs, run a fill and drain cycle to check for leaks. Regular inspections and timely replacements can help prevent future issues. Continue reading for detailed step-by-step procedures, necessary tools, maintenance tips, and troubleshooting guidance to complete your repair effectively.
What Causes a Dishwasher Water Line to Leak
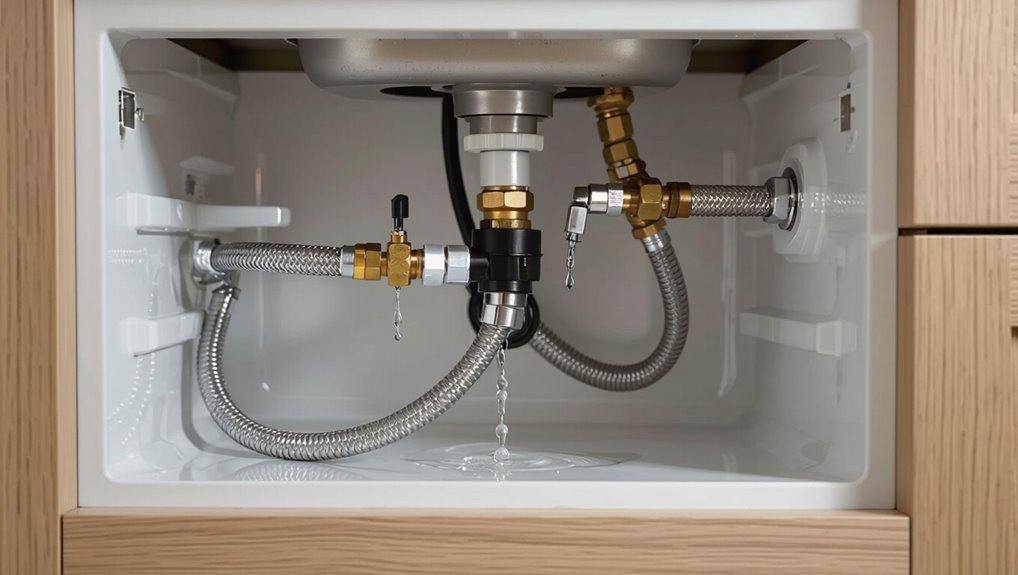
Leaks in dishwasher water lines commonly originate from the supply or drain line, control valve, or fittings.
Causes include age-related wear, corrosion, kinks or physical damage, improper installation, and loose connections.
Visible drips, pooling under the unit, damp cabinets, or reduced water pressure are typical symptoms indicating a water-line leak.
Common leak sources (supply line, drain line, valve, fittings)
Several common culprits account for a dishwasher water line leak: the supply line that brings water in, the drain line that carries it away, the inlet valve that controls flow, and the fittings that connect components.
Each can fail from loose connections, cross-threading, cracks, or improper installation. Identifying the exact source is the first step in how to fix a leaking dishwasher water line.
Wear and tear and age-related failures
Over time, normal use and environmental factors degrade hoses, seals, and valves, making them prone to failure.
Rubber hoses harden, crack, or blister; clamps corrode; sealant and gaskets compress or split. Mineral buildup accelerates wear.
Metal components fatigue and develop hairline fractures. Aging parts lose elasticity and watertight integrity, producing slow leaks or abrupt failures that require replacement to restore reliability.
Improper installation and loose connections
While wear and aging commonly undermine component integrity, many dishwasher water line failures stem from installation errors and insecure fittings.
Incorrectly seated compression nuts, cross-threaded connections, improperly cut tubing, or omitted ferrules allow pressure-driven leaks. Movement during operation loosens joints if lines lack proper strain relief or support.
Correct alignment, torque to manufacturer specs, and secure clamps prevent most installation-related leaks.
Corrosion, kinks, and physical damage
Corrosion, kinks, and physical damage accelerate failure of dishwasher water lines by weakening materials and compromising seals.
Corrosion thins metal and corrodes fittings, creating pinholes and brittle sections.
Kinks in flexible hoses stress fibers and restrict flow, promoting wear at bends.
Abrasion, punctures, and crushed tubing from tools or cabinet edges breach integrity, leading to eventual leakage and failure.
Symptoms that indicate a water-line leak
When a dishwasher water line begins to fail, several clear signs typically appear that point to a leak: puddles or damp spots under or beside the appliance, unexplained increases in water bills, visible corrosion or mineral deposits on fittings, a persistent drip from the supply connection, intermittent loss of water pressure during cycles, and musty odors indicating trapped moisture.
Quick assessment: How to confirm the water line is the source
A brief visual inspection looks for wet spots, corroded fittings, loose clamps, and drips at the supply line connection and under the dishwasher.
Next, a controlled diagnostic run — opening the dishwasher and watching the water line and junctions during fill and drain cycles — helps confirm active leaks.
If a steady stream, spray, or rapid pooling appears, the water should be shut off immediately at the supply valve to prevent damage.
Visual inspection checklist
Before lifting the dishwasher or removing panels, inspect accessible fittings, hose connections, and the supply shutoff for visible moisture, mineral buildup, or loose clamps to quickly determine whether the water line is the leak source.
Check under the sink and beneath the unit, trace the entire supply hose, examine compression fittings and elbow joints, and note corrosion, hairline cracks, or water stains for targeted repair.
How to run a diagnostic test while watching for leaks
Start the diagnostic by running a short cycle while observing all accessible connections for active moisture. Ensure the dishwasher is supplied and set to a wash or fill phase so water flows through the supply line.
Note drip locations, timing, and whether leaks begin at hose ends, fittings, or valve.
Repeat the test if needed, use a dry paper towel to detect slow weeps, and record findings for repair.
When to shut off water immediately
If water appears continuously beneath the dishwasher, sprays from a visible joint, or floods unexpectedly when the unit fills or pumps, shut off the water supply at once; these signs strongly indicate the supply line or its fittings are the source and immediate cessation prevents further damage.
Confirm by drying the area, running a short fill cycle, and observing for fresh leakage at hoses, connectors, or valve.
Tools and materials you need for repair
A concise kit of essential tools and parts makes most dishwasher water-line repairs straightforward. Basics include adjustable wrenches, pliers, a bucket, and a flashlight, plus common replacements like supply hoses, compression fittings, and clamps.
Protective gear and floor-covers help prevent damage, while optional diagnostics such as a leak detector or moisture meter speed identification of hidden problems.
Essential tools (wrenches, pliers, bucket, flashlight)
Gather the correct tools before touching the water line: an adjustable wrench and slip-joint pliers for fittings, a small bucket to catch draining water, and a flashlight to inspect tight spaces.
Include plumber’s tape, an assortment of rags, and a basin wrench for confined nuts. A magnetic tray or small parts container prevents losing fasteners.
Safety gloves protect hands during tight turns.
Replacement parts (supply hoses, compression fittings, clamps)
Several essential replacement parts are commonly required when repairing a leaking dishwasher water line: supply hoses, compression fittings, and hose clamps.
Durable braided stainless hoses resist kinks and corrosion. Compression fittings guarantee a watertight connection at valves and appliance inlets; sizes must match pipe threads.
Worm-drive or stainless-steel clamps secure hose ends. Carry spare seals and thread tape for reliable assembly and leak prevention.
Safety gear and materials to protect floors and cabinets
When preparing to repair a leaking dishwasher water line, proper safety gear and protective materials minimize injury and prevent water damage to floors and cabinets.
Recommended items include waterproof gloves, safety glasses, knee pads, absorbent towels, a waterproof tarp or plastic sheeting, bucket, and absorbent pads for under-cabinet leaks.
Secure edges with painter’s tape to prevent slippage and protect cabinet finishes.
Optional diagnostic tools (leak detector, moisture meter)
After laying out protective coverings and donning safety gear, attention turns to optional diagnostic tools that speed detection and verify repairs.
A handheld electronic leak detector pinpoints active drips behind panels; an infrared camera reveals cold spots from moisture.
A moisture meter quantifies dampness in wood and insulation to confirm drying.
Use these tools to locate leaks, assess damage, and validate successful repairs.
Step-by-step repair: Fixing a leaking dishwasher water supply line
The technician begins by shutting off the water supply and disconnecting power to guarantee safety.
After removing the kickplate or toe panel to access the supply line, they inspect the hose and fittings to locate the leak.
If fittings are loose they are tightened and tested; if the flexible hose is damaged it is replaced.
Step 1 Turn off water and power safely
Shut off the water supply and cut power before touching the dishwasher to prevent electrical shock and further leaking.
Locate the house shutoff valve for the dishwasher line and close it.
Turn off the dishwasher at the circuit breaker or unplug it.
Verify water is off by running a nearby faucet and confirm power is disconnected using the appliance’s controls or a noncontact tester.
Step 2 Access the water line (remove kickplate or toe panel)
With water and power confirmed off, access to the dishwasher’s water line requires removing the kickplate or toe panel at the appliance base.
Using a screwdriver or socket, remove fasteners, set the panel aside, and slide forward the insulation or foam barrier.
Kneel to inspect the lower cavity, exposing the supply hose, fittings, and valve while keeping small parts organized and workspace dry.
Step 3 Inspect and identify the exact leak point
Begin by visually and physically tracing the water supply path from the shutoff valve through the hose and fittings to locate moisture, drips, corrosion, or mineral buildup.
Note wet spots, verdant stains, or white crust at connections. Squeeze flexible hoses to reveal hairline leaks.
Inspect the inlet valve, compression fittings, and any crimps.
Mark the exact leaking component for targeted repair or replacement.
Step 4 Tighten loose fittings and test
After the exact leak point is marked, the technician proceeds to tighten any loose fittings to stop the seepage.
Using an adjustable wrench, connections are snugged at the compression nut and valve union without overtightening.
The supply is slowly pressurized, inspected for drips, and fittings retorqued if necessary.
Final observation confirms no leakage and normal water flow before restoring panels and cleaning the area.
Step 5 Replace damaged flexible hose
If the flexible supply hose shows cracks, bulges, or persistent leaks after tightening fittings, it should be replaced to guarantee a durable seal and prevent water damage.
Shut off water, disconnect hose from dishwasher and shutoff valve, note thread type and length, purchase matching replacement, install new hose with proper washers or ferrules, hand-tighten then secure with wrench, and test for leaks.
Step 6 Replace corroded valves, adapters, or compression nuts
When replacing a damaged flexible hose does not stop leaking, attention should turn to the supply-side fittings: shutoff valves, adapters, and compression nuts often corrode or deform and can allow slow leaks despite a new hose.
Isolate water, remove the old fitting, inspect threads and ferrules, then replace with correctly sized brass or stainless parts.
Tighten to manufacturer torque and check for visible defects.
Step 7 Reassemble, restore water and power, and test for leaks
Reassemble the supply connections and mounting hardware in the reverse order of disassembly, ensuring all fittings, gaskets, and clamps are seated correctly.
Turn the water supply on slowly, check for immediate drips, then restore electrical power or reconnect the breaker.
Run a short wash cycle and inspect all joints under load for leaks.
Tighten any loose fittings and recheck until dry.
Repairing a leaking dishwasher drain line
A leaking dishwasher drain line typically shows different signs than a supply leak, often appearing as puddling around the base or water under the sink rather than a constant pressurized spray.
The inspector should access and examine the drain hose and clamp for cracks, kinks, loose fittings, or blockages, and determine whether the hose needs resecuring or replacement.
Attention must also be paid to connections at the garbage disposal or air gap, where worn seals or improperly seated fittings commonly cause leaks.
Differences between supply and drain leaks
Several clear signs distinguish a leaking dishwasher supply line from a drain line problem: supply leaks typically originate near the water inlet or shutoff valve and produce continuous drips or pressure-driven sprays.
In contrast, drain leaks appear at hose connections or the air gap and occur primarily during or just after the drain cycle.
Supply leaks wet the floor continuously; drain leaks coincide with wash/drain stages, often carrying food particles or suds.
How to access and inspect the drain hose and clamp
After noting when leaks occur and where they originate, the next step is to access the dishwasher’s drain hose and clamp to inspect for signs of wear, loose fittings, or obstruction.
Turn off power and water, pull the unit slightly from undercounter, locate the hose connection at the pump and sink, visually and manually check for cracks, splits, corrosion, clamped tightness, and trapped debris.
Replacing or resecuring the drain hose
Begin by preparing the workspace: disconnect power and water, slide the dishwasher out enough to reach the drain hose, and place a towel or shallow pan to catch residual water.
Inspect hose for cracks or soft spots, remove old clamp, detach hose from dishwasher and sink connection, fit a new EPA-approved hose if damaged, reseat and secure with a worm-drive clamp, test for leaks.
Addressing leaks at garbage disposal or air gap connection
With the drain hose reseated and clamped, attention turns to the connection points at the garbage disposal and air gap, common sources of dishwasher leaks.
Inspect hose fittings, gaskets, and clamps for cracks, corrosion, or looseness.
Tighten or replace defective clamps and gaskets, clear air gap debris, and confirm proper hose routing and correct disposal knockout removal.
Test for leaks under load.
When to use temporary fixes and how to apply them
Temporary fixes can bridge a leaking dishwasher water line until a permanent repair is made, but they must be chosen and applied correctly.
Simple measures—wrapping threaded connections with plumber’s tape and securing fittings with hose clamps—are appropriate for minor leaks, while epoxy or specialized leak sealers can stop small cracks when parts cannot be replaced immediately.
Users should understand the risks of temporary repairs, monitor for recurring leaks, and plan a permanent fix within days to weeks to avoid water damage and system failure.
Using plumber’s tape and hose clamps safely
When a small leak appears at a threaded fitting or a permeable section of hose and a full repair must wait, plumber’s tape and hose clamps provide a quick, controllable seal that can hold until parts are replaced.
Wrap PTFE tape three to five times clockwise on male threads; tighten fittings snugly.
For hose tears, position a stainless clamp over the damaged area and tighten evenly.
Monitor and replace promptly.
Using epoxy or leak sealers when it’s appropriate
Several situations justify using epoxy or commercial leak sealers as temporary fixes: small punctures in rubber supply lines, slow weeps at non-threaded joints, or when replacement parts are unavailable immediately.
The technician should dry the area, roughen surfaces, follow manufacturer cure times, and apply appropriate amount.
Use sealers rated for potable-water contact and monitor the repair until a permanent replacement can be installed.
Risks of temporary repairs and timeline to permanent fix
Because short-term patches can fail unpredictably, technicians must weigh the immediate benefits against the risks of water damage, contamination, and code violations before applying them.
Temporary fixes—tape, sealant, or clamps—are suitable only to stop leaks until parts arrive or a licensed plumber schedules a permanent repair.
Establish a short, documented timeline (24–72 hours) and monitor closely; replace fittings or lines promptly.
Signs you should call a professional plumber or appliance technician
If the leak involves a complex valve or manifold or continues after several repair attempts, a professional should be contacted.
Visible water damage, mold growth, or any risk to electrical components also warrants immediate expert assessment.
Homeowners should likewise consider warranty terms and manufacturer service requirements before proceeding further.
Complex valve or manifold issues
Recognize when valve or manifold problems go beyond basic DIY troubleshooting: persistent dripping despite tightened fittings, water spraying from multiple ports, or a valve that no longer responds to the dishwasher’s cycle are clear indicators.
Seek professional service when corrosion, fractured manifolds, electrical control failures, or inaccessible assemblies are present.
Technicians can diagnose internal valve faults, replace sealed components, and guarantee water-tight reassembly safely.
Persistent leaks after multiple repairs
When leaks persist despite repeated tightening, part replacements, and seal changes, it signals the need for a professional plumber or appliance technician.
Persistent leakage after multiple DIY attempts often indicates hidden failures: warped fittings, cracked plastic components, internal valve faults, or improper installation.
A qualified technician can diagnose root causes, perform warranty-sensitive repairs, and guarantee safe, code-compliant solutions that prevent recurrence and protect the appliance.
Evidence of water damage, mold, or electrical risk
Detect visible water stains, soft or swollen cabinet wood, persistent musty odors, or active mold growth around the dishwasher as clear indicators to contact a professional.
These signs, especially when combined with flickering lights, tripped breakers, or corrosion on electrical components, indicate a hazardous interaction between moisture and wiring that requires a licensed plumber or appliance technician for safe diagnosis and repair.
Immediate professional assessment prevents escalation.
Warranty considerations and manufacturer service
After evidence of water damage or electrical risk has been identified, consult warranty terms and manufacturer guidance before attempting repairs.
If the dishwasher remains under warranty, unauthorized fixes may void coverage.
Manufacturer service is recommended for complex leaks, internal component failures, or electronic faults.
Call a certified appliance technician or licensed plumber when damage exceeds user-serviceable parts, when safety is a concern, or when documentation advises professional intervention.
Preventive maintenance to avoid future water-line leaks
Routine preventive maintenance can greatly reduce the risk of future dishwasher water-line leaks by establishing a regular inspection schedule focused on checking for cracks, corrosion, loose fittings, and signs of moisture.
Proper installation practices—secure connections, use of appropriate-rated hoses and fittings, and correct routing—minimize stress points that cause failures, while following manufacturer-recommended replacement intervals for hoses and connectors guarantees aging parts are removed before they fail.
In colder climates, winterizing and insulating exposed lines and draining or shutting off exterior feeds protect plumbing from freeze damage.
Regular inspection schedule and what to look for
A simple inspection schedule—monthly visual checks and a more thorough quarterly review—helps catch wear before it becomes a leak.
Inspect hose fittings, clamps, and visible tubing for cracks, corrosion, or soft spots.
Check for dampness under the dishwasher, around connections, and at the shutoff valve.
Note any vibration, loose mounts, or mineral buildup and document findings for timely repairs.
Best practices for installation to reduce leaks
Begin installations with careful planning and use quality components to minimize future leaks: select a braided stainless-steel supply line, match thread types between fittings, and position the shutoff valve and hose with gentle bends rather than sharp kinks.
Torque fittings to manufacturer specs, use appropriate thread sealant or washers, secure lines with vibration-damping clips, route away from heat sources and moving parts, and test under pressure before finalizing.
Recommended replacement intervals for hoses and fittings
Good installation practices reduce failure risk, but even the best components age and require scheduled replacement to prevent leaks.
Rubber inlet hoses: replace every 5 years or sooner if cracking appears.
Braided stainless hoses: inspect annually, replace every 7–10 years.
Shutoff valves and fittings: inspect yearly, replace after signs of corrosion or after 10–15 years.
Replace immediately after any visible deterioration.
Winterizing and protecting lines from freezing or damage
When temperatures approach freezing, proactive winterizing of dishwasher water lines prevents burst pipes and consequential water damage. This includes insulating exposed supply lines, securing fittings against movement, and ensuring outdoor shutoff valves are drained or closed.
Additionally, winter precautions involve installing heat tape where needed, routing lines away from unheated spaces, checking for slow drips, and testing shutoffs so minor issues are fixed before cold causes failure.
Cost and time estimates for common repairs
Cost and time expectations help homeowners choose between DIY and professional repairs for a leaking dishwasher water line. Typical part and labor ranges and a comparison of average DIY time versus professional service time are summarized below to set realistic expectations. This information frames the next steps and budgeting decisions.
| Item | Estimate |
|---|---|
| Parts and labor | $25–$300 |
| DIY vs. Pro time | 30 minutes–3 hours vs. 1–2 hours (plus travel) |
Typical parts and labor cost ranges
Repairing a leaking dishwasher water line typically involves a small set of parts and a short block of technician time, so homeowners can expect predictable cost and duration ranges.
Parts commonly cost $10–$75 (hoses, fittings, valves, clamps).
Labor runs $60–$150 per hour; most repairs take 0.5–2 hours.
Total typical repair cost: $50–$300, depending on complexity and local rates.
Average DIY time vs. professional service time
Compare typical do-it-yourself and professional timelines to choose the most efficient route for fixing a leaking dishwasher water line.
A DIY repair (identifying leak, shutting water, replacing hose or fittings, testing) typically takes 1–3 hours for someone with basic tools.
A licensed plumber usually completes the job in 30–90 minutes.
Professionals add travel time and warranty but guarantee faster, guaranteed results.
Troubleshooting checklist for persistent or intermittent leaks
A focused troubleshooting checklist guides the reader through stepwise checks to locate persistent or intermittent dishwasher water line leaks.
It emphasizes observing leaks during different cycle phases and using simple diagnostics to reproduce elusive failures. Clear, sequential actions help isolate the source and decide whether parts or professional service are needed.
- Inspect visible connections and hose clamps for tightness and wear.
- Run short cycles while watching for leaks during fill, wash, and drain phases.
- Use towels, paper, or food coloring to trace slow or hidden seepage.
- Test with and without dishwasher loading and with different cycle settings to reproduce intermittent leaks.
Stepwise checklist to narrow down elusive leaks
When leaks are intermittent or hard to locate, a systematic, step-by-step checklist helps isolate the source by eliminating possibilities in logical order.
Inspect visible fittings, hoses, and clamps; dry area and run short fill to observe.
Check inlet valve, drain connection, and door seal.
Tighten or replace suspect parts, retest, document findings, and repeat until no leak appears.
Diagnostic tips for intermittent leaks during cycles
Having worked through the stepwise checklist to rule out obvious sources, attention shifts to leaks that appear only during specific points in a cycle.
Observe cycles to identify timing (fill, wash, drain, heat). Use towels and paper to localize moisture.
Run short tests targeting suspected stages. Check door seals, float assembly, spray arm connections, and drain hose clamps for pressure-activated failures.
Examples of successful repairs and common mistakes to avoid
Several brief case examples illustrate how homeowners stopped leaks by tightening compression fittings, replacing cracked supply hoses, or reseating loose hose clamps.
Common errors—such as overtightening fittings, using the wrong sealant, or neglecting to test under full pressure—often lead to repeat leaks.
Preventive steps like following torque guidance, using correct parts, and performing a pressure test are recommended to avoid recurrences.
Short case examples of DIY fixes
Below are concise case examples that illustrate common DIY approaches to repairing a leaking dishwasher water line, highlighting what worked, what failed, and key lessons learned.
One homeowner replaced a cracked hose with a reinforced braided line, resolving the leak.
Another tightened a loose fitting but missed a corroded clamp, causing recurrence.
A successful fix combined part replacement and proper torque on fittings.
Common errors that cause repeat leaks and how to prevent them
The case examples above show how quick fixes can appear effective yet still leave underlying issues; common errors that cause repeat leaks often stem from incomplete diagnosis, improper parts, or incorrect installation.
Technicians should check fittings, replace worn hoses with OEM-rated parts, tighten to specified torque, and verify valve seating.
Pressure testing and observing cycles prevent recurrence.
Document repairs and follow manufacturer guidelines to avoid repeat failures.
Conclusion
When a dishwasher water line leaks, prompt, informed action prevents costly damage and restores appliance reliability. For example, a homeowner named Maria discovered a slow drip at the inlet hose, shut off the supply, tightened a loose compression fitting, and avoided ceiling damage to the downstairs neighbor’s apartment. With basic tools, routine inspections, and timely repairs, most leaks are simple to fix—saving money, stress, and the hassle of water-related home repairs.