How to Blow Out Water Lines in Your House: Step-by-Step Winterization Guide
To effectively blow out water lines in your house and prevent freezing and burst pipes during winter, you’ll need to use an air compressor to purge both potable and irrigation pipes. This process involves isolating the systems, setting safe air pressure, and opening fixtures to force out water until the lines are completely dry. Special attention is required for toilets, appliances, water heaters, and sprinkler systems. Remember to use safety gear and pressure regulators to protect your plumbing. If you encounter leaks or frozen sections, it’s advisable to seek professional help. Follow the detailed step-by-step guide for complete instructions.
What it Means to Blow Out Water Lines and When to Do It
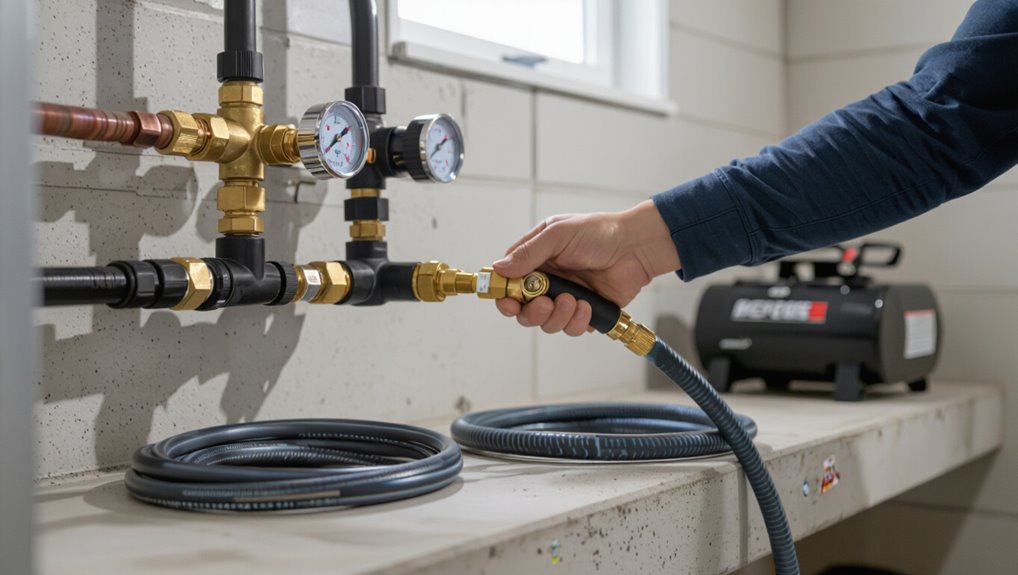
Blowing out water lines means removing standing water from a plumbing system to prevent freeze damage during cold periods.
This step is particularly important for year-round homes in freezing climates, seasonal properties left vacant, and any plumbing with exposed or poorly insulated pipes.
Failure to winterize can lead to burst pipes, mold growth, and costly repairs.
Why winterizing plumbing matters for homes and seasonal properties
Preservation of a home’s plumbing during freezing months is a straightforward but essential practice: winterizing prevents pipes from freezing, bursting, and causing costly water damage.
Property owners, including seasonal homeowners, gain peace of mind and lower repair costs by learning how to blow out water lines in house systems or hiring pros.
Proper winterization protects fixtures, limits mold risk, and preserves property value.
Signs you need to winterize (climate, vacancy, exposed pipes)
When should a homeowner act to winterize plumbing?
A homeowner should prepare when freezing temperatures are forecast, when a property will be vacant for days or weeks, or when pipes run through unheated spaces (crawlspaces, attics, exterior walls).
Seasonal properties, unpredictable cold snaps, and evidence of drafts or poor insulation around plumbing signal that blowing out lines is prudent to prevent cold-related damage.
Risks of not blowing out water lines (burst pipes, mold, repair costs)
If cold water is left in house lines during a freeze, expanding ice can crack pipes, causing sudden bursts that flood walls, floors, and belongings.
Burst pipes lead to structural damage, mold growth from lingering moisture, ruined insulation and finishes, and costly emergency repairs.
Insurance claims may rise, living areas become uninhabitable, and remediation plus replacement of plumbing can total thousands.
Tools, Equipment, and Materials You Need
A concise list of necessary tools, equipment, and consumables prepares a homeowner for a safe and effective blowout.
The discussion covers an essential tools checklist, appropriate compressor types and recommended PSI/capacity, and optional items that speed or protect the job such as air adapters, trap primers, and antifreeze.
Clear recommendations and brief usage notes follow to help select the right gear for different house sizes and plumbing layouts.
Essential tools checklist
Proper preparation requires assembling the right tools and materials before beginning a water line blowout. A concise checklist reduces mistakes and speeds the process.
Essential items include fittings, safety gear, and isolation tools. Verify compatibility with home plumbing and have spares for quick swaps.
- Air compressor hose and quick-connect fittings
- Isolation keys/valves
- Blowout adapter
- Safety glasses and gloves
- Shop vacuum
Types of compressors and recommended PSI/capacity
Selecting the right compressor depends on pipe size, system length, and desired purge speed; typical residential blowouts use portable compressors delivering 4–10 CFM at 40–80 PSI.
Larger homes or long runs benefit from 10–15 CFM to maintain pressure; tanks of 4–20 gallons smooth airflow.
Oil-free units reduce contamination.
Verify regulator, gauge, and quick-connect compatible with plumbing fittings.
Optional equipment that speeds the job (air adapters, trap primers, antifreeze)
After choosing a compressor with suitable PSI and CFM, several optional items can greatly speed the blowout and reduce cleanup.
Quick-connect air adapters fit various hose sizes; faucet and hose bib adapters allow simultaneous zone purging.
Trap primers prevent sewer gas when traps are dry. Non-toxic RV/boat antifreeze protects fixtures and basins.
Durable manifold kits and pressure gauges improve control and efficiency.
Preparing Your Home Before You Start
Before beginning, the homeowner should shut off the main water supply and identify all local shutoff valves.
Fixtures and isolated sections — including hose bibs, irrigation lines, and the water heater — must be drained and capped, while water-using appliances are turned off and electrical systems nearby are protected.
Appropriate safety precautions and personal protective equipment should be in place before pressurizing or purging any lines.
Shutting off the main water supply and locating shutoff valves
Begin by locating and turning off the home’s main water shutoff to stop incoming flow before any work begins.
Identify internal and external isolation valves—near the meter, basement, crawlspace, or exterior wall—and confirm their function by gently operating them.
Label valves for future reference and note any frozen, corroded, or hard-to-turn valves so repairs or professional assistance can be arranged before proceeding.
Draining fixtures and isolating sections (hose bibs, irrigation, water heater)
Drain all accessible fixtures and isolate entire systems to prevent trapped water from freezing or causing pressure issues during the blow-out.
Open faucets, flush toilets, and drain low points.
Close and cap hose bibs; shut isolation valves for irrigation zones and the water heater.
Drain or bypass the water heater per manufacturer instructions.
Verify drains are clear and isolated sections remain dry before pressurizing lines.
Turning off water-using appliances and protecting electrical systems
With fixtures emptied and isolated sections verified dry, attention shifts to appliances and electrical systems that could be affected by the blow-out.
Shut off supply valves to dishwashers, washing machines, ice makers and humidifiers. Drain and disconnect hoses. Disable water-connected appliances per manufacturer instructions.
Turn off circuit breakers for areas where compressed air might contact wiring or controls to prevent damage and false tripping.
Safety precautions and personal protective equipment
Several essential safety precautions must be observed before starting a blow-out to protect people and property:
- wear safety goggles,
- hearing protection,
- gloves,
- and sturdy footwear;
- avoid loose clothing.
Guarantee adequate ventilation for exhaust and depressurization.
Tag valves and appliances to prevent accidental activation.
Keep bystanders and pets clear.
Verify electrical isolation and have a fire extinguisher and first-aid kit accessible.
Step-by-Step Blow-Out Procedure for Interior and Exterior Lines
The procedure begins with preparing appliances and treatment systems, including draining the water heater and winterizing the water softener.
Next, all faucets, valves, and fixtures are opened to vent the system before a compressor is connected to the main line or an exterior hose bib.
Lines are then blown out methodically—room by room and fixture by fixture—with irrigation and sprinkler zones purged last using the proper sequence and nozzles.
Step 1 Drain the household water heater and water softener prep
Begin by draining the household water heater and preparing the water softener to prevent damage during the blow-out.
Shut power or gas, close incoming water, attach a hose to the heater drain and empty to a safe location.
Bypass and isolate the water softener, then drain its tanks per manufacturer instructions.
Verify both units are empty and secured before proceeding.
Step 2 Open all faucets, valves, and fixtures to vent the system
Open every faucet, valve, and fixture throughout the house—inside and outside—to create clear venting paths for air and water during the blow-out.
Work methodically: open sinks, tubs, showers, hose bibs, washing machine and dishwasher valves, and utility drains.
Leave hot and cold taps open.
Check shutoff valves to verify they are open downstream.
Note and label any stuck or leaking fixtures for repair.
Step 3 Connect compressor to the main line or exterior hose bib
Attach the compressor to the main line or an exterior hose bib using a pressure-rated hose and an appropriate adapter or quick-connect; verify the compressor is off while making connections.
A shutoff valve between the compressor and house prevents backflow.
Tighten fittings, inspect for leaks, and guarantee pressure relief is available.
Confirm regulator setpoint below pipe rating, typically 40–60 psi for residential systems, before starting.
Step 4 Blow out lines room by room and fixture by fixture
With the compressor connected and the regulator set below the pipe rating, the operator moves through the house, clearing each run individually to guarantee complete drainage.
Each fixture is opened, air is applied briefly, and lines are checked for sputtering or moisture.
Sequence follows logical plumbing runs to avoid backflow and trapped pockets.
- Kitchen and utility sinks
- Bathrooms, tubs, showers
- Toilets and supply lines
- Exterior hose bibs
- Washing machine and dishwasher lines
Step 5 Blow out irrigation and sprinkler systems with sequence and nozzles
Begin the outdoor sequence by isolating the irrigation system at the main shutoff and confirming the compressor regulator is set to a safe pressure for PVC and sprinkler components; this prevents damage while allowing effective purging.
Operate zones sequentially, run each zone until clear, then inspect nozzles and rotors for residual water.
Close valves, depressurize hose bibs, and tag the system as winterized.
Step 6 Clear traps, P-traps and low points; use compressed air carefully
Clear all accessible traps, P-traps, and low points before applying compressed air, since these are the spots where water most commonly collects and freezes.
Inspect drains, remove strainers, and tilt fixtures to drain.
Attach regulator-equipped compressor and limit pressure to recommended PSI for plumbing (typically 30–50 PSI).
Purge lines briefly in short bursts, watching for residual moisture and avoiding sustained high pressure that can damage fittings.
Step 7 Add non-toxic antifreeze to fixtures that retain water (toilets, traps)
After removing standing water from traps and low points and purging lines with compressed air, attention turns to fixtures that commonly retain small amounts of water despite blowing out the system.
A measured cup of RV/non-toxic antifreeze is poured into each toilet bowl, tank and sink or shower trap.
Verify traps have visible antifreeze, label treated fixtures, and vent spaces briefly to settle liquid.
Step 8 Final checks and closing valves, removing compressor, and sealing outdoor faucets
Confirm all interior fixtures show no water and that shutoff and isolation valves are returned to their normal positions before removing the compressor; then slowly depressurize the system, disconnect the air hose, and cap or drain and insulate exterior spigots and any exposed hose bibs to prevent freeze damage.
Perform a final walkthrough, verify no leaks, store equipment dry, label valves, and document actions for next season.
Special Procedures for Common Fixtures and Appliances
Specific fixtures and appliances require tailored blow-out steps to prevent damage and guarantee complete drainage.
The guide will cover toilets, showers, tubs, washing machines, dishwashers, water heaters and boilers (both tank and tankless), sump pumps, humidifiers and HVAC condensate lines, and irrigation systems including in-ground sprinklers.
Each item’s unique isolation, pressure, and component-care considerations will be addressed before the general blow-out sequence is applied.
Toilets, showers, and tubs
When draining a home’s plumbing for winterizing, toilets, showers, and tubs require targeted steps to prevent trapped water from freezing and damaging fixtures. Each fixture type demands slightly different handling because of trap configurations and integrated valves.
Flush toilets, remove residual tank water, and use compressed air to clear the bowl and trap.
For showers and tubs, open drains, remove stoppers, and blow out branch lines gently.
Washing machines and dishwashers
Several common appliances—washing machines and dishwashers—require tailored steps to prevent trapped water in hoses, pumps, and valves from freezing and causing damage.
Disconnect and drain supply hoses, run a final drain and spin or pump cycle, remove and empty filters and traps, and detach drain lines to allow residual water to escape.
Leave doors ajar and label shutoff valves for later reassembly.
Water heaters (tank and tankless) and boilers
Water heaters and boilers require distinct winterization steps because trapped water in tanks, heat exchangers, and connected piping can expand and rupture components.
For tanks, drain, shut gas/electric, and bypass antifreeze-sensitive zones.
For tankless units, follow manufacturer purge and blow procedures to protect the heat exchanger.
Boilers require draining low points, isolating circulators, and adding appropriate antifreeze or dry‑out measures per service guidelines.
Sump pumps, humidifiers, and HVAC condensate lines
Having addressed heaters and boilers, attention shifts to fixtures that manage ground and indoor moisture: sump pumps, whole‑house or portable humidifiers, and HVAC condensate lines.
Drain and disconnect humidifiers, purge water from float valves and trays, and store removable components.
For sump pumps, unplug, remove hoses, and clear pits.
Blow compressed air through condensate lines or flush with water and compressed air to prevent freezing.
Irrigation systems and in-ground sprinklers
Irrigation systems and in‑ground sprinklers require specific winterization steps to prevent frozen pipes and damaged valves; the core task is to remove all standing water from mains, lateral lines, and heads using the method appropriate to the system.
Use correct shutoffs, drain zones, and purge methods; protect backflow devices and test for leaks before freeze.
- shut off supply
- isolate backflow
- blow out zones
- drain low points
- insulate exposed parts
Troubleshooting and Common Problems During Blow-Outs
When issues arise during a blow-out, the technician first verifies compressor output and airflow to rule out equipment faults or clogged hoses.
Attention then shifts to locating stubborn water pockets and low points, inspecting valves and fittings for freezing or damage discovered mid-process.
After the procedure, the operator checks for leaks at joints and appliances and documents any repairs or replacements needed.
Low airflow or compressor won’t build pressure
Diagnose low airflow or a compressor that won’t build pressure by isolating the source: check for clogged filters, leaky fittings, undersized hoses or valves left partially open, and verify the compressor’s intake and discharge are unobstructed.
If the unit cycles frequently without reaching cutoff, test for worn seals, inadequate oil (if applicable), or a failing unloader valve.
Repair leaks, replace filters, use proper hose diameter, and confirm regulator settings.
Stubborn water pockets and how to find low points
Because water naturally collects at the system’s lowest points and in pockets created by horizontal runs or fittings, stubborn remaining water is a common challenge during blow-outs.
Technicians locate low points by tracing pipe routes, inspecting exposed runs, and feeling for cold spots.
Use short bursts of compressed air, gravity drains, and manual opening of fixtures at suspected lows until no moisture exits.
Frozen valves or damaged fittings discovered mid-process
Detecting a frozen valve or a damaged fitting mid-blow-out requires immediate pause and assessment to prevent further harm.
The operator should stop air introduction, isolate affected zones, and inspect visually for ice, cracks, or loose connections.
Gentle thawing and tightening may suffice; if integrity is compromised, cap the line and schedule repair.
Resume only after confirmed safety and pressure control.
Detecting and addressing leaks after blow-out
After completing a blow-out, inspect the system for signs of leaks—visible drips, wet spots, frost lines, or a sustained pressure drop on gauges—and prioritize areas near joints, valves, and splices where failures most commonly appear.
Isolate sections, re-pressurize briefly with low air pressure to locate leaks, mark defects, then repair or replace affected fittings.
Retest and monitor pressure for stability before finalizing winterization.
When to Call a Professional and What to Expect
Signs of persistent leaks, frozen or damaged pipes, unclear shutoffs, or lack of the right equipment indicate it is time to hire a licensed plumber.
Professionals typically offer services such as pressurized blow-outs, line inspections, and antifreeze application, with costs varying by home size, system complexity, and regional rates.
Before hiring, one should ask about licensing and insurance, exact services included, estimated price breakdown, warranty terms, and projected timeline.
Indicators you should hire a plumber
Call a licensed plumber when symptoms go beyond routine maintenance or when a DIY attempt risks property damage.
Persistent leaks, frozen or burst pipes, unclear main shutoff issues, or loss of water pressure after winterization signal professional intervention.
Also hire one if compressor use or air-gun methods fail, if valves appear corroded, or if water quality and backflow concerns arise.
Expectations include diagnosis and safe repair.
Typical professional services and pricing considerations
When professional help is required, plumbers typically offer a range of services for winterization and blowout tasks, including system assessment, main shutoff verification, compressed-air blowouts, zone-by-zone isolation, pressure testing, and post-service inspections to confirm valves and backflow devices function properly.
Costs vary by home size, number of zones, travel, and needed repairs; expect base fees plus hourly or per-zone rates.
- Inspection and assessment
- Blowout with dry-down
- Pressure and leak testing
- Valve and backflow servicing
- Emergency or seasonal surcharge
Questions to ask a contractor before hiring
After reviewing typical services and pricing, homeowners should prepare focused questions to evaluate a contractor’s competence, scope of work, and pricing structure before scheduling a blowout.
Ask about licensing, insurance, references, experience with similar systems, specific steps included, equipment used, estimated duration, warranty or guarantee, emergency response, and written estimates.
Clarify payment terms and any permit requirements.
Post-Winter Reopening: Turning Water Back On Safely
The homeowner should follow a clear step-by-step refill and air-purge procedure to prevent trapped air and water hammer when restoring service.
After water is restored, a systematic check for leaks, pressure testing, and restarting appliances in the correct order will identify issues before damage occurs.
A concise winter-to-spring checklist consolidates these tasks to confirm all systems are functioning safely.
Step-by-step system refill and air purge procedure
Begin by preparing the house and its main shutoff so water can be restored in a controlled, gradual manner.
Open exterior valves, close outdoor hose bibs, then slowly crack the main shutoff to admit water.
Open faucets one at a time from lowest to highest fixtures to purge air.
Monitor for steady flow and listen for hammering; stop and reclose if anomalies occur.
Checking for leaks, pressure tests, and appliance restart order
Inspect plumbing and fixtures systematically for leaks and pressure issues before fully restoring service.
Technicians should open main supply slowly, monitor pressure gauge for spikes, and check joints, traps, and visible piping.
Run faucets and appliance supply lines sequentially—water heater, boiler, washing machine, dishwasher—bleeding air and observing for leaks.
Repair any leaks, confirm stable pressure, then resume normal operation.
Winter-to-spring checklist to ensure systems are functioning
After confirming leak repairs and stable pressure, technicians should follow a compact winter-to-spring checklist to verify all systems before full service is restored.
Inspect pipe insulation, valves, and outdoor fixtures; flush lines to clear air and debris; test water heater, boiler, and irrigation controls; run appliances and fixtures sequentially; monitor for pressure drops or leaks for 24–48 hours; document findings and notify homeowners.
Preventive Maintenance and Long-Term Tips
The homeowner should consider upgrades such as freeze‑proof faucets and better pipe insulation to reduce future winterization time and risk.
Establishing a seasonal schedule and keeping simple records of each blow‑out helps guarantee consistency and highlights recurring problem areas.
Common mistakes to avoid—insufficient draining, neglecting outdoor fixtures, and skipping tests—are easily prevented by following these best‑practice tips.
Upgrades that reduce winterization effort (freeze-proof faucets, insulation)
When homeowners invest in freeze-proof hose bibs, pipe insulation, and insulated access panels, they markedly reduce the time and risk involved in seasonal blowouts. These upgrades limit exposed water, retain heat, and simplify shut-off and drainage procedures.
Installing frost-free spigots, adding foam or wrap insulation to vulnerable runs, and sealing crawlspace doors minimizes freezing points, lowers maintenance frequency, and reduces required labor for winterization.
Seasonal schedule and record keeping for repeat winterizations
Routine establishes reliability: homeowners benefit from a fixed seasonal schedule and concise records that document each winterization—dates, valves closed, lines blown, antifreeze used, and any repairs—so future jobs are faster, safer, and easier to audit.
Clear logs aid service coordination and warranty claims.
- Annual checklist with target dates
- Log of performed actions and materials
- Photo evidence of valve positions
- Notes on anomalies
- Next-service reminders
Common mistakes to avoid and best-practice tips
Avoid common pitfalls by following proven procedures and staying proactive about maintenance; neglect or improvisation often creates bigger problems down the line.
Verify shutoffs, label valves, and depressurize systems before applying compressed air. Use correct pressure, protect fixtures with plugs, and clear drains.
Inspect for leaks, document steps, and schedule regular checks. Consult professionals for complex systems or uncertainty.
Quick Reference: Blow-Out Timetable and Safety Reminders
Because timing and safety are critical for a successful blow-out, the quick reference below condenses an effective timetable and key precautions into a single, easy-to-scan guide that professionals and experienced homeowners can follow.
| Step | Time | Safety |
|---|---|---|
| Prep valves | 10–15 min | Shut power, bleed pressure |
| Blow lines | 20–40 min | Watch gauges, avoid overpressure |
| Verify & drain | 10 min | Recheck, insulate exposed pipes |
Conclusion
By following the blow-out procedure, a homeowner can protect pipes and appliances from devastating winter damage, preserving fixtures as if guarding a small kingdom from a frosty siege. Completed carefully with the right tools, preparations, and safety checks, the process drastically reduces freeze risks and costly repairs. When uncertainty arises, calling a professional guarantees thorough protection. With routine maintenance and timely reopening steps, plumbing endures winters reliably for years to come.