How to Remove a Stuck Furnace Filter: Safe Steps to Free and Replace It
To safely remove a stuck furnace filter, power off the system and wear gloves and a mask. First, inspect the slot for any jams and loosen any fasteners. Stabilize the frame and gently wiggle the filter while pulling it straight out. If it’s still stuck, use silicone spray or a putty knife to ease it out. As a last resort, you can cut the filter and vacuum up any debris. After successfully removing the old filter, install a correctly sized replacement and run the system briefly to ensure proper airflow. Follow the detailed steps below for a comprehensive guide.
How to Tell If a Furnace Filter Is Stuck and Whether Removal Is Necessary
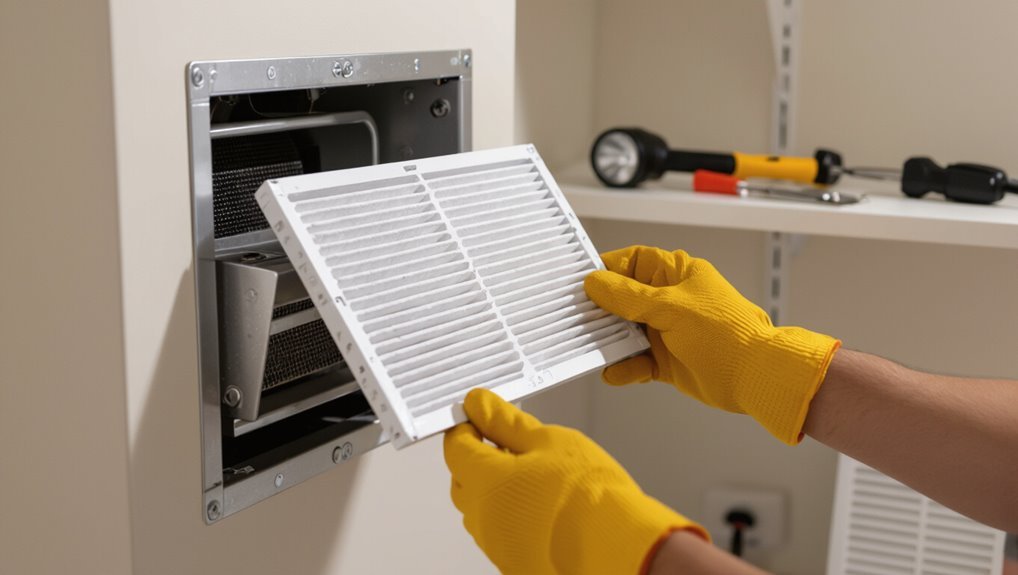
Clear signs distinguish a stuck furnace filter—such as visible jamming, warped edges, or resistance when attempting removal—from a filter that is merely dirty and needs replacement.
Because a stuck filter can impair airflow, strain the furnace, and pose safety risks, prompt removal is recommended when obstruction is confirmed.
If the filter is inaccessible, damaged, or removal risks harming the unit, a professional should be contacted instead of attempting DIY.
Signs a filter is stuck vs. filter simply dirty
Determining whether a furnace filter is stuck or merely dirty hinges on observing a few specific signs: reduced airflow, visible dust build-up, warped or torn media, and resistance when attempting removal.
If the frame is misaligned, corroded, or lodged by debris, it suggests a stuck filter rather than simple clogging.
For guidance on next steps, consult instructions for how to remove a stuck furnace filter.
Safety reasons to remove a stuck filter promptly
Act promptly: a stuck furnace filter can impair airflow, reduce system efficiency, and create safety hazards such as overheating, increased fire risk, and buildup of harmful particulates that compromise indoor air quality and respiratory health.
Prompt removal restores ventilation, prevents strain on motors and heat exchangers, reduces combustion hazards, and limits allergen and particulate accumulation that could worsen asthma, allergies, or long-term respiratory issues.
When to call a professional instead of DIY
Recognize when a stuck furnace filter exceeds routine DIY: if the filter is fused in place by heavy debris, warped or brittle from age, or trapped behind bent metal or damaged housing, field methods can do more harm than good. Call a technician when electrical components, sealed housings, persistent odors, or visible damage exist; professionals prevent injury and system harm.
| Indicator | Action |
|---|---|
| Bent housing | Call pro |
| Odor or smoke | Call pro |
| Fragile filter | Call pro |
Tools and Materials You May Need
A clear list of tools and materials helps streamline removal of a stuck furnace filter. Recommended items include a basic toolkit (screwdriver, pliers, flashlight), protective gear (gloves, dust mask), and several common replacement filter sizes and types.
The following section outlines what to have on hand and why each item matters.
Basic toolkit checklist
Gathering the right tools simplifies removal of a stuck furnace filter and helps avoid damage or injury. A concise toolkit speeds the job and prevents improvisation that could harm the unit.
Essential items include:
- Flashlight for visibility in tight compartments
- Needle-nose pliers for gripping edges
- Flathead screwdriver for pry leverage
- Replacement filter matching size and MERV rating
Protective gear and precautions
Several protective items can reduce injury and equipment damage when removing a stuck furnace filter: work gloves to prevent cuts from sharp metal and fiberglass, safety glasses to shield eyes from dust and debris, and a dust mask or respirator if the filter is especially dirty.
Additionally, long sleeves protect skin, knee pads improve comfort, and a flashlight guarantees visibility in tight, dim compartments.
Replacement filter types and sizes to have on hand
Many homeowners keep at least two common replacement filters on hand—one pleated MERV 8–11 for routine use and one higher-efficiency MERV 13 or electrostatic option for occasional heavy-pollution periods—along with the exact size(s) specified on the furnace or existing filter: nominal dimensions like 16x20x1, 20x25x1, or 16x25x4.
| Type | Size |
|---|---|
| Pleated | 16x20x1 |
| Pleated | 20x25x1 |
| HEPA-like | 16x25x4 |
| Electrostatic | Custom sizes |
Preparing the Furnace for Safe Filter Removal
Before attempting removal, the HVAC system should be powered down following the manufacturer’s shutdown steps and by switching the breaker or power switch off.
The filter location and type of housing (slot, door, or cabinet) should be identified so the correct access method can be used.
Clear the area around the furnace and lay down drop cloths or cardboard to protect floors and catch debris.
Powering down the HVAC system step-by-step
To prepare the furnace for safe filter removal, the homeowner should first power down the HVAC system to eliminate electrical and airflow hazards. Switch thermostat to OFF, turn furnace switch to OFF, and cut power at the breaker. Confirm shutdown by feeling airflow and checking display. Record steps taken for restart.
| Step | Action | Verification |
|---|---|---|
| 1 | Thermostat OFF | Screen blank |
| 2 | Furnace switch OFF | Fan silent |
| 3 | Breaker OFF | Multimeter 0V |
Locating the filter and understanding common filter housings
With the system powered down and verified, the homeowner can locate the air filter and identify the housing style that holds it.
Filters commonly sit in return-air grilles, dedicated furnace filter drawers, or cabinet-mounted slots.
Note frame orientation, filter size stamped on the filter or housing, and fasteners—clips, screws, or sliding tracks—so removal technique matches the specific housing without forcing components.
Clearing the surrounding area and protecting surfaces
Clear the immediate area around the furnace so there is unobstructed access to the filter housing and room to set down tools or the old filter.
Remove loose items, rugs, and obstructions.
Lay a drop cloth or cardboard to protect flooring and catch debris.
Cover nearby surfaces and controls with a towel or plastic to prevent scratches, dust, and accidental damage during removal.
Step-by-Step Methods to Free a Stuck Furnace Filter
The following methods offer a progression from least to most invasive for freeing a stuck furnace filter.
They cover gentle manual wiggling and pulling, lubrication with soft tapping, removing access panels or housing components, using simple tools like pliers or a putty knife with care, and, as a last resort, cutting and replacing the filter in place.
Each technique is presented with safety and damage prevention in mind.
Method 1 Gentle manual wiggling and pulling (best for lightly stuck filters)
Begin by turning off the furnace power to prevent the fan from starting. Then locate the filter slot and inspect how the filter is seated.
The technician uses slow, alternating sideways and outward motions, keeping hands close to edges to avoid bending. If resistance lessens, continue until free; otherwise stop and reassess.
- Stabilize frame with one hand
- Wiggle corner gently
- Pull evenly along face
- Pause if stuck
Method 2 Lubrication and soft tapping techniques (for sealed edges)
Apply a small amount of lubricant and use measured taps to loosen filters whose edges are sealed by dust, paint, or swollen frame material.
The technician applies silicone spray sparingly, waits, then taps the frame edges gently with a rubber mallet or wooden dowel to break the seal. Work evenly around all sides to avoid bending the frame.
- Use silicone or graphite spray
- Tap gently and evenly
- Wait after application
- Protect surrounding surfaces
Method 3 Removing access panels or housing components (for difficult access)
When direct access to the filter slot is blocked by a tight housing or nested panels, removing adjacent access panels or disassembling portions of the furnace cabinet provides the clearance needed to extract a stuck filter safely.
Wear gloves, turn power off, and document screw locations before removal.
- Identify fasteners and panel types
- Use correct replacement screws/labels
- Avoid bending ducts or seals
- Reassemble and test airflow
Method 4 Using simple tools safely to pry or grip without damage (pliers, putty knife)
Although gentle hands often suffice, a few basic tools—needle-nose pliers, a putty knife, and a small flat screwdriver—can provide controlled leverage to free a stuck furnace filter without damaging the frame or surrounding seals.
- Inspect filter edges and note obstruction points
- Use putty knife to create a thin gap, working slowly
- Grip frame corners with needle-nose pliers, apply even pull
- Protect seals with tape or cloth while levering
Method 5 Cutting and replacing in-situ when removal risks damage (last-resort)
Consider cutting and replacing a stuck furnace filter only as a last resort when attempts to remove it would risk bending the frame, tearing seals, or damaging surrounding ductwork; this method accepts that the old media will be sacrificed to preserve the system.
Use sharp shears to cut the filter, remove sections, clean the slot, fit a new filter, and seal edges to prevent bypass.
- Cut away collapsed media carefully
- Remove remnants with vacuum
- Insert exact-size replacement
- Seal gaps with foil tape
How to Avoid Damaging the Furnace While Removing the Filter
Attention to vulnerable components such as the filter frame, blower wheel, and access door helps prevent accidental damage during removal.
Aware operators use controlled, steady force and stop if resistance persists to avoid bending parts or breaking clips.
Visible warping, loose fasteners, or unusual noises after an attempt indicate the need for professional repair.
Common parts at risk and how to protect them
Removing a stuck furnace filter risks damaging nearby components such as the blower wheel, motor shaft, electrical wiring, duct connector plates, and the air intake grille; recognizing these vulnerable parts before beginning work helps guarantee targeted protection and prevents costly repairs.
Use soft tools, pad sharp edges, secure wiring, support ducts, and avoid contact with moving parts.
| Part | Risk | Protection |
|---|---|---|
| Blower wheel | Bend/debris | Soft brush, no contact |
| Motor shaft | Misalignment | Support, avoid torque |
| Wiring | Cuts | Tape, disconnect power |
| Duct plates | Deformation | Cushion, gentle leverage |
| Intake grille | Breakage | Cover, remove clips first |
Force limits and when to stop
After identifying vulnerable components and taking protective measures, the next priority is understanding how much force is safe to apply before risking damage.
Apply steady, moderate pressure—no sudden jerks—and stop if resistance remains after a few deliberate attempts.
If the filter won’t budge with fingertip pulling, light tapping, or gentle prying, cease further force and consider alternative release methods or professional help.
Signs of damage that require professional repair
If visible cracks, bent framing, loose wiring, scorched components, or persistent rattling appear when attempting to remove the filter, these are clear signs that the furnace may be damaged and requires professional repair.
The homeowner should stop, secure power, document damage with photos, and contact a licensed HVAC technician.
Continued DIY attempts risk electrical hazards, fire, voided warranties, and further mechanical harm.
Installing the Replacement Filter Correctly
Next steps cover selecting the correct filter size and appropriate MERV rating to match the system and indoor air needs.
The proper orientation and airflow arrows will be explained to guarantee the filter faces the correct direction.
Finally, securing the filter and reassembling the housing will be addressed to restore safe, efficient operation.
Choosing the correct filter size and MERV rating
Choosing the correct filter size and MERV rating is essential for proper airflow and indoor air quality. The replacement must match the furnace’s specified dimensions and balance filtration efficiency with system capacity.
Refer to the furnace manual or existing filter for exact dimensions. Select a MERV rating that captures desired particulates without overburdening the blower—typically MERV 6–8 for standard systems, higher only if unit supports it.
Orientation and airflow direction explained
A furnace filter has two key sides—one that faces incoming air and one that faces the blower—so proper orientation is critical to guarantee airflow and filtration work as designed.
The arrow on the frame indicates airflow direction; install with the arrow pointing toward the blower.
Pleated media should face the airflow so particles are trapped before reaching the fan, ensuring efficiency and filter lifespan.
Securing the filter and reassembling the housing
Slide the replacement filter into the slot with the arrow aligned toward the blower, ensuring the pleated media sits flush against the frame and there are no gaps along the edges.
Verify filter seating, then close the access panel or grille, engaging any clips or screws.
Restore power, run the system briefly to confirm proper airflow and absence of unusual noise, and note the replacement date.
Testing the System After Replacement
After replacing the filter, the system should be restarted following a brief checklist (power on, thermostat settings, and airflow panel secured) while observing initial operation.
The technician should listen for unusual noises and watch for abnormal airflow, odors, or visible leaks.
If any irregular behavior appears—rapid cycling, loud rattles, or reduced airflow—the system should be shut down and inspected before continued use.
Restart checklist and initial operation observation
Power the furnace and thermostat, then conduct a quick visual and audible check before normal operation begins.
Verify filter frame seating, panel latches, and airflow direction markings.
Confirm blower starts on low delay then cycles to heat or cool call.
Check thermostat settings, fan mode, and circuit breaker position.
Note system response timing and record any immediate faults or error codes for follow-up.
Listening and visual checks for abnormal behavior
With the initial restart checklist complete and the furnace running, attention shifts to listening and visual checks for abnormal behavior.
The technician notes unusual noises—rattles, bangs, squeals—or irregular cycling.
Visual inspection verifies steady flame, no smoke, secure vents, and proper airflow at registers.
Any persistent oddities are logged for follow-up diagnostics, ensuring safe, efficient operation after filter replacement.
When to shut down and inspect further
Shut the system down for a focused inspection whenever persistent unusual noises, repeated short cycling, visible smoke, burning smells, or a rapid rise in return-air temperature occur after a filter change.
Technicians then verify correct filter size and installation, inspect blower motor, wiring, and vents for obstruction or damage, and check limit switches and pressure differentials.
Document findings and repair or escalate if hazards exist.
Preventive Measures to Keep Filters from Getting Stuck
Preventive measures reduce the chance of a filter becoming lodged and extend system life.
A consistent replacement schedule with reminders, correct filter sizing and secure fit, and regular cleaning of the filter housing are key practices.
Implementing these simple steps keeps access clear and minimizes future removal problems.
Recommended replacement schedule and reminders
A simple, consistent replacement schedule is the most effective way to prevent furnace filters from becoming stuck.
Establish intervals based on filter type and household factors, set calendar reminders, and inspect monthly. Replace when visibly dirty or airflow decreases.
- Replace every 1–3 months for disposable filters
- Check monthly during heavy use
- Use phone or calendar alerts
- Keep spare filters on hand
Proper filter sizing and fit tips
When filters match the furnace’s dimensions and slide smoothly into the housing, they are far less likely to bind or wedge in place.
Verify exact length, width, and thickness; confirm airflow direction arrows align.
Choose rigid-frame or snug pleated filters rather than flimsy types.
Replace with manufacturer-recommended sizes and avoid trimming.
Ascertain filter rails and guides are undamaged for consistent seating.
Maintenance routines to keep the housing clean and accessible
Having the correct filter size and intact rails helps, but routine cleaning of the filter slot and surrounding housing keeps future changes effortless.
Inspect monthly; vacuum dust, wipe with a damp cloth, and clear debris from corners and rails.
Lubricate metal guides lightly if needed.
Ascertain access panels fit properly and fasteners operate smoothly.
Document maintenance dates to maintain consistency and prevent buildup.
Troubleshooting Common Complications
The guide next addresses common complications that can arise when replacing a furnace filter.
It covers aligning a new filter in a warped housing, removing residual debris or adhesive that holds a filter in place, and handling a filter that collapses or tears during removal.
Clear, practical next steps are provided for each situation.
Difficulty aligning a new filter into a warped housing
A warped filter housing can prevent a new filter from seating properly, causing gaps or binding that reduce airflow and strain the furnace.
Inspect the frame for bends or cracked corners. Gently reshape metal with pliers or rubber mallet, supporting surrounding panels to avoid damage.
If warping persists, install a thin shim or replace the housing to guarantee a secure, airtight fit.
Residual debris or adhesive holding a filter in place
Scrape away accumulated debris and adhesive spots carefully to free a stuck furnace filter without damaging the frame or ductwork.
Use a plastic scraper or credit card to loosen gunk, working incrementally. Apply a damp cloth or mild solvent sparingly to dissolve residue, then blot dry.
Avoid metal tools and excessive force. Inspect mounting surfaces and remove remaining particles before sliding a replacement filter into place.
Filter collapsing or tearing during removal and next steps
If a furnace filter tears or collapses during removal, proceed cautiously to prevent debris from entering the ductwork and to preserve any usable frame for replacement.
Collect loose media with a vacuum and disposable gloves, gently pry remaining pieces from the slot, and inspect the housing for trapped fragments.
Replace the filter immediately with a new one; seal gaps and clean surrounding surfaces before restarting the system.
Cost, Time Estimates, and When to Hire a Professional
Removing and replacing a stuck furnace filter typically takes a homeowner 15–45 minutes, depending on access and complications.
Parts and basic tools—replacement filter, gloves, screwdriver—usually cost $20–$100, while specialized parts or new housings raise the price.
Professional HVAC service is recommended when the filter slot is damaged, the filter is fused in place, airflow or mechanical issues are present, or the homeowner lacks the tools or confidence to proceed.
Typical time required for DIY removal and replacement
Estimate the time for a DIY furnace filter removal and replacement at roughly 10–30 minutes for most homeowners: Typical cases take 10–20 minutes; stuck filters or awkward access extend to 30–45 minutes. Professionals shorten time but cost more. Use the table for quick planning.
| Task | Easy access | Difficult access |
|---|---|---|
| Remove old | 5–10 min | 10–20 min |
| Install new | 5–10 min | 10–15 min |
Estimated costs for parts and tools
Following the time estimates for DIY removal and replacement, attention turns to the costs involved in parts and basic tools needed for the job.
A replacement filter typically costs $5–$40 depending on size and MERV rating.
Basic tools—screwdriver, flashlight, putty knife—total $10–$30 if not owned.
Budget $20–$70 for common scenarios; receipts and part sizes vary.
Indicators that professional HVAC service is warranted
Recognize when a stuck furnace filter becomes more than a DIY nuisance: persistent airflow restriction, unusual noises, visible damage to the filter slot or housing, recurring filter jamming after multiple attempts, or signs of system strain such as frequent cycling and higher-than-normal energy bills indicate professional HVAC service is warranted.
Estimated cost: $100–$400; time: 1–3 hours.
Consider hiring when:
- Recurrent jamming
- Structural damage
- System performance drop
- Safety concerns
Conclusion
In the rare, apocalyptic event of a stubborn, immovable furnace filter, the guide’s calm, precise steps feel like a heroic manual against domestic doom. Follow the safety checks, gentle persuasion techniques, and replacement tips; success will be swift and satisfying. If obstruction persists, calling a pro prevents devastation to the HVAC domain. Regular maintenance renders such crises almost mythical, turning looming catastrophe into a trivial, almost laughable household anecdote.