How to Frame Around Ductwork: Step-by-Step Guide for a Clean, Code-Compliant Finish
Framing around ductwork involves strategic planning to ensure proper clearances, fire safety, and ongoing access for maintenance. Begin by mapping out the duct placements, then install level plates or metal tracks and secure studs to form soffits or bulkheads. Don’t forget to include access panels, insulation, and fire-rated barriers, sealing seams with approved mastic or intumescent materials. Maintain appropriate fastener spacing and handle materials carefully to avoid damage and leaks. Adhere to local building codes and schedule necessary inspections for compliance. This guide provides detailed steps to achieve a clean and code-compliant finish.
Overview of Framing Around Ductwork for a Clean, Code-Compliant Finish
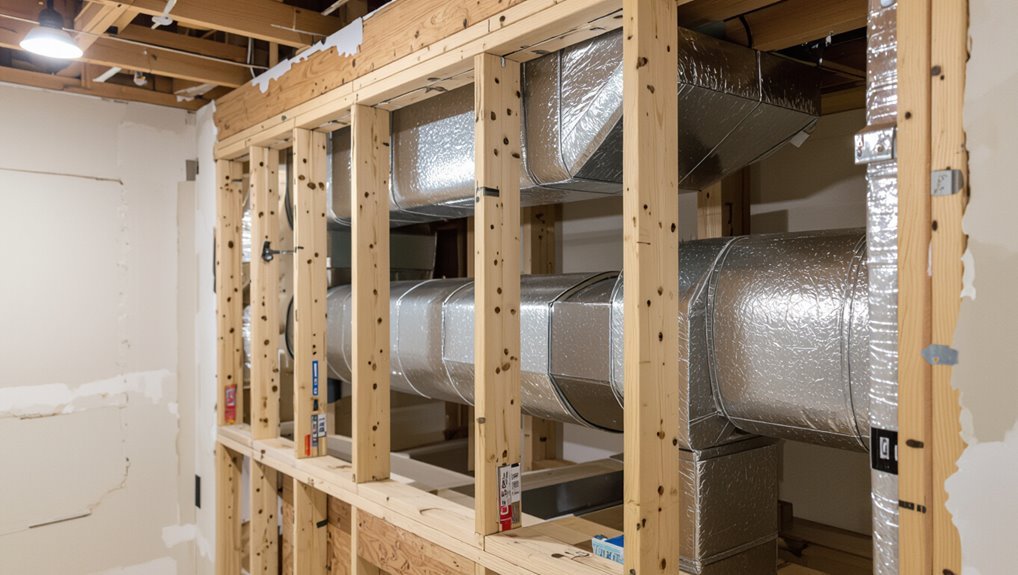
Proper framing around ductwork guarantees fire safety, maintains HVAC efficiency, and meets local building codes.
Common situations include exposed ducts, dropped ceilings and soffits, and wall penetrations that require clean, supported enclosures.
A concise framing workflow—measure, build a support structure, insulate and seal, then finish—typically takes from a few hours to a couple of days depending on complexity.
Why proper framing matters for safety, efficiency, and code compliance
Safety, durability, and regulatory compliance converge when framing around ductwork is done correctly. Proper framing protects ducts from mechanical damage, prevents air leaks that reduce system efficiency, and maintains required clearances for fire and service access.
Clear understanding of how to frame around ductwork guarantees inspections pass, energy loss is minimized, and occupants remain safe through compliant, durable installations.
Typical scenarios requiring duct framing (exposed ducts, dropped ceilings, soffits, wall penetrations)
Many common construction and renovation situations call for deliberate framing around ductwork to achieve a clean, code-compliant finish.
Typical scenarios include exposed ducts in basements or industrial spaces, dropped ceilings concealing runs, soffits built to hide horizontal sections, and wall penetrations where ducts pass between rooms.
Each scenario demands tailored framing, firestopping, and access considerations to maintain safety and serviceability.
Quick summary of steps and expected timeline
After identifying the scenario—exposed runs, dropped ceilings, soffits, or wall penetrations—the overview outlines a concise sequence: measure and map the duct route, plan framing members and clearances, install firestops and insulation where required, erect framing and attach sheathing or access panels, then finish with sealing and inspections.
Typical timeline: planning 1–2 hours, framing 2–8 hours, finishing and inspection 1–3 hours.
Building Codes and Permits Relevant to Duct Framing
Building codes set minimum clearances around ducts, require specific firestopping where ducts penetrate assemblies, and often mandate smoke barriers or rated enclosures in certain locations.
Fire-resistance ratings and approved methods for sealing penetrations are commonly specified to maintain compartmentation and limit fire and smoke spread.
The need for a permit and the advisability of consulting an inspector depend on project scope and local jurisdiction, so builders should verify requirements before framing begins.
Common local-code requirements for duct clearances and firestopping
When planning framing around ductwork, contractors must account for local code requirements that govern minimum clearances, permitted penetrations, and approved firestopping methods to maintain both airflow performance and passive fire protection.
Inspectors commonly require specified setbacks from combustibles, access panels for service, labeled duct materials, and listed firestop systems at wall or floor penetrations.
Documentation and permits validate compliance.
Fire-resistance ratings, smoke barriers, and penetration sealing
Although duct framing often focuses on structural support and clearance, it must also accommodate required fire-resistance ratings, smoke barrier continuity, and approved penetration seals so that assemblies perform as designed under code.
Framing must maintain rated assembly integrity, use listed through-penetration firestop systems where ducts cross barriers, and guarantee smoke seals and fire dampers are installed per manufacturer and code specifications to preserve compartmentation.
When to pull a permit and when to consult an inspector
Who decides whether duct framing work requires a permit or merely an inspector consult depends on scope, location, and applicable code provisions. Municipal building departments determine permit needs; structural alterations, fire-rated assembly changes, or mechanical rerouting typically require permits. Minor nonstructural enclosures may only need an inspection or informal advice. Always verify local codes, submit accurate plans when required, and obtain approvals before starting work.
Materials, Tools, and Safety Gear You’ll Need
The section outlines the choice of framing materials—wood or metal studs—along with drywall, fire-rated components, insulation, vapor barriers, and duct wrap options appropriate for HVAC installations.
It also lists essential tools and fasteners such as saws, drills, screws, anchors, and sealants needed to construct and secure the framing.
Finally, it covers required personal protective equipment and safe handling practices for working around HVAC components.
Framing materials: wood vs. metal studs, drywall, fire-rated materials
Selecting framing materials for boxing in ductwork requires balancing structural needs, ease of installation, and code compliance.
Wood studs suit short runs and simple cuts; metal studs resist rot, are lighter, and offer straighter lines for long spans.
Use appropriate drywall thickness; employ fire-rated gypsum where code demands fire separation.
Fasteners and edge details must match chosen materials for secure, compliant assemblies.
Insulation, vapor barriers, and duct wrap options
Begin by gathering insulation types, vapor barriers, and duct wrap designed for HVAC use, since proper materials determine thermal performance, condensation control, and code compliance.
Select fiberglass, mineral wool, or closed-cell foam for thermal and acoustic needs.
Use permeable or impermeable vapor barriers per local code.
For exposed ducts, choose foil-faced or canvas duct wrap with appropriate R-value and approved fire ratings.
Tools and fasteners: saws, drills, screws, anchors, sealants
Gather essential tools and fasteners specific to framing around ductwork: a circular saw or reciprocating saw for cutting framing lumber and drywall, a drill/driver with bits for pilot holes and fasteners, self-tapping screws and wood screws in appropriate lengths, masonry or hollow-wall anchors where framing meets concrete or metal studs, and high-quality HVAC sealants and fire-rated caulk to seal penetrations.
Include a speed square, tape measure, chalk line, clamp, level, and utility knife.
Personal protective equipment and safe handling of HVAC components
After listing the cutting tools, fasteners, and sealants needed for framing around ductwork, attention turns to the personal protective equipment (PPE) and safe handling practices that protect installers and the HVAC system.
Installers must wear gloves, eye protection, hearing protection, dust masks or respirators, and steel-toe boots.
Handle ducts gently, support seams, avoid compressing insulation, and ground metal to prevent cuts and static damage.
Planning the Frame Around Ducts: Measurements and Layout
Accurate measurements of duct dimensions, required clearances, and access points form the foundation of any framing plan.
The planner should translate those measurements into a layout for soffits, chases, and bulkheads that preserves airflow and fits within structural constraints.
The design must also allocate space for service access, vents, and future maintenance to avoid costly modifications later.
Measuring duct dimensions, clearances, and access requirements
When planning the frame around ductwork, the installer first documents the exact duct dimensions, orientations, and any fittings or joints that affect clearance; these measurements determine the framing footprint and necessary offsets.
The installer also records required clearances per code, insulation thickness, and service access points. Marking primary and secondary measurements on plans guarantees accurate stud placement, removable panel locations, and unobstructed airflow and maintenance access.
Creating a layout plan for soffits, chases, and bulkheads
Although framed elements must fit unseen mechanicals, the layout for soffits, chases, and bulkheads begins with a clear plan that translates measured duct profiles and required clearances into scaled drawings.
The planner marks wall lines, ceiling heights, and offsets for insulation and framing members, locates junctions, notes overlaps, and specifies material sizes and fastener spacing to guarantee rigid, code-compliant assemblies.
Accounting for service access, vents, and future maintenance
Several key access points—service panels, inspection ports, and vent terminations—must be integrated into the layout so that HVAC components remain reachable without dismantling framing or finishes.
The plan should mark clear access doors, removable panels, and minimum clearance zones per code.
Coordinate with HVAC contractors for filter, damper, and motor access, and provide labeled pathways for future expansion or rerouting to simplify maintenance.
Step-by-Step Framing Process
The following section outlines a concise, sequential framing workflow beginning with site preparation and protection of ducts and the surrounding workspace.
It covers establishing reference lines and attaching plates or track, erecting studs, headers, and blocking, and incorporating vents, grilles, and access panels into the frame.
The sequence concludes with installation of insulation and soundproofing around the duct to guarantee performance and maintainability.
Preparing the site: protecting ducts and workspace
Begin by clearing and outlining the work area so that all duct runs are visible and accessible; this guarantees framing measurements and protection plans match actual conditions.
Next, cover ducts with durable tape and protective cardboard or foam, secure loose insulation, and mask vents.
Establish walkways, remove tripping hazards, and place dust barriers.
Post signage and limit traffic to trained personnel only.
Building a reference line and attaching plates/track
With ducts protected and the work area secured, a straight, level reference line is established to guide plate or track placement; this line guarantees studs align precisely with duct runs and roof or ceiling planes.
Plates or metal tracks are snapped to the line, fastened to substrate at code-specified intervals, and checked for plumb and continuity before proceeding to stud installation and penetration planning.
Constructing the frame: studs, headers, and blocking
Once the track is secure and the reference line confirmed, framing proceeds by laying out studs, cutting headers, and installing blocking in a systematic sequence to guarantee alignment and load distribution.
Studs are spaced per code, trimmed to exact length, then fastened plumb. Headers span openings, sized for load, and are doubled or laminated.
Blocking anchors duct supports and provides attachment points for finishes.
Integrating vents, grilles, and access panels into the frame
Install vents, grilles, and access panels by locating their exact positions on the framed surface, cutting openings to manufacturer dimensions, and reinforcing surrounding members to maintain structural integrity and allow for future servicing.
Secure perimeter blocking, notch studs as needed, and install mounting frames or nailers flush with finished plane.
Verify alignment, fasten units per instructions, and guarantee access panels operate unobstructed.
Installing insulation and soundproofing around the duct
After securing vents and access panels, attention turns to insulating and soundproofing around the duct to control thermal loss and minimize airborne and structure-borne noise.
The installer fits appropriate insulation jackets or batt insulation, ensuring full coverage without compressing airflow.
Acoustic foam, resilient channels, or isolation clips are added where ducts contact framing.
All materials meet local code and HVAC manufacturer recommendations.
Applying firestopping, sealing gaps, and smoke barrier details
Begin by identifying all penetrations and seams where the duct passes through fire-resistance-rated assemblies or compartmentalized spaces.
Apply approved firestop sealants, intumescent collars, or wrap systems per manufacturer and code.
Seal remaining gaps with non-combustible caulk or mineral wool.
Confirm smoke barrier continuity with rated seals at joints and access panels.
Document materials and installation for inspection and compliance.
Hanging and finishing drywall for a seamless appearance
Measure and mark stud lines, openings, and service locations before any drywall is handled to confirm accurate cuts and flush surfaces.
Sheets are hung perpendicular to framing, staggered at joints, fastened at proper spacing, and cut precisely around ducts.
Taping, joint compound application, and sanding proceed in thin layers for feathered changes.
Prime and paint after inspection to verify a seamless, code-compliant finish.
Special Situations and Techniques
The article next addresses techniques for handling specific challenges, including framing around large rectangular ducts versus round ducts.
It also covers working in finished basements, attics, and tight crawlspaces and the use of removable access panels or hinged doors for serviceability.
Finally, it outlines approaches for building soffits that conceal multiple ducts or plumbing while preserving clearance and access.
Framing around large rectangular ducts versus round ducts
Ductwork presents distinct framing challenges depending on shape: large rectangular ducts require broad, continuous support and careful alignment with joists, while round ducts demand clearance and flexible framing to accommodate curved surfaces.
For rectangular runs use blocking, ledger strips, and full-height soffits to distribute loads and maintain straight lines.
For round ducts employ adjustable brackets, split framing members, and gap-filled insulation to prevent vibration and air leaks.
Working in finished basements, attics, and tight crawlspaces
Working in finished basements, attics, and tight crawlspaces demands careful planning and specialized techniques to protect existing finishes, maintain access, and guarantee safe installation.
Practitioners should use padded protection, minimal fasteners, and compact framing methods; respect clearance and insulation; plan ventilation and lighting; favor removable supports over permanent obstruction; and document as-built dimensions for serviceability while complying with local codes and fireblocking requirements.
Creating removable access panels and hinged doors
Install removable access panels and hinged doors where serviceable fittings, cleanouts, or dampers require routine inspection or adjustment, designing them to match surrounding finishes while preserving clearances and insulation.
Use fire-rated assemblies where code mandates, seal edges against air leakage, and provide secure but accessible hardware.
Label panels for identification, mount with removable fasteners or continuous hinges, and guarantee trim aligns flush for a clean appearance.
Framing for soffits that conceal multiple ducts or plumbing
Beyond access panels and hinged doors, soffits offer a practical solution for concealing multiple ducts or plumbing runs while maintaining serviceability and a finished appearance.
Soffit framing uses a robust perimeter of studs and blocking, with removable or hinged panels where needed.
Maintain clearance for insulation and code-required access, secure mechanical supports, and coordinate with trades to avoid future conflicts while ensuring firestopping and finish trim continuity.
Common Mistakes and How to Avoid Them
Common errors in framing around ductwork include unintentionally blocking airflow or service access, using non–fire-rated materials where firestopping is required, and leaving overly tight clearances that cause vibration and noise.
Failing to install proper insulation can also promote condensation and mold. Highlighting these mistakes helps guarantee proper performance, safety, and maintainability.
Blocking ventilation or access unintentionally
When framing around ductwork, mistakes that restrict airflow or access can turn a simple wall into a costly retrofit.
Installers should verify duct routes, maintain clearances, and plan removable access panels before sheathing.
Avoid nailing or compressing ducts, and label hidden vents.
Coordinate with HVAC plans and measure twice to preserve serviceability and required airflow paths, preventing expensive reopenings.
Using non-fire-rated materials where firestopping is required
Blocking ducts or sealing access can be as damaging as using the wrong materials for firestopping; both compromise safety and future serviceability.
Builders sometimes plug gaps with caulk, foam, or unlisted wraps that fail fire tests. Code requires listed firestop systems and tested components.
Inspect openings, use manufacturer-certified intumescent sealants, collars, or mortar, and document installations to guarantee compliance and maintain warranties.
Over-tight clearances causing vibration and noise
Allowing ductwork to fit too tightly within framing or enclosure gaps often transfers vibrations directly to surrounding structure, producing hums, rattles, and amplified noise throughout a building.
To avoid this, maintain manufacturer-recommended clearances, install vibration isolators or neoprene sleeves at contact points, and use flexible connectors between ducts and equipment.
Inspect and adjust fasteners to prevent metal-to-wood binding.
Skipping insulation that leads to condensation and mold
Excessive vibration and rigid connections are not the only pitfalls of tight framing; another common mistake is omitting insulation around ductwork, which can cause condensation on cold surfaces and foster mold growth in enclosed spaces.
Properly insulating and sealing gaps prevents temperature differentials, protects framing, and reduces moisture accumulation.
Inspect for thermal bridges, use vapor retarders where required, and follow local code for R-values and clearance.
Finishing Touches for a Clean, Professional Look
Attention to seams, corner beads, and proper paint preparation creates invisible shifts that elevate the framed ductwork.
Careful selection of trim, deliberate shadow gaps, or a decorative soffit can define the space while maintaining a polished appearance.
Incorporating acoustic treatments where the framing meets the ductwork helps reduce HVAC noise transmission without compromising the finish.
Seams, corner beads, and paint prep for invisible transitions
A few careful steps at seams and corners make the difference between a project that looks DIY and one that reads professional.
Seams receive taped, embedded joint compound in two thin coats with light sanding between.
Corner beads protect edges; metal or PVC beads fastened flush, mudded, and feathered prevent cracking.
Prime thoroughly, spot-sand, and use a high-hide topcoat for seamless, paint-ready changes.
Trim, shadow gaps, and decorative soffit options
Why choose trim and shadow gaps over a flush finish? Trim adds definition, conceals minor gaps, and protects edges.
Shadow gaps create clean visual lines and permit slight movement without visible cracks.
Decorative soffits conceal bulkier ducts, allow integrated lighting or vents, and coordinate with room style.
Choices depend on aesthetics, maintenance access, and local code clearances.
Acoustic treatments to reduce HVAC noise transmission
Several practical measures can considerably reduce HVAC noise transmission without compromising airflow or access.
Soft acoustic liners, mass-loaded vinyl barriers, and resilient channels isolate vibration and dampen duct-borne sound.
Flexible duct connectors and insulated plenum boxes minimize structure-borne noise.
Seal gaps and use acoustic sealant at joints.
Confirm treatments allow service access and meet fire and building codes for safe, effective noise control.
Inspection Checklist and Maintenance Guidance
A concise pre-inspection checklist should confirm code compliance, clearances, firestopping, and safe access before framing is completed.
The guide also outlines seasonal maintenance tasks and practical methods for creating removable access panels to reach ducts after framing.
Clear criteria are given for when to call an HVAC professional or inspector for repairs, permits, or safety concerns.
Pre-inspection checklist for code compliance and safety
Before any framing work begins, the installer should complete a concise pre-inspection checklist to verify code compliance and safety. This includes confirming clearances from duct surfaces, fireblocking and firestopping requirements, access panel locations, combustible material separation, and the presence of required insulation or protective covers.
The checklist should also record local code references, permit status, electrical or mechanical conflicts, required clearances for appliances, and corrective actions before proceeding.
Seasonal maintenance tasks and how to access ducts after framing
Periodic seasonal maintenance guarantees duct systems remain efficient and safe after framing is complete. The inspection checklist should guide access points, clearance verification, filter and insulation checks, and sealing integrity.
The checklist lists scheduled tasks: open access panels, inspect joints for leaks, verify clearances around mechanicals, replace or clean filters, assess insulation condition, remove debris, and document findings with dates and recommended repairs.
When to call an HVAC pro or inspector
Routine seasonal checks will reveal many issues that a homeowner can address, but certain findings should prompt professional evaluation.
If leaks, visible mold, persistent airflow loss, unusual noises, or suspected refrigerant odor appear, contact an HVAC technician.
Also schedule inspection when framing alters duct routing, after major repairs, or before occupancy.
Document concerns, access points, and any measurements for the inspector.
Materials and Cost Comparison
For a clear comparison of options when framing around ductwork, wood framing, metal studs, and prebuilt soffits each present distinct cost profiles, benefits, drawbacks, and typical use cases. The table below summarizes those differences to guide material selection by budget, durability, and project speed. Following the table, the article will review practical examples and decision factors for common installation scenarios.
| Material | Typical Cost | Key Pros / Cons |
|---|---|---|
| Wood framing | Low–moderate | Pros: easy to work with, widely available; Cons: susceptible to moisture/termite issues |
| Metal studs | Moderate | Pros: noncombustible, straight; Cons: requires specialized fasteners and tools |
| Prebuilt soffits | Moderate–high | Pros: fast install, factory-finished; Cons: less customizable, higher upfront cost |
Cost, pros, cons, and typical use cases for wood framing, metal studs, and prebuilt soffits
Choosing between wood framing, metal studs, and prebuilt soffits often comes down to budget, job complexity, and desired finish: wood framing is usually the least expensive and easiest for custom shapes but can warp or rot in damp spaces; metal studs cost slightly more upfront, resist moisture and fire, and provide straighter lines though they require different fasteners and cutting tools; prebuilt soffits have the highest material cost but save labor time and yield a clean, factory-finished appearance ideal for repetitive installations or tight schedules.
| Option | Notes |
|---|---|
| Wood | Low cost, flexible, risks moisture |
| Metal studs | Mid cost, durable, needs tools |
| Prebuilt soffits | High cost, fast install, uniform |
| Use cases | Custom work, wet areas, fast projects |
Quick Reference: Tools and Fastener List
A concise checklist of hardware and supplies helps guarantee safe, efficient framing around ductwork.
The following items cover the essentials and preferred products for most installations:
- Cordless drill and impact driver
- Framing nails/screws and metal framing clips
- Fire-rated sealant and intumescent firestopping
- Measuring tools, metal snips, and personal protective equipment
Essential tools
Begin by assembling a compact set of tools and fasteners tailored to framing around ductwork: a circular saw or reciprocating saw for cutting framed members and drywall, a drill/driver with a set of bits, a framing hammer, tape measure, speed square, level, utility knife, chalk line, tin snips for metal ducts, and pry bar.
Include clamps, saw horses, drywall T-square, staple gun, and safety gear.
Recommended fasteners, sealants, and firestopping products
Select fasteners, sealants, and firestopping products that match framing material, duct type, and applicable codes to guarantee secure attachment, airtight joints, and required fire ratings.
Use corrosion-resistant screws or nails sized for stud thickness; HVAC sheet-metal screws for ducts.
Choose UL-classified intumescent firestop sealants, rated fire collars for penetrations, and ASTM-tested acoustic sealants.
Prefer low-VOC, paintable products and follow manufacturer cure times and installation instructions.
Troubleshooting Scenarios
Common field issues include unexpected obstructions in the framing path, minor leaks or loose joints that require resealing after framing, and the need to retrofit older, non-compliant duct enclosures.
The section outlines practical steps for identifying and addressing each problem while maintaining structural and airflow integrity.
Recommended responses prioritize safety, code compliance, and minimal disruption to surrounding work.
Dealing with unexpected obstructions in the framing path
When an unexpected obstruction such as ductwork appears in the planned framing line, the framer must assess its size, location, and structural impact before proceeding; quick measurements and a clear plan prevent costly rework.
After assessment, options include rerouting studs, installing headers or soffits, or creating removable access panels.
All modifications must preserve load paths, comply with code clearances, and maintain service access for future maintenance.
Fixing minor leaks and resealing joints after framing
Address minor leaks promptly to prevent water damage and compromised insulation; the framer should inspect all exposed joints, seams, and penetrations after framing is complete.
Small gaps and hairline leaks are sealed with approved mastic, foil tape, or aerosol sealant compatible with duct material. Fasteners are tightened, insulation repositioned, and foam applied sparingly.
Reinspect after HVAC startup and record repairs.
Retrofits: updating old non-compliant duct enclosures
Following inspection and minor repairs, framers and HVAC technicians frequently encounter older duct enclosures that no longer meet code or performance standards.
They assess insulation, clearances, firestopping, and material integrity, then design retrofit solutions: replace damaged duct sections, add required fire-rated barriers, improve insulation and sealing, and adjust framing for access.
Documentation and permits guarantee compliance and durable, efficient operation.
Conclusion
In conclusion, the guide emphasizes planning with precision, cutting with care, fastening with firmness, and sealing with scrutiny; following codes, obtaining permits, and choosing appropriate materials; protecting workers, verifying clearances, and allowing for airflow; inspecting joints, testing airflow, and maintaining access. By balancing safety with efficiency, aesthetics with functionality, and permanence with serviceability, the framer achieves a clean, code-compliant finish that performs reliably, looks professional, and endures through routine maintenance.