How to Use a Toilet Auger: Step-by-Step Guide to Unclog Toilets Like a Pro
A toilet auger is an essential tool for tackling stubborn clogs that a plunger can’t handle. To use it effectively, first, remove excess water from the bowl and wear gloves and goggles for protection. Place the rubber boot over the drain, feed the flexible cable until you feel resistance, and then rotate it clockwise to break up or capture the obstruction. After use, be sure to sanitize the tool. For further assistance, the guide includes steps for cleaning, troubleshooting, and advice on when to call a plumber.
How to Use a Toilet Auger to Unclog a Toilet Quickly and Safely
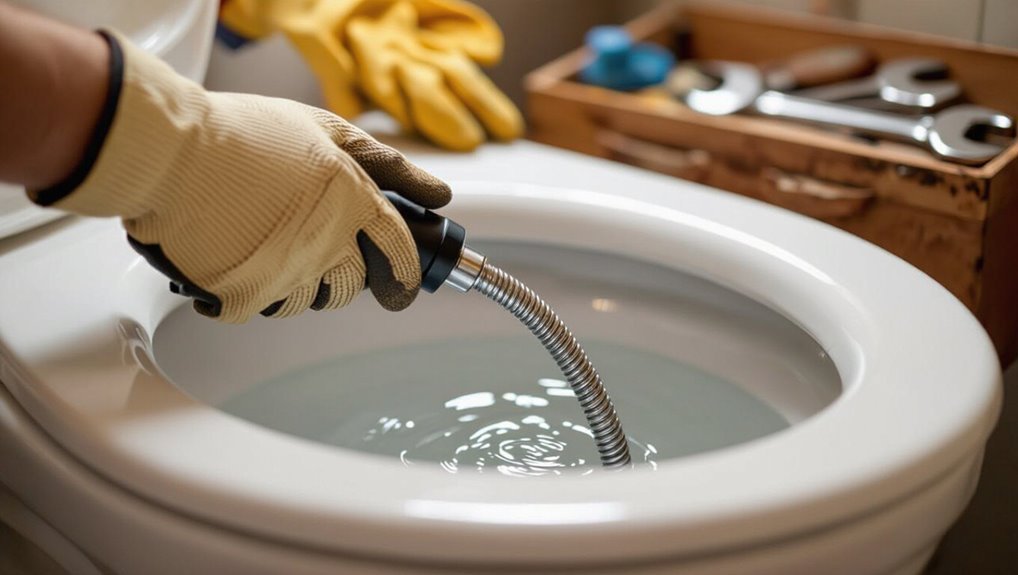
A toilet auger is a hooked cable tool designed to reach and break up obstructions in the toilet trap and drain, and it is used when a plunger cannot clear the clog.
Different models—handheld closet augers, drum-style augers, and longer drain snakes—vary in cable length, coating, and tip design to suit porcelain toilets or deeper sewer lines.
Choosing the right type reduces the risk of damage and speeds safe clearance.
What a toilet auger is and when to use one
Toilet augers are specialized plumbing tools designed to remove clogs lodged beyond the reach of a plunger, using a long, flexible cable and a hooked or coiled tip to navigate the toilet’s trap and drain.
They are used when plunging fails or water remains slow. Knowing how to use a toilet auger helps address hair, paper, or small objects without dismantling fixtures or calling a plumber.
Types of toilet augers and how they differ
After identifying when an auger is needed, the next step is choosing the right type for the job.
Different augers suit various clogs and fixtures: plumbing professionals compare design, length, tip, and planned use. Selection affects effectiveness and safety; proper matching reduces damage and repeat blockages.
- Closet auger (toilet-specific)
- Drum auger (cabinet sinks)
- Power auger (severe clogs)
- Handheld cable (versatile)
Tools and safety gear you need before starting
Before beginning, gather essential tools and supplies such as a toilet auger, bucket, gloves, and disinfectant.
Wear personal protective equipment and follow basic hygiene precautions to avoid exposure to wastewater.
Prepare the bathroom by clearing nearby items and protecting floors and fixtures to minimize damage and mess.
Essential tools and supplies
A small set of reliable tools and basic safety gear will make clearing a clog with an auger faster and safer.
Required items should be compact, functional, and readily available to avoid delays and extra mess.
- Toilet auger (commercial bowl auger)
- Bucket and towels for spills
- Adjustable pliers or wrench
- Plumbing-safe drain cleaner or lubricant
Personal protective equipment and hygiene precautions
With the basic tools set out, attention should shift to personal protective equipment and hygiene to reduce exposure to bacteria and bodily fluids.
Protective measures minimize risk and simplify cleanup. Wear gloves, eye protection, and appropriate clothing; have disinfectant and hand sanitizer available.
Follow safe removal and disposal procedures after work.
- Nitrile gloves
- Safety goggles
- Disposable coveralls or old clothes
- Disinfectant and hand sanitizer
Preparing the bathroom to avoid damage and mess
When preparing the bathroom to avoid damage and mess, the user should clear the area around the toilet, protect adjacent surfaces, and organize tools and safety gear within easy reach.
Lay down absorbent towels or a disposable mat, remove rugs and fragile items, place a bucket and trash bag nearby, and guarantee gloves, goggles, and cleaning supplies are accessible.
Confirm good lighting and ventilation.
Quick pre-checks to try before using an auger
Before reaching for the auger, a quick set of checks can save time and prevent damage. A few controlled plunges are recommended first, avoiding harsh chemical drain cleaners that can harm porcelain and metal and complicate later repairs.
If the water level responds and the obstruction seems local and soft, an auger is appropriate; persistent backups, gurgling in other fixtures, or sewage odors indicate a professional plumber is needed.
Safe plunging technique to attempt first
Start by attempting a controlled plunge to clear minor clogs before reaching for an auger.
The user should position a flange plunger, create a firm seal, and use steady, forceful thrusts—not violent jerks—maintaining suction on both up and down strokes.
After several strokes, pause to check water movement; if drainage improves, repeat until clear.
If not, proceed to auger use.
When to avoid chemicals and why
Although chemical drain cleaners can seem like a quick fix, they should be avoided in many toilet-clog situations because they can damage porcelain, plumbing seals, and the auger itself.
They may create hazardous fumes or burns. Instead, try boiling water (carefully), a plunger, or a biological enzyme cleaner; these options reduce risk to fixtures and personal safety before employing an auger.
Signs the clog is suitable for an auger vs. plumber intervention
How can one tell if an auger is the right tool or if a plumber should be called?
The clog is suitable for an auger when water drains slowly or a single flush stalls, no sewage odor or multiple fixtures blocked, and the blockage is likely localized (toilet paper, debris).
Call a plumber if water backs up from other drains, sewage smell persists, or repeated clogs occur.
Step-by-step guide: Using a toilet auger
The following steps outline how to use a toilet auger, beginning with correct positioning and preparing the toilet bowl.
The procedure covers inserting the cable carefully to avoid scratching porcelain, extending it until resistance indicates the clog, and then breaking up or hooking the obstruction to reel it back.
Finally, the auger is retracted and the cable cleaned before testing the flush.
Positioning the auger and preparing the toilet bowl
Before inserting the auger, the user should clear the area, put on gloves, and remove excess water from the bowl until only a few inches remain; this reduces splashing and gives better access to the trap.
The auger’s handle is positioned near the tank, feed tube aimed at the drain. Confirm the rubber boot rests squarely against the porcelain to create a seal.
Inserting the auger cable without scratching porcelain
Begin by centering the auger’s rubber boot over the drain and holding the feed tube steady to keep the cable aligned; this minimizes contact with the porcelain as the cable is fed into the bowl.
Guide the cable slowly, keeping tension controlled and the tube angled gently. Use the protective boot as a barrier, avoid metal-to-ceramic contact, and retract slightly if resistance shifts toward the rim.
Extending the cable and feeling for the clog
Extend the cable steadily while maintaining firm control of the feed tube so only the auger’s protected tip enters the trap.
The operator advances slowly, pausing to note changes in resistance. Soft, gradual feedback indicates passage through curves; a sudden stop or firmer resistance signals contact with blockage or tighter bends.
Hands remain ready to adjust feed tension and prevent kinking or sudden cable recoil.
Breaking up or hooking the clog and reeling it back
Once the operator feels firm resistance indicating contact with the obstruction, they should apply controlled clockwise rotation on the crank while maintaining steady forward pressure on the tube; this both helps the auger’s tip bore into or snag the clog and prevents the cable from buckling.
Gentle pull-back tests whether material hooks; if resistance lessens, continue alternating short pushes and reels to fragment or secure debris until flow restoration is sensed.
Retracting the auger and cleaning the cable
Slowly withdraw the cable while keeping a firm, steady grip on the handle to prevent sudden unspooling or springback.
Guide the coil slowly into the drum, pausing if resistance is felt.
Wipe the cable with disposable rags or paper towels, removing debris and residue.
Sanitize the cable and drum with a disinfectant, allow to dry, then store the auger in a ventilated, protected place.
Flushing and confirming the drain is clear
With the auger retracted and cleaned, the operator should flush the toilet to verify the blockage has cleared and the trap is draining normally.
Observe water flow speed and listen for smooth draining without gurgles.
Check bowl refill level and tank refill cycle.
If water drains steadily and the bowl refills correctly, the line is clear; tidy the workspace and sanitize tools before storage.
What to do if the first attempt fails
If the initial pass fails to clear the clog, the operator should pause and reassess the situation before repeating attempts.
Inspect for visible obstructions, guarantee the auger reached the trap, and check cable condition.
Try one or two additional gentle passes, rotating and retracting slowly.
If resistance persists, stop and call a professional to avoid damage or use alternative methods per local guidelines.
Common mistakes to avoid when using a toilet auger
Users should avoid common mistakes that can turn a simple clog into a bigger problem.
Excessive force on the cable can damage pipes, using the wrong auger type can harm the toilet, and neglecting hygiene raises cross-contamination risks.
Clear attention to technique, tool selection, and sanitation minimizes damage and health hazards.
Forcing the cable and risking pipe damage
Forcing the auger cable through resistance risks bending the cable, scratching glaze, or cracking soil‑pipe joints; when an operator meets firm obstruction, smooth, controlled pressure combined with slight rotation is safer than brute force.
Backing the cable out periodically prevents kinking. Excessive force can dislodge seals, damage wax rings, or push clogs deeper.
Patience and methodical technique reduce repair costs and plumbing failures.
Using the wrong auger type for your toilet
Choosing the wrong auger for a toilet can turn a simple clog into a costly repair.
Using a closet auger on fragile porcelain, a drain snake for tight trapways, or an oversized head can scratch glaze, bend components, or fail to reach the blockage.
Select an appropriate toilet-specific auger, match length and tip type, and consult manufacturer guidance to avoid damage and ineffective clearing.
Ignoring hygiene and cross-contamination risks
Neglecting hygiene when using a toilet auger risks spreading bacteria and viruses, contaminating tools, hands, and surrounding surfaces.
Users should disinfect the auger before and after use, wear gloves and eye protection, and avoid touching clean areas.
Contaminated equipment must be sealed or sanitized; disposable covers and proper handwashing prevent cross-contamination.
Proper cleanup protects household members and maintenance personnel.
Cleaning and storing your toilet auger properly
After use, the cable and handle should be rinsed and disinfected with a bleach solution or an EPA-registered disinfectant to remove debris and pathogens.
The auger should be fully dried and coiled without kinks before storage to prevent rust and damage to the cable.
Stored in a dry, cool place off the floor and protected from heavy objects, the tool will retain function and last longer.
How to sanitize the cable and handle after use
Disinfecting the cable and handle promptly prevents corrosion and limits bacterial growth while preserving the auger’s functionality.
After use, rinse residue with clean water, then apply a household disinfectant or diluted bleach solution along the cable and handle.
Wipe thoroughly with disposable cloths or paper towels, allow to air-dry, and don gloves during the process.
Dispose of used wipes safely.
Best storage practices to prolong tool life
Once disinfected and dried, the auger should be stored to minimize corrosion, kinking, and contamination.
The cable must be coiled loosely on its drum, secured to prevent unspooling. A wall hook or dedicated cabinet keeps it off damp floors.
Apply a light lubricant to cable joints and metal parts.
Store away from direct sunlight and extreme temperatures to preserve integrity and function.
When to call a professional plumber
Persistent gurgling, recurring backups, foul sewer smells, or multiple fixtures backing up are warning signs that the problem may extend beyond the toilet to the sewer line or venting system.
In such cases, a professional plumber can diagnose the issue with specialized equipment and recommend repairs.
Homeowners should expect diagnostic fees plus repair or replacement costs, and should request an upfront estimate before work begins.
Warning signs that indicate a deeper sewer or venting issue
If a toilet auger repeatedly clears a bowl but clogs return quickly, it can signal a deeper sewer or venting problem that requires a professional assessment.
Additional warning signs include slow drains throughout the home, gurgling noises, sewage odors, multiple fixtures backing up, and persistent backups after rain.
These indicators suggest mainline blockage, collapsed pipe, or vent stack issues needing licensed plumbing inspection and repair.
Estimated costs and what to expect from a plumber
When professional help becomes necessary, homeowners should expect a range of costs depending on the complexity of the problem: basic service calls often start around $75–$150, simple unclogs $100–$300, and more extensive sewer or camera inspections $300–$1,000+.
Plumbers may charge hourly rates ($75–$200), diagnostic fees, and parts.
Expect transparent estimates, scope explanation, warranty terms, and cleanup.
Preventive habits to reduce future toilet clogs
The article outlines simple preventive habits to minimize future toilet clogs, beginning with clear guidance on what should be flushed and what must be disposed of elsewhere.
It also recommends routine maintenance tips—such as periodic flushing with hot water and using enzyme-based cleaners—to keep drains clear.
These measures reduce reliance on a toilet auger and lower the risk of recurring blockages.
What to flush and what to dispose of elsewhere
A clear habit of flushing only toilet paper and human waste greatly reduces the risk of clogs and extends the life of plumbing.
Toilets are not trash cans; other items should be discarded in bins to prevent blockages and sewer issues.
- Sanitary products
- Wipes (even “flushable”)
- Cotton swabs and dental floss
- Cooking grease and solids
Routine maintenance tips to keep drains clear
Building on habits that keep non-flushable items out of the bowl, simple routine maintenance can further reduce the chance of clogs and costly repairs.
Periodic flushing with hot (not boiling) water, monthly use of enzyme drain cleaners, clearing sink strainers, avoiding excessive paper, and inspecting toilet seals prevent buildup.
Promptly address slow drains with a plunger or auger to stop minor issues becoming major problems.
Comparison: Toilet auger vs. closet auger vs. drain snake
In comparing a toilet auger, a closet auger, and a drain snake, the focus lies on design, length, and planned use: each suits specific clogs—toilet augers protect porcelain, closet augers reach trap bends, drain snakes extend for long runs. Choose based on fixture, clog location, and required reach.
| Tool | Best for | Length |
|---|---|---|
| Toilet auger | Toilet bowl | Short |
| Closet auger | Trap and flange | Medium |
| Drain snake | Long drains | Long |
Conclusion
Like a seasoned mariner steering through a shoal, the homeowner who masters the toilet auger navigates blockages with calm skill. Armed with basic safety gear, sensible pre-checks, and steady technique, minor clogs yield without drama. Proper cleaning and storage keep the tool ready for future tides, while knowing when to summon a professional prevents needless strain. Adopt preventive habits, and the bathroom will run as smoothly as a well-kept harbor.