How to Remove a Water Heater Drain Valve Safely: Step-by-Step Guide
To safely remove a water heater drain valve, first shut off the power or gas supply, close the cold-water inlet, and relieve tank pressure by draining a small amount of water into a safe container. Next, wear protective gloves and goggles, apply penetrating oil to any stuck threaded valves, and turn them counterclockwise using a wrench. If you encounter sweat-mounted valves, you may need to cut or desolder them. Finally, install a matching brass or plastic valve with tape or sealant, refill the tank slowly, and check for leaks. Follow these steps for a safe and effective valve replacement.
What a Water Heater Drain Valve Is and Why You Might Remove It
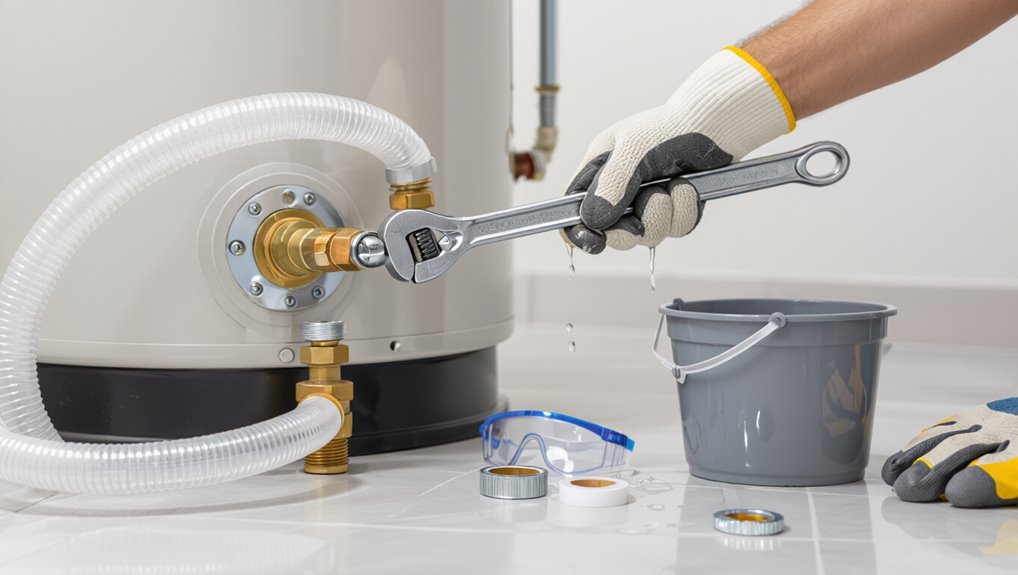
A water heater drain valve is a service fitting that allows tank drainage on tank-type heaters and assists in flushing or servicing some tankless units.
Homeowners and technicians commonly remove or replace the valve when it leaks, is clogged with sediment, or when upgrading to a more durable or ball-style valve.
Removing the valve improperly can cause leaks, sudden full-tank water release, or damage to the tank and surrounding property.
Function of the drain valve on different water heater types
Drain valves serve as the low-point outlet for flushing sediment and draining water from storage tanks, tankless units with condensate traps, and indirect or boiler-connected heaters.
Their role varies with design and usage: on traditional storage tanks, the valve permits routine flushing to prevent sediment buildup and extend element life.
On tankless systems, it facilitates maintenance of inline filters and condensate lines.
On indirect or boiler-fed heaters, it enables isolation and service of the heat exchanger or connecting piping.
How to remove a water heater drain valve.
Common reasons to remove or replace the valve
Remove or replace a water heater drain valve when leaks, corrosion, blockages, or failure impede draining or maintenance. Typical reasons include visible leakage, mineral buildup, valve stiffness, broken handle, or upgrade for better materials. Replacement restores reliable draining and prevents water damage or inefficient flushing. Assess condition, corrosion level, and flow before deciding.
| Cause | Symptom | Action |
|---|---|---|
| Leak | Drip at joint | Replace |
| Corrosion | Rust flakes | Inspect |
| Blockage | Slow flow | Clean |
| Handle broken | No operation | Replace |
| Upgrade | Plastic to brass | Upgrade |
Risks of removing a drain valve improperly
Following assessment of leaks, corrosion, or blockages that justify replacing a valve, attention must turn to the risks of improper removal.
Improper removal can cause scalding from hot water, sudden pressure release, tank damage, and flooding.
Cross-threading or overtightening can strip fittings.
Contaminants entering the system reduce water quality.
Electrical and gas components may be compromised if safety protocols are ignored.
Quick Safety Checklist Before You Start
Before beginning, a concise list of required tools and replacement parts should be assembled and checked for condition.
Appropriate personal protective equipment—gloves, eye protection, and heat-resistant clothing if the tank is warm—should be worn and safety precautions observed.
If corrosion, leaking at fittings, or unclear plumbing configurations are present, a licensed plumber should be contacted rather than proceeding solo.
Tools and materials required
A compact checklist clarifies the tools and materials needed for a safe drain valve replacement: adjustable wrench or hex socket, flathead screwdriver, replacement drain valve (brass for longevity), Teflon tape or pipe joint compound, a bucket or hose to direct drained water, rags, and safety gear—gloves and eye protection.
- Replacement valve and sealing compound
- Wrench or socket set
- Drain hose or bucket
- Clean rags and disposal container
Personal protective equipment and precautions
Wear appropriate personal protective equipment and observe key precautions to reduce the risk of burns, cuts, and chemical exposure when working on a water heater drain valve. Use insulated gloves, safety goggles, and long sleeves. Shut off power and water, relieve pressure, and cool the tank. Keep a fire extinguisher nearby and work in a well-ventilated area.
| PPE | Action | Reason |
|---|---|---|
| Gloves | Insulated | Prevent burns |
| Goggles | Seal | Protect eyes |
When to call a professional instead of DIY
Assess the situation against a short checklist to decide whether a professional is required: signs of active leaking, extensive corrosion, unknown pipe materials (e.g., lead), electrical or gas complications, inability to fully shut off water or power, or prior failed repair attempts all warrant calling a licensed plumber or technician.
Engage a pro if wall or floor damage, unclear warranty terms, or uncertainty about proper tools, fittings, or safety procedures exists.
Preparing the Water Heater for Valve Removal
Before removing the drain valve, the power or gas supply to the heater is shut off following the manufacturer’s steps to eliminate electrical or combustion hazards.
The cold water supply is then closed and tank pressure is relieved by opening a nearby hot water tap or the drain valve briefly.
Finally, the tank is partially drained into a suitable container or hose routed to a safe drain to collect wastewater and prevent spills.
Shutting off power or gas supply step-by-step
Shut off the water heater’s energy source to eliminate risk while working on the drain valve: The technician isolates electricity or gas before drainage. For electric units, switch the breaker off and lock out. For gas, turn the pilot to off and close the gas valve; consult a pro if uncertain.
| Source | Action | Verify |
|---|---|---|
| Electric | Breaker off | Multimeter zero |
| Gas | Valve off | Sniffer check |
Turning off the cold water supply and relieving tank pressure
Turn off the cold water supply to the heater at the shutoff valve, then open a nearby hot water faucet to bleed residual pressure from the tank; this prevents water spray and makes draining safer and easier.
Confirm the valve fully closes, listen for flow cessation, and leave the faucet open until pressure stabilizes.
Wear eye protection and avoid standing over fittings.
Draining the tank partially and collecting water safely
With the cold supply closed and tank pressure relieved, the next step is to drain a controlled amount of hot water so the valve can be removed without flooding the area.
Attach a hose to the drain, route it to a safe drain or bucket, open the drain slowly, and monitor flow and temperature.
Stop when water level is below the valve opening before proceeding.
Step-by-Step Guide to Removing the Drain Valve
The procedure begins with locating and visually inspecting the existing drain valve to determine its type and condition.
For threaded valves, the guide covers loosening techniques.
For sweat-mounted or soldered valves, it outlines safe cutting and desoldering methods.
It also addresses strategies for corroded, stuck, or broken valves and how to remove internal components if required.
Locating and inspecting the existing valve
A quick visual scan of the water heater area helps pinpoint the drain valve, usually located near the tank’s bottom on the side or front; it will typically be a brass spigot with a threaded outlet for a hose or a small lever.
Inspect for corrosion, mineral buildup, leaks, paint or sealant remnants, and accessible hose connection; note valve orientation, mounting type, and surrounding fittings for safe removal planning.
Methods to remove a threaded drain valve
Begin by fully draining and depressurizing the heater and confirming power or gas is off before attempting valve removal.
For threaded valves, apply penetrating oil, allow soak time, then use an adjustable wrench or pipe wrench on the hex flats.
Stabilize the tank fittings, turn counterclockwise, avoid twisting piping.
If stubborn, heat the fitting slightly or use a second wrench for leverage until the valve backs out.
Removing a sweat-mounted or soldered drain valve safely
After removing a threaded valve or attempting that method, attention shifts to sweat-mounted (soldered) drain valves, which require different handling because they are bonded to the tank with solder rather than threads. A technician cools the area, cuts piping if needed, applies heat-resistant shielding, and uses a torch to melt solder while preventing tank damage. Inspect for leaks before refilling.
| Step | Tool | Safety |
|---|---|---|
| Cool | Wet rag | Vent area |
| Cut | Tube cutter | Shut power |
Dealing with a corroded, stuck, or broken valve
When a drain valve is corroded, seized, or damaged, the technician assesses access, condition, and risk before proceeding. They isolate water and power, relieve pressure, and attempt gentle penetration with penetrating oil and controlled heat if metal permits.
If movement fails, the technician uses appropriate extraction tools, secures a containment plan for leaks, and prepares replacement parts and safe disposal.
How to remove internal valve components if necessary
Having isolated power and water, relieved pressure, and attempted to free a seized or damaged exterior valve, the technician next focuses on the internal components that may be corroded or obstructed.
They drain remaining water, remove the valve body, inspect seat, washer, spring, and stem, then extract damaged parts with pliers or pick tools.
Clean passages, replace components, and test for leaks.
Replacing or Repairing the Drain Valve
Selecting the correct replacement valve requires matching size, material, and connection type to the heater’s plumbing.
For a threaded valve, the process is to clean the threads, apply appropriate sealant or tape, and tighten securely.
In contrast, a sweat/soldered valve needs proper fluxing, heating, and solder application before cooling and cleaning.
After installation, the valve should be sealed, pressurized, checked for leaks, and given any finishing touches such as trimming and insulating.
Choosing the correct replacement valve (size, material, type)
Choosing the correct replacement drain valve requires matching size, material, and type to the existing plumbing and the heater’s specifications to guarantee a secure, long-lasting fit.
Confirm thread type (NPT or BSP), diameter, and seating style. Select corrosion-resistant materials—brass or stainless steel preferred for longevity.
Choose a valve type (ball, multi-turn) compatible with flow needs and maintenance access without altering tank fittings.
Installation steps for a threaded replacement valve
Begin by shutting off the water supply to the heater and confirming the tank is drained and cooled; this prevents spills and scalding during valve removal. Apply plumber’s tape to threads, hand-start the threaded replacement, tighten with a wrench without over-torquing, reconnect a hose and restore water slowly while checking for leaks. Replace if leaking; tighten or reseal as needed.
| Step | Action | Check |
|---|---|---|
| 1 | Tape threads | Seal |
| 2 | Hand-start | Alignment |
| 3 | Wrench-tighten | Leak test |
Installation steps for a sweat/soldered replacement valve
Prepare the tank and workspace for a sweat (soldered) valve installation by shutting off the water, draining and cooling the heater, and ensuring the area around the existing valve is dry and free of corrosion or insulation that could impede soldering.
Remove the old valve, clean and flux the copper fitting, fit the new sweat valve securely, apply heat evenly to solder the joint, and allow proper cooling before moving on.
Sealing, testing for leaks, and finishing touches
Once the solder has cooled and the workspace is clear, the installer moves on to sealing and testing: apply thread sealant or plumber’s tape to any threaded connections.
Open the water supply slowly to pressurize the tank, and inspect the new valve and adjoining fittings for drips or weeps.
If no leaks appear, tighten as needed, drain remaining debris, restore insulation, and confirm operation before cleanup.
Troubleshooting Common Problems During Removal
If the drain valve threads strip or break, the guide explains evaluating whether a repair, thread chaser, or tank-side replacement is required.
It also covers steps to stop persistent leaks after replacement, including tightening, reseating, or using appropriate sealants and testing under pressure.
Finally, the section addresses how to clear sediment and clogs revealed during removal and when to flush or call a professional.
What to do if the valve threads strip or break
Encountering stripped or broken drain valve threads requires immediate attention to prevent leaks and simplify replacement.
First, shut off water and drain remaining contents.
If threads are damaged, extract the old valve; use penetrating oil and a wrench or vise-grips.
For severely damaged ports, cut out the fitting and install a replacement via soldered copper adapter or threaded tank petcock kit, ensuring proper sealing.
Handling persistent leaks after replacement
After replacing a damaged drain valve, persistent leaking around the fitting indicates either an installation issue or an underlying tank problem.
The technician should confirm valve tightness, proper sealant or tape, and correct washer orientation.
If leaks persist, inspect the tank for corrosion, hairline cracks, or a failed internal sleeve.
Replace the tank or consult a professional plumber if tank integrity is compromised.
Addressing sediment and clog issues revealed during removal
When the drain valve is removed, sediment and mineral buildup within the drain opening or lower tank often become apparent, and diagnosing the severity of these deposits guides the next steps.
The technician inspects for compacted grit, corrosion flakes, or large obstructions.
Light deposits are flushed with garden hose pressure; stubborn clogs require mechanical agitation, a flexible drain snake, or professional descaling to protect tank integrity.
Post-Removal Safety Checks and Maintenance
After the drain valve is removed and replaced, the tank must be refilled slowly and repressurized to avoid air pockets and pressure spikes.
Once water flow and pressure are confirmed, power or gas can be safely restored and the heater monitored for proper ignition, heating, and leaks.
A regular maintenance schedule—including periodic valve inspections and tank flushes—helps prevent future valve failures and extends system life.
Refilling and repressurizing the tank correctly
Begin by closing the tank’s drain and any open petcock.
Then open the cold-water supply valve slowly to allow the tank to fill; the installer should listen for steady flow into the tank and watch for water exiting any open hot faucets to confirm air is being purged.
Once steady flow is observed, tighten the replacement drain valve, inspect all joints for leaks, and verify tank pressure stabilizes at household mains level.
Restoring power or gas and checking heater operation
Restore utility service only after confirming the tank is full, all valves are secure, and there are no leaks; this prevents damage and hazards when the heater restarts.
Turn on power or relight the pilot following manufacturer instructions.
Monitor for proper ignition, heating cycles, and normal pressure.
Check for unusual noises, odors, or leaks during the first heating cycle and shut off service if any problem appears.
Suggested maintenance schedule to prevent future valve issues
Although occasional issues can arise even after a successful repair, implementing a simple, regular maintenance schedule will minimize future drain valve problems and extend the heater’s service life.
- Inspect valve for leaks monthly and tighten if needed.
- Operate valve quarterly to prevent seizing.
- Flush tank annually to remove sediment.
- Replace valve every 3–5 years or at first sign of corrosion.
Cost, Time Estimate, and When Replacement Is Better Than Repair
A brief estimate helps homeowners decide whether to tackle a valve swap or opt for a full replacement.
Typical DIY removal and replacement can take 30–90 minutes, with parts and common tools usually totaling $10–$60, while new water heaters range much higher.
Replacement is generally recommended when the tank shows leaks, extensive corrosion, recurrent failures, or when the unit is past its expected service life.
Typical time required for DIY removal and replacement
Estimating the time and cost to remove and replace a water heater drain valve helps homeowners decide between DIY repair and full replacement.
Typical DIY removal and replacement takes about 45–120 minutes for someone with basic tools and experience; novices may need extra time for draining, drying, and leak-checking.
Complex access or corrosion can extend the task, making professional replacement more practical.
Estimated costs for parts and common tools
Several common replacement options for a water heater drain valve cost between $5 and $30 for parts, with basic hand tools and sealants adding roughly $10–$40 if not already on hand.
Total DIY expense typically ranges $15–$70. Labor time often 30–90 minutes.
If repeated leaks, extensive corrosion, or inaccessible fittings make the job complex, professional service or broader replacement may be more economical.
Signs the entire water heater should be replaced instead of the valve
Many homeowners should consider full replacement rather than repairing a faulty drain valve when clear indicators point to widespread wear: chronic leaks from multiple fittings, heavy internal corrosion or sediment buildup, a rusty or bulging tank, frequent need for repairs, or water that is discolored or smells strongly of metallic or rotten odors.
Replacement costs typically run higher than valve repair; expect several hours and professional labor when service life nears its end.
Related Considerations and Alternatives
The homeowner may consider using a hose bib adapter or an external hose to make draining easier and cleaner.
Temporary fixes to a leaking valve should be weighed against the longevity and safety of a permanent replacement.
Proper disposal of old valves and mindful handling of drained water reduce environmental impact and may be required by local regulations.
Using a hose bib adapter or external hose for draining
Consider attaching a hose bib adapter or running an external hose from the water heater drain to direct hot water away from the work area. This approach simplifies draining by providing a controlled, extended outlet that reduces splashing and allows discharge to a floor drain, yard, or bucket.
Confirm fittings are tight, use heat-resistant hose, slope hose for full drainage, and inspect for leaks during use.
Temporary fixes versus permanent replacements
Sometimes a quick patch can restore function long enough to plan a proper repair, but evaluating whether a temporary fix or full replacement is appropriate requires weighing cost, safety, and expected lifespan.
Temporary measures—sealants, hose clamps, or replacement spigots—may be viable short-term.
Persistent leaks, corrosion, or compromised integrity warrant full valve replacement to guarantee reliability, code compliance, and reduced failure risk over time.
Environmental and disposal considerations for old valves and water
Several factors influence proper disposal of old drain valves and the water they may contain, including local hazardous-waste rules, material recyclability, and potential contamination from rust, scale, or chemical additives.
- Check local regulations for metal recycling and contaminated water disposal.
- Drain water into sanitary sewers only if permitted.
- Separate recyclable metals; remove plastic/rubber for proper waste streams.
- Label and transport suspect fluids to hazardous-waste facilities.
Conclusion
All tasks finished, and the drain valve loosened just as the old hose split—coincidence, perhaps, or the kind of small chaos that exposes necessity. The heater sits drained, parts laid out, and a new valve waits; the work was cautious, measured, and oddly rhythmic. With safety checks repeated and fittings torqued, the lesson is clear: careful preparation and attention to detail turn accidental disruption into reliable repair, saving time, money, and future trouble.