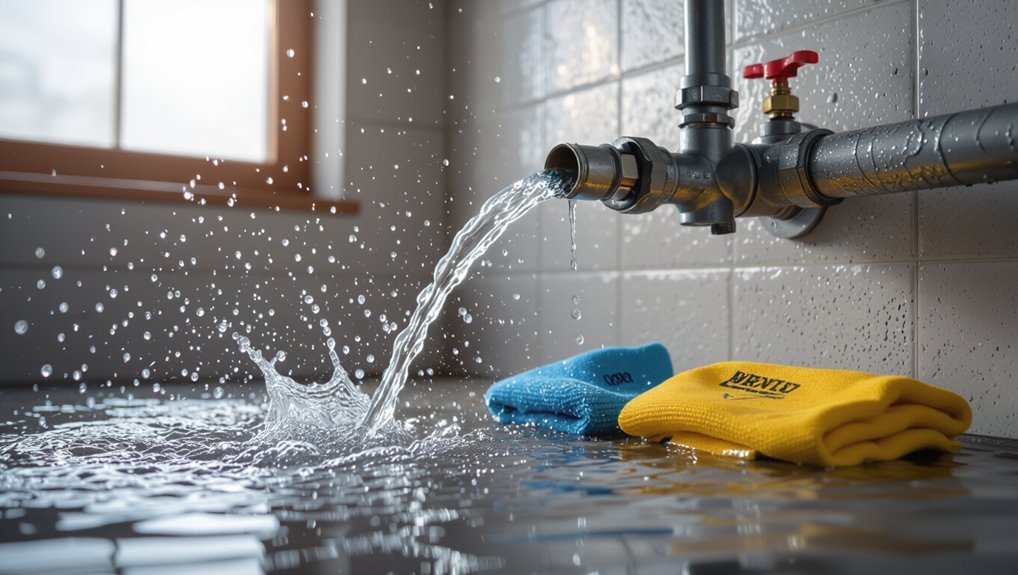
Emergency Fixes for Pipes Burst: Quick DIY Steps to Stop Water Damage
If you have a burst pipe, the first step is to shut off the main water valve immediately to prevent water damage. Next, confirm that the water flow has stopped by checking a faucet. Isolate any branch shutoffs and open the highest and lowest taps in your home to relieve pressure and drain the system. If water is approaching electrical areas, cut off the power and use a non-contact tester to ensure safety before proceeding. To contain the water spread, use towels, buckets, or plastic sheeting, and take photographs of any damage for insurance purposes. For a temporary fix, you can apply a rubber sleeve, self-fusing tape, or epoxy putty over the leak. Keep a close eye on the repair, and follow up with permanent solutions and safety measures as needed.
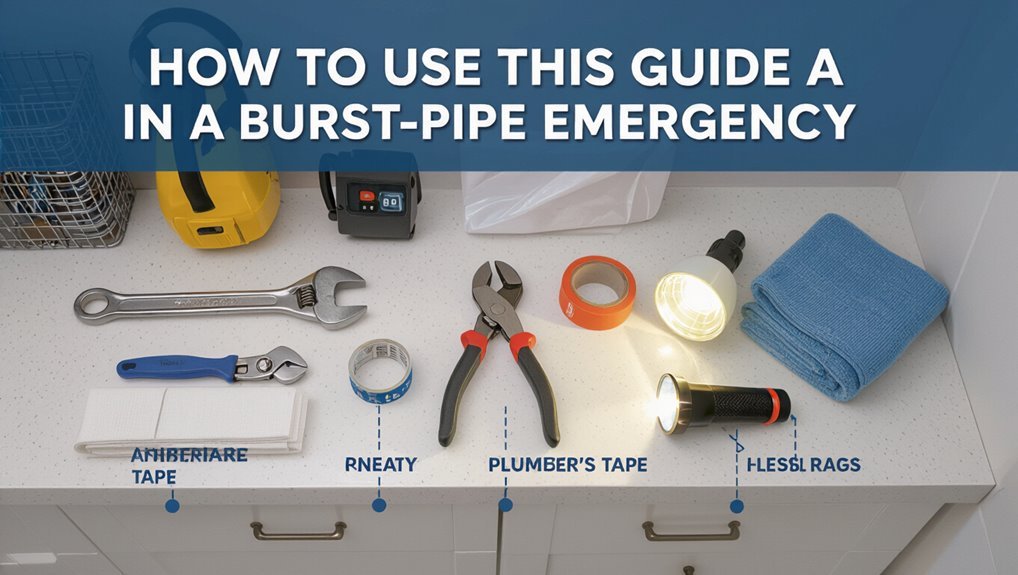
How To Use This Guide In A Burst-Pipe Emergency
Begin by stopping the immediate flow of water and evaluating safety: shut off the main water valve, cut power to affected areas if wiring is wet, and move occupants away from the leak.
The guide functions as a concise reference: follow step sequences, locate tools, and prioritize containment before repair. Users are advised to scan symptom lists to identify pipe type and rupture scale, then match recommended temporary fixes.
Photographs and diagrams expedite decisions; checklists reduce oversight.
Time estimates clarify when to call professionals. The tone remains practical and neutral, promoting calm, efficient action without assuming prior plumbing expertise.
Immediate Actions: What To Do First
Shut off the main water supply immediately, then assess safety hazards such as electrical exposure, structural instability, or gas lines before anyone approaches the leak. The responder should document the scene with photos, move people and pets to safety, and place containers to catch water while avoiding contact with wet electrical fixtures.
Contain spreading water using towels and barriers, and protect valuables by elevating them. Call emergency services if hazards exist.
- Photograph damage and location.
- Remove occupants from danger zones.
- Use absorbent materials and temporary barriers.
- Isolate and protect irreplaceable items.
Shut Off Your Main Water Valve
Locate the home’s main water valve and turn it fully clockwise to stop the flow of water. The homeowner should know the valve’s location—typically near the perimeter, basement, crawlspace, or where the service line enters. Use the correct tool if the handle is stiff; avoid forcing or breaking fittings. Confirm the valve’s action by checking a faucet; water should cease. Notify household members before shutting off to prevent surprises. Once closed, leave the valve in the off position until repairs begin. Record the valve type and condition for professionals arriving to assess and repair the burst pipe.
Drain And Relieve Pressure After Shutting Off The Water
After the main valve is closed, open multiple faucets—starting at the highest and working down to the lowest—to drain water from the lines and relieve residual pressure.
Doing so prevents unexpected spurts, reduces risk when repairing fittings, and helps identify low spots where water gathers.
Check outdoor spigots and appliance shutoffs.
Use a bucket for remaining drips and watch for discoloration or sediment.
Once flow subsides, close lower taps last to retain some air cushion in high fixtures.
- Open attic/bathroom taps first.
- Then open sinks and showers.
- Open outdoor spigots.
- Drain appliances and hose bibs.
Cut Power Safely If Water Reaches Electrical Areas
With water drained from the lines, attention should turn to any areas where moisture has reached electrical fixtures or outlets.
One person should avoid touching wet electrical components; instead, another should locate and switch off the main breaker or relevant circuit breakers at the panel. If breakers are inaccessible, contact the power utility to cut service.
Once power is off, test outlets and switches with a noncontact voltage tester to confirm de-energized circuits before approaching.
Document affected areas with photos, and tape warning signs on panels.
After drying and inspection by a qualified electrician, restore power only when safety is confirmed.
Contain The Leak: Protect Floors And Belongings
In areas where water is actively escaping, quickly create barriers to limit spread and shield floors and belongings.
The person places towels, plastic sheeting, or containers to divert flow and protect finishes.
Prioritize stopping water from reaching carpets, hardwood, and valuables.
Use furniture risers or blocks under legs when safe.
Maintain clear paths to containment points and mark wet zones to prevent tracking.
- Layer towels and absorbent mats at leak edges.
- Roll plastic sheeting toward a drain or bucket.
- Elevate vulnerable items on stable platforms.
- Seal gaps around doors with towels or draft guards.
Move And Salvage Wet Furniture And Electronics Safely
When moving wet furniture and electronics, prioritize safety and rapid stabilization: shut power to affected circuits, wear protective gloves and boots, and assess each item’s weight and fragility before lifting. Quickly move salvageable items to dry, ventilated areas; lift with knees, use dollies for heavy pieces, and keep electronics upright. Wipe surfaces, remove batteries, and document damage for insurance. If mold appears, isolate items and seek professional cleaning. Communicate calmly with household members to coordinate efforts and avoid injury.
| Item | Emotional weight |
|---|---|
| Family sofa | Loss, urgency |
| Laptop | Fear, hope |
| Photo albums | Grief, resolve |
Stop Leaks Temporarily With A Pipe Clamp Or Rubber Patch
The source of the leak should be identified and exposed so the repair area is clean and dry.
A rubber patch is centered over the hole and pressed firmly to form an initial seal.
A pipe clamp is then placed and tightened to hold the patch in position and stop the flow until a permanent repair can be made.
Locate Leak Source
Locate the leak by examining pipe runs for wetness, corrosion, or spray patterns to pinpoint the exact breach before applying a temporary clamp or rubber patch. The inspector traces damp areas from fixtures to mains, feeling for temperature changes and listening for hisses.
Visual cues—mineral stains, fresh drips, displaced insulation—reveal likely spots. Shut nearby valves and dry the area to confirm active leakage.
Measure pipe diameter and note fittings or joints involved to choose an appropriate clamp. Record location and accessibility for repairs or for relaying clear information to a plumber.
- Follow water trails
- Inspect joints and fittings
- Dry and recheck
- Note pipe size and access
Apply Rubber Patch
Using a clean piece of rubber, a clamp, and basic hand tools, a temporary patch can be fitted over the breach to stop or slow a leak until permanent repairs are made.
First, water flow is reduced and the area dried; loose corrosion or debris is cleared.
Rubber—cut from an inner tube or heavy glove—is sized to cover the hole with overlap.
The patch is centered and held in place while a clamp’s padding or a tight wrap secures it, avoiding direct metal-to-metal contact that can worsen damage.
The repair is monitored and treated as short-term until a professional replacement is completed.
Secure With Clamp
After a rubber patch is positioned, attention turns to clamping as the primary method for holding the repair in place and arresting flow. The responder fits a metal or plastic clamp over the patch, centers it on the breach, and tightens evenly to compress the rubber against the pipe. Proper torque prevents slipping and further damage; excessive force is avoided.
Clamps offer immediate pressure sealing until permanent repair. Inspect for drips, adjust as needed, and note clamp type for replacement. Temporary clamps suit straight sections; specialty clamps handle irregular shapes or larger ruptures.
- Choose compatible clamp size
- Center patch precisely
- Tighten evenly to specified torque
- Monitor and replace promptly
Wrap A Burst Pipe With Repair Tape The Right Way
When a pipe bursts, applying repair tape correctly can instantly reduce leaking and stabilize the line until a permanent repair is made. The responder first shuts off water and dries the pipe surface. They select a waterproof, self-fusing silicone or rubber repair tape rated for pressure.
Tension is essential: they stretch and wrap the tape tightly, overlapping each layer by half, extending several inches beyond the damaged area. Multiple passes build a uniform seal. They press and smooth to bond layers, avoiding gaps or air pockets.
The repair is temporary; the line should be inspected and permanently repaired by a professional promptly.
Use Epoxy Putty For A Quick Permanent-Looking Seal
For a quick, durable-seeming repair on a leaking pipe, epoxy putty offers a hard-setting compound that bonds to metal, PVC, and other common plumbing materials.
It cures rapidly, resists water, and can restore pressure containment when applied correctly.
Surface preparation—clean, dry, and roughen—is essential.
Knead to uniform color, press firmly over the defect, and shape to overlap surrounding pipe.
Allow full cure before restoring flow.
- Clean and dry the area thoroughly.
- Remove corrosion or loose material; roughen surface.
- Mix and apply putty, compressing to eliminate voids.
- Wait manufacturer cure time before testing.
Use A Spare Hose And Hose Clamp As An Emergency Fix
Fit a spare length of flexible hose over the damaged section and secure it tightly with a stainless-steel hose clamp to stop active leakage until a permanent repair can be made. The method suits small punctures or short cracks on accessible straight runs.
Cut hose to cover damage plus overlap at each end, slide clamps on, then position and tighten evenly to compress the hose onto the pipe. Test under low pressure, then slowly restore normal flow while watching for seepage.
This is a temporary measure; hose material and clamps degrade. Replace the compromised pipe or fit an appropriate coupling as soon as practicable.
When A Compression Coupling Is The Right Temporary Repair
In situations where a short section of pipe has a damaged joint or a clean, straight break and access is limited, a compression coupling provides a quick, secure temporary seal without soldering or welding.
It suits copper, PVC, and PEX when cuts are square and remaining pipe length allows proper seating. The repair is fast, requires common tools, and can stop major leaks until permanent replacement.
Make certain pipe ends are clean, straight, and free of burrs; tighten nuts evenly to avoid overtightening. Check pressure compatibility and plan for a permanent fix once water can be shut off safely.
- Verify pipe type and size
- Cut square, deburr ends
- Hand-tighten then wrench snugly
- Test under moderate pressure
Quick DIY Fixes For Small Pinhole Leaks
For small pinhole leaks, quick temporary seal options such as pipe repair tape, epoxy putty, or rubber patches with hose clamps can stop water immediately.
Once the emergency is controlled, longer-term repair methods—like soldering, replacing a pipe section, or using a proper compression coupling—should be considered to restore reliability.
The choice depends on pipe material, access, and how long a temporary fix must hold.
Temporary Seal Options
When a small pinhole leak appears, several quick temporary seal options can stop or slow water long enough to arrange a proper repair; common choices include pipe repair tape, epoxy putty, rubber-and-clamp patches, and self-fusing silicone tape.
Each option suits different materials and access constraints. Clean and dry the area, shut water if possible, and apply the chosen seal per instructions. These measures are short-term and designed to limit damage until a professional or permanent solution is implemented. Consider safety—turn off electricity near wet areas—and monitor the seal closely for failure.
- Pipe repair tape
- Epoxy putty
- Rubber-and-clamp patch
- Self-fusing silicone tape
Longer-Term Repair Methods
Shifting from immediate patches, longer-term DIY repairs aim to restore pipe integrity for months or years rather than hours, using methods that blend durability with manageable skill and tools.
For small pinhole leaks, options include replacing a short pipe section with matching material and proper couplings, using compression or sharkbite fittings for copper or PEX, and soldering or brazing when experienced. Epoxy putty and fiberglass wrap applied per instructions can provide durable seals if surfaces are clean and dry.
After repair, pressure-testing, insulation, and periodic inspection reduce recurrence; complex or hidden failures warrant professional assessment.
Use A Rubber Sleeve And Jubilee Clip On Copper Pipes
On copper pipes that have developed small splits or pinhole leaks, a rubber sleeve secured with a Jubilee clip provides a quick, reliable temporary seal.
The rubber cushions and conforms around the defect while the stainless steel clip compresses evenly, stopping drips until a permanent repair is possible.
Clean the area, slide the sleeve over the leak, position the clip, then tighten gradually to avoid crushing the pipe.
Check for continued seepage and re-tighten slightly if needed.
Suitable for accessible, low-pressure indoor lines; not a permanent solution.
- Inspect pipe and shut water off.
- Clean and dry surface.
- Fit sleeve over leak.
- Tighten clip incrementally.
Temporary Fixes For PVC, Copper, And PEX Pipes
Temporary fixes for PVC, copper, and PEX pipes allow homeowners to stop leaks quickly and minimize water damage until a professional repair can be made.
For PVC, apply plumbing epoxy putty or wrap with self-fusing silicone tape over a clean, dry area; clamp a short piece of pipe or rubber as backing if needed.
For copper, use a rubber patch secured with hose clamps or a repair coupling; soldering is not advised in emergencies.
For PEX, use silicone tape or a PEX repair sleeve and clamp; avoid kinking lines.
Always isolate the leak by shutting water off and drain the section before applying fixes.
How To Check That Your Temporary Repair Will Hold Overnight
The homeowner should inspect the repair area for continued drips, watching closely for even the smallest leak.
They should also monitor surrounding surfaces for new moisture and check for unusual odors that could indicate trapped water or contamination.
If any signs worsen overnight, a more secure fix or professional help is warranted.
Check For Continued Drips
Frequently, a homeowner will need to confirm that a quick patch remains watertight before leaving it overnight; this involves a concise inspection of the repair site, surrounding fittings, and downstream fixtures for any slow leaks or moisture accumulation.
The homeowner inspects for visible drips, feels for dampness, and checks under sinks and adjacent floors. Visual checks use a flashlight; paper towels placed beneath joints reveal slow seepage. After tightening clamps or tape, recheck pressure by briefly turning water on. If any seepage appears, reinforce the repair or shut the main valve and call a professional.
- Inspect repair site carefully
- Use paper towels to detect seepage
- Reapply or tighten temporary fixes
- Test briefly under normal pressure
Monitor Moisture And Odors
After confirming no visible drips, attention should shift to subtle signs of lingering moisture and developing odors that indicate a repair may not hold overnight.
Inspect surrounding surfaces for darkening, warping, or soft spots; run a dry paper towel along seams and joints to detect dampness.
Smell for musty or mildew notes near walls, ceilings, and enclosed spaces; trace any scent to its source.
Feel floors and baseboards for coolness that suggests residual water.
Recheck temporary patches and tighten clamps if moisture returns.
Document observations and set hourly checks until permanent repairs are completed to prevent hidden damage.
How To Drain And Isolate Sections If You Can’t Reach The Main Valve
When the main shutoff is inaccessible, homeowners should focus on isolating and draining individual branches of the plumbing to limit water loss and damage.
Identify accessible fixture shutoffs (sinks, toilets, washing machines) and close them.
Open highest and lowest taps on affected branches to vent and drain.
Use buckets and rags to capture residual water and prevent pooling.
If valves are seized, temporarily clamp supply with rubber and hose clamps.
- Locate and close fixture shutoffs.
- Open high and low taps to drain lines.
- Use buckets, towels, and a wet vacuum.
- Clamp stubborn supplies as a temporary stopgap.
How To Isolate And Protect Your Water Heater After A Burst
After a burst, one of the first actions recommended is to shut off the water supply to the heater to prevent further inflow.
The heater should then be drained using its drain valve to relieve pressure and remove remaining water.
Finally, any exposed electrical components must be protected or disconnected to reduce shock and fire hazards.
Shut Off Water Supply
Locate and shut off the main water supply immediately to prevent further flooding and pressure on the water heater. The person should confirm the valve position, isolate the cold inlet to the heater if separate, and turn off any nearby shutoffs for appliances. After stopping flow, relieve remaining pressure by opening a nearby faucet. Inspect visible connections for leaks and note valve types for repair.
- Find main shutoff (typically at meter or where line enters).
- Close cold-water inlet to the heater.
- Open a high faucet to reduce pressure.
- Visually check heater connections and document leaks.
Drain The Water Heater
With the main supply shut off and pressure relieved, the next step is to isolate and drain the water heater to prevent internal damage and further leakage.
Close the cold-water inlet valve feeding the tank. Open a hot-water faucet at a low point in the house to allow air in.
Attach a garden hose to the tank’s drain valve and direct discharge to a safe drain or outside. Open the drain valve slowly, watching flow and any sediment.
If the tank won’t drain, open the pressure-relief valve briefly. Once emptied, close valves and leave the hose connected for inspection or repair access.
Protect Electrical Components
Typically, the priority is to cut power to the water heater before addressing any water damage to prevent electrical shock or short circuits.
A licensed electrician is recommended, but immediate homeowner steps include shutting the circuit breaker and switching off gas supply for gas heaters.
Keep electrical panels, outlets, and controls dry; elevate temporary pumps and extension cords.
Document conditions with photos and avoid restoring power until the unit is inspected.
- Turn off circuit breaker and gas valve.
- Remove standing water near electrical components.
- Elevate or relocate pumps and cords.
- Call a professional for inspection and safe restart.
Handling Frozen Pipes That Have Burst: Thawing Safely
When a frozen pipe has burst, homeowners should act quickly but cautiously to thaw remaining frozen sections and minimize further water damage. They should first shut off water and open faucets to relieve pressure.
Apply gradual heat—space heaters, hair dryers, or electric heat tape—moving heat along the pipe toward the faucet; avoid open flames. Insulate exposed pipes with towels or foam after thawing.
Monitor for leaks as ice melts; collect water and remove soaked materials to prevent mold. If thawing reveals significant damage, or if pipes are inaccessible, contact a licensed plumber promptly to assess and repair safely.
How To Make A Fast Emergency Kit With Household Items
Assemble a quick emergency kit from common household items to address burst-pipe damage and immediate needs. A compact kit enables containment, drying, and temporary sealing until professional repair.
Include materials that stop leaks, protect floors, and control minor flooding. Store items in a durable bag near the main shutoff.
- Heavy-duty trash bags and duct tape for temporary containment and patching.
- Towels, microfiber cloths, and absorbent rags for water removal.
- Plastic bins or buckets to catch drips and contain debris.
- Rubber gloves and a flashlight for safe handling and inspection.
Tools To Keep In A Burst-Pipe Emergency Kit
Include a small set of purpose-built tools in the burst-pipe emergency kit to enable safe shutoff, quick temporary repairs, and basic diagnostic checks before a plumber arrives.
A good kit contains an adjustable wrench for shutoff valves, pipe repair clamps or rubber and hose clamps, self-fusing silicone tape, epoxy putty for temporary sealing, and a roll of plumber’s tape.
Include a flashlight with fresh batteries, waterproof gloves, absorbent towels, and a small bucket.
Add needle-nose pliers, a utility knife, and a basic multi-bit screwdriver.
Store items in a durable, labeled container kept near the main water shutoff.
Using Portable Pumps And Wet Vacs Safely Indoors
In confined indoor spaces, portable pumps and wet vacs offer fast water removal but demand careful setup to prevent electrical hazards and property damage.
Operators should first cut power to affected circuits and use battery-powered or GFCI-protected equipment. Position pumps on stable, dry surfaces; keep cords elevated and away from water. Empty collection tanks promptly to avoid overflow.
Monitor pump intakes to prevent clogging from debris.
- Verify power isolation and GFCI protection.
- Use appropriate pump size for water depth.
- Maintain clear hose routes and secure fittings.
- Inspect equipment for damage before use.
Quick Drying Tips To Reduce Mold After Water Damage
After water has been removed with pumps or wet vacs, prompt drying is the next priority to limit mold growth; responders should open windows when weather permits and run air movers and dehumidifiers to accelerate evaporation.
Carpets and padding should be lifted and dried separately; porous materials that retain moisture may need removal.
Direct air toward wet surfaces and ceiling cavities, and monitor relative humidity aiming below 50%. Use hygrometers to track progress.
Furniture should be elevated on blocks.
Inspect hidden spaces—behind baseboards, inside wall cavities—and continue drying until moisture readings normalize.
Document conditions and drying steps for possible insurance follow-up.
Short-Term Water Storage And Sanitation After Shutdown
Establish temporary potable water supplies and basic sanitation immediately after a shutdown to protect health and prevent secondary damage.
The homeowner secures clean containers, chlorinates small water batches (approx. 8 drops of 5–6% bleach per gallon), and labels potable reserves. Nonpotable water is set aside for flushing and cleaning.
Hygiene kits with hand sanitizer, sealed wipes, and portable toilets minimize contamination risks. Waste is contained and removed promptly to avoid odor and pests.
- Collect and label potable containers.
- Treat water with measured bleach.
- Use nonpotable water for toilets/cleaning.
- Maintain hygiene kits and dispose waste.
Preventing Sewage Backup During Plumbing Failures
The text recommends immediate steps to prevent sewage backup during plumbing failures, beginning with shutting off the main sewer valve to stop incoming flow.
Temporary sealing of floor drains can block reverse flow into living spaces until repairs are made.
For longer-term protection, installation of a backflow preventer is advised to keep wastewater from reentering the property.
Shut Off Main Sewer Valve
Shut off the main sewer valve promptly to guarantee sewage from backing into fixtures and lower-level drains when a plumbing failure occurs.
The homeowner should locate the valve—often outside near the foundation or in the basement—identify its type (gate, ball, or rotary), and use the correct tool to turn it fully closed.
After shutting, check indoor drains for reversal signs and document valve position.
If the valve is seized or inaccessible, contact a plumber immediately. Restore flow only after repairs and professional inspection guarantee system integrity and safety.
- Locate valve quickly
- Use proper tool
- Verify closures indoors
- Call pro if stuck
Seal Floor Drains Temporarily
When a plumbing failure threatens lower-level areas, temporarily sealing floor drains prevents sewage from backing into living spaces and reduces contamination risk.
One method uses a tight-fitting drain cover or a rubber test plug inserted and inflated to block flow; make certain material compatibility and avoid overinflation.
For larger drains, a heavy-duty plastic bag taped securely over the opening or a plywood disc weighted down provides a short-term barrier.
After sealing, monitor for trapped water elsewhere and ventilate to reduce odors.
Remove temporary seals only when sewer conditions are restored or a plumber confirms it is safe to reopen the drain.
Install Backflow Preventer
Install a backflow preventer to block sewage from reversing into a property during pipe failures or municipal backups. A one-way valve installed on the building drain protects fixtures and living spaces, reducing contamination and costly restoration.
Selection depends on local code, pipe size, and expected backflow pressure. Professional installation is recommended to guarantee correct orientation, venting, and easy access for testing.
Regular inspections and annual testing maintain reliability; debris and corrosion can impair function. During emergencies, shut off mains and notify authorities if backflow occurs.
- Choose code-compliant model
- Hire licensed plumber
- Schedule annual test
- Keep access clear
Containing And Removing Contaminated Water Safely
Containment of contaminated water begins with quickly isolating the affected area to prevent spread and protect clean zones. Personnel don impermeable gloves and boots, block doorways with towels or plastic sheeting, and shut HVAC to avoid aerosolizing contaminants. Pump or bail out standing water into approved drains; avoid basement sump pumps if sewage is present. Discard porous materials soaked by contaminated water.
| Visual | Action |
|---|---|
| Pooled water at threshold | Block with rags/plastic |
| Soiled carpet removed | Bag and dispose |
Sanitize hard surfaces with appropriate disinfectant and ventilate after cleanup.
Safety For Children And Pets During A Burst-Pipe Event
After isolating contaminated areas and removing soaked materials, attention should turn to keeping children and pets out of harm’s way; caregivers should immediately move them to a safe, dry room away from the affected zone and close doors to prevent re-entry.
Supervisors must check shoes and clothing for contamination, secure medications and cleaning chemicals out of reach, and keep utilities off unless deemed safe.
Maintain ventilation to reduce fumes and monitor for stress in animals or children.
Record whereabouts and contact details in case of evacuation.
- Establish a single safe room.
- Remove hazards and toxins.
- Keep identification and meds ready.
- Monitor health and behavior.
When To Call A Plumber Immediately Versus Continue DIY
Visible major leaks, such as water gushing from a pipe or pooling rapidly, typically require calling a plumber immediately.
If damage appears complex or is hidden behind walls or under floors, professional assessment is advised rather than prolonged DIY.
Any situation that creates unsafe conditions—electrical hazards, structural compromise, or persistent flooding—warrants immediate professional intervention.
Visible Major Leak
A major leak that sprays water or floods a room demands immediate assessment to decide whether homeowner action will suffice or a professional is required.
The observer should shut off water at the main, isolate electricity if water reaches outlets, and contain flow with buckets and towels.
If water continues under pressure, connections burst, or ceilings collapse, a plumber is necessary.
If flow stops and damage is localized, short-term DIY containment may be acceptable until help arrives.
- Stop water and power to prevent escalation.
- Contain spread and protect valuables.
- Assess source: active burst or slowed leak.
- Call a plumber for pressure, structural, or extensive flow.
Complex Or Hidden Damage
When surface flooding subsides or obvious bursts are contained, hidden or complex damage may still be present and require immediate professional attention.
Signs such as persistent damp spots, unexplained pressure loss, recurring leaks after temporary repairs, foul odors, or new stains indicate underlying failures beyond simple patches.
Structural compromise—soft floors, warped trim, or bulging drywall—suggests concealed saturation or ongoing leaks.
DIY measures suit visible, low-pressure drips and temporary containment; anything involving supply-main failures, multiple leak points, unknown sources, or suspected mold warrants dialing a licensed plumber.
Prompt professional diagnosis prevents escalation and costly secondary damage.
Unsafe Conditions Present
Recognizing unsafe conditions is critical: any situation involving high water flow, electrical contact, gas odor, structural instability, or inability to isolate the supply demands immediate professional intervention rather than continued DIY attempts.
A plumber or emergency responder should handle scenarios where personal safety or major property loss is at stake.
Temporary DIY measures are acceptable only if isolation is certain and hazards absent.
Clear criteria guide the decision to call a pro.
- Visible live wiring contact with water.
- Strong gas or chemical odors near the leak.
- Rapid, uncontrollable flooding despite shutoffs.
- Collapsing ceilings, floors, or major structural damage.
What Information To Give The Plumber For Faster Service
What details should be relayed to the plumber to speed response and repair? Provide precise location of the leak (room, wall, floor, fixture), visible symptoms (spraying, dripping, pooled water), estimated flow rate, and when the issue began.
Note pipe material if known, recent work or freezing events, and whether water is hot, cold, or both.
Mention shutoff valve status and access constraints (locked areas, narrow stairs).
Report any electrical hazards or contaminants.
Give contact information, best arrival window, and permission for emergency entry if needed.
Indicate insurance involvement only if it affects billing or approvals.
Photos And Notes To Accelerate Your Homeowner Claim
After notifying the plumber, the homeowner should assemble clear photographic and written evidence to speed an insurance claim: wide shots showing the room and affected walls or floors, medium shots framing the fixture and surrounding damage, and close-ups of leaks, burst pipe ends, water stains, warped materials, mold, and any damaged belongings.
Record timestamps, locations, and brief descriptions for each image; note actions taken (shutoff, towels, buckets) and contractor visits.
Preserve originals; back up copies.
Organize chronologically and by area.
Provide a simple inventory of visibly damaged items with estimated age and purchase info.
- Timestamps and locations
- Action log
- Chronological folders
- Damaged-item inventory
When To File An Emergency Mitigation Claim With Insurance
File an emergency mitigation claim as soon as immediate damage-control actions are underway and the homeowner has basic documentation—shutoff time, photos, and a short action log—so the insurer can guarantee or reimburse urgent repairs like water extraction, drying, and temporary boarding.
The claim should be filed when ongoing water intrusion risks persist, visible structural or mold threats exist, or temporary repairs are needed to prevent further loss.
If contractors must be hired immediately, notify the insurer first when possible.
Prompt filing expedites approval, avoids denied reimbursement, and guarantees mitigation aligns with policy requirements while permanent repairs are scheduled.
Insurance Steps: Documenting Damage For Claims
After addressing immediate repairs, the homeowner should methodically assess and photograph all visible damage to create a clear record.
They should preserve receipts, invoices, and any records of repairs or temporary measures.
Finally, they should promptly contact their insurance agent to report the claim and provide the documentation.
Assess And Photograph Damage
Before contacting the insurer, the homeowner should quickly survey the affected areas and take clear, well-lit photographs that show the full scope of the water damage, any visible pipe failures, and surrounding structural or content damage.
The homeowner documents room-by-room, capturing wide shots, close-ups of leaks, timestamps, and sources.
Notes on locations and observed progression accompany images.
Photographs should avoid staging repairs; they must reflect current conditions.
Where safe, video walkthroughs supplement stills.
This evidence speeds claims and supports repair estimates.
Follow insurer guidance for submission formats and deadlines to guarantee eligibility.
- Wide-area context shots
- Close-ups of pipe failure
- Photos of affected possessions
- Timestamped walkthrough videos
Preserve Receipts And Records
Once photographs and notes are collected, homeowners should gather and preserve all receipts and records related to emergency expenses and repairs. Receipts for temporary accommodations, tarps, pumps, replacement parts, and professional services form a chronological expense trail.
Include invoices, contractor estimates, payment confirmations, and bank or credit card statements showing transactions. Label documents with dates, vendor names, and brief descriptions of purpose.
Store digital scans in multiple locations—cloud and external drive—and keep originals in a dry, secure folder. Maintain correspondence with repair providers and any permits.
Organized records streamline claim preparation and help substantiate amounts claimed without delay.
Contact Your Insurance Agent
Who should be notified first when water damage from a burst pipe becomes evident? The homeowner should promptly contact their insurance agent to report the loss, initiate a claim, and obtain guidance on documentation and approved vendors. The agent confirms coverage, explains deductible implications, and advises on temporary repairs to prevent further damage.
- Photograph damage and timestamp files.
- List damaged items with estimated values.
- Keep receipts for emergency repairs and purchases.
- Follow the agent’s instructions before major repairs to make certain claim eligibility and faster settlement.
Assessing Structural Risk: Ceilings, Walls, And Floors
When evaluating burst-pipe damage, inspectors should prioritize the condition of ceilings, walls, and floors to determine immediate safety hazards and the scope of repairs. Visual signs—sagging ceilings, bowing walls, softened flooring—indicate compromised structure requiring shoring or evacuation. Inspectors document wet areas, staining, and mold growth, noting load-bearing members and finishes. Short-term measures include removing saturated materials and supporting weakened spans. Safety dictates shutting off power where water contacts electrical systems. Decisions about professional structural assessment hinge on extent of deformation, persistent moisture, and visible fractures.
| Element | Sign | Recommended action |
|---|---|---|
| Ceiling | Sagging | Support/inspect joists |
| Wall | Cracks | Monitor/brace if needed |
| Floor | Soft spots | Remove/replace subfloor |
How To Check For Hidden Leaks Behind Walls And Under Floors
Begin by conducting a systematic inspection of likely concealment areas—baseboards, plumbing chases, appliance connections, and along floor seams—looking for subtle indicators such as discoloration, soft spots, peeling paint, efflorescence, or a musty odor; use a moisture meter and thermal camera to pinpoint elevated moisture behind surfaces, and confirm with small exploratory openings only where readings or visible signs justify further investigation.
Technicians note sounds of running water and elevated humidity in cavities.
Document locations, isolate water, and dry affected zones.
When necessary, access small panels to trace supply lines and fittings before calling professional repair.
- Use moisture meter and thermal scan
- Inspect baseboards and flooring seams
- Create minimal exploratory openings
- Log findings and isolate water
Avoiding The Top DIY Mistakes That Make Leaks Worse
Before attempting repairs, the person should shut off the main water supply to stop flow and reduce damage.
They should also choose proper temporary clamps rather than makeshift fixes that can worsen leaks or cause pipe failure.
Clear, timely action and appropriate materials minimize risk until professional repair is possible.
Turning Off Main Water
At the first sign of a major leak, shutting off the main water supply is the single most effective step to limit damage and simplify repairs.
The household should locate the main valve—usually near the meter, basement, or exterior wall—and turn it clockwise until fully closed.
Afterward, open faucets to drain residual water and reduce pressure.
Notify occupants and, if needed, shut off electricity in flooded areas.
Record valve position and assess for safe access before calling a professional.
- Know valve location ahead of time.
- Use a wrench if stuck.
- Drain lines after shutoff.
- Communicate with household.
Using Proper Temporary Clamps
Clamp the leak with a purpose-built temporary clamp designed for the pipe material and size, not with improvised items that can shift, corrode, or crush the line. The responder selects a clamp rated for pressure and compatible with copper, PVC, or PEX, centers it over the defect, and tightens evenly. Padding prevents damage; stainless hardware resists rust. Periodically inspect for seepage and replace clamps before permanent repair. Avoid tape-only fixes or wire that cuts into the pipe. Proper clamps stabilize flow, reduce water loss, and buy safe time for a professional replacement.
| Pipe Type | Recommended Clamp |
|---|---|
| Copper | Stainless band |
| PVC | Rubber-lined band |
| PEX | Saddle clamp |
| Small leak | Mini repair clamp |
Replacing A Damaged Section Of Pipe: A Simple Walkthrough
When a section of pipe has burst, the clear priority is to isolate and remove the damaged portion so a new, secure connection can be made; this walkthrough outlines the essential steps, tools, and safety checks needed to perform the repair efficiently and reliably.
The practitioner shuts main water, drains lines, and inspects damage. Cut back to solid pipe, deburr edges, and dry the area.
Fit an appropriate replacement length and secure with approved couplings or compression fittings.
Test under low pressure, check for leaks, then restore full supply.
- Shut water and drain
- Cut and prepare ends
- Fit replacement and secure
- Test and inspect
Solder A Copper Joint Safely For A Lasting Fix
Before applying heat, the technician makes certain the work area is well-ventilated, the water supply is shut and drained, and combustible materials are cleared; proper preparation prevents common soldering failures and safety hazards.
The copper surfaces are cleaned with emery cloth or a wire brush until bright, flux applied sparingly to promote wetting.
Parts are assembled snugly, support provided to avoid movement.
Using a propane torch, heat is applied evenly to the joint, watching flux darken and melt.
When solder flows into the seam by capillary action, heat is removed and the joint cools undisturbed.
Finally, excess flux is wiped away and the repair tested for leaks.
Join PEX With A Crimp Or Clamp: Step-By-Step
Using a PEX crimp or clamp system, the repair proceeds quickly and reliably when the correct tools and fittings are selected.
The technician measures and cuts PEX squarely, slides on the ring or crimp, inserts the fitting fully, then compresses the ring with a crimp tool or pinch clamp pliers.
After cooling or settling, the connection is inspected with a gauge or visual check and pressure-tested before restoring supply.
Proper ring placement and tool calibration prevent leaks.
Clean work and correct sizing assure longevity and avoid rework.
- Cut squarely
- Fit ring/clamp
- Compress correctly
- Pressure-test
PVC Repair And Solvent-Welding Basics For Homeowners
The section introduces basic PVC repair steps, beginning with proper pipe preparation: cutting square, deburring edges, and cleaning surfaces for a secure joint.
It outlines solvent-welding technique, including primer use, solvent application, and correct assembly timing to guarantee a reliable bond.
Safety precautions and quick-test methods for emergency repairs are noted to help homeowners restore flow promptly.
PVC Pipe Preparation
When preparing PVC pipe for repair, a homeowner should make certain the work area is clean, dry, and well-lit, then gather the correct-size pipe, fittings, a PVC cutter, primer, and solvent cement.
The pipe ends must be cut squarely, deburred, and checked for cracks or warping. Dry-fit components to confirm alignment and measure insertion depth marks.
Surfaces should be free of grease, moisture, and loose particles; wipe with a clean cloth. Use primer only where recommended and follow product instructions.
Proper preparation guarantees a reliable joint and reduces leak risk during emergency repairs.
- Cut squarely and deburr edges
- Inspect for damage
- Dry-fit and mark depth
- Clean and dry surfaces
Solvent-Welding Technique
After preparing and dry-fitting PVC components, the repair proceeds to solvent-welding, a controlled chemical bonding process that fuses pipe and fitting into a single, watertight piece.
The technician applies primer to both surfaces, ensuring softened PVC for proper fusion, then spreads solvent cement evenly on pipe end and fitting socket.
Components are joined with a quarter-turn and held briefly to prevent push-out while the chemical sets. Excess cement is wiped away.
Curing time varies by temperature and product; short-term pressure testing should wait recommended minutes. Proper ventilation and gloves protect the installer from fumes and skin contact during the procedure.
Choosing The Right Repair Material For Each Pipe Type
Which repair materials suit a given pipe depends on the pipe’s composition, location, and operating pressure. For metal pipes, epoxies or soldered patches work for small leaks; for PVC, solvent cement or plastic epoxy is preferred. Flexible rubber sleeves with hose clamps suit temporary exterior repairs; high-pressure mains require certified clamps or professional replacement.
Consider chemical compatibility, temperature range, and code compliance when selecting materials.
- Metal (copper/steel): epoxy, solder, mechanical clamps
- PVC/CPVC: solvent cement, plastic epoxy
- PEX: crimp rings, push-fit fittings
- Temporary exterior: rubber sleeve + hose clamps
When To Upgrade Old Pipes Instead Of Patching Them
In evaluating whether to upgrade rather than patch old pipes, the decisive factors are age, frequency of failures, material degradation, and system risk: if a line shows widespread corrosion, recurring leaks, brittle joints, or cannot meet current pressure and health codes, replacement is more cost-effective and safer than repeated spot repairs. A professional assessment of lifespan, repair history, and water quality guides decisions. Prioritize sections with chronic issues, lead or galvanized materials, and inaccessible routing. Budgeting considers disruption vs long-term savings. The table summarizes triggers, consequences, urgency, typical materials, and recommended action.
| Trigger | Consequence | Recommended Action |
|---|---|---|
| Chronic leaks | Structural damage | Replace |
| Corrosion | Contamination | Replace |
| Brittle joints | Sudden failure | Replace |
| Lead/galv | Health risk | Replace |
| Single isolated leak | Localized damage | Patch |
Seasonal Tips: Preventing Bursts In Winter And Freeze Zones
Regularly before the cold season, homeowners and facility managers should take targeted steps to prevent pipe bursts in freeze-prone areas. Insulation, controlled heating, and proactive maintenance reduce risk. Awareness of vulnerable locations—exterior walls, attics, crawlspaces, and detached garages—guides interventions. Consider long-term fixes where repeated freezing occurs.
- Add foam pipe insulation and heat tape to exposed runs.
- Seal drafts and add exterior wall insulation near plumbing.
- Maintain a minimum indoor temperature and allow slow faucet drips during extreme cold.
- Winterize outdoor faucets and isolate or drain unused lines.
Quick Checklist To Follow After A Burst-Pipe Emergency
After a burst-pipe emergency, the first priority is to shut off the water supply to stop further flooding.
Next, immediate steps should be taken to protect valuables and move furniture or coverings to safeguard flooring.
A concise checklist helps guarantee these actions are performed quickly and in the correct order.
Shut Off Water Supply
Locate the main shut-off valve immediately and close it to stop water flow; doing so prevents further flooding and limits water damage while further steps are taken. The person should check exterior and interior valves, turn clockwise firmly, and verify taps run dry. If the valve is stuck, use pliers cautiously or call local emergency services.
After shutting off, open lowest and highest faucets to drain remaining water and relieve pressure. Note the shut-off location for future reference and inform household members.
- Identify valve location
- Turn valve fully off
- Drain residual water
- Label and communicate
Protect Valuables And Flooring
With belongings and floors vulnerable to rapid water damage, prioritize quick removal or elevation of valuables and temporary protection for flooring; move small items to higher ground, place electronics and important documents in sealed plastic containers, and lift furniture onto blocks or waterproof barriers to prevent swelling and staining. Then follow a concise checklist: dry visible surfaces, clear rugs, mark soaked areas, and ventilate to limit mold. Use absorbent towels and plastic sheeting for temporary coverage. Coordinate items by priority and weight; document damage with photos. Seek professional salvage for antiques or saturated cabinetry.
| Item | Action |
|---|---|
| Electronics | Seal, elevate |
| Documents | Waterproof container |
| Furniture | Lift, block |
Conclusion
Like a skilled first responder arriving at a scene, this guide equips homeowners with rapid, practical steps to limit damage and restore safety after a burst pipe. By shutting off the main valve, relieving pressure, cutting power if needed, choosing appropriate repair materials, and considering upgrades for aging plumbing, one can stem immediate harm and plan lasting fixes. Seasonal prevention and a concise checklist guarantee readiness for future emergencies. Stay calm and act swiftly.