How to Transport a Water Heater Safely: Step-by-Step Tips for Moving Tanks and Protecting Your Home
To transport a water heater safely, follow these essential steps: first, shut off the power and water supply. Drain the tank by attaching a hose to the drain valve to relieve pressure. Make sure to cap all openings and isolate electrical or gas lines. Measure the weight of the unit, and use an appliance dolly with straps, enlisting two people to lift while keeping the tank upright. Protect your floors with coverings and secure the heater during transit. For detailed procedures, equipment lists, and troubleshooting tips, continue reading.
Overview of Safely Transporting a Water Heater
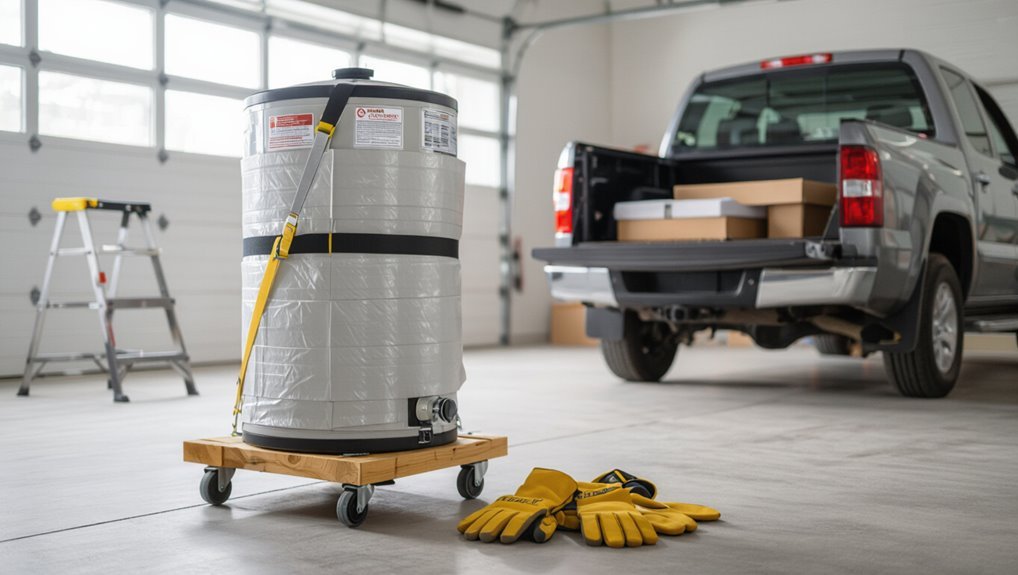
Situations such as home renovation, replacement, or relocation can require moving a water heater, and understanding the reasons helps prioritize proper handling.
Safety concerns center on preventing scalding, avoiding gas or electrical hazards, and protecting the tank from damage during transport.
Essential precautions include draining the unit, securing fuel and power sources, and using appropriate lifting and tie-down equipment.
When and why you might need to move a water heater
Many homeowners and contractors occasionally need to move a water heater—for replacement, renovation access, or to transport it to a repair shop—and understanding the reasons and timing for such moves helps guarantee safety and prevent damage.
Typical situations include unit failure, home remodeling, flood mitigation, or relocation.
Deciding when to act and planning steps clarifies how to transport water heater without causing leaks, injury, or property harm.
Quick safety summary and essential precautions
Because water heaters are heavy, potentially pressurized, and contain hot water and electrical or gas connections, transporting one requires strict adherence to basic safety steps: drain and depressurize fully, disconnect electrical or gas supplies, secure valves, and use proper lifting equipment and straps.
Protect surrounding surfaces, transport upright when possible, avoid tilting, and enlist helpers or professionals to prevent injury and damage.
Preparing the Water Heater for Transport
Before moving a water heater, gather the necessary tools and materials and review a clear step-by-step draining procedure.
The unit should be disconnected from plumbing, power, and gas following safety best practices, with openings sealed and any remaining water contained.
These preparations minimize spills, prevent damage, and reduce risk during transport.
Tools and materials checklist
A concise checklist of tools and materials helps guarantee the water heater is prepared for safe transport and reduces delays.
Essential items are listed for quick verification and secure handling.
- Adjustable wrench, pipe tape, and basic hand tools.
- Hose, bucket, and garden spigot adapter.
- Appliance dolly with straps and protective blankets.
- Work gloves, safety glasses, and floor protection pads.
How to drain the tank step-by-step
With tools and protective gear assembled, the next step is to drain the water heater so it can be moved safely.
The procedure: shut off cold supply and power, attach a hose to the drain valve, open a hot tap to relieve pressure, open the drain valve and allow full emptying into a safe drain or bucket, then close valve and remove hose once flow stops.
Disconnecting plumbing and electrical/gas safely
Shut off and isolate all utilities, then verify the heater is cold and fully drained before touching any connections.
Cap water lines, remove union fittings or flex connectors, and label pipes for reinstallation.
For electric units, disconnect power at the breaker and detach wiring from the junction box, insulating exposed conductors.
For gas units, shut the gas at the appliance valve and disconnect only after sealing the line.
Securing openings and handling residual water
Several simple steps guarantee openings are sealed and any residual water is controlled before moving a water heater.
Caps or threaded plugs protect inlet and outlet to prevent leaks and debris.
Drain valve is opened and flushed; remaining water is collected in a pan and towels.
Gas lines and electrical ports are capped.
All fittings are taped and labeled for reinstallation.
Assessing Weight, Size, and Access Requirements
The next step is to estimate the water heater’s weight and external dimensions to determine handling needs and vehicle capacity.
Measurements should be compared against doorways, stairwells, and truck or van clearance to identify potential tight spots or required disassembly.
If size, weight, or access make safe moving doubtful, hiring professional movers with proper equipment is recommended over a DIY attempt.
How to estimate weight and dimensions
How much space and mass must be planned for when moving a water heater? The writer recommends measuring height and diameter, noting insulation or attached plumbing.
Estimate dry weight from manufacturer specs; add 8–10 lb per gallon if filled. Include packaging and dolly weight.
Record dimensions and total mass to choose straps, lifting gear, and transport vehicle with appropriate capacity and safety margins.
Checking doorways, stairways, and vehicle clearance
Before moving begins, the person responsible should verify that all entryways, stairwells, and the transport vehicle offer sufficient clearance and safe passage for the heater’s measured dimensions and mass.
Measure height, width, and diagonal clearance; note door swing and landing sizes. Check stair tread depth, handrail projections, and vehicle bed height.
Account for protective padding and secure tie-down locations before loading.
When to hire professionals vs. DIY
When should a homeowner call professionals instead of attempting a DIY move?
Homeowners should hire pros when tanks exceed two people’s safe lift, dimensions complicate maneuvering, access involves tight stairwells or narrow doorways, or vehicle loading requires specialized equipment.
Professionals also suit older, corroded units or installations needing disconnect/reconnect to avoid damage, injury, or code violations.
Choosing the Right Equipment and Vehicle
Selecting appropriate moving equipment and a suitable vehicle is essential for safe water heater transport.
The discussion covers essential tools like a heavy-duty dolly, secure straps, and loading ramps, along with vehicle choices and loading considerations to match the unit’s size and weight.
It also addresses protective padding and stabilization techniques to prevent shifting and damage during transit.
Moving equipment needed (dolly, straps, ramps)
Gathering proper moving equipment is essential for securing a water heater and preventing injury or damage during transport.
Suitable tools minimize strain and protect the appliance. Recommended items include:
- Appliance dolly with straps for upright stability.
- Heavy-duty ratchet straps to secure load.
- Loading ramp with non-slip surface.
- Moving blanket or protective padding for surfaces and fittings.
Vehicle types and loading considerations
Although cargo vans and pickup trucks are commonly used for water heater transport, choosing a vehicle should be driven by size, weight capacity, and securement options rather than convenience.
The vehicle floor must support the heater’s weight and allow safe loading/unloading. Consider ramp angle, cargo area dimensions, tie-down anchor points, and payload limits.
Verify clearances and parking access before starting the move.
Protective padding and stabilization methods
Wrap the water heater in heavy-duty moving blankets or foam sheets and secure them with stretch wrap or ratchet straps to prevent scratches and absorb shocks during transit.
Place the unit upright on a non-slip surface, brace it with wheel chocks or wooden blocks, and use adjustable cargo straps to anchor it to anchor points.
Fill voids with foam pads to prevent shifting.
Step-by-Step Transport Process
The step-by-step transport process covers safe two-person lifting techniques and proper body mechanics to reduce strain and prevent injury.
It explains how to move the heater onto a dolly, secure the tank with straps, and steady it during rolling.
Finally, it outlines loading the unit into a vehicle, positioning it for stability, and driving precautions to minimize tipping or damage.
Two-person lifting techniques and body mechanics
Positioning two people correctly before lifting a water heater reduces strain and prevents injury: one person should take the corner nearest the heater’s valves and the other the opposite corner, both facing the same direction with feet shoulder-width apart.
They bend at the knees, keep backs straight, communicate timing, lift smoothly together, pivot with feet, and set the tank down gently, maintaining neutral spines.
Using a dolly and securing the tank on the dolly
Begin by selecting a dolly rated for the water heater’s weight and with straps or a built-in bracket; place it close to the unit so minimal horizontal movement is required.
Tip the heater gently onto the dolly, center it on the platform, fasten straps snugly around tank and base, secure valve protection, and test stability with slight rocking before proceeding.
Loading into a vehicle and positioning for transport
With the dolly secured and the heater stable, loaders should lift the unit into the vehicle using the ramp or tailgate, keeping the tank upright and centered over the floor.
Position it close to the vehicle’s centerline, away from doors and windows.
Block the base with wedges, strap the tank to anchor points, and protect fittings with padding before final tightening.
Driving precautions to prevent tipping or damage
Before driving, confirm the water heater is firmly secured, upright, and cushioned so it cannot shift.
Then plan a route and driving style that minimizes sudden movements, maintaining steady speeds, gentle braking, and gradual turns to reduce tipping risk and protect fittings.
Monitor traffic, avoid potholes and abrupt lane changes, use a spotter when reversing, and stop to recheck straps on long trips.
Protecting Your Home During Removal and Delivery
Before removal and again at delivery, the homeowner should protect floors and walls with durable coverings such as rosin paper, moving blankets, or cardboard runners.
Careful planning and use of drip pans, towels, and a wet-vac minimize the risk of water and debris damage during disconnection and relocation.
In tight spaces, movers must measure, pad corners, and use proper lifting techniques to prevent scratches, drywall cracks, or structural harm.
Floor and wall protection options
Protective coverings and strategic padding prevent damage to floors, baseboards, and walls during water heater removal and delivery.
Recommended options balance protection and ease of cleanup:
- Heavy-duty rosin paper taped at seams for hardwood and tile.
- Corrugated cardboard layers for temporary cushioning.
- Moving blankets secured with contractor tape along wall edges.
- Thin plywood sheets to distribute weight over soft surfaces and thresholds.
Preventing water and debris damage during removal
Drain and isolate the water heater and contain loose debris to minimize risk of spills and mess during removal.
Place absorbent pads and drip pans beneath fittings, cap open lines, and use plastic sheeting over floors and nearby surfaces.
Secure loose insulation and sediment in sealed bags.
Keep a wet/dry vacuum and microfiber cloths on hand to catch residual water and wipe tracked grit.
Managing tight spaces and avoiding structural damage
With water contained and loose debris secured, attention turns to maneuvering equipment through confined areas and preventing harm to the structure.
Protective padding covers doorways, floors, and banisters. Measure clearances, remove trim or obstacles if needed, and use sliders or dollies to distribute weight.
Communicate roles, move slowly, and brace load to avoid gouges, dents, or strain on framing and finishes.
Handling Different Types of Water Heaters
Different types of water heaters require distinct handling techniques and precautions.
Traditional tank units demand attention to weight distribution and securing loose fittings, while short, tall, or extra-wide tanks present unique balance and clearance challenges during movement.
Electric and gas models also differ in reconnection requirements and safety checks, so proper labeling and compliance with local codes are essential.
Traditional tank water heaters: special considerations
Many traditional tank water heaters require extra precautions during transport because their size, weight, and retained water create specific risks; securing the tank upright, protecting inlet/outlet fittings, and ensuring the pressure-relief valve and thermostat controls are not jostled are essential to prevent damage and leaks.
Drained or partly drained tanks still contain residue; use straps, padding, and stable surfaces, and check for corrosion and loose components.
Short/tall/extra-wide tanks: techniques and risks
Handle short, tall, and extra-wide water heaters according to their specific center-of-gravity and clearance challenges.
Short, heavy units require strong base support and secure straps to prevent tipping.
Tall models need bracing and low-angle tilting to avoid toppling and doorframe collisions.
Extra-wide tanks demand wider dollies and team lifting; watch for pinch points, uneven weight distribution, and constrained passages.
Electric vs. gas water heaters: reconnection notes
When reconnecting a water heater, the technician must account for the fundamental differences between electric and gas units: electric models require safe, code-compliant electrical hook-ups and properly sized breakers and wiring, while gas heaters demand secure fuel-line connections, leak-tested fittings, and correct venting for combustion gases.
Inspection, pressure checks, grounding verification, pilot/ignition testing, and adherence to local codes minimize hazards and guarantee reliable operation.
Common Problems and How to Avoid Them
Common problems during water heater transport include leaks from residual water, cosmetic damage like scratches and dents, and safety hazards such as burns, gas leaks, or electrical shocks.
Each issue requires specific preventive steps—draining and sealing connections, using proper padding and securement, and following safety protocols for fuel and power.
Addressing these areas reduces damage risk and protects both the equipment and handlers.
Leaks and residual water issues
Leaks from valves, fittings, or the tank itself are among the most frequent causes of damage during water heater transport.
Even small amounts of residual water can slosh free and corrode components or stain surfaces. To prevent leaks, drain thoroughly, cap and tape openings, inspect and tighten fittings, and use absorbent pads and leak trays.
Secure upright to minimize sloshing.
Scratches, dents, and cosmetic damage
Many water heaters sustain surface damage during handling or transport that, while often cosmetic, can expose metal to corrosion and reduce resale value.
Protective padding, shrink wrap, and foam corners prevent scratches. Secure placement in the vehicle minimizes dents from shifting.
Inspect upon arrival, touch up paint where needed, and document damage for claims. Prompt repair preserves finish and resale prospects.
Safety hazards: burns, gas leaks, and electrical shocks
Because water heaters contain hot water, gas lines, and live electrical connections, improper handling or transport can create serious burn, fire, or electrocution risks.
Workers should drain tanks, cool systems, and disconnect power and gas per manufacturer instructions.
Cap and secure gas fittings, insulate exposed terminals, wear gloves and eye protection, and use proper lifting techniques.
Verify no leaks before reconnecting and testing.
Post-Transport Checklist
After transport, the unit should be inspected for dents, leaks, and loose fittings.
If immediate reinstalling is not possible, it should be stored upright in a dry, secure location with the drain valve closed and protected.
Before connecting, the heater must be tested and reconnected according to manufacturer guidelines to guarantee safe operation.
Inspecting the water heater for damage
Begin by placing the water heater on a stable, level surface and performing a systematic visual inspection for dents, cracks, loose fittings, or paint damage that could indicate internal harm.
Check fittings, valves, and connections for leaks or corrosion.
Inspect the base and insulation for moisture, rust, or deformation.
Note any anomalies, photograph damage, and document serial numbers before repair or reinstall decisions.
Safe storage tips if not immediately reinstalling
Once the inspection is complete and any damage is documented, the heater should be prepared for storage rather than immediate reinstallation.
Drain residual water, leave drains slightly open to vent moisture, cap inlet/outlet fittings, and wrap with breathable protective covering.
Store upright on a pallet in a dry, temperature‑stable, secure area away from chemicals and freezing risk.
Check periodically for leaks or condensation.
Reinstallation reminder: testing and reconnecting safely
Before reconnecting the unit, verify the tank and surrounding components are clean, dry, and undamaged, and confirm all transport caps and protective coverings have been removed.
Inspect fittings, valves, and the pressure relief assembly for leaks or damage.
Reconnect water and power/gas per manufacturer instructions, purge air from lines, set thermostat, and perform a controlled leak and operation test before leaving the area.
Cost, Time Estimates, and When to Hire Pros
A typical DIY move of a residential water heater takes one to three hours, depending on access and whether the unit must be drained and disconnected.
Expected expenses include small equipment rental (dolly, straps, plywood) and possible truck fees, while professional mover or licensed plumber rates vary widely by region and service complexity.
Professional help is recommended when the unit is oversized, plumbing or gas connections are involved, or when the homeowner lacks proper tools or experience.
Typical time required for DIY move
Estimating time for a DIY water heater move depends on unit size, access conditions, and the mover’s experience; a straightforward swap of a standard tank heater typically takes 2–4 hours.
However, larger tanks, tight stairways, or required disconnect/reconnect work can extend the process to half a day or more.
Preparation, securing help, and allowing extra time for troubleshooting reduce rush and risk.
Estimated costs for equipment rental or professional movers
Several common factors determine whether renting equipment or hiring movers is the more cost-effective choice for transporting a water heater. Costs vary by rental type, distance, and labor. Renters: dolly $20–40/day, straps $5–10. Movers: $150–400 local. Time and risk should guide decisions.
| Option | Typical Cost | Notes |
|---|---|---|
| Dolly + straps | $25–50/day | DIY moderate effort |
| Truck rental | $30–100/day | Fuel extra |
| Professionals | $150–400 | Includes labor |
Signs you should hire licensed plumbers or movers
When should a homeowner call in licensed plumbers or professional movers? Indicators include large or full tanks, lack of proper lifting equipment, plumbing disconnections required, tight stairways or narrow exits, old or delicate units, time constraints, or liability concerns.
If permits, gas or electrical work, or risk of damage exist, hiring licensed professionals typically reduces injury, property loss, and unexpected delays.
Additional Tips and Best Practices
Seasonal and weather conditions can affect scheduling, packing, and road safety, so planning around forecasts and temperature extremes is advised.
Proper disposal or recycling options for old tanks should be explored in advance to meet local regulations and minimize environmental impact.
A concise checklist covering tools, securing methods, and safety steps helps guarantee no critical item or action is overlooked during transport.
Seasonal and weather considerations
Although temperature and precipitation vary, planning around seasonal and weather conditions is essential to protect both the water heater and those handling it.
Cold risks freezing and brittle components; warm months increase heat exposure. Use weatherproof covers, insulated blankets for freezing temperatures, secure tarps for rain, and schedule moves during milder forecasts.
Monitor wind and road conditions to prevent damage and accidents.
Environmental disposal and recycling options for old tanks
Because old water heaters often contain recoverable metals and hazardous components, proper disposal should prioritize recycling and safe decontamination.
Local regulations dictate handling, and certified recyclers recover steel, copper, and insulation while managing residual chemicals.
Consider donation, scrap yards, municipality take-back, or hazardous-waste facilities.
Verify permits, drain and neutralize fluids before transfer, and obtain recycling receipts for compliance and environmental record-keeping.
Checklist summary for safe transport
After preparing an old tank for recycling or disposal, attention turns to the practical steps for moving a water heater without damage or injury.
A compact checklist guarantees safe transport and minimizes risk:
- Securely drain and cap lines.
- Use straps and a dolly; protect surfaces.
- Balance load in vehicle; cushion contact points.
- Wear PPE; verify route clearance.
Conclusion
Moving a water heater safely protects both property and people; one in six homeowners report DIY mishaps during appliance moves, a statistic that underscores the real risk. By following preparation, proper equipment selection, and careful handling steps, the chances of damage or injury drop markedly. Even experienced DIYers benefit from planning and occasional professional help. Thoughtful transport preserves the unit, prevents costly repairs, and keeps households safer.