How to Test a Water Heater Pressure Relief Valve: Step-by-Step Safety Guide
To test a water heater’s temperature-and-pressure relief valve safely, first, ensure the heater is powered down and the cold-water supply is shut off. Wear appropriate safety gear, then attach a hose to the discharge pipe and place a bucket underneath. Lift the valve lever to check for a quick discharge and ensure it reseals tightly. If you notice continuous dripping, no flow, or a stuck lever, it’s time to replace the valve. Always adhere to local codes and maintenance guidelines for safety. For detailed procedures and troubleshooting, continue reading.
What a Water Heater Pressure Relief Valve Is and Why It Matters
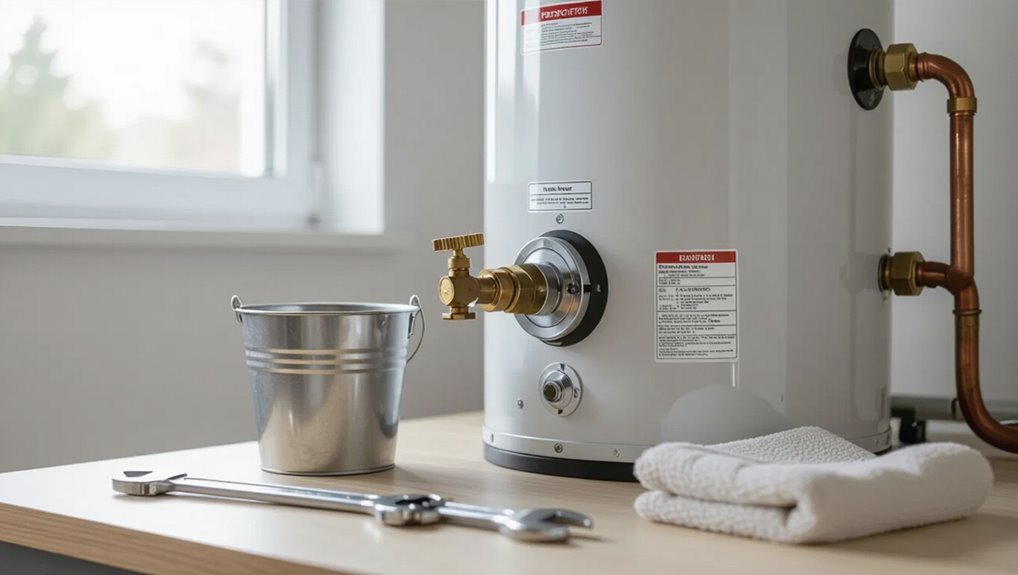
A temperature-and-pressure (T&P) relief valve is a safety device that releases water when temperature or pressure in a heater exceeds safe limits, preventing dangerous buildup.
If the valve fails, overpressure can cause scalding, component failure, or catastrophic tank rupture.
Valve design and placement vary between tanked and tankless systems, so testing and replacement procedures differ accordingly.
Purpose and function of the temperature and pressure (T&P) relief valve
Safety depends on the temperature and pressure (T&P) relief valve to prevent dangerous buildup inside a water heater by opening when either parameter exceeds safe limits.
The valve senses excessive temperature or pressure, discharging water to protect the tank and plumbing.
Regular checks clarify readiness; homeowners learning how to test water heater pressure relief valve confirm operation, ensuring the device responds promptly and reliably.
Risks of a faulty relief valve (overpressure, scalding, tank rupture)
Many potential hazards arise when a water heater’s temperature and pressure relief valve fails, ranging from minor leaks to catastrophic tank rupture.
Failure permits excessive pressure and temperature, increasing risk of scalding, steam release, and structural damage.
Persistent leaks cause corrosion and water damage; sudden rupture can propel shrapnel, flooding, and fire hazards if near electrical or gas components.
Regular inspection reduces these dangers.
How relief valves differ by water heater type (tankless vs. tanked)
How do pressure relief approaches vary between tankless and tanked water heaters?
Tanked units require a temperature and pressure relief (T&P) valve to vent excess pressure and temperature from stored hot water.
Tankless systems rarely use T&P valves; they rely on system controls and pressure reliefs on connected plumbing.
Valve placement, capacity, and testing frequency differ accordingly for safety and code compliance.
How to Prepare to Test a Water Heater Pressure Relief Valve Safely
Before testing the relief valve, assemble necessary tools and materials and don appropriate personal protective equipment to prevent scalding and injury.
The preparatory checklist includes shutting off power or gas, closing the cold-water supply as needed, and verifying expected system pressure and water supply conditions.
If the heater shows signs of corrosion, leaks, unusual noises, or if the operator is uncomfortable with the steps, a qualified plumber should be contacted instead of proceeding.
Tools and materials needed
To prepare for testing a water heater pressure relief valve, gather only the essential tools and materials so the task proceeds efficiently and safely.
A concise set prevents delays and guarantees accurate inspection. Include items that allow controlled operation, drainage, and a basic inspection without improvisation.
- Adjustable wrench, bucket, garden hose
- Towel, rags, small flashlight
- Replacement valve, basic pliers
Personal protective equipment and safety precautions
With tools and materials laid out, attention turns to protective gear and safety steps that minimize risk during the valve test.
The tester should wear safety glasses, heat-resistant gloves, long sleeves, and closed-toe shoes.
Confirm area ventilation, drain or depressurize the system per instructions, keep bystanders clear, and have a fire extinguisher and phone nearby.
Verify stable footing and adequate lighting.
When to call a professional instead of testing yourself
When should a homeowner step back and call a licensed plumber? A professional is needed if leaks persist after testing, if valve or tank corrosion is visible, if pressure readings are abnormal, or if the homeowner lacks tools or confidence.
Also call when gas connections, electrical components, or complex plumbing modifications are involved.
Prioritize safety and code compliance; permit-requiring work should be left to licensed technicians.
Pre-test checklist: power/gas shutoff, water source, pressure expectations
Begin by isolating the water heater from its energy and water supplies and confirming expected pressure conditions before any valve manipulation.
The technician verifies electrical breakers or gas supply off, closes cold-water inlet, opens a nearby hot tap to relieve system pressure, and guarantees a bucketed discharge path.
Expected static pressure and relief valve rating are checked against manufacturer specifications before proceeding.
Step-by-Step Procedure to Test the Pressure Relief Valve
The procedure begins by isolating the heater: cut power or gas and shut off the cold-water inlet to relieve system pressure.
Next, position a bucket and attach a hose to the relief valve discharge, then manually lift the valve lever to confirm a clear flow.
Finally, lower the lever and verify the valve reseats properly with no continued leakage.
Step 1 Turn off power or gas supply to the heater
Shut off the heater’s power or gas supply before any work begins to eliminate ignition and electrical hazards.
A qualified person isolates the circuit breaker or main gas valve, verifies the off position, and posts warnings to prevent accidental reactivation.
Confirm absence of power with a non-contact tester or verify the gas line valve is fully closed before proceeding to further inspection steps.
Step 2 Shut off cold-water supply and relieve system pressure
Close the cold-water inlet to isolate the tank and then open a hot-water faucet or the relief valve drain to bleed pressure from the system.
After confirming inlet shutoff, wait until flow slows and tank pressure drops.
Verify gauge reads zero if present.
Make certain all occupants know testing is underway to prevent accidental faucet use and re-pressurization before the procedure is complete.
Step 3 Position a bucket and place a hose on the discharge pipe
Place a sturdy bucket beneath the pressure relief valve’s discharge pipe and attach a short hose to the pipe outlet to direct flow safely away from the tank and surrounding surfaces.
Confirm the bucket is large enough for expected discharge and positioned on stable ground.
Route the hose to a drain or outside, secure connections with hose clamps, and verify the hose has no kinks.
Step 4 Manually lift the valve lever and observe discharge
Grasp the relief-valve lever firmly and lift it upward about one-quarter to one-half of its travel to open the valve; a steady stream of hot water should discharge through the hose into the bucket or drain, confirming the valve opens and the outlet is clear.
Observe flow rate and color; note any sputtering, sluggish flow, or debris.
Record findings and proceed cautiously.
Step 5 Release the lever and check for proper reseating
Release the lever slowly and observe whether the valve seals fully as the flow diminishes; a properly reseated valve will stop discharging within a few seconds and exhibit no continuous dripping.
Note whether any residual moisture remains at the outlet or on the valve body. If leakage persists, the valve may be corroded or faulty and should be replaced to maintain safe operation.
Step 6 Restore supplies and inspect for leaks
After confirming the valve seats and observing no persistent dripping, the technician should restore the water and power supplies to the heater.
They open the cold-water supply slowly, check for proper fill and venting, and restore electrical or gas service per manufacturer instructions.
Finally, they inspect connections, the relief valve, and nearby piping for leaks, tightening or replacing fittings if any seepage appears.
How to Interpret Test Results and What They Mean
Normal behavior is characterized by a brief, forceful discharge followed by a tight reseal.
Continuous dripping, failure to discharge, or a stuck lever indicate the valve may be failing or obstructed.
Related causes to evaluate include high system pressure, thermal expansion, or sediment buildup affecting operation.
Normal behavior: brief discharge and tight reseal
When functioning correctly, the pressure relief valve will open briefly to discharge a small amount of water or steam and then reseat tightly without dripping.
This response relieves excess pressure or temperature, typically lasting only a second or two.
After reseating, no continuous moisture should appear at the outlet. Such behavior indicates proper valve seating, effective spring action, and a healthy safety mechanism.
Signs of a failing valve: continuous drip, no discharge, stuck lever
Several clear test outcomes indicate a failing pressure relief valve: a continuous drip from the discharge pipe, no discharge during a deliberate lift, or a lever that remains stuck or hard to move.
These signs mean the valve cannot seal or operate reliably. Continuous dripping shows improper closure, no discharge on lift indicates internal blockage or corrosion, and a stiff or seized lever signals mechanical failure requiring replacement.
Diagnosing related issues: high system pressure, thermal expansion, sediment
Interpret test results by linking valve behavior to underlying system problems:
An intermittently discharging or frequently dripping valve often points to high system pressure or thermal expansion forcing the relief path.
A valve that fails to open under manual lift suggests internal blockage from sediment or mineral buildup.
A stiff or partially moving lever indicates corrosion or mechanical seizure rather than pressure-related causes.
Further investigation should include pressure measurement, checking expansion tanks or backflow preventers, and flushing the heater to remove sediment.
Troubleshooting and Common Problems
After testing, common issues require methodical troubleshooting to determine whether the relief valve or related systems are at fault.
Persistent leaks after reseating, a valve that won’t discharge when tripped, intermittent dripping tied to thermal expansion, and visible corrosion or mineral buildup each point to specific causes and fixes.
The following guidance outlines likely causes, quick checks, and when replacement or professional service is warranted.
Valve leaks after reseating causes and fixes
When a pressure relief valve continues to drip after being reseated, it typically indicates an issue with the valve seat, sealing surfaces, or residual debris preventing a full seal.
Common causes include corroded or warped seats, mineral buildup, and damaged seals.
Fixes involve cleaning or replacing the valve, lapping the seat if serviceable, and installing a new certified relief valve when corrosion or wear prevents reliable sealing.
No discharge when lever lifted possible blockages or frozen valve
Check the relief valve by lifting its test lever and observing no flow; a lack of discharge can signal internal blockage, a frozen or seized mechanism, or an upstream obstruction in the discharge piping.
Inspect the valve and pipe for mineral buildup, corrosion, or debris. Verify the lever moves freely.
If stuck or clogged, isolate power/heat, drain, and replace the valve or clear piping per local codes.
Intermittent dripping thermal expansion and expansion tanks
A relief valve that frees and discharges properly may still drip intermittently due to thermal expansion issues in the closed water system.
When heating causes pressure spikes, the valve can release small amounts.
Installing or checking an expansion tank and its air charge often resolves cycling pressure.
Verify system backflow devices and adjust tank size or charge before replacing the valve.
Corrosion or mineral build-up and when replacement is necessary
If exposed to hard water or corrosive conditions over time, a pressure relief valve can develop mineral deposits or internal corrosion that prevents a tight seal or smooth operation.
Visual inspection may reveal crusting, pitting, or stuck components. Minor scale can sometimes be cleaned, but persistent leakage, impaired test operation, or visible corrosion warrants immediate replacement to guarantee safe pressure relief and prevent failure.
How to Replace a Faulty Pressure Relief Valve
When a relief valve fails, the replacement begins with selecting a valve that matches the water heater’s size and pressure rating.
The technician prepares appropriate tools and parts, follows a clear step-by-step replacement procedure, and then conducts post-replacement testing.
Final documentation records the new valve specifications, test results, and any maintenance performed.
Selecting the correct replacement valve (size, pressure rating)
Though seemingly simple, selecting the correct replacement pressure relief valve requires matching the tank’s outlet size and the valve’s pressure rating to the water heater’s specifications and local codes.
Incorrect sizing or an improper relief setting can cause leaks, failure to relieve overpressure, or code violations.
- Verify outlet thread size and connection type.
- Match temperature/pressure (T&P) rating to manufacturer and code.
- Choose certified valves from reputable manufacturers for compatibility and documentation.
Tools and parts required for replacement
A concise kit of hand tools and replacement parts is essential before beginning a pressure relief valve swap to guarantee a safe, efficient job.
Required items include shutoff tools and sealants, plus the matched replacement valve.
- Adjustable wrench, pipe wrench, screwdriver
- Thread seal tape or pipe joint compound
- Correctly rated replacement PRV and a short discharge pipe
Step-by-step replacement process
Begin by cutting power to the heater and shutting off the cold-water supply.
Then relieve system pressure by opening a hot-water faucet and allowing the tank to cool; these preparatory steps guarantee a safe, dry working area before loosening the relief valve.
Drain below valve level, place a bucket, loosen and remove old valve, inspect threads and discharge piping.
Apply plumber’s tape, install new valve, tighten to specification, reopen supply.
Post-replacement testing and documentation
Restart the system and verify valve performance through a controlled sequence of tests and clear records.
The technician depressurizes, restores supply, and cycles the relief valve under monitored temperature and pressure conditions.
Measured opening/reset values are logged, deviations noted, and photos or timestamps attached.
Any anomalies prompt isolation and retest or replacement.
Final documentation is filed with service date and technician identification.
Maintenance Tips to Extend Valve Life and Prevent Failures
Routine inspection and testing should be scheduled and recorded to catch wear before it becomes a failure.
Regularly flushing the tank to remove sediment, along with installing or maintaining a properly sized expansion tank, reduces stress on the relief valve.
A simple seasonal and long-term maintenance checklist helps guarantee these tasks are performed consistently.
Recommended inspection and testing frequency
Regularly scheduled inspections and tests of a water heater pressure relief valve help catch wear, corrosion, or mineral buildup before they lead to failure.
Recommended frequency balances safety and practicality:
- Visually inspect monthly for leaks, corrosion, or drips.
- Manually lift the valve lever and confirm operation every six months.
- Replace or have a professional test the valve annually or sooner if issues are detected.
Flushing the water heater to reduce sediment
Flushing the water heater removes accumulated sediment that can trap heat, accelerate corrosion, and impede the pressure relief valve’s proper operation.
Periodic draining clears grit from the tank bottom, improves heat transfer, and reduces valve stress.
The process involves shutting power or gas, connecting a hose to the drain valve, flushing until clear, then refilling and restoring service, following manufacturer safety instructions.
Installing or maintaining an expansion tank
Install an expansion tank to absorb thermal expansion and prevent repeated pressure surges that stress the water heater’s relief valve and plumbing.
Position it near the cold-water inlet, maintaining correct orientation and precharge pressure matching house static pressure.
Inspect for leaks, corrosion, or loss of air charge annually.
Replace a failed diaphragm or tank promptly to preserve relief valve function and system longevity.
Seasonal and long-term maintenance checklist
After addressing expansion tank concerns, a seasonal and long-term maintenance checklist helps preserve the relief valve and overall system performance.
Regular inspections, testing, and prompt repairs reduce failure risk. Suggested routine actions:
- Annually test valve operation and clear discharge piping.
- Biannually inspect for corrosion, leaks, and mineral buildup.
- Replace valve per manufacturer schedule or after any malfunction.
Safety Regulations, Codes, and Warranty Considerations
Local building codes typically specify relief valve types, discharge routing, and periodic testing requirements to guarantee safe pressure relief.
Manufacturer warranties can be voided by improper repairs or noncompliant parts, so adherence to installation and service instructions is critical.
Inspections or permits may be required for valve replacement or significant work, and professionals should be consulted when code or warranty questions arise.
Common building code requirements for relief valves
Compliance with building codes guarantees that pressure relief valves on water heaters protect occupants and property by meeting standardized performance and installation criteria.
Codes typically require ASME-rated valves, correct temperature-pressure (T&P) settings, direct discharge piping to safe locations, proper slope and termination, accessibility for testing, and prevention of discharge blockage or backflow.
Local amendments and inspection verification are common.
Manufacturer warranty implications of DIY repairs
When homeowners or contractors perform DIY repairs on a water heater—especially those involving the temperature-pressure (T&P) relief valve—manufacturers’ warranties can be voided if the work contradicts installation instructions, uses non-approved parts, or lacks proper documentation.
Warranty coverage typically requires adherence to specified maintenance procedures, certified technicians for certain repairs, and retention of receipts or service records for verification.
DIY alterations, improper part substitution, or undocumented service often nullify claims.
When an inspection or permit may be required
Warranty terms and local codes often interact regarding inspections and permits for work on water heater safety devices. Actions that void a warranty—such as unapproved parts or undocumented repairs—may also trigger the need for an inspection or permit under building and plumbing regulations.
Homeowners should verify local jurisdiction rules, consult the manufacturer’s warranty, and secure required permits or licensed-inspector signoffs before replacing or modifying relief valves to guarantee compliance.
Quick Reference: Common Symptoms, Causes, and Actions
A concise table of common symptoms, likely causes, and recommended actions helps homeowners and technicians quickly prioritize responses to pressure relief valve issues.
| Symptom | Likely Cause | Recommended Action |
|---|---|---|
| Dripping | Minor leak or debris | Inspect, clean, test |
| Continuous discharge | Overpressure/failed valve | Shutoff, replace valve |
| No discharge when tested | Valve seized | Replace valve |
Conclusion
A final check shows that the pressure relief valve is the water heater’s safety lifeline: when it functions, risk is reduced; when it fails, danger rises. Following careful preparation, testing, interpretation, and timely replacement keeps systems reliable. Like a watchful sentinel, regular maintenance and adherence to codes protect property and people. If symptoms or test failures appear, prompt action—repair or replace—prevents escalation and preserves warranties and peace of mind.