How to Remove an Expansion Tank From a Water Heater: Step-By-Step Safety Guide
To safely remove an expansion tank from a water heater, follow these steps: First, shut off the water supply and power or gas. Relieve system pressure and drain the tank if necessary. Support the tank and carefully disconnect it from the inlet, ensuring not to twist any pipes. Cap the exposed fitting with proper sealant. Inspect all threads, valves, and nearby joints for corrosion or leaks. Once everything is checked, restore service gradually and purge air from the faucets. For detailed steps, safety checks, and replacement tips, continue reading to avoid future issues.
What an Expansion Tank Does and Why You Might Remove It
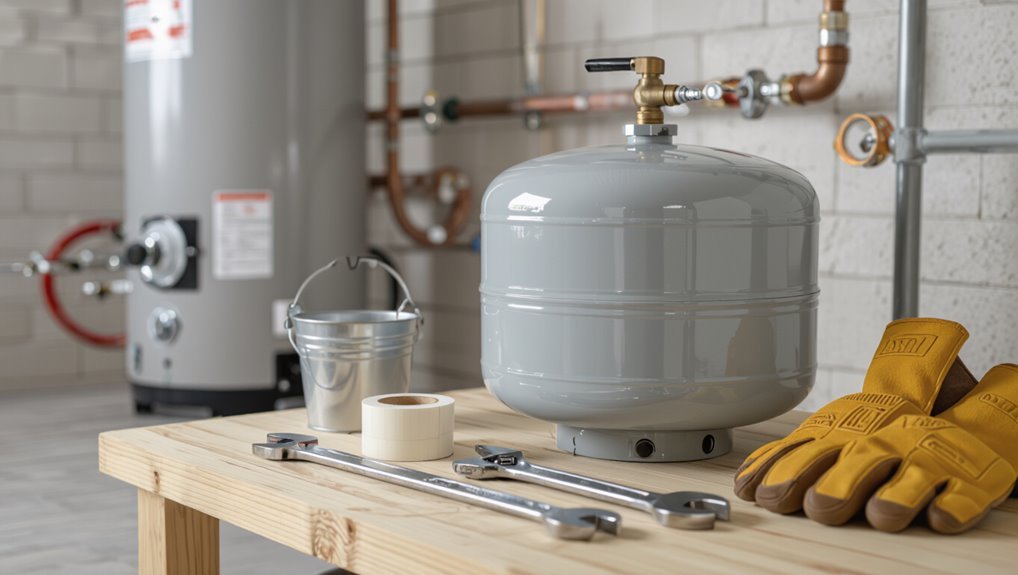
An expansion tank absorbs pressure fluctuations in closed water heating systems to protect pipes and valves from stress.
Indicators that the tank may need replacement or removal include constant high pressure, waterlogged feel, visible corrosion, or a failed air bladder.
Removal is appropriate when the tank is irreparably damaged or inappropriate for the system size, while repair or replacement suits fixable problems or mismatched capacity.
Purpose of an expansion tank in closed water heating systems
A closed water heating system relies on a small expansion tank to absorb pressure changes when water heats and expands, preventing stress on pipes, valves, and the water heater itself.
It cushions thermal expansion, protects fittings and the pressure relief valve, and stabilizes system pressure.
Understanding this function helps homeowners consider how to remove the expansion tank from the water heater safely and plan appropriate maintenance.
Signs the expansion tank needs replacement or removal
Signs that an expansion tank requires replacement or removal become evident through changes in performance and visible wear.
Common indicators include persistent water hammer, frequent pressure relief valve discharge, fluctuating system pressure, reduced hot water availability, and a tank that is waterlogged or visibly corroded.
Unusual noises, bulging, or a failed air charge also signal that the tank is no longer functioning properly.
When removal is appropriate vs. repair or replacement
When indicators such as water hammer, frequent relief-valve discharge, or a waterlogged tank appear, the homeowner or technician must next decide whether repair, replacement, or full removal is appropriate.
Removal suits systems where thermal expansion is negligible, code permits no tank, or tank interferes with retrofit.
Repair addresses diaphragms or fittings; replacement is chosen for persistent failure, corrosion, or mismatched capacity.
Safety Precautions Before Starting
Before beginning work on removing an expansion tank, the necessary tools and materials should be assembled and inspected to guarantee proper fit and function.
The writer should note required personal protective equipment and basic plumbing safety practices, such as shutting off water and relieving system pressure.
Finally, local code requirements must be verified and a professional consulted if the job exceeds the homeowner’s skill or local regulations demand it.
Required tools and materials
A concise checklist of required tools and materials helps guarantee the removal proceeds safely and without interruption.
- Adjustable wrench, pipe wrench, or basin wrench for fittings.
- Thread sealant or plumber’s tape and replacement fittings.
- Bucket, towels, and absorbent pads for water containment.
- Flashlight, inspection mirror, and small tubing cutter if isolation valves require removal.
Personal protective equipment and plumbing safety tips
Several key pieces of personal protective equipment and simple plumbing safety practices reduce risk during expansion tank removal.
Protective gloves and safety glasses guard against hot water and debris. Closed-toe shoes and long sleeves prevent burns.
- Verify water is cooled and system pressure relieved.
- Use non-slip footwear.
- Wear cut-resistant gloves.
- Keep a drip tray and towels nearby.
Verifying local codes and when to call a professional
With protective gear and pressure checks in place, attention should turn to regulatory requirements and recognizing when a homeowner should hire a licensed plumber.
Verify local codes for expansion tank sizing, installation, and permit needs by consulting municipal resources or a building inspector.
If unfamiliar with code interpretation, soldering, gas connections, or if the system shows corrosion or leaks, contact a licensed plumber promptly.
Preparing the Water Heater and System
Before beginning removal, the technician first disconnects power to an electric heater at the breaker or shuts off the gas supply and pilot for gas units.
Next, the cold-water supply is closed to isolate the tank and prevent incoming water during the procedure.
Finally, system pressure is relieved and a controlled amount of water is drained to lower the level and reduce pressure before working on the expansion tank.
How to shut off power or gas to the water heater
Cut the unit’s energy supply to prevent electrical shock or fuel ignition while working on the tank.
For electric heaters, switch off the dedicated circuit at the breaker panel and lock/tag it if possible.
For gas heaters, turn the gas control to OFF and close the appliance shutoff valve on the gas line.
Verify by confirming no power indicator or pilot flame.
Turning off the cold-water supply and isolating the tank
Shut off the cold-water supply to the heater at the shutoff valve to stop incoming water and prevent backflow while work is performed.
Close any upstream isolation valves and, if present, the expansion-tank isolation valve.
Verify the supply line is closed by gently opening a nearby cold tap.
Cap or drain short sections as needed to prevent spills before proceeding with pressure relief and draining steps.
Relieving pressure and draining enough water safely
While pressure remains in the tank and lines, the system must be relieved and partially drained to prevent scalding and to reduce weight on the expansion tank connection.
The technician opens a nearby hot-water faucet, attaches a hose to the drain valve, and slowly opens the valve until water flow lowers tank level.
Air is introduced by opening a cold-water bleed to ease draining.
Step-by-Step Removal Procedure
The technician begins by locating the expansion tank, verifying its connections, and confirming the system is safe to work on.
Next steps cover releasing the tank’s air charge, isolating and disconnecting plumbing fittings, and removing any mounting brackets or straps.
Finally, the tank is extracted and the connection points are inspected for wear or leaks.
Locating the expansion tank and identifying connections
Begin by visually surveying the water heater area to locate the expansion tank, typically a small cylindrical vessel mounted above or beside the heater and connected to the cold-water inlet line.
Note mounting bracket, pipe fittings, and a threaded connection to the inlet.
Identify shutoff valve, union or threaded nipple, any isolation valves, and nearby electrical or gas components to avoid during removal.
Depressurizing the expansion tank (air charge removal)
Before removing the expansion tank, relieve its air charge to prevent a sudden release of pressure and water when the tank is disconnected.
The technician closes the cold-water inlet, opens a nearby hot faucet to reduce system pressure, then uses a tire gauge or pressure relief valve to check and bleed air from the tank’s Schrader valve until pressure matches house water pressure.
Disconnecting the tank from plumbing fittings
Disconnect the tank from the plumbing fittings methodically to prevent leaks and protect surrounding components.
Close the main water supply and drain isolated lines.
Place a bucket and rags beneath fittings.
Use appropriate wrenches to loosen union or threaded connections, supporting the tank to avoid strain.
Remove fittings slowly to catch residual water.
Cap or plug exposed pipes immediately to prevent contamination.
Removing mounting brackets or straps
With the plumbing fittings safely isolated and capped, attention shifts to the mounting brackets or straps that secure the expansion tank.
The technician locates fasteners, supports the tank, and loosens bolts or screws with appropriate tools.
If straps are tensioned, relieve tension slowly.
Remove brackets or straps completely, set hardware aside in labeled container, and verify the tank is free from its supports before proceeding.
Extracting the tank and inspecting connection points
Lift the expansion tank straight out from its fittings using a steady, controlled motion to avoid twisting the inlet connection or stressing nearby pipes.
Place the tank on a padded surface.
Inspect threads, fittings, and sealing surfaces for corrosion, dents, or worn threads.
Check pipe joints and nearby valves for leaks or mineral buildup.
Note any damaged components for repair or replacement before reinstalling.
Post-Removal Tasks
After the expansion tank is removed, the technician should seal or cap the exposed pipe and inspect all joints for leaks.
Once the plumbing is secure, water service and the heater’s power or gas supply can be restored and the system repressurized.
Finally, the water heater and system pressure should be tested to confirm proper operation and leak-free performance.
Sealing or capping the pipe and checking for leaks
Cap or seal the open pipe immediately to prevent water loss and contaminants entering the system.
A compatible cap or plug is tightened to specification, using thread sealant or tape as appropriate.
Inspect joints and surrounding fittings for drips. Wipe dry, then monitor for several minutes and recheck after pressure changes.
Address any seepage by retightening or replacing seals before proceeding.
Restoring water, power/gas, and repressurizing the system
With the open pipe sealed and fittings confirmed leak-free, restoration of services can begin.
The water supply is slowly reopened, watching for drips. If applicable, restore gas or electricity to the heater per manufacturer instructions.
Repressurize the plumbing by opening nearby faucets to purge air, then isolate and close.
Verify isolation valves operate smoothly and monitor connections briefly for any emerging leaks.
Testing the water heater and system pressure
Begin by powering the heater and reintroducing water slowly while observing system pressure and temperature readings to confirm normal operation.
The technician monitors the pressure gauge for stability, checks for leaks at fittings and valves, verifies thermostat response and burner/pilot or element function, and listens for unusual noises.
If readings exceed safe limits or anomalies appear, the system is shut down and inspected before returning to service.
Replacement Options and Installation Considerations
Selection of a replacement expansion tank should match the system’s pressure, required capacity, and inlet type to guarantee proper performance.
The article will contrast the risks and occasional justifications for leaving a system without an expansion tank versus installing a replacement.
It will also outline the basic steps for mounting, connecting, and pressurizing a new tank after removal.
Choosing the right replacement expansion tank (size, capacity, inlet type)
When replacing an expansion tank, the homeowner must match the tank’s size, water capacity, and inlet type to the system’s pressure requirements and piping configuration to guarantee safe, effective operation.
Select a tank rated for the home’s maximum working pressure, with bladder volume appropriate for water heater capacity and thermal expansion.
Choose compatible inlet thread (male/female, NPT) and orientation for straightforward installation.
Pros and cons of leaving no expansion tank
Opting to leave an expansion tank out of a water heater system eliminates a component and its upfront cost but introduces trade-offs that affect pressure management, appliance longevity, and code compliance.
- Reduced initial expense
- Increased thermal expansion stress on plumbing and valve wear
- Potential code or warranty violations
- Greater long-term maintenance and replacement risk
Basic steps to install a new expansion tank after removal
Begin by confirming the replacement tank matches the system’s required size, connection type, and precharge pressure so it can absorb thermal expansion effectively.
Then gather the appropriate fittings, pipe sealant, and basic tools before starting the installation.
Shut off water and power, drain needed lines, apply sealant to threads, mount tank securely, reconnect piping, refill and purge air, restore pressure, check for leaks and proper operation.
Troubleshooting Common Issues After Removal
After removal, the reader may encounter persistent pressure fluctuations or new leaks that indicate a missing or failing expansion solution.
Noisy plumbing or water hammer can emerge when the system loses the tank’s shock-absorbing effect and may require arrestors or rebalancing.
If the water heater’s temperature-and-pressure (T&P) valve activates, immediate steps include shutting off power and water, relieving system pressure, and inspecting for overheating or overpressure causes.
Persistent pressure fluctuations or leaks
Persistent pressure swings or new leaks after removing an expansion tank often indicate issues with the system’s pressure regulation, valve integrity, or residual trapped air.
The homeowner should inspect the relief and shutoff valves, check for loose fittings at the heater and supply lines, bleed trapped air, and verify incoming supply pressure.
If instability or leaks persist, consult a licensed plumber to prevent damage.
Noisy plumbing or water hammer after removal
Noticeable banging, rattling, or sharp tapping noises in the pipes—commonly called water hammer—can appear after an expansion tank is removed, because the tank previously absorbed pressure spikes and cushioned sudden valve closures.
Without it, the momentum of moving water transfers directly to the plumbing, producing shock waves and vibration.
Inspect piping supports, add clips or straps, install a water hammer arrestor near affected fixtures, and check for quick-closing valves that may require replacement.
What to do if the water heater’s T&P valve activates
If the water heater’s temperature-and-pressure (T&P) relief valve discharges following expansion tank removal, the valve is responding to excessive pressure or temperature that the system no longer mitigates.
The immediate step is to stop adding stress to the tank by shutting off the cold-water supply and confirming the thermostat setting is within safe limits.
Then inspect for thermal issues, pressure spikes from the supply, or a failed expansion tank substitute before considering valve replacement.
Check pipework for leaks, measure static and operating pressure with a gauge, restore a compliant expansion solution or install a pressure-reducing valve, and replace a faulty T&P valve only if it fails testing.
Maintenance Tips to Avoid Future Removals
A regular inspection schedule for expansion tanks, such as annual visual checks and pressure testing every few years, helps prevent unexpected failures.
Technicians should verify and, if needed, adjust the tank’s air charge with a tire-style gauge and a hand pump to maintain proper balance with system pressure.
Clear signs like persistent waterlogging, corrosion, or a ruptured bladder indicate replacement is preferable to repeated removals.
Recommended inspection schedule for expansion tanks
Because thermal expansion and pressure-related wear occur gradually, a regular inspection schedule for an expansion tank prevents unexpected failures and extends component life.
Recommended cadence and checks include:
- Quarterly visual inspection for leaks and corrosion.
- Biannual verification of mounting and connections.
- Annual pressure and diaphragm integrity assessment by a professional.
- Immediate inspection after plumbing changes or pressure events.
How to check and adjust air charge in an expansion tank
Begin by shutting off the water supply and relieving system pressure before accessing the tank’s Schrader valve; this guarantees a safe, accurate air-pressure reading.
Use a tire gauge to measure pre-charge; compare to manufacturer or system static pressure (typically 12–20 psi).
If low, depressurize tank, add air with a pump; if high, release slowly.
Recheck pressure and restore system operation.
Signs that indicate timely replacement rather than removal
Recognize clear indicators that an expansion tank needs replacement rather than removal: persistent loss of air charge, visible corrosion or tank deformation, chronic waterlogging despite proper valve operation, frequent pressure relief valve discharges, or a tank older than its expected service life.
Immediate replacement prevents repeated failures, protects the water heater and plumbing, restores stable system pressure, and reduces risk of costly emergency repairs.
Comparison of Expansion Tank Types and Performance
A concise comparison helps readers choose between bladder and diaphragm expansion tanks based on reliability, maintenance needs, and cost. The following table highlights key contrasts to guide a practical decision. Consider system pressure, anticipated service life, and ease of repair when selecting a type.
| Feature | Bladder Tanks | Diaphragm Tanks |
|---|---|---|
| Typical lifespan | 7–15 years | 10–20 years |
| Maintenance | Moderate (possible bladder replacement) | Low (fewer moving parts) |
| Cost vs. performance | Lower initial cost, more common | Higher initial cost, often more durable |
Brief guide to choosing between bladder vs. diaphragm tanks
Although both bladder and diaphragm expansion tanks serve the same function—absorbing thermal expansion in closed water heating systems—their internal designs affect performance, maintenance, and suitability for different installations.
Bladder tanks use a replaceable rubber bladder, offering easier service but potential bladder failure.
Diaphragm tanks have a fixed membrane, often more durable and better for high-cycle systems.
Choose based on longevity, maintenance access, and budget.
When to Hire a Professional
When removal involves corroded fittings, altered piping, or unknown code issues, a licensed plumber should be engaged.
The contractor’s scope, typical labor and part costs, and warranty or permit requirements are key questions to confirm before hiring.
Requesting credentials, written estimates, and references helps guarantee the right professional is selected.
Complex scenarios that require licensed plumbers
If unexpected complications arise—such as corroded fittings, a leaking tank, or a pressurized system with a malfunctioning backflow preventer—homeowners should consider contacting a licensed plumber.
Professionals handle welded or seized connections, suspected tank failure, complex valve assemblies, oil- or gas-fired heaters, and systems tied to municipal backflow devices.
They diagnose hidden leaks, guarantee code compliance, and safely isolate pressurized lines.
Typical costs and questions to ask a contractor
After noting situations that require professional intervention, homeowners should understand the typical costs and the right questions to ask when hiring a contractor.
Typical replacement or repair estimates, permit fees, and labor rates vary regionally. Ask for licenses, insurance, references, and written estimates.
Consider warranty terms and timeline before authorizing work.
- Verify license and insurance
- Request written estimate
- Check references
- Confirm warranty and timeline
Conclusion
After a careful, cautiously choreographed removal, the homeowner discovers that the expansion tank—formerly the unsung hero of muted pipes and peaceful pressure—was just another metal cylinder with commitment issues. Ironically, relief arrives not from dramatic plumbing mastery but from routine checks and a new washer. The system behaves, as if never disturbed, while the removed tank sits nobly in the garage, honored for its brief, quiet service and immediately relegated to “maybe someday” status.