How to Drain a Water Softener Tank Quickly and Safely: Step-by-Step Guide
To quickly and safely drain a water softener tank, first cut the power and shut off the water supply. Engage the bypass to isolate the softener. After that, wear gloves and goggles, set up a drain pan, and attach a sturdy hose to the drain line. You can use gravity or a submersible pump for efficient draining. Vacuum out any remaining brine and sludge, and rinse the resin tank if necessary. Finally, check seals, refill the tank slowly, restore power, and run a regeneration cycle. For detailed steps, precautions, and troubleshooting tips, refer to the full guide.
How to Drain a Water Softener Tank Quickly and Safely
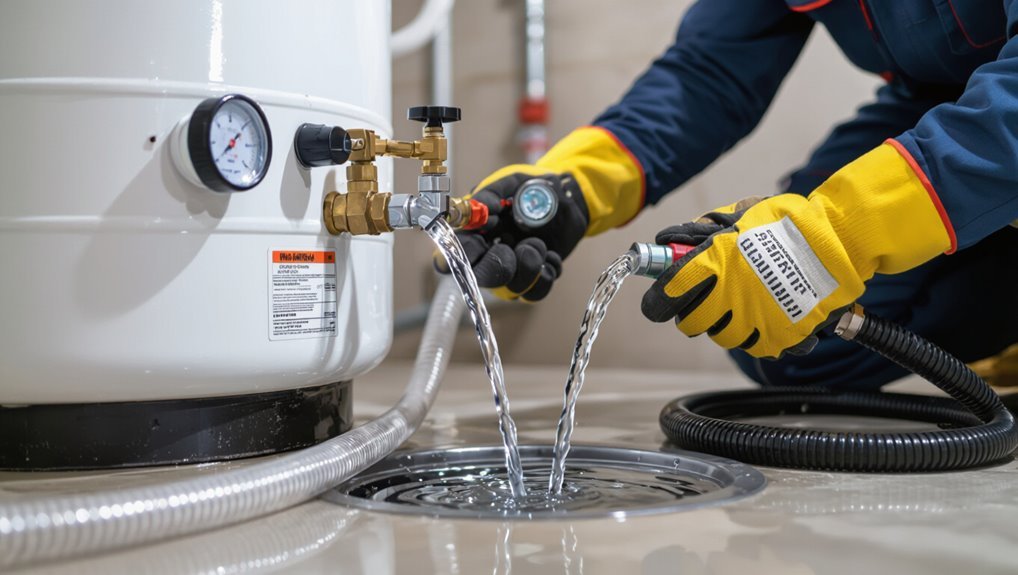
A concise, step-by-step method for quickly and safely draining a water softener tank is provided, highlighting shutoff, brine line handling, and proper discharge.
Immediate draining is recommended if contamination, major leaks, or system failure occur, while routine draining is only needed for maintenance, repairs, or winterization.
Safety precautions and brief checks to determine urgency are summarized to guide appropriate action.
One-paragraph direct solution summary
Begin by shutting off the water supply and power to the softener. Then, open a nearby faucet to relieve system pressure.
Next, attach a hose to the drain line or remove the drain cap. Direct discharge to a safe location, and slowly open the drain while monitoring flow.
Follow manufacturer steps for backwash and rinsing. Then restore power and water, checking for leaks.
When to drain immediately vs. routine draining
Recognize the difference between urgent and routine draining: urgent draining is warranted when leaks, severe clogging, contaminated backwash, foul odors, or sudden system failures occur and require immediate action to prevent water damage or health risks.
Routine draining follows manufacturer schedules, prolonged inactivity, or after repairs to clear sediments and reset resin.
Prioritize safety, isolate power and water, then drain as needed.
Basic Understanding What Is a Water Softener Tank and Why Drain It
A water softener tank houses the resin bed and plumbing that remove hardness minerals from household water by ion exchange.
Common reasons to drain the tank include routine maintenance, repairs, winterizing to prevent freeze damage, and replacing spent resin.
Incorrect draining can cause flooding, equipment damage, or loss of resin, so proper procedure and precautions are essential.
How a water softener tank works
Visualize a tall, cylindrical tank filled with resin beads that capture hardness minerals as hard water passes through; this is the basic water softener tank, designed to exchange calcium and magnesium ions for sodium or potassium ions to prevent scale buildup.
Water flows downward, ions swap on bead surfaces, softened water exits; periodic regeneration flushes trapped minerals and restores resin ion charge for continued operation.
Common reasons to drain the tank (maintenance, repair, winterizing, resin replacement)
After explaining how resin beads capture hardness minerals and require periodic regeneration, it follows that the tank will sometimes need to be emptied.
Draining occurs for routine maintenance, component repair, winter preparation, or when replacing resin media to restore capacity. Proper emptying prevents contamination and eases access for technicians.
- Scheduled maintenance checks
- Repair or part replacement
- Winterizing and resin replacement
Risks of incorrect draining (flooding, damage, resin loss)
Incorrectly draining a water softener tank can lead to several serious problems that extend beyond mere inconvenience.
Improper procedures may cause basement flooding, damage to valves, control heads, and plumbing, and allow resin beads to escape or clog drains.
Lost or contaminated resin reduces softener effectiveness and increases repair costs.
Professional guidance and following manufacturer steps minimize these risks.
Safety Precautions Before You Start
Before beginning, the operator should don appropriate PPE and follow hand‑washing to prevent chemical or biological exposure.
Power to the unit should be cut, the water supply shut off, and the bypass valve set while the brine tank, resin tank, drain line, and control valve are identified.
If any component is damaged, inaccessible, or the operator is unsure, a qualified technician should be contacted.
Personal protective equipment and hygiene
Several essential personal protective equipment items and basic hygiene practices reduce injury and contamination risk when draining a water softener tank.
Protective gloves, safety goggles, and closed-toe shoes protect against chemical exposure, sharp edges, and spills. A dust mask helps with fine particulates.
Wash hands thoroughly after work, launder contaminated clothing separately, and disinfect tools and surfaces to prevent residue transfer and skin irritation.
Turn-off checklist: power, water supply, bypass valve
One clear checklist guarantees power, water, and bypass controls are secured before any work begins:
Verify electrical power is disconnected at the softener’s switch or breaker to prevent activation.
Shut the incoming water supply to stop flow into the unit.
Engage the bypass valve to divert water around the softener, confirming both inlet and outlet positions to avoid flooding or backflow during draining.
Locating components: brine tank, resin tank, drain line, control valve
With power off, water shut, and the bypass engaged, attention turns to identifying the softener’s key parts to guarantee safe handling.
Locate the brine tank (usually a square tank holding salt), the taller resin tank beside it, the drain line exiting the control valve, and the control valve atop the resin tank.
Note access points, fittings, and any visible leaks before proceeding.
When to call a professional
When should a professional be contacted before attempting to drain a water softener?
A professional is advised if plumbing knowledge is limited, if the unit is integrated with home plumbing or irrigation, if leaks, corrosion, or electrical control issues exist, or if local codes restrict DIY work.
Also hire a technician when warranty concerns or complicated repairs arise to prevent damage and guarantee safety.
Tools and Materials Needed
A concise list of tools and materials helps guarantee the tank can be drained safely and efficiently.
Essential tools include a screwdriver, adjustable wrench, bucket or hose, and protective gloves.
Optional items such as a wet/dry vacuum, larger pump, or additional fittings can speed the process or reduce spill risk.
Essential tools
Proper preparation minimizes delays and prevents damage during a water softener drain—gathering the right tools and materials first guarantees each step can be completed safely and efficiently.
Essential tools focus on safe isolation, controlled drainage, and basic maintenance: useful items reduce risk and speed the process.
- Adjustable wrench and pliers for valves and fittings
- Utility bucket and sturdy hose for controlled discharge
- Wet/dry shop vacuum for residual brine and sludge
Optional items for faster or safer draining
Several helpful extras can make draining a water softener faster, cleaner, and safer.
These optional items streamline work, reduce spillage, and protect the technician. Consider adding them when speed or safety is a priority.
- Flexible drain hose for direct, controlled discharge
- Submersible pump to accelerate water removal
- Chemical-resistant gloves and eye protection for splashes
Step-by-Step Guide Drain a Water Softener Tank Quickly and Safely
The procedure begins with preparation: shutting off the water supply, relieving system pressure, and gathering necessary tools.
Next, a technician can manually open the control valve and attach a drain hose, then empty the brine and resin tanks separately or employ an electric/utility pump for faster removal.
The process concludes with a final rinse of both tanks and a careful inspection for leaks or residue.
Step 1: Preparation steps
Before draining, the operator first shuts off the main water supply and disconnects electrical power to the softener.
The valve is then set to bypass to keep household plumbing functional while the tank is emptied.
Floors are protected and a drain or bucket is prepared to catch any overflow.
Shut off water and power
Begin by shutting off the water supply to the softener and cutting power to the control valve to prevent the unit from regenerating or allowing water flow during draining.
Verify upstream and downstream shutoff valves are closed.
Turn off electrical supply at the breaker or unplug the controller. Confirm no lights or displays remain active.
Wear gloves and eye protection before proceeding with drain preparations.
Put unit in bypass mode
With water and power secured, the technician next places the softener into bypass mode to isolate the tank from household plumbing.
They rotate the bypass valve(s) per manufacturer instructions until flow bypasses the resin tank.
Verification includes checking faucets for untreated water and listening for valve clicks.
Proper bypass prevents supply interruption and containment contamination while allowing safe draining and servicing.
Protect floors and catch overflow
To prevent water damage and simplify cleanup, the technician lays down absorbent pads or waterproof tarps around the softener and positions a drain pan beneath the drain line and any fittings that may leak.
Hose connections are checked and secured; nearby floor drains are cleared. A towel or sponge is kept ready for small spills, and a bucket is placed to catch unexpected overflow during draining.
Step 2: Manual drain via control valve and drain hose
The user should open the control valve and run the drain hose to a safe, approved discharge point before beginning.
Gravity draining is preferred when possible, but a pump may be used if the layout prevents downhill flow.
Flow should be watched closely to prevent slow drainage or backflow into the system.
Open the drain line and direct to safe discharge
Begin by locating the softener’s drain line and confirming it is free of kinks or obstructions; this line will carry resin-laden water away during manual draining.
Open the drain connection at the control valve, secure the hose, and route its end to an approved discharge point (floor drain, utility sink, or outdoor safe area).
Make certain the outlet is below the tank and observe for leaks.
Use gravity vs. pump-assisted draining
With the drain hose secured and routed to a suitable discharge point, the operator must decide between gravity draining and using a pump-assisted method.
Gravity draining suits tanks positioned above the outlet and requires no power; flow is slower but simple.
Pump-assisted draining works for low-lying installations or faster removal, using a submersible or utility pump rated for saline brine and compatible hose fittings.
Monitor flow and avoid backflow
Monitor the drain flow continuously and check fittings for leaks or kinks to guarantee steady discharge; sudden drops in flow or sputtering can indicate airlocks, clogged lines, or an improperly seated control valve.
Observe hose gradient to prevent siphoning back into household plumbing. Install or verify a vacuum breaker or air gap at the drain.
Stop and reseat connections if any backflow or odor appears.
Step 3: Draining the brine tank and resin tank separately
The next step separates the brine tank from the resin tank to address concentrated salt, sludge, and resin maintenance.
The brine tank is emptied and scraped or vacuumed to remove salt bridges and settled sludge using appropriate PPE and a wet/dry vacuum.
If the resin tank is being replaced or deep-cleaned, the media is flushed thoroughly with clean water and a manufacturer-recommended cleaner before refilling.
How to remove brine and sludge safely
Begin by isolating the brine tank and resin tank so each can be drained and cleaned separately; this prevents cross-contamination and makes sludge removal more effective.
Wear gloves and eye protection.
Pump or bail out brine into a corrosion-resistant container for proper disposal.
Scrape hardened salts and sludge with a plastic scoop, vacuum remaining residue, rinse with fresh water, and inspect for damage before reassembly.
Flushing resin tank if replacing or deep-cleaning
After removing brine and scraping away hardened salts, attention turns to the resin tank for flushing before replacement or a deep clean.
The valve is bypassed, media is loosened, and low-pressure potable water is introduced to rinse resin, dislodging fines and contaminants.
Drain until runoff clears.
Inspect for resin degradation, then sanitize according to manufacturer instructions before reassembly and normal operation.
Step 4: Using an electric or utility pump for faster draining
For faster emptying, select an electric or utility pump rated for non-corrosive, sediment-laden water and sized to match the tank’s flow rate and outlet diameter.
The pump should be positioned and connected so suction does not contact resin directly—use a short, coarse-filtered intake hose and avoid inserting the hose to the tank bottom.
Care must be taken to protect the control valve and bypass lines from pressure spikes or vacuum that could crack plastics or dislodge internal components.
Pump selection and set-up
Selecting the right pump and preparing it correctly guarantees the softener tank drains quickly and without damage.
Choose a submersible or utility pump rated for the tank’s volume and solids. Verify horsepower, flow rate, and compatible hose diameter.
Inspect power source, GFCI protection, and secure hose routing to a safe discharge.
Prime if required and test briefly before full operation.
Avoiding damage to resin and control valve
Begin by positioning the pump and hose to minimize suction directly on the resin bed or control valve inlet, since aggressive draw or vacuum can compact beads, cause channeling, or pull resin into the valve.
Use a strainer or soft intake, maintain gentle flow, avoid poking the hose into the media, and monitor discharge for resin.
Stop immediately if beads appear or valve operation binds.
Step 5: Final rinse and inspection
After the tank is flushed, the unit is refilled slowly while watching all connections for any signs of leakage.
Once water pressure is stable and no leaks are detected, power is restored and the control valve is set to initiate a manual regeneration or the next scheduled cycle.
A brief functional test confirms proper operation and finalizes the service.
Refill and test for leaks
With the tank refilled to the proper level and the system pressurized, a careful leak test and final inspection guarantee the softener is ready for service.
Inspect all fittings, valves, and drain connections for visible drips. Wipe joints dry, observe for several minutes, and retighten any loose fittings.
Check bypass and control housing for seepage. Document findings and correct faults before normal use.
Restore power and set regeneration cycle
Restore electrical power to the softener and program a regeneration cycle to flush residual sediment and recondition the resin bed.
The technician verifies settings, guarantees timer and salt dosage match manufacturer recommendations, and initiates a manual or immediate regen.
After completion, checks for normal flow, absence of cloudy discharge, and proper valve seating.
Records completion time and any anomalies for future reference.
Alternative Methods and When to Use Them
The discussion compares partial versus full drains, outlining the trade-offs in time, water use, and sediment removal.
It also covers winterizing techniques for cold climates and when a rapid-drain emergency procedure is appropriate.
Guidance focuses on choosing the safest, most practical method for the situation.
Partial drain vs. full drain pros and cons
Choosing between a partial and full drain depends on the tank’s condition, the issue being addressed, and time or water restrictions. Partial drains save time and water but may miss sediments; full drains clear buildup but require more time and water. Choose based on inspection, recurring odors, or sediment levels.
| Method | Pros | Cons |
|---|---|---|
| Partial | Saves water | Misses deep sediment |
| Full | Thorough cleaning | Time and water heavy |
| Hybrid | Balanced | Requires judgment |
Winterizing method for cold climates
Many homeowners in cold regions use a specific winterizing method that drains and bypasses the softener while protecting remaining components from freezing. This approach minimizes water exposure in the resin tank and prevents ice damage to valves and lines.
It involves shutting supply, opening drain and bypass valves, removing residual water from brine and control housings, and insulating exposed pipes and fittings before prolonged cold.
Emergency rapid-drain options
Homeowners who have already used winterizing steps may still face sudden freezes, leaks, or power outages that demand faster water removal than standard procedures allow.
In emergencies, bypass valves and tank drain ports expedite evacuation; attaching a wet/dry shop vacuum or submersible pump speeds flow.
Confirm power shutoff, chain-of-custody for brine, and immediate professional service if valves malfunction or structural damage is suspected.
Common Problems and Troubleshooting During Draining
During draining, common issues include slow or stalled flow, clogs in the drain line or valve, resin escaping the tank, and control valve faults.
Each problem has specific diagnostics and remedies such as clearing blockages, flushing or replacing resin, and testing or repairing the valve.
The following section outlines causes, step-by-step fixes, and when to call a professional.
Slow or no drainage causes and fixes
Slow or no drainage in a water softener often indicates a blockage, valve malfunction, or drain hose issue that prevents proper brine and wastewater flow; diagnosing the specific cause quickly reduces water damage risk and restores regeneration efficiency.
Inspect valves for proper position and wear, check controller settings and cycle initiation, verify drain hose elevation and kinks, and test pump operation; promptly replace faulty components.
Clogs in drain line or valve how to clear
Inspect the drain line and valve for obstructions, since mineral buildup, sediment, or debris commonly restricts flow and prevents proper regeneration.
Clear visible blockages using a stiff brush, pipe snake, or compressed air.
Flush the line with clean water and a vinegar solution to dissolve scale.
Reassemble fittings, test flow, and repeat if flow remains restricted.
Replace damaged sections or seals as needed.
Resin leakage and how to recover or replace resin
Recognize resin leakage as a common issue where small amber or reddish beads escape from the tank or drain, indicating a cracked distributor, damaged screen, or worn valve seals; prompt action is required because lost resin reduces softening capacity and can clog plumbing.
Inspect tank internals, recover loose resin with a wet/dry vacuum, replace damaged distributors or screens, and refill with manufacturer-specified resin quantity.
Control valve malfunctions discovered while draining
After addressing resin loss and repairs, attention turns to the control valve, since defects often become apparent while draining the tank and can impede regeneration or cause leaks.
Technicians should inspect for stuck pistons, chipped seals, or clogged screens.
Test valve cycles, check wiring and timers, and replace worn O-rings.
If uncertain, consult manufacturer documentation or a qualified service provider to prevent damage.
Mistakes to Avoid
When preparing to drain a water softener tank, common mistakes can cause equipment damage or household contamination.
Technicians should bypass the unit, disconnect power following manufacturer instructions, prevent brine from entering household drains, and use correct pump pressure and hose size.
Ignoring any of these steps risks leaks, electrical hazards, or ineffective drainage.
Failing to bypass the unit
Bypassing the water softener before draining is a critical step often overlooked; failing to do so can allow untreated water to enter the home’s plumbing and can subject the unit to unnecessary pressure and strain.
Ignoring bypass risks contaminating fixtures, confusing diagnostics, and causing valve wear.
Always shift valves to bypass before opening drain lines, then verify isolation to protect the system and household water quality.
Disconnecting power incorrectly
Power should be cut correctly before any work begins to avoid electrical hazards and damage to the control head. Disconnecting power incorrectly—such as switching off only a wall outlet while leaving the unit hardwired, or removing power without following the manufacturer’s shutdown procedure—can cause short circuits, corrupt programming, or trigger unintended regeneration cycles.
Technicians should isolate power at the breaker, verify zero voltage, and follow the manual’s shutdown checklist.
Allowing brine to contaminate household drains
After isolating electrical supply and confirming shutdown, attention must shift to the brine system to prevent saline water from entering household drains.
Failure to divert or contain brine can corrode plumbing, harm septic systems, and violate local disposal regulations.
Properly seal brine lines, route discharge to approved drain points or neutralization containers, and inspect fittings to avoid leaks during tank draining.
Using incorrect pump pressure or hose size
Select the correct pump pressure and hose diameter to match the water softener’s drain requirements; using a pump that is too powerful or a hose that is too narrow can cause backpressure, leaks, or fittings to fail, while an undersized pump or oversized hose may result in slow draining and incomplete flushing.
Verify manufacturer specs, measure hose length, and use pressure regulators and properly rated fittings to prevent damage.
Best Practices and Preventive Maintenance
A concise preventive plan keeps a water softener functioning and reduces the need for emergency draining.
This includes a regular flushing schedule with clear signs for when flushing is required, careful brine management to minimize buildup, and seasonal checks combined with professional servicing at recommended intervals.
All maintenance actions should be logged with dates, reasons, and outcomes to track trends and inform future care.
Regular flushing schedule and signs it’s needed
Routine flushing every 3–6 months keeps a water softener’s resin clean and prevents mineral buildup that reduces efficiency; frequency should be adjusted based on water hardness, household size, and observed performance.
Signs indicating a flush is needed include reduced softening, visible sediment, or foul odors.
- Reduced water softness after regeneration
- Cloudy water or particles from faucets
- Sulfuric or musty smells suggesting bacterial growth
Proper brine management to reduce future draining
Manage brine carefully to minimize the need for frequent tank draining and extend system life.
Maintain correct salt levels, use high-purity salt to reduce crusting, and prevent bridging by checking the tank regularly.
Verify proper brine draw settings and clean the brine well if sediment accumulates.
Flush brine tanks after heavy use and avoid overfilling to reduce sludge buildup and odors.
Seasonal checks and professional servicing intervals
Inspect seasonal conditions and schedule professional servicing to preserve softener performance and prevent costly failures.
Technicians should check resin condition, valves, brine tank integrity, and control settings before temperature extremes or heavy usage periods.
Homeowners are advised to frequency-service annually or biennially based on water hardness, system age, and manufacturer recommendations to maintain efficiency and avoid unexpected downtime.
Record-keeping: dates, reasons, outcomes
Maintaining a concise log of service dates, the reason for each entry, and the outcome provides a clear maintenance history that simplifies troubleshooting and warranty claims.
The log should note technician or owner, parts replaced, water test results, and any adjustments.
Retain receipts and photos; record preventive actions and next recommended service.
Store digital and paper copies for easy access.
Estimated Time, Cost, and Difficulty
The section outlines expected time, cost, and difficulty for draining a water softener tank.
It contrasts a quick flush that may take 15–30 minutes with a thorough drain and resin rinse that can require one to three hours.
Estimated expenses and required skill are summarized, noting low DIY costs for basic tasks versus higher fees for professional service and when hiring an expert is recommended.
Time breakdown for quick vs. thorough drain
How long it will take to drain a water softener tank depends on whether a quick flush or a thorough emptying is chosen. A quick drain typically finishes in 15–30 minutes while a complete, careful purge can take 1–3 hours.
Quick drains remove most water and take minimal setup. Thorough purges include disassembly, rinsing resin, and slow refilling.
Difficulty and time scale with tank size.
Typical costs (DIY vs. professional)
Several factors determine whether a DIY drain or a professional service is chosen, with time, cost, and difficulty forming the primary distinctions.
DIY expenses typically include basic tools, hoses, and disposal supplies—often $0–$50 if tools are on hand, $50–$150 otherwise.
Professional service fees range from $100–$300 for simple drains, higher for complex jobs or emergency calls, but include labor and disposal.
Skill level required and when to hire help
Many homeowners can handle routine water softener tank draining with basic DIY skills, but tasks involving heavy sediment, corroded fittings, electrical components, or complex plumbing usually require a professional.
Estimate 1–3 hours for DIY, $0–$50 for supplies.
Hire a licensed plumber or technician if unsure, if leaks, wiring, or warranty issues exist, or if time and safety concerns outweigh DIY benefits.
Tools and Products Recommended (Quick Shopping Guide)
A concise list of equipment helps guarantee the tank is drained safely and efficiently.
Recommended items include durable drain hoses, a suitable submersible pump or utility pump, compatible fittings and adapters, and basic protective gear such as gloves and eye protection.
Also suggested are safe cleaning agents formulated for water softeners and approved options for brine disposal or neutralization.
Drain hoses, pumps, fittings, and protective gear
Select durable drain hoses, a reliable pump, compatible fittings, and basic protective gear to guarantee safe, efficient softener tank drainage.
Choose kink-resistant, food-grade hose; a submersible pump with sufficient flow; and threaded or barbed fittings matching valve sizes.
Wear gloves and eye protection. Confirm hose length reaches drain without strain and test connections for leaks before operation.
- Kink-resistant hose
- Submersible pump (rated flow)
- Threaded/barbed fittings and clamps
Safe cleaning agents and brine disposal options
After confirming hose and fitting integrity, attention turns to cleaning agents and brine disposal methods that prevent damage to the softener and local plumbing.
Use manufacturer-approved cleaners, mild detergent, or citric acid for resin tank cleaning.
Neutralize concentrated brine before disposal; dilute and discharge to sanitary sewer where permitted.
Avoid septic systems and storm drains.
Wear gloves and follow local regulations.
Conclusion
Draining a water softener tank quickly and safely protects the system and home plumbing while enabling maintenance or relocation. Following proper safety precautions, using the right tools, and adhering to step-by-step procedures minimizes risk and prevents common mistakes like damaging valves or spilling brine. Regular preventive maintenance and timely professional help extend equipment life and performance. With basic tools and care, homeowners can complete the task efficiently, keeping costs and disruption low.