How to Plumb a Drain in Concrete: Step-by-Step DIY Guide for a Leak-Free Installation
To install a drain in concrete, start by planning your layout and ensuring compliance with local codes. Choose compatible drain bodies and pipes. Core-drill or saw the slab, clean the opening, and dry-fit the drain, ensuring it’s set at the correct slope. Connect to existing plumbing using appropriate couplings, seal all joints and the concrete interface, then backfill and patch the slab. Finally, test for leaks to ensure a reliable installation. For detailed steps, tips, and common pitfalls, continue reading.
What You’ll Achieve and When to Plumb a Drain in Concrete
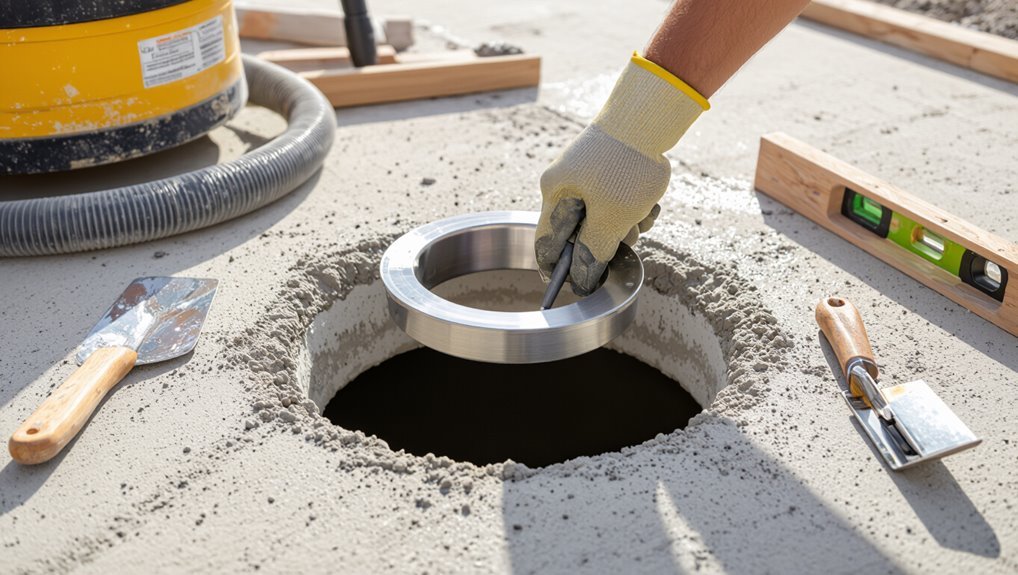
Typical scenarios for installing a drain in concrete include bathrooms, laundry rooms, basements, and outdoor areas where surface or subsurface water must be managed.
The expected outcome is a functional, code-compliant drain that channels water away reliably; common DIY limitations include difficulty cutting and forming concrete, meeting slope and trap requirements, and ensuring proper connections to existing plumbing.
Homeowners should weigh the project’s complexity and local code demands before attempting work themselves.
Typical scenarios for installing a drain in concrete (bathroom, laundry, basement, outdoor)
When installing a drain in concrete, common scenarios include bathrooms, laundry rooms, basements, and exterior areas, each presenting distinct functional and access requirements.
Professionals and DIYers evaluating how to plumb a drain in concrete consider slope, trap placement, venting, and proximity to existing soil or waste lines.
Choices vary: floor drains for basements, shower drains for bathrooms, utility drains for laundries, and yard/drainage outlets outdoors.
Expected outcomes and common limitations of DIY concrete drainage work
Having reviewed the common concrete drain scenarios—bathrooms, laundries, basements, and outdoor outlets—it’s important to set realistic expectations for what a DIY installer can accomplish and where professional help is advisable.
DIYers can cut slabs, install traps and piping, and achieve watertight seals for simple layouts.
Complex grading, structural reinforcement, deep sewer ties, or code compliance issues typically require licensed contractors.
Tools, Materials, and Safety Equipment Required
A concise list of essential tools—such as a concrete saw, hammer drill, pipe cutter, and level—prepares the installer for the mechanical work.
Required materials and parts include appropriate pipes and fittings, a drain body, sleeves for concrete pours, and compatible sealants.
Personal protective equipment and basic site-preparation items—gloves, eye and ear protection, dust masks, barriers, and drop cloths—ensure a safe, controlled work area.
Essential tools list
Tools and materials must be selected for durability and compatibility with concrete work and plumbing standards.
The essential tools focus on accurate cutting, drilling, securing, and finishing while ensuring safety. Proper selection reduces rework and leaks.
- Hammer drill with masonry bits
- Concrete saw or grinder
- Pipe cutters and deburring tool
- Personal protective equipment (respirator, gloves, eye protection)
Materials and parts (pipes, fittings, sleeves, drain body, sealants)
Durable, code-compliant materials and precisely matched parts are critical to a reliable drain installation in concrete.
Specify pipe type/size, solvent- or gasketed fittings, concrete sleeves, and a corrosion-resistant drain body with adjustable flange.
Use approved sealants and waterproofing membranes where required.
- PVC/ABS or cast-iron pipe selection
- Changeover and gasket fittings
- Concrete sleeves and collars
- Drain body, flange, and sealants
Personal protective equipment and site preparation items
Before work begins, personnel must assemble appropriate personal protective equipment and site-preparation items to control hazards and protect both workers and the installation.
Essential gear and setup minimize injury, dust, and contamination while ensuring accurate placement and sealing of drain components.
- Safety glasses, respirator, gloves, knee pads
- Hearing protection, steel-toe boots
- Dust barriers, tack mats
- Marking tools, measuring tape
Understanding Concrete Drain Basics and Local Codes
Concrete drain installations require different techniques than typical above‑floor plumbing because embeds, pitch, and access are constrained by the slab.
Key considerations include minimum slope, trap placement, venting, and specific code checkpoints that determine acceptability and permit needs.
A licensed plumber should be consulted and permits obtained when codes, complexity, or structural penetrations are involved.
How concrete drains differ from standard drain installations
When poured surfaces require integrated drainage, installers must account for the slab’s permanence and thickness. These factors change routing, fixture choice, and repair options compared with standard floor or wall drains.
Concrete drains demand embedded piping, durable cast-in fittings, and precise coordination with structural work. Future access is limited, so durable materials, leak-proof joints, and accurate placement to avoid costly coring or slab removal are essential.
Minimum slope, trap requirements, venting, and code checkpoints
Having established that slab drains require embedded piping and permanent fixtures, the discussion moves to the hydraulic and code parameters that govern their performance: minimum slopes for self‑scouring, trap sizing and placement to prevent sewer gas, venting strategies compatible with slab construction, and the local code checkpoints that verify compliance.
Slopes typically 1/8–1/4 in/ft, traps must retain 2–4 in water seal, vents or alternative relief prevent siphonage; confirm local code for materials, cleanouts, and inspection points.
When to call a licensed plumber or get permits
Why involve a licensed plumber or secure permits for slab‑embedded drains?
A licensed plumber guarantees code compliance, correct slope, proper trap and vent placement, durable joints, and leak prevention.
Permits verify inspections, protect warranties, and prevent costly remediation or legal issues.
Call a professional for complex layouts, connections to mains, structural penetrations, or when local codes mandate licensed work and approved inspections.
Pre-Installation Planning and Layout
Before cutting or coring, the installer measures and marks the drain location precisely in relation to fixtures to guarantee proper reach and alignment.
Existing utilities are checked with appropriate scanners to avoid rebar, conduits, and other embedded obstructions.
A pipe route is chosen and slope calculations are confirmed to provide adequate fall for drainage while minimizing concrete removal.
Measuring and marking the drain location relative to fixtures
Accurate measurement and clear marking of the drain location relative to fixtures is essential to guarantee proper slope, alignment with trap and vent lines, and unobstructed access during concrete work.
Measure fixture centerlines, transfer distances to the slab layout, and record pipe invert elevations. Use chalk lines, laser or tape, and durable markers.
Confirm clearance for flange and maintenance access before cutting or forming concrete.
Checking existing utilities and scanning for rebar or conduits
Several critical checks should be completed to locate existing utilities and embedded elements before cutting or drilling into concrete.
Use an electronic rebar/conduit detector and ground-penetrating radar when available, consult as-built drawings and utility locates, and contact local utility services.
Mark detected lines visibly, verify depth and orientation, and plan holes to avoid structural reinforcement or live conduits to prevent damage and safety hazards.
Selecting pipe route and slope calculations
Route selection for a drain through concrete must balance gravity flow requirements, structural constraints, and accessibility for future maintenance.
The planner maps shortest feasible run, avoids load-bearing elements and utilities, and specifies minimum slope (typically 1/4″ per foot for 1½–2″ lines; 1/8″ per foot may suffice for larger pipes).
Include drop structures, cleanouts, and verify slopes with laser or level before cutting.
Preparing the Concrete for Penetration
The concrete is prepared by selecting an appropriate cutting method—core drilling for precise holes or saw and jackhammer for larger openings—then removing the debris.
Surrounding surfaces are protected and dust is controlled with barriers and wet cutting or vacuums.
Finally, the opening is cleaned and squared to a level surface so the drain body seats properly.
Methods to cut and remove concrete (core drill vs. saw & jackhammer)
When penetrating concrete for a drain, two primary approaches prevail: core drilling for precise circular openings and saw-and-jackhammer methods for larger or irregular cuts.
Core drills yield smooth, dimensionally accurate holes ideal for pipe sleeves.
Sawing plus jackhammering offers speed for trenches or odd shapes but increases vibration and cleanup.
Choice depends on hole size, access, equipment availability, and structural considerations.
Protecting surrounding surfaces and controlling dust
Many mitigation steps help shield adjacent surfaces and suppress dust before cutting into concrete: surface coverings, targeted containment, and proactive dust collection are essential.
Protective sheeting, taped seams, and drop cloths guard floors and fixtures. Temporary barriers and plastic enclosures isolate the work zone.
Use a vacuum-attached saw or HEPA dust extractor, wet cutting where appropriate, and seal vents to minimize airborne contamination.
Preparing a clean, level opening for the drain body
Begin by marking the drain center and outline dimensions on the slab. Then confirm layout with a level and square to verify the opening will sit plumb and flush with the finished floor.
Remove concrete within the outline using a rotary hammer and chisel, creating straight edges and uniform depth.
Clean dust, remove debris, and check that the opening matches the drain body for a tight, even fit.
Installing the Drain Assembly Step-by-Step
Before final installation, the installer should dry-fit all components to confirm alignment and fit within the prepared opening.
The drain body is then set into the concrete cutout, connected to the existing plumbing with appropriate couplings or connector fittings, and adjusted to maintain the correct slope toward the main line.
Finally, the penetration is secured and finished with sleeves or escutcheons to protect the pipe and guarantee a watertight, clean connection.
Dry-fit components and confirm alignment
Lay out the drain parts on the concrete and assemble them without adhesives to verify fit and alignment.
Check flange seating, gasket compression, and pipe engagement. Rotate and adjust components until the grate sits flush and outlet aligns with the waste line.
Confirm vertical and horizontal orientation with a level and straightedge. Mark reference points for final installation and note any trim or shim needs.
Setting the drain body into the concrete opening
Set the drain body carefully into the prepared concrete opening, aligning it to the reference marks established during the dry-fit.
The installer seats the flange level with the finished slab, verifies vertical plumb with a small level, and checks the grate clearance.
Shim with non-compressible spacers if needed, then backfill gaps with non-shrinking mortar around the flange to secure positioning before curing.
Connecting to existing plumbing (couplings, transition fittings)
Once the drain body is secured, the installer proceeds to tie it into the existing plumbing using the appropriate couplings and connection fittings.
They select compatible materials (PVC, ABS, cast iron) and use reducers, rubber couplings or mechanical fittings to shift sizes and types.
Connections are aligned, test-fitted, tightened or solvent-welded per manufacturer instructions, then pressure-checked for leaks before final sealing.
Ensuring proper slope and fall to the main line
A careful, consistent slope between the drain outlet and the building’s main line is established to guarantee proper gravity flow. The installer measures and marks the required fall (typically 1/4 inch per foot for most fixtures) along the drain run, adjusts the drain body height, and verifies alignment with a level or digital inclinometer before permanently securing connections.
Measurements are rechecked, fittings aligned, and temporary supports used until final fastening.
Securing pipe penetration and using sleeves or escutcheons
With slope confirmed and temporary supports holding alignment, attention turns to securing the pipe where it penetrates the slab and finished floor.
The installer fits a protective sleeve through the concrete, centers the pipe, then applies compressible sealant or flashing tape to prevent movement and water ingress.
An escutcheon trims the finished floor, creating a neat, accessible, and watertight connection.
Making Watertight Seals and Concrete Reinstatement
Attention turns to achieving watertight joints and restoring the concrete surface after the drain is set.
The discussion covers selecting and applying appropriate sealants and gaskets, proper backfilling and compaction around the pipe, and techniques for patching, troweling, and curing the concrete.
Practical tips and common pitfalls for each step are highlighted to guarantee a durable, leak-free installation.
Choosing and applying sealants and gaskets for leak-proof joints
Selecting and applying the correct sealants and gaskets is essential to guarantee watertight joints between drains and concrete, prevent leaks, and facilitate durable concrete reinstatement.
Choose compatible materials: NSF-rated neoprene or EPDM gaskets and polyurethane or silicone sealants designed for concrete and PVC/metal interfaces.
Clean and dry surfaces, apply primer if required, compress gaskets evenly, tool sealant smooth, cure per manufacturer instructions for reliable, long-lasting seals.
Backfilling and compacting around the pipe
After gaskets and sealants are set and cured, backfilling and compaction restore load-bearing capacity, protect the joint, and complete the watertight envelope between pipe and concrete.
Use clean, well-graded granular fill in 4–6 inch lifts, moisture conditioned for ideal compaction.
Compact each lift uniformly with a plate compactor or hand tamper, avoid point loads on the pipe, and verify alignment before final sealing.
Replacing and finishing concrete (patch mix, troweling, curing tips)
Restore the concrete surface by placing a compatible patch mix, consolidating it around the pipe collar, and finishing to match the surrounding slab texture and slope.
Tool edges cleanly, feathering to existing concrete. Trowel for smoothness or broom-finish for traction.
Protect from rapid drying with curing compound or damp burlap for recommended cure time.
Inspect joints and sealant after cure for watertight integrity.
Testing the Installation for Leaks and Proper Flow
The installer should begin with controlled water and visual inspections to confirm drainage paths and detect obvious leaks.
Comparative pressure testing and dye or flow tests help distinguish seal failures from blockages.
If tests reveal problems, attention should focus on common failure points such as joint seals, pipe slope, and concrete penetrations.
Water tests and visual inspections
Before covering the drain, a contractor must perform water tests and visual inspections to confirm there are no leaks, obstructions, or improper slopes that would impair flow.
They observe seepage, standing water, and joint integrity while running controlled flow. Results dictate corrections before concrete encasement.
- Run steady flow to check drainage rate.
- Inspect joints and seals closely.
- Look for standing water and pooling.
- Verify slope with level and straightedge.
Pressure testing vs. dye/flow tests
Having completed visual inspections and steady-flow checks, attention turns to methods that more rigorously confirm watertightness and flow integrity: pressure testing and dye/flow tests.
Pressure tests pressurize sections to reveal leaks via gauges and soap or audible detection.
Dye or flow tests trace pathing and identify cross-connections, slow spots, or misalignment.
Combine both for definitive verification before sealing concrete.
Troubleshooting common failure points
Inspect the installation systematically for common failure points by isolating sections and applying targeted leak and flow tests.
Check joints, seals, and connections for slow seepage under low pressure, then repeat under higher pressure.
Observe flow for airlocks, trapped debris, or incorrect pitch.
Record test durations and locations of failure.
Repair with appropriate couplings, sealants, or regrading, then retest until stable.
Common Mistakes to Avoid
Common errors in concrete drain installation include incorrect slope or misaligned connections, which compromise flow and access.
Inadequate sealing at the concrete interface often leads to leaks and premature failure.
Careless cutting or drilling that damages structural rebar or buried utilities can create safety and repair issues.
Incorrect slope or misaligned connections
Incorrect slope or misaligned connections will quickly undermine a concrete drain, causing slow drainage, backups, and undue stress on joints.
Installers must verify consistent fall (typically 1/8–1/4 in/ft), align fittings before concrete placement, and maintain accessible cleanouts.
Misalignment leads to joint fatigue and leaks elsewhere; corrective rework later is costly and may require cutting concrete to reposition piping.
Poor sealing at the concrete interface
Failing to seal the interface between pipe and concrete allows water, soil, and corrosive agents to migrate, producing leaks, freeze damage, and premature joint failure.
Proper sealing requires compatible sealants, correct joint profiles, and consistent compaction of surrounding concrete. Neglecting these invites soil washout, pipe movement, and accelerated deterioration.
Inspect seals before backfilling and use proven materials to guarantee long-term performance.
Damaging structural rebar or utilities
Strike or cut into hidden rebar or buried utilities can compromise structural integrity, create expensive repairs, and pose serious safety hazards.
Professionals recommend scanning with rebar locators and utility detectors before cutting. Mark and avoid detected lines, use core drilling with vacuum extraction, and consult utility companies when necessary.
Document findings and adjust layout to prevent cutting reinforcement or disrupting conduits and pipes.
Maintenance and Long-Term Care
A regular inspection schedule should be established, noting signs of slow drainage, odor, leaks at joints, and concrete cracking around the fixture.
Minor clogs can often be cleared with a hand snake, enzyme-based cleaners, or targeted flushing methods that avoid harsh chemicals which damage seals and surrounding concrete.
Criteria for repair versus replacement should be based on extent of deterioration, frequency of failure, and availability of compatible replacement components.
Routine inspection schedule and what to look for
Because concrete-embedded drains endure shifting loads and chemical exposure over time, a regular inspection schedule is essential to catch deterioration early.
Inspect quarterly for surface cracks, joint separation, visible corrosion of fittings, standing water, and unusual odors.
Annually perform a closer check: test seals, verify slope, examine access points and anchoring.
Record findings, photograph issues, and schedule repairs promptly.
How to clear minor clogs without damaging concrete-installed drains
Begin by evaluating the clog’s location and cause before attempting removal.
Use a plastic drain snake or hand auger to dislodge debris, avoiding metal tools that can chip concrete or damage seals.
Flush with warm water and a mild enzyme cleaner; avoid harsh acids or high-pressure jets.
Reassemble covers securely and monitor flow.
Repeat gently as needed; document recurrence for further assessment.
When to replace components vs. repair
After clearing minor clogs and confirming that flow and seals are intact, assessment shifts to whether components should be repaired or replaced based on condition, cost, and expected lifespan.
Corroded metal, cracked fittings, persistent leaks, or warped gaskets merit replacement. Minor wear, accessible parts, and low-cost fixes suit repair.
Prioritize materials compatible with concrete and long-term durability to avoid repeat work.
Cost Estimate, Timeframe, and Material Checklist
A concise cost breakdown covers materials, tool rental, and any required permits to set realistic budgeting expectations.
Typical project timelines for common scenarios—minor repairs, new drain installs, or full slab work—help plan labor and disruption.
A final pre-work checklist of materials, rented equipment, permits, and site access items reduces the risk of delays.
Typical cost breakdown (materials, tool rental, permits)
Budgeting for a drain installation in concrete requires accounting for three primary expense categories: materials, tool rental, and permits.
Typical costs: materials $50–$300, core drill or saw rental $40–$120/day, permit $0–$200 depending on jurisdiction.
Contingency of 10–20% advised.
| Item | Typical cost |
|---|---|
| Materials | $50–$300 |
| Tool rental | $40–$120/day |
| Permit | $0–$200 |
| Contingency | 10–20% |
Estimated project timeline for common scenarios
How long will the average concrete drain installation take depends on scope and site conditions: a simple slab-to-pipe retrofit typically requires 4–8 hours.
A new slab penetrated for a floor drain takes 1–2 days, and complex relocations or underground tie-ins require 2–4 days.
- Materials: PVC/ABS pipe, fittings, flange, sealant, concrete mix.
- Tools: saw, core drill, jackhammer, trowel.
- Labor: one to two competent installers.
- Contingencies: permits, drying/cure time.
Final pre-work checklist to avoid delays
With the schedule and scope established, the final pre-work checklist consolidates cost estimates, timelines, and material lists to prevent on-site delays.
It verifies budget accuracy, orders and confirms delivery windows for pipes, fittings, concrete, sealants, and tools.
It schedules labor and inspections, allocates contingencies, and confirms required permits.
A signed checklist prevents surprises and keeps the project on time and on budget.
Example Projects and Step-by-Step Scenarios
The section presents three concise, practical scenarios to illustrate common concrete drain installations: a basement floor drain, a laundry drain through an existing slab, and an outdoor patio drain tied into a storm line.
Each scenario outlines a clear step sequence from planning and cutting to connection and testing.
Readers are shown typical challenges and solutions for each project type.
Installing a floor drain in a basement (step sequence)
Installing a floor drain in a basement requires careful sequencing of tasks to guarantee proper slope, watertight connections, and compliance with local codes.
The sequence: locate drain and mark slab, cut and remove concrete, set and slope base sub-trench, install drain body and trap primer, connect to waste line with proper fittings and supports, backfill and compact, pour concrete, test for leaks and final finish.
Adding a laundry drain through existing slab (step sequence)
After placing a floor drain in a basement, attention often turns to adding a laundry drain through an existing slab, a task that demands careful planning to preserve slab integrity and guarantee proper drainage.
The sequence: locate utilities, core-drill the slab, set PVC trap adapter with proper slope, connect to waste line or pump, seal concrete patch, test for leaks and adjust venting as needed.
Outdoor patio drain tie-in to storm system (step sequence)
Begin by mapping the patio’s low points and existing storm infrastructure. Then plan a route that minimizes cuts and preserves slope while avoiding buried utilities.
Excavate trench along route, install catch basin with debris grate, set PVC/SDR pipe at 1–2% fall, bed in compacted sand, connect to storm main with proper adapter and gasket.
Pressure test, backfill, and restore concrete or pavers.
Conclusion
The guide equips a homeowner to cut, set, and seal a drain through concrete with confidence, emphasizing code compliance and leak prevention. For example, a renter-turned-handy homeowner in Portland successfully replaced a failing laundry drain by mapping the run, core-drilling a precise hole, installing a flange with epoxy and silicone, and testing for leaks over 48 hours—avoiding costly water damage. Careful planning, correct tools, and attention to seals guarantee a durable installation.