How to Plumb a Combi Boiler: Step-by-Step Guide for Safe, Efficient Installation
To plumb a combi boiler safely and efficiently, follow these essential steps: assess the installation site and flue routing, isolate all supplies, mount the unit level, and connect the gas, cold feed, hot outlet, condensate, and safety discharge using appropriate valves and WRAS-compliant fittings. After installation, conduct leak, combustion, and pressure tests, commission the controls, and demonstrate their use. For a detailed walkthrough and troubleshooting tips, continue reading.
What a Combi Boiler Is and Why Proper Plumbing Matters
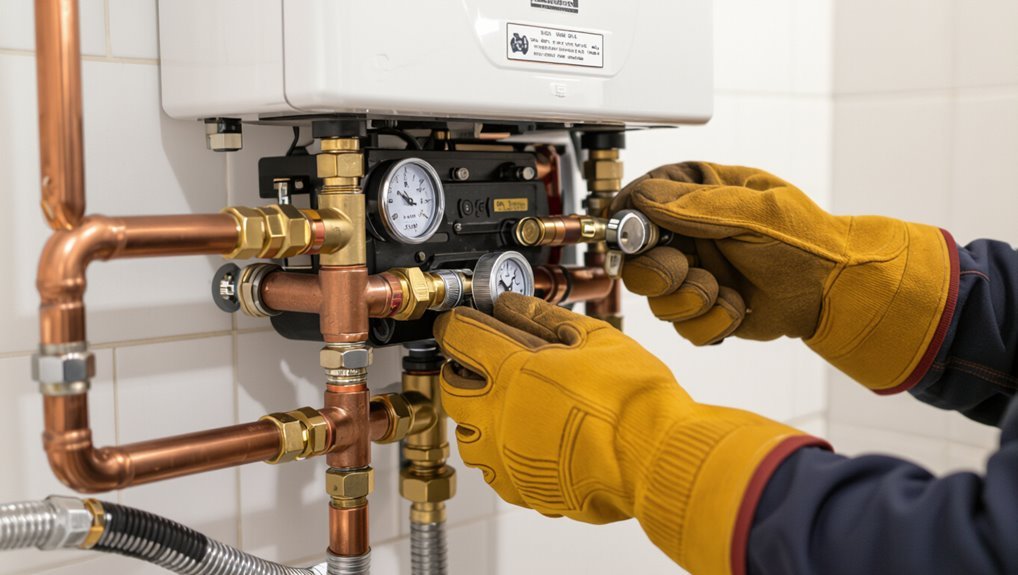
A combi boiler is a compact unit that provides on-demand domestic hot water and central heating without a separate cylinder or cold-water tank.
Proper plumbing and installation guarantee safe operation, peak efficiency, and longer equipment life by preventing leaks, corrosion, and improper pressure or flow.
Compliance with regulations and manufacturer warranty requirements should be confirmed before work begins.
How a combi boiler works in domestic heating and hot water systems
Combi boilers combine space heating and on-demand domestic hot water into a single compact unit, supplying radiators and taps without a separate hot water cylinder.
The unit senses a demand, diverts gas and water flow through a heat exchanger, and circulates heated water to radiators or directly to taps.
Clear piping, correct valves, and flue routing are essential when learning how to plumb a combi boiler.
Benefits of correct installation for safety, efficiency, and longevity
Because improper plumbing can quickly compromise performance and safety, correct installation is essential to confirm a combi boiler operates reliably, efficiently, and for its expected lifespan.
Proper installation minimizes leak and carbon monoxide risks, assures correct pressure and flow for steady heating and hot water, reduces fuel consumption, prevents premature component failure, and simplifies maintenance, delivering predictable performance and lower lifetime costs.
Regulatory and warranty considerations before starting
Before any work begins, homeowners and installers must verify applicable regulations and warranty terms to avoid voiding coverage or violating codes.
Confirm local building codes, gas safety regulations, and required permits.
Check manufacturer installation requirements, approved components, and certified installer stipulations.
Document compliance, retain receipts and certificates, and consult authorities or warranty support when uncertainties arise to protect safety and coverage.
Tools, Materials, and Safety Preparations
A concise checklist of required tools and materials—wrenches, pipe cutters, suitable pipes, fittings, valves, and approved sealants—sets the foundation for a safe combi boiler installation.
Clear safety preparations, including PPE, gas and electrical isolation procedures, and site risk checks, must be completed before any work begins.
A licensed Gas Safe engineer should be contacted for any gas connections, electrical work, or when the installer lacks the appropriate certification.
Required tools and equipment checklist
Several specific tools and safety items are necessary to install a combi boiler correctly and comply with regulations.
The installer requires accurate diagnostic, cutting, and fastening tools plus protective equipment.
Essential items include:
- Adjustable spanners, pipe cutters, and deburring tools.
- Multimeter, gas leak detector, and pressure gauge.
- PPE: gloves, eye protection, respirator, and portable fire extinguisher.
Materials and consumables checklist (pipes, fittings, valves, sealants)
When preparing materials for a combi boiler installation, the installer should assemble all pipework, fittings, valves, and sealants to match system type, local codes, and boiler manufacturer specifications.
Essential consumables include corrosion-resistant copper or stainless pipe, push-fit or compression fittings, isolation and safety valves, and approved thread sealant or PTFE tape.
Typical checklist examples:
- Copper/PEX pipe lengths and insulation
- Ball valves, drain-offs, pressure relief valve
- PTFE tape, jointing paste, and pipe clips
Safety precautions, PPE, and gas/electrical isolation steps
Begin by confirming that all power and gas supplies are isolated and locked off before any work commences, and that appropriate personal protective equipment (PPE) is worn.
Use insulated gloves, safety glasses, ear protection, and respiratory protection if soldering or cutting.
Verify isolation with suitable testers, tag locked circuits, depressurize water lines, and guarantee adequate ventilation and fire precautions are in place.
When to call a Gas Safe or licensed professional
Although experienced DIYers can handle routine maintenance, any work involving gas connections, boiler commissioning, alterations to flueing, or electrical wiring must be handed to a Gas Safe–registered engineer or equivalent licensed professional.
Call a licensed pro for new installations, fuel-type changes, persistent faults, pressure or leak concerns, relocations, or warranty-covered work.
Professional certification guarantees legal compliance, safe commissioning, and valid insurance.
Site Assessment and Pre-Installation Steps
Before work begins, the installer surveys the proposed boiler location for adequate ventilation, safe flue routing, and service access.
They inspect existing heating pipework and components for compatibility, assess home heat demand to select an appropriately sized combi model, and confirm the chosen unit matches system and water supply requirements.
Finally, they plan pipe runs and the controls layout—programmer, valves, and TRVs—to guarantee efficient routing and straightforward commissioning.
Assessing location: ventilation, access, and flue routing
Site selection for a combi boiler hinges on three interrelated criteria: adequate ventilation, convenient maintenance access, and a feasible flue route.
The assessor verifies room volume, avoids confined spaces unless mechanical ventilation is added, guarantees clearances for servicing and panel removal, and plans a direct, code-compliant flue path minimizing bends.
Consider exterior termination, structural penetrations, and neighbor/ventilation proximity restrictions.
Checking existing heating system compatibility and pipework condition
Compatibility assessment begins with a systematic review of the existing heating system and pipework to determine whether the combi boiler can be integrated without extensive modification.
Inspect pipe material, diameter, joints, corrosion, and flow direction; verify central heating pump position, cylinder removal, and condensate routing.
Identify incompatible components, isolation valve locations, and any required upgrades to controls, pressure relief, or backflow prevention prior to installation.
Sizing the boiler and matching combi model to home demand
Having established the condition and layout of existing pipework, the next step is to size the combi boiler to match the property’s heating and hot-water demands.
Calculate heat loss per room, estimate peak hot-water flow (bath/showers, taps), and factor radiator sizes.
Select a combi with adequate kW output and flow rate, allowing modest margin for future changes and efficiency losses.
Planning pipe runs and controls layout (programmer, valves, TRVs)
Map the pipe runs and controls before any drilling or cutting to confirm efficient routing, minimize heat loss, and simplify future maintenance.
The installer should plot central heating and hot water routes, locate the programmer, zone valves and TRVs for accessible control, and plan condensate and gas runs.
Include isolation valves, adequate pipe spacing, insulation, and service access to guarantee safety, balance, and straightforward commissioning.
Step-by-Step Installation Process
The installation begins with removal of the old boiler and preparation of a clean, level mounting surface.
Next, the new combi boiler is positioned and secured, the flue fitted with correct termination, and the gas supply connected, sized, and tested with shutoff in place.
Finally, the cold water feed, hot water outlet, and domestic supply are connected and checked for correct flow and leaks.
Removing old boiler and preparing mounting surface
Before removing the old boiler, the installer isolates power and gas, shuts off the water supply, and drains the system to minimize hazards and fluid loss.
The unit is disconnected from piping, condensate and flue, then carefully removed.
The wall and surrounding area are cleaned, corroded anchors extracted, and surfaces checked for level, plumb and structural integrity.
Any repairs or reinforcement are completed before proceeding.
Positioning and mounting the new combi boiler
Several clear reference points are marked on the prepared wall to guide exact placement and alignment of the new combi boiler.
The unit is lifted onto the mounting bracket, level checked, and temporarily supported. Fixings are tightened to manufacturer torque specifications.
Access clearances are confirmed, condensate and pressure relief routing planned, and surrounding surfaces protected.
Final visual inspection verifies secure, plumb installation before pipework connections commence.
Installing the flue and ensuring correct termination
Begin by confirming the flue type, length limits, and siting requirements specified by the boiler manufacturer and local building regulations.
Install the flue with correct fall and secure supports, seal all joints per instructions, and maintain required clearances from windows, vents, and combustible materials.
Fit the terminal with anti-backflow and weatherproofing components, then inspect alignment, seals, and visibility before final commissioning.
Connecting gas supply: shutoff, pipe sizing, and testing
One clear step is to isolate the gas supply, verify pipe sizing against the boiler’s maximum input and local codes, and perform pressure and leak tests to confirm a safe, compliant connection.
The installer fits an accessible shutoff valve, sizes pipework for flow and head loss, uses approved materials and fittings, purges air, conducts pressure tests, and applies an approved leak detection method before commissioning.
Connecting cold water feed, hot water outlet, and domestic supply
Installers must accurately connect the cold water feed, hot water outlet, and domestic supply to guarantee proper flow, prevent backflow, and maintain pressure stability.
They fit isolation valves, pressure-reducing valves, and a WRAS-compliant check valve on the cold feed.
Hot outlet connections use suitable fittings and thermal expansion measures.
Domestic supply routing minimizes bends and secures leak-tested joints before commissioning.
Connecting central heating flow and return pipes
With the cold feed, hot outlet and domestic supply secured and pressure checks completed, attention moves to connecting the central heating flow and return.
The installer isolates system valves, aligns flow to boiler outlet and return to inlet, measures and cuts pipework, deburrs ends, fits appropriate fittings and seals, then tightens connections.
Final system purge and pressure test guarantee leak-free operation before commissioning.
Fitting safety devices: pressure relief valve and expansion vessel connection
Begin by locating the manufacturer-specified positions for the pressure relief valve (PRV) and expansion vessel on the combi boiler and its system piping, ensuring adequate clearance for access and future servicing.
Fit the PRV with appropriate discharge pipework to a safe termination point.
Install the expansion vessel on its isolation valve and charging point, verify correct pre-charge, and pressure-test the assembly for leaks and operation.
Installing condensate drain and frost protection where required
One clear step is to route the condensate drain from the boiler outlet to a suitable discharge point, ensuring a continuous fall, correct pipe diameter, and appropriate socketed or push-fit connections.
Where external runs are unavoidable, incorporate frost protection—insulation and either electric trace heating or a tundish and trapped fall to prevent freezing—positioned before the external section and controlled from the boiler or a dedicated thermostat.
Install a tundish near the boiler, avoid long horizontal runs, secure pipework, test flow, and verify external tracing energises correctly.
Electrical connections: thermostat, programmer, and mains wiring
Before connecting any wiring, isolate the mains supply and confirm that the installer holds the appropriate electrical qualifications and local certification required for boiler work.
Connect the boiler’s fused spur to a dedicated radial circuit with correct cable size and RCD protection.
Wire the programmer and room thermostat to designated low-voltage terminals, verify polarity and zone wiring, label connections, and test controls before restoring power.
Filling, purging, and pressurising the heating system
Proceed to fill, purge, and pressurise the system methodically to guarantee reliable circulation and prevent airlocks.
Close radiators’ bleed valves, open the filling loop slowly, monitor pressure gauge to reach manufacturer’s cold-fill value, then isolate.
Bleed radiators one by one from lowest to highest until water runs clear and air is expelled.
Recheck pressure and top up as necessary.
Initial boiler commissioning and setting operating parameters
Begin commissioning by verifying all safety controls, gas and electrical supplies, and that the system has been filled, purged, and pressurised to the manufacturer’s cold-fill specification.
Technicians then set boiler parameters: combustion settings, flue draft, minimum and maximum flow temperatures, and domestic hot water priority.
Perform leak and CO checks, adjust pump speed and system balancing, document settings and hand over user controls.
Testing, Commissioning, and Handover
The installer completes systematic leak checks for gas, water, and condensate, followed by gas tightness, spillage, and combustion safety tests to confirm a safe appliance.
System balancing is carried out with radiator purging and flow temperature tuning to guarantee efficient heating performance.
Finally, controls and basic maintenance are demonstrated to the homeowner and all documentation, certifications, and warranty registration are completed and handed over.
Leak checks for gas, water, and condensate
Before commissioning, the installer performs systematic leak checks on gas, water, and condensate connections to guarantee safety and long-term reliability.
Visual inspection, pressure testing and approved leak-detection fluid verify joints, valves and fittings.
Condensate traps and discharge runs are examined for blockages and secure seals.
Any leak is isolated, repaired and retested.
Records of tests and remedial actions are documented for handover.
Gas tightness, spillage, and combustion safety checks
Having completed leak verification on gas, water, and condensate, attention shifts to gas tightness, spillage, and combustion safety checks to confirm the appliance operates safely under working conditions.
Technicians verify gas-tight joints with pressure testing, inspect flue seals and spillage detectors, measure combustion emissions and CO levels, and confirm correct ventilation.
All findings are recorded, and any faults rectified before handover.
System balancing, radiator purge, and flow temperature tuning
Once pipes and radiators are free of leaks and combustion checks are passed, attention turns to system balancing, radiator purging, and flow temperature tuning to guarantee efficient heat distribution and safe operation.
The installer flushes and vents each radiator, sets differential valve settings, adjusts pump speed, and calibrates flow temperature against boiler load.
Final pressure, flow rates, and documentation are recorded for commissioning.
Demonstrating controls and maintenance to the homeowner
Begin by guiding the homeowner through the boiler controls, safety features, and routine maintenance tasks. This ensures they can operate the system confidently and recognize warning signs.
Demonstrate setpoint changes, timer programming, and hot-water priority.
Explain pressure checks, condensate trap inspection, filter cleaning, and bleed valves.
Identify common fault codes, reset procedures, and when to isolate the boiler and contact a qualified engineer.
Completing documentation, certifications, and warranty registration
After explaining controls, safety features, and routine maintenance, the installer should move on to formal testing and handover paperwork.
Record commissioning checks, flue and pressure tests, and system settings.
Complete required certificates, safety notices, and gas-safety documentation.
Provide the homeowner with manuals and test records.
Register the warranty promptly with the manufacturer and retain copies for compliance and future service.
Common Problems During Installation and How to Fix Them
The installer may encounter several common faults at handover that require prompt diagnosis and remedy.
Typical issues include inadequate water pressure or no hot water, persistent leaks at joints or valves, initial lockouts or error codes, flue condensation or termination errors, and electrical or thermostat communication faults.
Each problem demands specific checks—pressure and flow, joint integrity, fault-code troubleshooting, flue siting and condensation management, and wiring/communication verification—before the system is signed off.
Poor water pressure or no hot water after install
Troubleshooting poor water pressure or a lack of hot water after installing a combi boiler requires systematic checks of the system’s supply, valves, and settings to isolate the cause quickly.
Inspect incoming mains isolation, filling loop and pressure gauge, and thermostat/programmer settings.
Verify pump operation, trapped air via system bleeding, and any closed zone valves.
Restore correct pressure per manufacturer specifications and retest performance.
Persistent leaks from joints or valves
Addressing persistent leaks from joints or valves begins with isolating the source and evaluating whether the issue stems from improper tightening, damaged seals, or incompatible fittings.
Once identified, depressurize the system, replace damaged washers or O-rings, re-seat compression fittings or swap to compatible unions, and apply appropriate thread sealant.
Retest at working pressure and monitor for recurrence before returning system to service.
Boiler locking out or error codes on first use
After resolving visible leaks, attention turns to commissioning issues such as boiler lockouts or error codes on first startup.
Technicians should consult the manual for specific codes, check gas supply, polarity, and condensate trap blockages, verify pressure and system filling, and confirm proper sensor and probe connections.
Clear faults after corrections, reset per manufacturer instructions, and document findings for warranty and safety compliance.
Flue condensation or incorrect flue termination issues
When flue condensation forms or the terminal is positioned incorrectly, the result can be corrosion, poor combustion, backflow of fumes, or repeated lockouts.
Installers must consequently identify the cause—siting, fall, length, terminal obstruction, or incompatible materials—and take corrective action to confirm safe, code-compliant venting.
Inspect condensate traps, correct flue fall, reinstall or relocate terminals per code, replace corroded sections, and verify manufacturers’ clearances.
Electrical faults and thermostat communication problems
Diagnose electrical faults and thermostat communication problems systematically, since these issues commonly cause intermittent operation, failure to fire, or incorrect temperature control.
Inspect wiring for loose connections, corrosion, blown fuses, and correct polarity.
Verify thermostat compatibility, wiring diagram, and signal types (volt-free, 230V, or digital).
Test continuity, voltages, and comms with a multimeter.
Replace faulty components and retest for stable responses.
Best Practices to Ensure Long-Term Efficiency and Safety
The section outlines key commissioning settings and filling procedures that optimize efficiency while preventing corrosion, including recommended inhibitors and correct pressure protocols.
It also covers routine maintenance schedules and the importance of annual servicing to detect issues early.
Finally, it highlights performance upgrades such as magnetic filters and TRVs that extend system life and improve operation.
Recommended commissioning settings for efficiency
A few precise commissioning settings can markedly improve a combi boiler’s efficiency and long-term safety by optimizing performance for the specific installation.
Set flow temperatures to design heating curves, adjust weather compensation if available, balance system pump speeds, verify correct gas pressure and modulation, program domestic hot water priority and timings, enable frost and overheat protections, and document final parameters for future servicing.
Corrosion prevention, suitable inhibitors, and correct filling procedures
Following final commissioning adjustments, attention should turn to corrosion prevention, inhibitor selection, and correct filling procedures to protect system components and maintain efficiency.
Use a compatible, manufacturer-approved inhibitor (glycol or nitrite-free formulations as specified), dose per system volume, and document concentration.
Flush to remove debris, refill slowly to avoid airlocks, vent radiators, and verify system pressure and inhibitor levels after 24–48 hours.
Scheduling routine maintenance and annual servicing
Schedule routine maintenance and an annual service to preserve combi boiler performance, safety, and warranty compliance.
A qualified Gas Safe engineer should inspect combustion, ventilation, seals, and controls, test safety devices, clean heat exchanger and burners, and check system pressure.
Keep service records, address faults promptly, and follow manufacturer intervals to prevent failures, maintain efficiency, and guarantee regulatory and warranty obligations remain valid.
Upgrades and accessories that improve performance (mag filters, TRVs)
Routine servicing highlights issues that can be resolved or prevented by targeted upgrades and accessories that enhance a combi boiler’s longevity and efficiency.
Magnetic filters remove ferro-particles, reducing heat exchanger wear and improving circulation.
Thermostatic radiator valves provide room-level control, lowering energy use and balancing system temperatures.
Pressure relief valves, scale inhibitors and smart controls further protect components and optimize performance over time.
Comparison of Installation Approaches and Cost Considerations
When comparing DIY work to a licensed installer, the article notes differing risk profiles, legal obligations, and typical cost ranges that influence the decision. A concise table summarizes key contrasts and a typical labour/time breakdown for a standard combi swap. The following overview frames costs, compliance, and expected time so readers can weigh options.
| Aspect | DIY (typical) | Licensed installer (typical) |
|---|---|---|
| Risk & legal | Higher risk; potential non-compliance, insurance issues | Lower risk; certified work, warranty and regulatory compliance |
| Cost range | £500–£1,500 (parts only; variable) | £1,200–£3,000 (parts + labour; depending on complexity) |
DIY vs licensed installer: risks, legal requirements, and typical cost ranges
Although a confident DIYer might consider installing a combi boiler to save money, the choice between self-installation and hiring a licensed installer carries significant differences in safety, legal compliance, and overall cost.
DIY saves labour but risks improper flue, gas, or pressure work, voids warranties, and may breach regulations.
Licensed installers guarantee certification, insurance, and typical UK install costs of £1,500–£3,500.
Typical timeframes and labour breakdown for a standard combi swap
A typical combi boiler swap can be completed in a single day for straightforward like‑for‑like replacements.
However, it commonly takes 1–3 days when accounting for pipework alterations, flue modifications, system flushing, and testing.
Labour splits:
- site prep and removal 1–3 hours,
- pipework and flue work 2–8 hours,
- mounting and connections 1–3 hours,
- commissioning and certification 1–4 hours,
plus allowance for unexpected issues.
Quick Troubleshooting Checklist After Installation
After installation, a brief troubleshooting checklist guides immediate action for safety and damage control.
- If gas is smelled: evacuate, avoid switches or flames, and call emergency services.
- If leaks or loud/unusual noises are observed: isolate the boiler using the shut-off valves and contact a qualified technician.
Immediate steps if you smell gas, see leaks, or hear unusual noises
If a strong smell of gas, visible water leaks, or unexpected noises are detected after commissioning a combi boiler, immediate and structured actions are required to protect occupants and property.
Ventilate the area, avoid open flames and electrical switches, and evacuate nonessential persons.
Shut off gas and water at accessible valves if trained to do so.
Record observations and notify the installer or qualified technician.
When to isolate the boiler and call emergency services or a technician
When signs indicate a safety risk—such as persistent gas odor, uncontrolled water leakage, visible flame abnormalities, or electrical sparking—the boiler should be isolated immediately and emergency services or a qualified technician contacted.
Additionally, isolate and seek professional help if carbon monoxide alarms activate, pressure drops or spikes dramatically, persistent overheating occurs, or attempts to reset repeatedly fail.
Do not reignite or repair alone.
Useful Resources and Regulatory References
Locate authoritative sources and applicable codes before beginning any combi boiler work; reliable references include manufacturer installation manuals, the current edition of the Building Regulations (Part L and Part G where relevant), local water authority guidance, and industry standards such as BS 5546 and BS EN 12828.
Consult these for compliance, safety, and testing requirements.
- Manufacturer installation manual
- Building Regulations and British Standards
- Local water authority and gas safety guidance
Conclusion
A properly plumbed combi boiler delivers efficient heat and instant hot water while minimizing risks when installed to standards. Studies show professionally installed systems reduce energy use by up to 20%, illustrating measurable savings over DIY attempts. Following site assessment, correct component selection, pressure testing, and thorough commissioning guarantees safety and longevity. Adherence to regulations and routine maintenance preserves performance, protects occupants, and maximizes the system’s return on investment over its lifespan.