How to Insulate PEX Pipe: Easy DIY Methods to Prevent Freezing
To effectively insulate PEX pipe and prevent freezing, use closed-cell foam sleeves or tubular elastomeric covers. This insulation traps heat and blocks drafts, significantly reducing the risk of pipes freezing. Simply install pre-slit foam over straight sections, apply pre-formed covers on elbows and valves, seal seams with foil or UV-rated tape, and secure everything with zip ties. For pipes that are exposed outdoors or over long distances, consider adding UV jackets or thermostatic heat tracing. These straightforward measures are effective in most cases; continue reading for tips on high-risk areas, testing methods, and when to consult a professional.
Quick Answer: Will Insulating PEX Pipe Stop Freezing?
Insulating PEX pipe reduces heat loss and can delay freezing, but it does not guarantee pipes will never freeze in severe cold or prolonged exposure. It markedly lowers the risk by retaining warmth and reducing thermal bridging.
Proper insulation combined with heat tape, maintained indoor temperatures, and sealing drafts provides reliable protection. Insulation effectiveness depends on R-value, thickness, installation quality, and exposure level.
For exposed exterior runs or unheated spaces, insulation alone may be insufficient; active heating or relocation may be required. Regular inspection and preventive measures are recommended to manage residual risk and respond to unusually cold events.
What Homeowners Mean by “Insulate PEX Pipe
When homeowners say they will “insulate PEX pipe,” they typically mean enclosing the tubing with a thermal barrier—foam sleeves, rubber jackets, or wrapped fibrous insulation—to reduce heat loss, limit condensation, and provide modest freeze protection. The description often includes cutting measured sections, securing seams with tape or zip ties, and selecting thickness appropriate to exposed conditions. It usually excludes active heating methods. The goal is pragmatic: maintain warmer water temperature, slow ambient heat transfer, and minimize energy waste. Materials, installation neatness, and accessibility for future repairs are commonly emphasized.
| Material | Benefit |
|---|---|
| Foam sleeve | Lightweight, easy |
| Rubber jacket | Durable, flexible |
| Fibrous wrap | Conforms tightly |
| Tape/sealant | Prevents gaps |
How to Identify PEX Runs Most at Risk of Freezing
After describing common insulation methods, attention turns to locating PEX runs that face the highest freeze risk.
The most vulnerable sections are those in unheated spaces: crawlspaces, exterior walls, attics, basements, garages, and uninsulated rim joists. Long, exposed lengths and runs near windows, doors, or poorly sealed penetrations increase exposure. Low-flow or rarely used branches, such as outdoor hose bib lines and guest-bath feeds, cool faster.
Identify routing that follows exterior walls or runs through unconditioned cavities and note shallow burial under flooring. Mapping these characteristics helps prioritize insulation, sealing, or supplemental protection without assuming automatic coverage.
When Insulation Alone Is Enough vs. Reroute or Heat Trace
In deciding whether added insulation suffices or more aggressive measures are required, assess heat loss drivers: exposed length, ambient temperatures, water use frequency, and proximity to unheated spaces.
If runs are short, intermittently used, and within mildly cold but protected zones, foam sleeves or wrap combined with sealing gaps typically prevent freezing.
Longer runs, continuous subfreezing exposure, or infrequent flow favor active solutions: rerouting into conditioned areas, installing thermostatically controlled heat trace, or adding insulated enclosures.
Cost, labor, and code constraints guide choice. When in doubt, favor redundancy—insulation plus heat trace—over relying on insulation alone.
Decision Checklist: DIY vs. Call a Pro
Who should tackle pipe insulation and who should be called in? A homeowner comfortable with basic tools can handle straightforward insulation in accessible areas. Call a professional for complex layouts, suspected leaks, extensive freezing history, electrical heat-trace installation, or when local code matters.
| Situation | DIY Appropriate? | When to Call Pro |
|---|---|---|
| Accessible, short runs | Yes | No |
| Hidden or cramped runs | No | Yes |
| Repeated freeze incidents | No | Yes |
| Electrical heat-trace or code work | No | Yes |
Assess competence, risk tolerance, and warranty or permit requirements before deciding.
Materials: What You Need for DIY PEX Insulation
The following section lists the basic tools and supplies needed to insulate PEX, including cutting tools, adhesive tape, and fastening materials.
It then compares common insulation options—foam sleeves, fiberglass wrap, and rubber tubular insulation—by suitability and R-value.
Recommendations focus on matching material properties to the installation environment and desired thermal performance.
Tools And Supplies
For a successful DIY PEX insulation project, gather a concise set of tools and materials tailored to pipe size and site conditions: PEX-compatible foam or fiberglass insulation, appropriate-sized slit or wrap-around tubes, a measuring tape, utility knife or insulation cutter, quality adhesive or foil tape, plumber’s tape for sealing joints, and optional pipe hangers or insulation supports where pipes run horizontally.
Additionally, a marker for layout, gloves and eye protection, a straightedge for clean cuts, a heat gun for shaping flexible insulation if needed, and a caulk gun with compatible sealant improve outcomes.
Keep spare fasteners and replacement tape on hand.
Insulation Materials
Effective insulation selection hinges on matching material properties to pipe size, temperature range, and installation environment. Common choices include closed-cell foam tubing for easy slip-on fitting, rubber (EPDM) for flexibility and higher temperature tolerance, and fiberglass with a vapor barrier for long runs or exposed applications.
For exterior or wet locations, use UV-resistant and water-repellent jackets. Tape, adhesive-backed foam, and heat-shrink sleeves address seams and joints. For freeze-prone areas, combine insulation with electric heat tape. Selection balances R-value, moisture resistance, ease of installation, and budget to guarantee reliable PEX protection.
Choosing the Right Insulation Type for PEX Pipe
When selecting insulation for PEX pipe, homeowners and professionals must weigh thermal performance, moisture resistance, ease of installation, and compatibility with pipe movement.
Choices hinge on environment: conditioned basements favor closed-cell materials that resist vapor; unheated crawlspaces may require higher R-value options.
Flexible, compressible types accommodate expansion and bends without stressing fittings.
Fire rating, UV exposure, and rodent resistance influence selection for exposed runs.
Consider maintenance access and the ability to layer with heat tape where necessary.
Cost and availability matter, but matching insulation properties to local climate and routing specifics yields the most reliable freeze protection.
Foam Split-Sleeve: Pros and Install
Foam split-sleeve insulation offers a simple, cost-effective solution for insulating PEX runs where ease of installation and flexibility matter.
The closed-cell polyethylene foam resists moisture, provides R-value suitable for most residential water lines, and resists compression around bends.
Its pre-slit design snaps onto pipes without adhesives or tools, speeding DIY installs in basements, crawlspaces, and exterior runs.
Sizes match common PEX diameters; seams seal with tape or adhesive for improved protection.
While not a substitute for buried or exterior-rated insulation in severe climates, it performs well for interior freeze prevention and heat retention on everyday installations.
Fiberglass Wrap & Foil Tape: When and How
For PEX runs requiring higher-temperature protection or exposure in unconditioned spaces, fiberglass wrap combined with foil tape provides a durable, heat-resistant insulation method that also manages condensation.
Fiberglass blanket or tape is wrapped tightly around the pipe, overlapping seams to achieve consistent coverage and minimum recommended thickness.
A vapor-retardant foil tape seals seams and end joints, preventing moisture ingress and maintaining thermal performance.
Installers should wear gloves and a mask to avoid irritation.
This method suits attic, crawlspace, and near-heat sources where foam sleeves aren’t adequate.
Make sure joints, valves, and fittings receive the same attention for continuous protection.
Self-Sealing Neoprene and Rubber: Quick Install
Installers can quickly protect PEX runs using self-sealing neoprene or rubber sleeves that combine flexibility with a built-in adhesive closure. These sleeves slip over pipes, compressing to form a continuous thermal barrier without tools. Foam-backed rubber resists compression set and retains insulating value around bends and fittings; thicker walls increase R-value.
Adhesive flap seals seams, simplifying installs in crawlspaces and utility rooms. Cut lengths to fit and overlap seams by an inch, ensuring adhesive contacts clean, dry pipe. Periodic inspection guarantees adhesive integrity; replace damaged sections rather than patching to maintain continuous insulation and prevent cold spots.
Outdoor PEX: UV-Resistant Insulation Options
When PEX piping leaves protected interior spaces and is exposed to sunlight, material choices and installation methods must account for ultraviolet degradation as well as thermal performance.
For outdoor runs, select insulation rated UV-resistant or combine standard closed-cell foam with an ultraviolet-stable outer jacket. Products include UV-stable polyethylene foam, elastomeric foam with factory-applied UV coatings, and corrugated PVC or aluminum cladding for added abrasion and sun protection.
All joints should be sealed with UV-rated tape or weatherproof mastic to prevent water intrusion and sun exposure. Secure insulation to prevent movement and inspect periodically for cracking, discoloration, or adhesive failure.
Insulating PEX in Crawlspaces and Basements
In crawlspaces and basements where temperature fluctuations and moisture are common, insulating PEX focuses on preventing heat loss, freeze risk, and condensation while allowing access for maintenance.
Install closed-cell foam sleeves or tubular elastomeric insulation to resist moisture and compressive damage. Seal joins with weatherproof tape or heat-shrink tubing and secure with corrosion-resistant straps avoiding tight bends. Elevate lines off cold concrete with insulated hangers and add a vapor barrier where dampness is present.
For long runs, consider adding electric tracing with thermostat control.
Routine inspection guarantees insulation integrity, fastener stability, and moisture-free conditions to maintain pipe performance.
Insulating PEX in Exterior Walls and Cavities
For runs placed within exterior walls and wall cavities, insulating PEX focuses on preventing heat loss, reducing condensation risk, and maintaining accessibility for repairs without compromising wall assembly performance. Install closed-cell foam sleeve or wrap with continuous batt insulation, keeping a small clearance for thermal movement. Seal penetrations with foam or grommets to stop drafts. Consider running PEX on the warm side of sheathing when possible and maintaining drainage planes. Avoid compressing insulation around pipe. Label accessible chase locations for future work. Use vapor-aware materials appropriate to climate to prevent moisture trapping and mold.
| Material | Placement | Benefit |
|---|---|---|
| Closed-cell foam | Around pipe | Thermal + moisture barrier |
| Fiberglass batt | Within cavity | Cost-effective fill |
| Spray foam | Penetrations | Air seal |
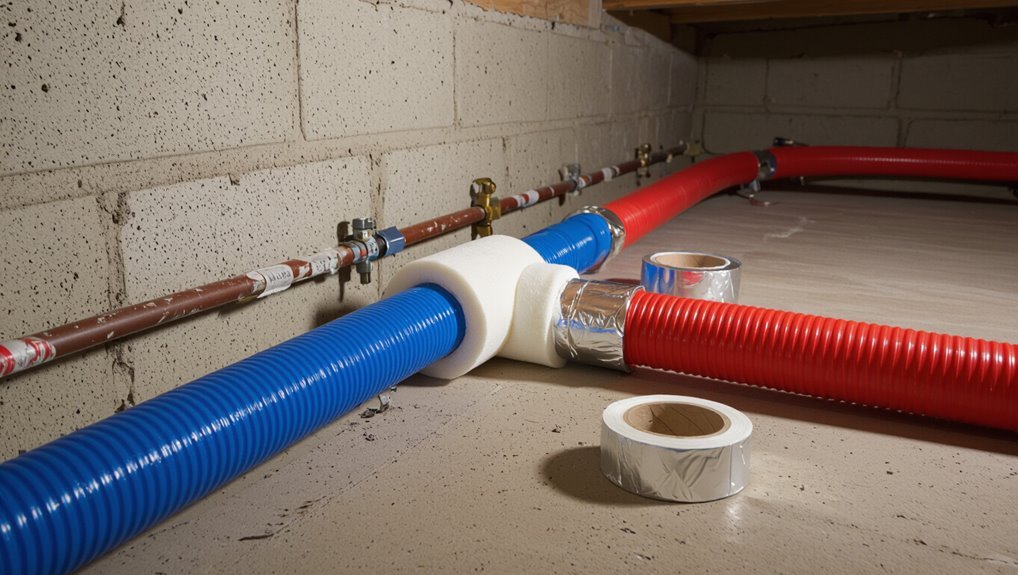
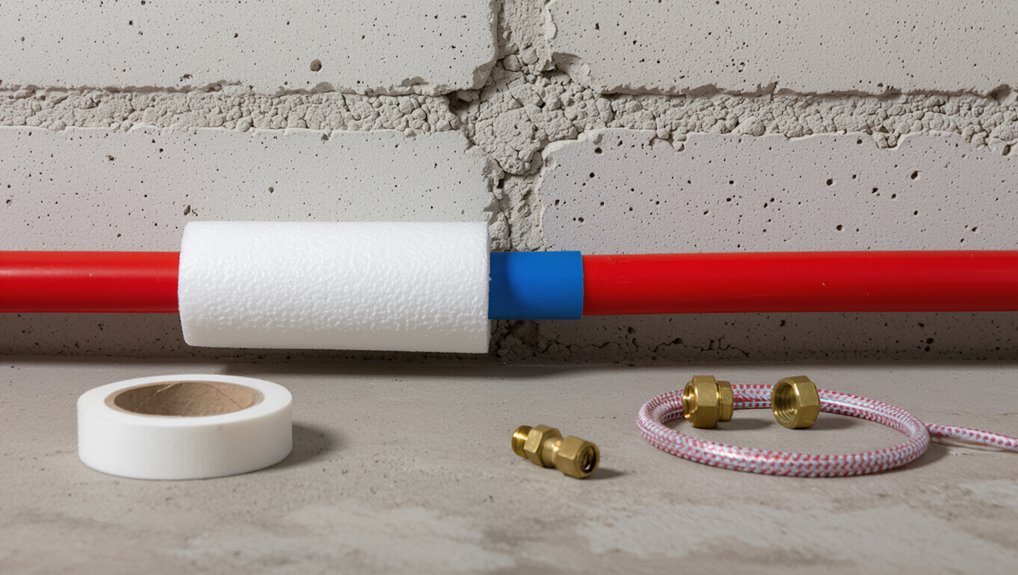
Insulate Fittings, Joints, and Valves
Beyond insulating straight runs, attention must shift to fittings, joints, and valves because these components are common points of heat loss and condensation.
Small foam covers and split-tube insulation fit most elbows and couplings; secure with zip ties or HVAC tape.
For valves and larger fittings, use pre-formed neoprene or silicone covers that conform to shapes and maintain access.
Wrap threaded connections with pipe insulation tape, avoiding interference with operation.
Insulate saddle tees and manifolds with removable jackets for maintenance.
Make certain insulation remains dry and snug; replace degraded material promptly to preserve thermal performance and prevent freezing.
Sealing Wall Penetrations Where PEX Passes Through
When PEX passes through walls, gaps must be sealed to prevent air leakage and pest entry. The author recommends filling spaces around the pipe with appropriate sealant sized to the annular gap.
Where the penetration crosses a fire-rated barrier, fire-resistant caulk or intumescent sealants should be used to maintain the wall’s fire performance.
Seal Gaps Around Pipe
Through wall or floor penetrations, sealing gaps around PEX is essential to maintain thermal performance, prevent air leakage, and limit pest and moisture entry.
Install appropriately sized foam pipe collars or backer rod to fill voids, ensuring the fill material sits flush without compressing the PEX. Apply an appropriate non-hardening sealant or flexible caulk around the pipe exterior to accommodate movement and temperature changes.
For larger gaps, combine insulation wrap with a foam block to center the pipe before sealing.
Check for continuity of the thermal barrier and re-seal after any maintenance to preserve effectiveness and prevent drafts.
Use Fire-Resistant Caulk
Seal wall penetrations where PEX passes through with a fire-resistant caulk to maintain the fire barrier and limit the spread of smoke and flames.
A proper intumescent or firestop caulk fills gaps around tubing, expanding under heat to seal voids.
The installer should clean surfaces, insert backing material if needed, and apply a continuous bead around the pipe, smoothing for full contact.
Confirm compatibility with PEX and local codes; avoid combustible fillers.
Allow recommended cure time before insulation and wall finishes.
Periodic inspections guarantee seals remain intact after movement or settling, preserving both thermal performance and fire safety.
Combining Insulation With Heat Tape Safely
Combining insulation with heat tape requires careful attention to compatibility, installation order, and manufacturer guidelines to guarantee effective freeze protection without creating fire or overheating hazards.
The installer should verify that the chosen heat tape is rated for use with the insulation type, observe clearances, and follow the tape’s maximum overlap rules.
Proper sequence places heat tape directly on the pipe, secured per instructions, then insulation over but not compressing the tape.
Avoid covering thermostat sensors.
Regular inspection for damage and replacing worn tape prevents risks.
Documentation of product specs and installation date aids future maintenance.
- Confirm compatibility and ratings.
- Install tape first, then insulation.
- Inspect and document periodically.
Temporary Winter Fixes for Vulnerable PEX Runs
After confirming compatibility and installing heat tape beneath insulation, attention should turn to short-term measures that protect exposed PEX during cold snaps. Temporary fixes reduce freeze risk until permanent work is completed. Recommended actions include wrapping with foam or towels, securing heat sources safely, draining low-use lines, and keeping cabinets open to share warm air. Monitor conditions and restore permanent insulation when feasible.
| Fix | Materials | Duration |
|---|---|---|
| Foam wrap | Pipe foam or towels | Hours–days |
| Heat lamp | Low-watt, safe distance | Hours |
| Drain line | Bucket, valve open | Until thaw |
| Space heater | Thermostat control | Hours–days |
| Insulate door/cabinet | Blanket, wedge | Days |
Recommended Insulation Thickness and R-Value for PEX (By Climate)
In different climates, selecting PEX insulation requires balancing thickness and thermal resistance (R-value) to prevent freezing without overbuilding; colder zones need thicker, higher-R materials while milder areas can use thinner insulation.
- Cold climates (Zone 5–7): use closed-cell foam or fiberglass with vapor barrier, 1–2 inches thickness, R-6 to R-10 recommended for exposed runs.
- Moderate climates (Zone 3–4): use foam or tubular rubber, 1 inch typical, R-3 to R-6 sufficient for interior and semi-exposed lines.
- Mild climates (Zone 1–2): ½ inch tubular foam, R-2 to R-3 adequate for interior piping; thicker only if occasional extremes occur.
Tools and Measurements: Cutting, Measuring, and Fitting
Accurate measuring, precise cutting, and correct fitting are essential to a successful PEX insulation job.
The installer measures pipe runs carefully, cuts tubing squarely with a suitable PEX cutter, and deburrs ends to guarantee clean connections.
Properly seated fittings and secure clamps or crimp rings prevent leaks and allow insulation to perform as designed.
Measuring Pipe Lengths
Measure twice and cut once: when insulating PEX, precise measurement and clean cutting are essential to guarantee snug fits and continuous thermal protection.
The practitioner records run lengths, accounts for bends, fittings, and overlap, and selects insulation with appropriate internal diameter.
Measuring tape stays parallel to pipe; slack and sag are avoided. Markings indicate insulation start and end; allowance is added for connectors and wraps.
For long runs, measurements are taken in segments and summed to prevent waste.
- Note run length and fittings.
- Add overlap and connector allowances.
- Segment long runs, then total.
Cutting Cleanly And Squarely
Cut square cuts with a sharp tool and steady hands to guarantee insulation seams meet tightly and maintain thermal continuity; a clean, perpendicular edge prevents gaps, reduces sealing effort, and makes fittings sit flush. Precision cutting minimizes rework and preserves insulation geometry. Tools should be chosen for pipe diameter and material; batteries, alignment aids, and clamps improve consistency. After cutting, deburr and verify perpendicularity with a square or gauge. Clean surfaces before slipping insulation on. Small corrective shims are preferable to trimming insulation later. Consistent technique reduces thermal bridges and water ingress risk.
| Tool | Purpose | Tip |
|---|---|---|
| Tubing cutter | Straight cuts | Tighten gradually |
| Utility knife | Fine trimming | Score first |
| Deburring tool | Smooth edges | Rotate gently |
| Square/gauge | Verify angle | Check both sides |
Ensuring Proper Fittings
When preparing PEX runs for insulation, the installer selects fittings and tools that match pipe size and service conditions, then establishes measurement checkpoints to guarantee joints align and insulation layers remain continuous.
Proper fittings minimize leaks and create smooth surfaces for insulation to seat against. Measurements account for compression rings, crimp allowances, and insulation thickness so overlaps remain intact. Tools—tube cutter, expander, crimp tool—must be calibrated. Clean, deburred ends and correct insertion depth assure seals without bulges that break insulation continuity.
- Verify fitting type and size.
- Measure insertion and insulation offsets.
- Test joint alignment before insulating.
How to Test Insulated PEX for Cold Spots
How can one determine whether PEX insulation is performing uniformly along a run? A simple, systematic inspection combines touch, thermometer readings, and infrared scanning.
First, run hands along the insulated pipe (when safe) to feel for cold spots or drafts. Next, use a surface thermometer or infrared thermometer to record temperatures every few feet, comparing readings to identify deviations greater than a few degrees. For thoroughness, an infrared camera reveals subtle thermal leaks and compression points.
Mark any cooler sections, inspect joints and seams there, and add or replace insulation as needed to restore continuous coverage and thermal performance.
Seasonal Maintenance Checklist for Insulated PEX
Seasonally, a concise maintenance checklist helps guarantee insulated PEX retains thermal performance and prevents freeze-related failures; it prioritizes visually inspecting insulation integrity, checking for compression or gaps at fittings, verifying that vapor barriers remain intact, and confirming that heat-tracing (if present) and pipe supports are functioning correctly.
- Inspect insulation for tears, moisture, mold, or compression; replace damaged sections and seal seams.
- Check fittings, elbows, and clamps for gaps or unsecured wraps; rewrap with appropriate tape or foam collars.
- Test heat-trace cables, thermostats, and supports; ensure electrical connections are dry and strain-free, and clear surrounding debris.
Cost Comparison: DIY Insulation vs. Professional Solutions
Why choose DIY insulation over hiring a pro? DIY typically lowers upfront costs, uses basic materials, and lets homeowners control timing. Professional services add labor, warranties, and expertise, increasing expense but reducing risk for complex layouts.
| Option | Typical Cost Range |
|---|---|
| DIY foam sleeve | $0.50–$3 per foot |
| DIY fiberglass wrap | $0.30–$2 per foot |
| Professional install | $5–$20 per foot |
| Heated cable with install | $10–$30 per foot |
Decision depends on pipe accessibility, homeowner skill, and tolerance for ongoing inspection versus paying for guaranteed performance.
When to Call a Plumber or Electrician for Freeze Protection
When temperatures approach freezing or pipe runs are inaccessible, homeowners should consider calling a plumber or electrician for freeze protection. Professionals assess risk, recommend solutions, and make certain code compliance.
Typical scenarios requiring help include complex systems, repeated freeze events, or electrical heat-trace installation.
- Plumber: repairs damaged PEX, reroutes exposed runs, and installs insulation or thermostatic controls.
- Electrician: installs and wires self-regulating heat tape, dedicated circuits, and GFCI protection for wet areas.
- Both: coordinate on systems combining insulation, heat tracing, and automated controls for reliable, long-term freeze prevention.
Timely professional intervention reduces rupture risk and costly emergency repairs.
Conclusion
Insulating PEX greatly reduces freezing risk but is not an absolute guarantee; like a warm coat, it adds needed protection. Homeowners should assess exposed runs, shaded crawlspaces, and long, poorly insulated stretches to decide between foam sleeves, pipe wrap, or heat tracing. Simple insulation and proper routing often suffice, yet testing for cold spots and seasonal maintenance remain essential. When uncertainty or electrical work arises, a licensed plumber or electrician should be called.