How to Install a Little Giant Condensate Pump: Step-by-Step Guide for HVAC Beginners
To install a Little Giant condensate pump, start by selecting the appropriate model based on tank size, lift height, and flow requirements. Position the pump level and in an accessible location. Next, connect the condensate inlet and discharge lines, ensuring you include a check valve. Wire the pump and float switch to the air handler according to the manufacturer’s diagrams and local codes. After installation, test for proper float operation and ensure there are no leaks. Schedule routine maintenance and refer to the detailed setup and troubleshooting steps for any additional assistance.
What a Little Giant Condensate Pump Is and Why You Need One
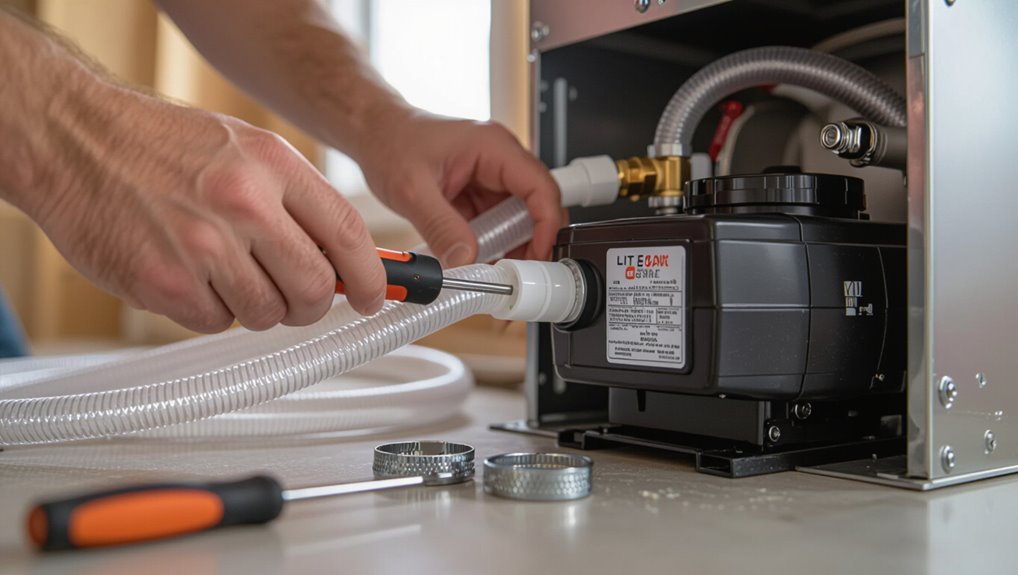
A Little Giant condensate pump collects and pumps away condensate from HVAC equipment, commonly used with furnaces, boilers, air handlers, and high-efficiency condensers.
Models vary by tank size, lift height, and flow capacity, so selection depends on the system’s condensate volume and required discharge height.
A pump is required when gravity drainage is impossible or when code and equipment location demand positive discharge.
Purpose and typical applications in HVAC systems
Condensate pumps collect and move the water produced by air conditioning coils, high-efficiency furnaces, and refrigeration equipment when gravity drainage isn’t feasible.
They prevent overflow, mold, and water damage by reliably discharging condensate to drains or outdoors.
Typical applications include split systems, packaged units, and condensate pans in basements or attics.
Guides on how to install little giant condensate pump focus on placement, connections, and safety.
Common models and capacity considerations
Sizing and model selection hinge on expected condensate volume, discharge lift, and installation constraints; Little Giant offers compact residential pumps (e.g., VCMA series) for low-flow applications and larger commercial units (e.g., 6MD, 8MD) with higher head and capacity for heavier loads.
Consider these factors:
- Flow rate (GPH) versus peak condensate production
- Maximum discharge head and pipe run limitations
- Reservoir size and duty cycle for continuous operation
When a condensate pump is required versus gravity drain
Many HVAC installations can rely on gravity to remove condensate, but situations with uphill discharge, long horizontal runs, or elevated equipment require mechanical assistance.
A Little Giant condensate pump provides the necessary lift and controlled discharge when gravity alone is insufficient. The pump is required where outlet elevation, distance, or impermeable routing prevents reliable gravity flow, or where a reliable, code-compliant drain is mandated.
Quick overview of installation steps
The article provides a concise checklist of required tools, replacement parts, and essential safety precautions for a Little Giant condensate pump installation.
It also notes typical time commitments, the recommended skill level, and an expected cost range for parts and labor.
These points prepare the reader for the step‑by‑step instructions that follow.
Summary checklist of tools, parts, and safety precautions
A concise checklist helps guarantee a safe, efficient Little Giant condensate pump installation: essential tools (screwdrivers, tubing cutter, pliers, drill, level), replacement parts and materials (pump, appropriate tubing, check valve, mounting hardware, overflow fittings), and basic PPE (safety glasses, gloves) should be gathered before work begins.
- Verify tools, parts, and fittings match specifications.
- Inspect pump and tubing for damage; test electrical connections.
- Follow PPE use, lockout procedures, and local codes during installation.
Estimated time, skill level, and cost range
Typically, installing a Little Giant condensate pump requires about 1–3 hours for a competent DIYer and 30–90 minutes for a trained technician, depending on site access and complexity.
Required skill is basic plumbing and electrical familiarity; novices may need guidance.
Parts and basic tools add $40–$150; professional labor increases total to $150–$400.
Complexity, repairs, or new fittings raise cost and time.
Pre-installation preparation
Before beginning installation, the technician should inspect the HVAC unit and drain pan to confirm compatibility and identify any needed replacement parts.
They must select the correct Little Giant pump model, verify electrical requirements and applicable local codes, and have appropriate components on hand.
Finally, safety measures—including shutting off power and water—should be completed and documented prior to work.
Inspecting the HVAC unit and drain pan compatibility
When preparing to install a Little Giant condensate pump, the technician confirms that the HVAC unit’s drain pan dimensions, outlet location, and material are compatible with the pump’s inlet and mounting options.
The technician inspects for rust, cracks, slope toward the outlet, and secure mounting points.
Clear access for tubing and power routing is verified, and existing fittings are noted for seal compatibility.
Selecting the correct pump model and replacement parts
With the drain pan and outlet verified, attention shifts to choosing a pump that matches the installation parameters and anticipated load.
Consider capacity, head height, and compatibility with condensate characteristics. Select OEM or equivalent replacement parts and tubing size.
Verify float switch type and mounting options.
- Flow rate and maximum head
- Materials and tubing diameter
- Compatible float/sensor and replacement kits
Verifying electrical requirements and local codes
Although often overlooked, verifying the electrical requirements and applicable local codes is a critical step in pre-installation preparation to guarantee the condensate pump operates safely and legally.
The installer should confirm voltage, amperage, circuit type, grounding, and GFCI needs per pump specifications.
Consult local building and electrical codes, obtain permits if required, and document compliance before proceeding with installation.
Safety measures and turning off power and water
Before beginning any work, the installer must shut off electrical power and water to the system and verify isolation to eliminate shock and flooding risks.
The installer should lock out/tag out breakers, close supply valves, and drain residual condensate. Protective gloves and eye protection are recommended.
Confirm de-energized circuits with a meter and test valves for leakage before proceeding with pump removal or installation.
Step-by-step installation process
The installation sequence begins with positioning the Little Giant pump in an accessible, level location that accommodates inlet and discharge routing.
Next steps cover connecting the condensate drain to the pump inlet, fitting the discharge line with a check valve, and wiring the unit to the HVAC system and float switch.
Finally, all fittings and penetrations are secured and sealed to guarantee a leak-free installation.
Mounting the condensate pump in the optimal location
When selecting the pump’s mounting point, consider proximity to the condensate source, a stable level surface, and convenient access for maintenance; these factors together assure reliable operation and simplify future service.
Mount the unit near a grounded electrical outlet, away from direct heat or freezing drafts, and secure it with vibration-isolating fasteners.
Confirm adequate clearance for removal and inspection.
Connecting the condensate drain line to the pump inlet
Begin by confirming that the pump is powered off and the condensate source is ready for connection.
Position the drain tubing to reach the inlet without kinks. Cut tubing squarely, slide provided adapter or hose barb onto tube, and secure with a clamp.
Insert tubing fully into the pump inlet until seated. Verify a snug, leak-free fit before restoring power and testing the system.
Installing the discharge line and check valve
Install the discharge line and check valve by first confirming the pump is de-energized and the outlet area is accessible.
Measure and cut appropriate tubing, fit it onto the pump outlet, and secure with hose clamps.
Install the check valve oriented for upward flow, tighten fittings, and slope the discharge line toward the drain.
Pressure-test for leaks and guarantee clear, unobstructed flow.
Wiring the pump to the HVAC system and condensate float switch
With the discharge line secured and verified for proper flow, attention turns to wiring the condensate pump so it integrates safely with the HVAC system and the float switch.
Power is isolated, the pump’s supply wires connect to the furnace/air handler control per manufacturer diagram, and the float switch leads are routed to the condensate safety input.
Tight, insulated connections are confirmed before restoring power and testing.
Securing and sealing all connections to prevent leaks
Carefully inspect every joint, fitting, and hose once the pump and discharge line are positioned to guarantee all connections are tight and properly aligned.
Apply plumber’s tape to threaded fittings, secure hose clamps at barb connections, and use appropriate sealant on PVC joints.
Trim hoses squarely, avoid over-tightening clamps, and route lines to prevent kinks or strain.
Recheck after initial run-in.
Testing pump operation and adjusting float/switch settings
Begin testing by powering the pump and introducing water to the reservoir in controlled increments to observe startup behavior and verify that the float and switch actuate at the planned levels.
Check that the pump runs only when the float rises to the cut-in point, then stops at cut-out.
Adjust float height or switch sensitivity per manufacturer instructions, retest until reliable cycling and no false triggers occur.
Final system restart and observation period
Power is restored to the HVAC system and condensate pump, and the installer observes the system through a controlled restart sequence to confirm proper operation under normal load.
The installer monitors pump cycling, drain flow, alarms, and condensate removal for several heating/cooling cycles.
Any leaks, unusual noises, or repeat trips prompt immediate shutdown, troubleshooting, and recheck until steady, reliable performance is verified.
Troubleshooting during and after installation
After installation, a systematic troubleshooting checklist helps identify why the Little Giant pump may not power on or run, or why it runs without evacuating water.
Attention should be paid to intermittent operation and float switch behavior, as well as clogged drain lines and algae buildup that restrict flow.
Simple diagnostic steps—power and fuse checks, impeller and tubing inspection, and float and line cleaning—address most post-installation issues.
No power or pump won’t run diagnostic steps
If the Little Giant condensate pump fails to receive power or the motor does not run, verify electrical supply, connections, and the pump’s internal safety switches before dismantling the unit.
Check circuit breaker, fuse, and incoming voltage. Inspect wiring, plug, and switch continuity. Confirm float or safety switch position.
- Test breaker and fuse
- Measure voltage at pump
- Bypass float switch to isolate fault
Pump runs but doesn’t evacuate water common causes
Once electrical supply and switch operation have been confirmed, attention turns to situations where the motor runs but water is not being expelled.
Common causes include clogged inlet or discharge lines, blocked check valve, airlock in the discharge tubing, improper routing or high discharge head exceeding pump capacity, damaged impeller or worn seals, and kinked tubing restricting flow.
Intermittent operation and float switch issues
Intermittent operation of a Little Giant condensate pump often traces to float switch problems or wiring faults that cause the motor to start and stop unpredictably.
Technicians should first inspect the float for sticking, debris, or improper seating in its guide and then verify the switch contacts and lead connections for corrosion, looseness, or intermittent continuity.
Replace damaged floats, secure loose wiring, and test under load to confirm reliable cycling.
Dealing with clogged drain lines and algae growth
Address clogged drain lines and algae growth promptly to prevent pump backups, reduced flow, and premature motor cycling; these issues commonly arise from stagnant condensate, organic buildup, and mineral deposits that constrict tubing or block the pump inlet and discharge.
Inspect lines, flush with diluted bleach or vinegar, clear obstructions with a soft brush or compressed air, replace brittle tubing, and schedule quarterly maintenance to prevent recurrence.
Maintenance and longevity tips
A basic maintenance routine includes a regular inspection schedule and simple cleaning steps to prevent clogs and buildup.
Seasonal checks—such as pre-winter draining and pre-summer performance tests—help guarantee reliable operation under changing conditions.
Clear criteria for replacement, including persistent leaks, loss of pumping capacity, or excessive noise, indicate when the pump or parts should be replaced.
Regular inspection schedule and cleaning steps
Routine inspections and periodic cleanings keep a Little Giant condensate pump reliable and prevent buildup that can cause failures.
A simple monthly check of connections and tank, quarterly float and switch tests, and semiannual deep clean extend service life.
Follow safety: power off, drain tank, use mild detergent.
Key tasks:
- Inspect fittings and tubing
- Test float/switch operation
- Clean tank and inlet/outlet
Seasonal checks and pre-winter/summer tasks
Prepare the condensate pump for seasonal extremes by performing targeted checks before winter and summer, since temperature and humidity shifts affect performance and risk of damage.
Inspect hoses and fittings for cracks, clear inlet and float assemblies of debris, verify condensate line insulation and slope, test pump activation and alarm, and confirm electrical connections are secure and protected from moisture.
Schedule timely service if abnormalities appear.
When to replace the pump or parts
After completing seasonal checks, attention should turn to signs that indicate replacement of the pump or its components.
Persistent leaks, reduced discharge, unusual noises, frequent cycling, corrosion, or failed float switches signal impending failure.
If troubleshooting—cleaning, tubing replacement, switch testing—doesn’t restore reliable operation, replace the faulty part or entire unit.
Follow manufacturer lifespan guidance and document replacements for future maintenance.
Safety, code compliance, and warranties
Attention to electrical safety and proper grounding is essential when installing a Little Giant condensate pump to prevent shock and equipment damage.
Installers should confirm applicable local codes and obtain any required permits before beginning work.
Registering the pump for warranty coverage and keeping clear service records preserves protections and simplifies future claims.
Electrical safety best practices and grounding
When working with a Little Giant condensate pump, follow strict electrical safety practices and grounding requirements to protect personnel, equipment, and to maintain code compliance and warranty coverage.
Disconnect power before service, use properly rated wiring, secure connections with approved connectors, and install a dedicated circuit or GFCI where specified.
Verify pump chassis is grounded to building ground and document compliance per manufacturer instructions.
Relevant local code considerations and permits
Because local building codes, plumbing ordinances, and electrical regulations vary widely, installers must verify applicable requirements before beginning work on a Little Giant condensate pump.
They should confirm permit needs, approved venting and discharge methods, trap and backflow prevention rules, electrical circuit and conduit standards, and inspection scheduling.
Noncompliance risks fines, forced rework, and safety hazards; document approvals before starting.
Warranty registration and keeping service records
After confirming permits and inspections, installers should register the Little Giant condensate pump with the manufacturer and maintain clear service records.
Registration preserves warranty coverage and speeds claims.
Service logs must note installation date, model/serial numbers, installer contact, inspections, maintenance, and any repairs.
Retain receipts and photos.
Provide copies to the owner and advise on warranty duration, transferability, and required maintenance intervals.
Tools, materials, and parts checklist for DIY installers
A concise checklist helps guarantee a smooth Little Giant condensate pump installation by listing required tools, safety gear, replacement parts, and common consumables.
The installer should prepare essential hand tools, PPE, tubing and fittings, and spare parts while confirming electrical and seal materials. Common consumables and testing items are noted for efficiency.
- Slip-joint pliers, screwdriver set, tubing cutter
- Safety glasses, gloves, multimeter
- Replacement pump tubing, check valve, silicone sealant
Common mistakes to avoid during installation
Several avoidable mistakes routinely compromise Little Giant condensate pump installations: incorrect tubing size or improper connections, failing to secure electrical wiring or verify grounding, omitting a proper check valve, and neglecting to slope or support the drain line.
Installers should also avoid poor float clearance, using wrong fittings, and ignoring manufacturer flow limits.
- Verify tubing and fittings
- Secure wiring and ground
- Fit correct check valve
When to call a professional HVAC technician
If the installer encounters electrical work, persistent leaks, or unclear drainage issues, it may be beyond a typical DIY scope.
Homeowners should prepare specific questions about diagnosis, pricing, warranty, and required permits when contacting a technician.
The technician’s service should include a clear explanation of findings, an itemized estimate, and a description of recommended repairs or replacements.
Signs the job is beyond DIY scope
When complex wiring, persistent leaks, unusual noises, or repeated pump failures appear, the task should be escalated to a licensed HVAC technician; these signs often indicate electrical faults, misaligned drainage, or systemic issues that exceed routine DIY repair.
Additionally, lack of proper tools, uncertain diagnostics, corroded components, or safety concerns—like exposed wiring or refrigerant involvement—warrant professional assessment to prevent damage, injury, or voided warranties.
Questions to ask a technician and what to expect from service
How should a homeowner prepare before calling a technician? Gather model numbers, note symptoms, and clear access to the pump.
Ask about licensing, diagnostic fees, warranty coverage, and estimated timeline. Expect inspection, written estimate, and explanation of repairs.
- Confirm technician credentials and insurance.
- Request line-item estimate and parts brands.
- Ask about post-service testing and guarantees.
Conclusion
A Little Giant condensate pump completes HVAC setups by quietly moving condensate where gravity won’t, and installing one is surprisingly straightforward when steps and codes are followed. This guide condenses essentials—preparation, stepwise hookup, troubleshooting, safety, and tools—into a clear roadmap. DIYers can save time and avoid common pitfalls, while knowing when to call a pro. Installing correctly protects equipment and home; neglecting it would be a catastrophe of biblical proportions.