How to Get Mice Out of Ductwork Quickly and Prevent Them From Coming Back
To quickly remove mice from your ductwork and prevent their return, start by shutting off the HVAC system and isolating the affected ducts to prevent the spread. Inspect all vents and access points, then use humane one-way exclusion devices or targeted traps for effective removal. Remember to wear personal protective equipment (PPE), bag any droppings, and HEPA-vacuum and disinfect the ducts post-removal. Seal any gaps with metal mesh, sheet metal, or HVAC-grade mastic, and replace any damaged flexible ducts. Additionally, implement outdoor cleanup and monitoring to deter reentry. For detailed step-by-step methods, repair tips, and guidance on when to call a professional, continue reading.
How to Remove Mice from Ductwork Quickly and Safely
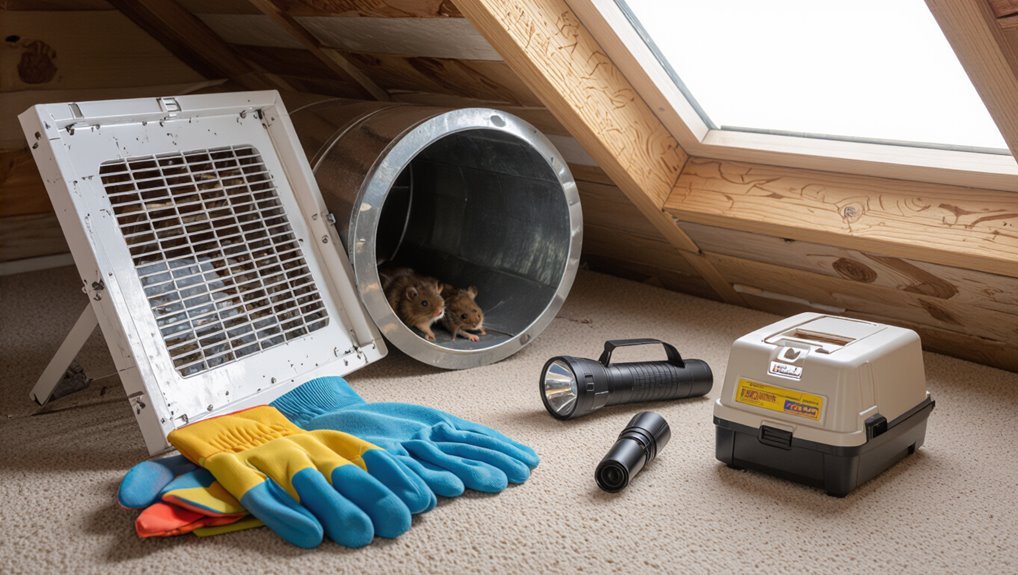
Signs of mice in ductwork—scratching noises, droppings near vents, and unusual odors—should be confirmed before any action is taken.
Immediate safety precautions include turning off the HVAC system, wearing gloves and a mask, and sealing openings to prevent further spread.
Quick removal options range from targeted trapping and one-way exclusion devices to disinfecting affected areas, with a professional called in if infestations persist, odors continue, or structural or HVAC damage is suspected.
Signs mice are in ductwork (how to confirm infestation)
How can a homeowner be sure mice are living in ductwork rather than merely passing through? Inspect for persistent droppings near vents, greasy rub marks, nesting materials, and gnawed insulation.
Listen for scratching at night and note recurring odors. Trapped airflow or unexplained allergies suggest contamination.
Combining visible signs with repeated activity helps confirm infestation and guides how to get mice out of ductwork.
Immediate safety precautions before attempting removal
Before attempting removal, the homeowner should prioritize safety by shutting off the HVAC system and cutting power to any accessible vents to prevent blowing dust and airborne particles.
They should wear PPE—gloves, NIOSH-rated mask, eye protection—and ventilate the area.
Seal off rooms to limit spread, keep pets and children away, and prepare proper waste bags for contaminated materials and droppings before any disturbance.
Fast-removal methods with step-by-step actions
Begin by isolating the affected duct runs and confirming the HVAC remains off and power to vents is cut; this establishes a controlled work area for rapid removal.
Then use gloves, flashlight, and a humane one-way exclusion tube or net to guide mice out.
Seal access after extraction and disinfect.
- Inspect and access
- Evict with one-way device
- Clean, seal, sanitize
When to call a professional pest control or HVAC technician
Call a professional when the scale, location, or risks of a duct infestation exceed DIY capabilities.
A licensed pest controller or HVAC technician should be engaged for large colonies, nesting near HVAC components, evidence of structural damage, persistent odors, or repeat infestations.
Professionals provide safe removal, duct sanitization, repair, and exclusion work, plus warranty-backed solutions and guidance to prevent recurrence, protecting health and system function.
Inspecting and Accessing Ductwork
The inspector begins by locating likely entry points and nesting areas within the duct system, noting gaps around vents, seams, and the plenum.
Essential tools and protective gear—flashlight, inspection mirror, gloves, mask, and a small camera—are prepared before entry.
Vents are carefully opened and trunk lines or the plenum accessed in a way that preserves the system and minimizes disturbance.
Locating entry points and nesting areas in ducts
Where did the mice get in and where are they nesting within the duct system must be determined before any remediation begins.
The inspector systematically traces airflow paths, checks seams, joints, register boots, and attic connections for gaps or chew marks, and listens for movement.
Nesting signs include insulation disruption, droppings, shredded paper, and concentrated odors near bends or dead-end branches.
Tools and protective gear needed for inspection
Several basic tools and specific protective gear are essential before entering or probing ductwork to inspect for mice.
The inspector should prepare to minimize contamination, injury, and damage while observing or reaching confined spaces.
- Nitrile gloves, N95 respirator, safety goggles.
- Flashlight or headlamp, inspection mirror, flexible camera.
- Screwdrivers, nut drivers, insulated pry bar.
How to safely open vents and access plenum and trunk lines
Begin by confirming power to the HVAC fan is off and that the system is tagged to prevent accidental restart; this reduces injury risk and limits airflow that can spread contaminants when vents are opened.
Wear PPE, remove vent grilles carefully, and inspect with a flashlight.
Access plenum and trunk lines via service panels or duct collars, avoid tearing insulation, document rodent entry points, and reseal after inspection.
Humane and Lethal Removal Options Compared
The section compares humane and lethal removal options for mice in ductwork, covering live-capture traps (placement, baiting, and safe handling), snap and electronic traps (best practices and common pitfalls), and rodenticide use with associated safety precautions.
It summarizes the pros and cons of each approach to help determine when nonlethal capture, instant-kill traps, or chemical control are most appropriate.
Practical considerations such as access constraints, risk to non-targets, and legal or ethical concerns are highlighted.
Live-capture traps: placement, baiting, and handling
Live-capture traps offer a controllable method for removing mice from ductwork, but effectiveness depends on strategic placement, appropriate baiting, and careful handling after capture.
Place traps near entry points, bends, and warm areas with minimal airflow. Use high-value bait like peanut butter or seed, secure traps to prevent movement, check frequently, and wear gloves when relocating captured rodents to reduce stress and disease risk.
Snap traps and electronic traps: best practices and pitfalls
Choose between snap and electronic traps based on target numbers, location, and tolerance for lethality:
Snap traps offer a low-cost, mechanical kill when set correctly, while electronic traps provide quick, single-capture euthanasia with reduced risk of misfires and nonlethal injuries.
Position traps near duct access points, bait sparingly, secure to prevent displacement, check daily, wear gloves, and dispose of carcasses promptly to limit odor and secondary attraction.
Rodenticide considerations and safety precautions
Although rodenticides can quickly reduce heavy infestations, careful evaluation of product type, placement, and non-target risk is essential before use.
Professionals recommend choosing registered formulations, following label directions, and avoiding bait inside ducts where pets, children, or wildlife could access residues.
Proper disposal, protective equipment, and notification of occupants minimize exposure.
Consider local regulations and consult pest control specialists for safe application.
Pros and cons comparison of removal methods
Weighing humane and lethal removal methods requires evaluating effectiveness, safety, cost, legal constraints, and ethical preferences; each approach offers trade-offs in speed of population reduction, risk to non-target animals and humans, and long-term prevention.
| Method | Pros | Cons |
|---|---|---|
| Live traps | Reversible, low bycatch | Labor-intensive |
| Snap traps | Fast, low cost | Ethical concerns |
| Poisons | Scalable | Secondary poisoning risk |
| Exclusion | Permanent | Requires repairs |
| Ultrasound | Non-lethal | Limited evidence |
Sealing Entry Points and Repairing Ducts
The section outlines where mice commonly gain access to homes and HVAC runs, including gaps around vents, utility penetrations, and attic or crawlspace openings.
It then summarizes effective sealing materials and techniques for closing gaps and reinforcing duct seams.
Finally, it covers how to repair torn or crushed ductwork and apply long-term exclusion measures to prevent reentry.
Common mouse entry points into homes and duct systems
Effective exclusion starts with a systematic inspection of likely access points where mice penetrate walls, foundations, attics, and duct systems.
Common entries include gaps around utility lines, uncapped vents, dryer and HVAC connections, torn duct joints, crawlspace vents, foundation cracks, soffit and roof openings, and damaged weatherstripping.
Identifying these specific vulnerabilities guides targeted repairs to prevent reentry and limit internal nesting opportunities.
Materials and methods for sealing ductwork and gaps
Begin by selecting durable, rodent-resistant materials—steel wool, copper mesh, hardware cloth (1/4–1/2 inch), sheet metal, and high-temperature metal tape—for closing openings, and combine them with sealants like silicone or urethane caulk for smaller gaps.
Exterior vents, seams, and attic penetrations require sturdy patching.
Follow by:
- Reinforce edges with sheet metal.
- Stuff gaps with copper mesh.
- Seal joints with metal tape and caulk.
How to repair damaged ductwork and prevent reentry
After reinforcing edges and sealing seams with metal tape, attention turns to repairing compromised duct sections and closing all potential mouse access points.
Technicians replace torn flexible ducts, patch holes with sheet metal and rivets, and seal joints with HVAC-grade mastic.
All exterior penetrations, vents, and wall gaps are screened or stuffed with copper mesh and closed with foam or metal to prevent reentry.
Preventing Mice From Returning to Ductwork
Effective prevention combines routine home maintenance to remove attractants, exterior yard measures to limit shelter and food, and ongoing monitoring to catch new activity early.
Regular tasks include sealing gaps, cleaning debris, trimming vegetation, and storing food and trash securely.
Audible, scent- and electronic deterrents can supplement these efforts as part of a scheduled inspection plan.
Home maintenance routines that deter rodents
Regularly scheduled home maintenance reduces the likelihood of mice returning to ductwork by eliminating access points, food sources, and inviting conditions.
Routine tasks include sealing gaps around vents and pipes, inspecting and repairing screens and weatherstripping, keeping attics and crawlspaces dry, cleaning lint and debris from ducts and filters, storing food in sealed containers, and promptly addressing leaks or clutter that create nesting opportunities.
Yard and exterior measures to reduce attraction
Several targeted outdoor steps can make a property far less appealing to mice and reduce the chance they re-enter ductwork.
Remove brush, woodpiles, and dense vegetation near foundations. Store firewood elevated and away from the house.
Seal exterior gaps, screen vents, and fit door sweeps. Manage compost and bird feed to limit food sources.
Keep grass trimmed and gutters clean.
Ongoing monitoring solutions and deterrents (audible, scent, electronic)
Maintain vigilance after sealing and yard work by installing ongoing monitoring and deterrent measures to catch reinfestation early and discourage mice from re-entering ductwork.
Place adhesive traps or motion sensors near vents, use ultrasonic or intermittent ultrasonic/pulse devices sparingly, and deploy predator-scent sachets or peppermint oil in inaccessible spaces.
Schedule periodic inspections and log activity to evaluate deterrent effectiveness and adjust tactics promptly.
Cleaning and Sanitizing After Removal
After mice are removed from ductwork, attention must turn to the hazards posed by droppings and nesting materials, which can carry pathogens and trigger allergies.
A clear, step-by-step cleanup and disinfection of ducts, vents, and accessible components helps remove contamination and reduce health risks.
The guidance should also state when HVAC filters or damaged components need replacement rather than cleaning to guarantee system safety and performance.
Hazards of rodent droppings and nesting materials
Contamination from rodent droppings and nesting materials poses significant health risks because they can harbor pathogens, allergens, and parasites that become airborne during disturbance.
Exposure may cause respiratory illness, allergic reactions, hantavirus, leptospirosis, and secondary infestations.
Surfaces, insulation, and ventilation components can retain spores and urine residues, increasing cross-contamination risk and necessitating prompt, careful assessment and containment by trained personnel.
Step-by-step cleanup and disinfection of ducts and vents
Begin by securing the work area and establishing containment to prevent dust and particulate spread into occupied spaces.
Wear PPE, remove visible droppings and nesting with dampened disposable towels, and place waste in sealed bags.
HEPA-vacuum ducts, scrub surfaces with EPA-registered disinfectant, and allow recommended dwell time.
Replace disposable cleaning materials, properly dispose of waste, and document completion.
When to replace HVAC filters and components
When should filters and other HVAC components be replaced rather than merely cleaned?
Replace disposable filters after contamination with droppings, nesting material, or strong odors.
Replace washable filters, foam pads, fan belts, and insulation if structural damage, persistent odor, or biofilm remains after cleaning.
Replace motors, control boards, or coils showing corrosion, contamination inaccessible to safe cleaning, or compromised performance to guarantee system safety and indoor air quality.
Costs, Timeframes, and What to Expect
Typical cost ranges for DIY versus professional removal are outlined to help readers weigh upfront expenses against long-term effectiveness.
Estimated timelines for removal, sealing, and cleanup are given so homeowners can plan access and minimize disruption.
Readers are prompted to address warranty, liability, and health considerations with any contractor before work begins.
Typical cost ranges for DIY vs professional removal
Costs for removing mice from ductwork vary widely depending on method and severity:
DIY efforts typically run from minimal outlay for traps and sealants to a few hundred dollars for tools and materials.
Meanwhile, professional services commonly range from several hundred to over a thousand dollars when inspection, exclusion work, sanitization, and follow-up visits are included.
DIY saves money but may miss hidden damage; professionals add guarantee and thorough remediation.
Estimated timelines for removal, sealing, and cleanup
A clear timetable helps homeowners plan responses and set realistic expectations for removing mice from ductwork.
Typical DIY removal and baiting: 1–3 days to detect activity, 1–2 weeks to reduce population.
Professional exclusion and sealing: 1–5 days for inspection and repairs.
Cleanup and sanitizing: 1–3 days depending on contamination.
Follow-up monitoring: weekly for 2–4 weeks to guarantee success.
Warranty, liability, and health considerations to discuss with professionals
When should homeowners expect clear answers about warranties, liability, and health safeguards?
Professionals should outline warranty coverage, time limits, exclusions, and proof requirements before work begins.
They must clarify liability for structural damage, contamination, and follow-up visits.
Health protocols—PPE, containment, air testing, and cleanup standards—should be documented.
Costs and dispute resolution procedures need transparent, written agreement.
Common Mistakes and How to Avoid Them
Many common mistakes can extend a ductwork infestation by leaving entry points open or ignoring nesting sites.
Safety errors—such as using toxic bait improperly or blocking vents without ventilation—can endanger occupants.
Relying on ineffective DIY tactics often wastes time; professional sealing, exclusion, and targeted trapping are safer, more reliable alternatives.
Mistakes that prolong infestations
Although seemingly minor, certain routine mistakes can extend a mouse infestation in ductwork by weeks or months. Ignoring breeding hotspots, failing to seal entry points fully, using ineffective bait placement, and neglecting regular inspections all allow populations to rebound.
Reliance on single methods, delaying professional assessment, and improper trap maintenance similarly prolong problems. Prompt, systematic correction prevents recurrence and shortens remediation time.
Safety errors that put occupants at risk
Ignoring basic safety protocols during ductwork mouse removal can expose occupants to serious health and property risks.
Failure to use respiratory protection, gloves, or containment can aerosolize droppings and urine, spreading hantavirus and other pathogens.
Electrical hazards, damaged insulation, and improper disposal increase fire, contamination, and infestation recurrence risks.
Professionals should assess hazards, seal access, and follow disposal and decontamination guidelines.
Ineffective DIY tactics and better alternatives
After addressing safety errors that increase health and property risks, attention should turn to common DIY tactics that appear convenient but often fail or make infestations worse.
Home remedies, glue traps in ducts, and indiscriminate poisons drive mice deeper, mask entry points, or create secondary poison risks.
Recommend professional exclusion, targeted baiting by licensed technicians, thorough sealing, and routine inspection as effective alternatives.
Resources and Further Help
Readers are encouraged to consult certified pest control and HVAC professionals for inspections and targeted removal.
Recommended resources include reputable trap and exclusion product brands, appropriate tools, and manufacturer websites for specifications.
Local ordinances and humane disposal or release guidance should be checked with municipal agencies or animal control.
How to find qualified pest control and HVAC professionals
Where should homeowners turn when mice are suspected in ductwork?
Homeowners should contact licensed pest control and HVAC professionals with ductwork experience.
Verify credentials, insurance, references, and reviews.
Ask about rodent exclusion, baiting protocols, ventilation cleaning, and warranties.
Request written estimates and clear timelines.
Prefer firms offering integrated plans and follow-up inspections to guarantee removal and prevention without voiding HVAC warranties.
Useful products, tools, and manufacturers to consider
Consult manufacturers and professionals for products specifically designed for rodent exclusion and HVAC-safe cleaning: durable metal vent covers, chimney caps, one-way exclusion doors, heavy-gauge steel mesh, and silicone-based sealants rated for duct materials; also consider EPA-registered rodent baits, tamper-resistant bait stations, and ultrasonic devices from reputable brands.
- Stainless steel mesh, clips, and fasteners.
- HVAC-friendly disinfectants and brushes.
- Branded exclusion doors and tamper boxes.
Local regulations and humane disposal guidance
Because local ordinances and public-health rules vary widely, homeowners should check city and county codes before removing or disposing of rodents from ductwork. Many jurisdictions regulate carcass disposal, use of pesticides, and entry into confined spaces like HVAC plenums.
Guidance recommends contacting local health departments or animal control, following humane euthanasia/disposal protocols when required, and documenting compliance to avoid fines or health risks.
Conclusion
Like a skilled locksmith sealing a vault, swift, thorough removal and diligent repairs lock mice out of ductwork for good. Combining careful inspection, humane or targeted removal, sealed entry points, and sanitation restores safety and comfort while reducing recurrence risk. Expect modest costs and routine follow-up; avoid quick fixes, gaps, or untreated nests. With persistence and the right help, homes stay rodent-free and systems run cleanly for the long term.