How to Finish a Basement Bathroom With Rough-In Plumbing: Step-By-Step Guide for DIYERS and Pros
To finish a basement bathroom with rough-in plumbing, start by assessing the existing drain, vent, and supply locations. Confirm any necessary codes and permits, and plan your layout for a full, three-quarter, or half bath. Next, install the water supply and shutoff valves, connect fixtures to the drain-waste-vent (DWV) system with the proper slope and traps, and run the venting. After testing for leaks, frame the space, insulate, and install moisture-resistant backer. Complete the electrical work with GFCI protection and ventilation, then tile and seal the surfaces. Follow this step-by-step guide for detailed instructions and tips to ensure a successful bathroom finish.
Overview: What “Rough-In Plumbing” Means for a Basement Bathroom
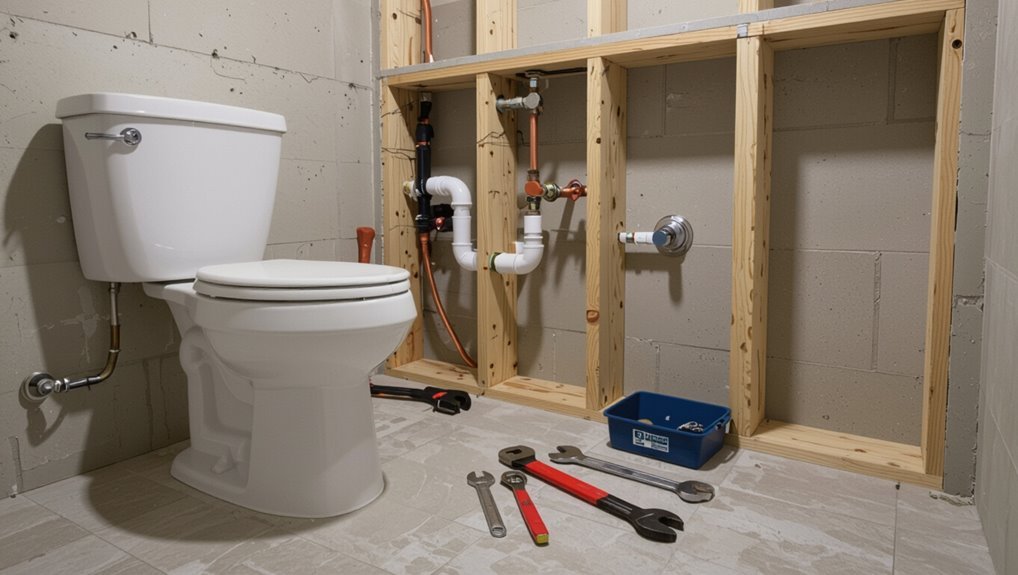
Rough-in plumbing refers to the installed drain, waste, vent and water supply lines that establish where fixtures will connect in a basement bathroom.
Typical configurations position a toilet and sink near stacked or branching soil stacks, with shower or tub drains and supply runs located according to finished layout.
A completed rough-in can be sufficient for future fixture installation, but additional plumbing work is required if fixture locations change, full water supply hookups are missing, or local code mandates added venting or trapping.
Definition and components of a rough-in (drain, vent, waste, water supply)
A basement bathroom’s rough-in refers to the essential, hidden network of pipes and connections installed before walls and finishes go up.
It includes the drain and waste lines that carry sewage away, the venting system that prevents traps from siphoning, and the cold and hot water supply lines that feed fixtures.
Understanding these components is crucial when learning how to finish a basement bathroom with rough in plumbing.
Typical rough-in configurations for toilets, sinks, and showers/tubs
With the basic components of a rough-in established, the next consideration is how those elements are arranged for each fixture: toilets, sinks, and showers/tubs each require specific pipe locations, invert elevations, and clearances that determine layout and future performance.
Toilets need a centered 3–4″ drain at standard offset; sinks use 1½–2″ traps and supply pairs; showers/tubs demand proper trap location, slope, and larger drains.
When a rough-in is sufficient vs. when further plumbing is required
When is the existing plumbing enough to finish a basement bathroom, and when must additional work be done?
A sufficient rough-in provides correctly placed waste outlets, venting, and adequate water supply lines for planned fixtures.
Additional work is required if vents are missing, drains are incorrectly located or sized, sewage ejectors are needed, or local codes demand different layouts; professional assessment is advised.
Quick Assessment: Can You Finish This Basement Bathroom Yourself?
A quick assessment weighs the homeowner’s plumbing, carpentry, and electrical skills against the tools required for framing, drywall, and fixture installation.
It also checks local permit requirements, code standards, and inspection timelines that could affect scope and cost.
Clear signs to hire a licensed plumber include complex drain reroutes, sewer connections, or any work that local code requires a permit for.
Required skills and tools for DIY finishing
Evaluating whether to DIY a basement bathroom begins with an honest inventory of practical skills and available tools.
Basic carpentry, drywalling, tiling, and familiarity with rough-in plumbing are essential. Comfort with electrical wiring basics and moisture-resistant installations helps.
Necessary tools include a drill, level, wet saw, plumbing kit, stud finder, insulation gear, and safety equipment.
Time and problem-solving aptitude complete the assessment.
Permits, codes, and inspections to check before work
Several jurisdictions require permits and inspections for finishing a basement bathroom, and validating local code obligations before work begins prevents costly rework or fines.
Verify plumbing, electrical, and ventilation requirements; confirm minimum ceiling heights, egress and moisture control rules; determine whether mechanical trades must be licensed; obtain necessary permits and scheduled inspections; keep records of approvals to guarantee final occupancy or resale compliance.
Signs you should hire a licensed plumber
One clear indicator that a licensed plumber is needed is when the project involves altering the main sewer line, rerouting soil stacks, or installing new waste branches that require tie-ins to existing plumbing.
Additional triggers include complex venting changes, gas line work, unclear code compliance, persistent drainage issues, or multi-fixture layouts.
When liability, inspections, or warranty matters arise, hire a pro.
Planning and Design Before You Start
Before beginning work, the homeowner should measure the space and confirm fixture placement with existing rough-ins to determine whether a full, three-quarter, or half bath is feasible.
They must also plan ventilation, lighting, and egress to meet code and guarantee comfort.
Finally, a realistic budget should account for materials, any subcontracted labor, permits, and a contingency for unexpected costs.
Measuring the space and confirming fixture placement with existing rough-ins
Accurate measurements and a clear understanding of existing rough-ins are essential to guarantee fixtures fit, meet code, and avoid costly relocations.
Measure floor dimensions, wall-to-center distances, and ceiling height; record drain, vent, and supply locations relative to fixed reference points.
Verify rough-in depths and slope, check clearances for doors and access panels, and document everything for permit submission and contractor reference.
Layout options: full bath vs. three-quarter vs. half-bath
With measurements and rough-in locations documented, the next decision is the bathroom layout type—full, three-quarter, or half—to match space, budget, and planned use.
A full bath includes tub, shower, toilet, sink for maximum functionality.
Three-quarter omits the tub (shower, toilet, sink) for space savings.
A half-bath provides only toilet and sink, ideal for guests or tight footprints.
Ventilation, lighting, and egress considerations
How will the space handle moisture, light, and emergency exit requirements?
Consider an exhaust fan sized to code and ducted outside, moisture-resistant finishes, and a dehumidifier if needed.
Provide layered lighting: general, task, and night fixtures with appropriate damp-rating.
Verify egress: window or door meeting local escape dimensions or alternate exit plan.
Confirm switches, fixtures, and clearances comply with code.
Budgeting: material, labor (if subcontracted), permit, and contingency costs
After confirming ventilation, lighting, and egress requirements, the planning phase must address the financial framework: materials, labor (including subcontractor rates), permit fees, and a contingency reserve.
Costs should be itemized, quotes documented, and local permit expectations verified. Contingency typically 10–20% of the project budget.
- Material estimates and supplier comparisons
- Labor/subcontractor bids and schedules
- Permit fees and contingency allocation
Materials and Tools Checklist
A concise list of required fixtures and fittings for the toilet, sink, and shower or tub sets the foundation for procurement.
Essential plumbing components—P-traps, traps, supply lines, shutoffs, and connectors—should be confirmed alongside construction and finish materials such as flooring, drywall, backer board, and trim.
With appropriate plumbing, carpentry, tile, and basic electrical tools readied for the work.
Fixtures and fittings needed for toilet, sink, and shower/tub
Completing a basement bathroom requires selecting the right fixtures and fittings for the toilet, sink, and shower/tub—items that balance function, space, and budget.
This checklist focuses on essential materials (toilet bowl and tank or compact one-piece unit, sink or vanity, shower pan or tub, valves, trim kits, drains, and waste lines) and the core tools needed for installation (adjustable wrenches, basin wrench, pipe cutter, plumber’s putty or silicone, Teflon tape, screwdrivers, level, drill with bits, and caulking gun).
Choose low-profile fixtures for limited headroom, shower enclosures that fit rough-in, durable trim finishes, and water-efficient options.
Confirm rough-in dimensions match selected items before purchase.
Plumbing materials: traps, P-traps, supply lines, shutoffs, connectors
Specify the correct plumbing materials early to guarantee reliable drainage and water supply: traps and P-traps sized to fixture drain diameters, braided or copper supply lines long enough for the run, accessible shutoff valves for each fixture, and appropriate connectors (compression, sweat, or push-fit) compatible with the pipe types in the basement.
Include proper venting, trap adapters, escutcheons, and corrosion-resistant fittings; match materials to local code.
Construction and finish materials: flooring, drywall, backer board, trim
Choose durable, moisture-resistant construction and finish materials that suit basement conditions and the designed bathroom use.
Specify cement backer board for tiled wet areas, greenboard or mold-resistant drywall where allowed, and vinyl, tile, or sealed engineered flooring rated for basements.
Use water-resistant trim and casing, corrosion-resistant fasteners, and appropriate underlayment and sealants to protect assemblies against humidity and occasional water intrusion.
Tools: plumbing, carpentry, tile, and electrical basics
With materials selected to withstand basement conditions, assemble a focused toolkit covering plumbing, carpentry, tile, and electrical work before beginning construction.
Essential tools save time and prevent mistakes. Include safety gear and suitable fasteners for moisture-prone areas.
Plan tool use by task to avoid unnecessary purchases.
- Pipe wrenches, PEX crimpers, cutter
- Circular saw, pry bar, level
- Wet saw, trowels, GFCI tester
Step-by-Step Installation Sequence
The installation sequence begins with confirming and preparing rough‑in locations to match the plan and local codes.
Next come water supply runs and shutoff valves, followed by connecting fixtures to the drain/waste/vent system in the proper order for toilet, sink, then shower while installing vents, traps, and ensuring correct slope.
Before closing walls, pressure tests and leak checks are performed to verify integrity.
Confirming and prepping the rough-in locations
Before any fixtures are set, verify that the rough-in locations for the toilet, sink, and shower/tub match the plumbing and framing plans and meet local code clearances; measure distances from fixed reference points, confirm pipe orientations and grades, and mark each location clearly so trades can work without guesswork.
Inspect subfloor and wall framing for reinforcement, clear debris, and flag any deviations requiring plan adjustment or permit notification.
Installing water supply lines and shutoff valves
After confirming rough-in locations and addressing any framing or subfloor corrections, attention shifts to laying out and installing the water supply lines and individual shutoff valves.
Measure routes, cut and deburr pipes (PEX, CPVC, or copper), secure runs with clamps, and maintain proper slope and clearance.
Install dedicated angle stops for each fixture, pressure-test the system, and correct leaks before concealing lines.
Connecting fixtures to drain/waste/vent (toilet, sink, shower) step sequence
Begin by mapping the drain/waste/vent (DWV) sequence for each fixture to guarantee proper flow, slope, and venting before any fittings are joined.
Next, rough-in and test toilet flange alignment, then attach closet flange to waste line.
Install sink tailpiece and P-trap to branch line.
Connect shower drain assembly and trap adapter.
Glue or solvent-weld joints, then pressure-test system.
Installing venting and ensuring proper slope and trap placement
Once the drain lines and fixture connections are laid out and tested, attention turns to installing venting and confirming proper slope and trap placement.
Vent stacks are routed to code-required heights and tied into branch drains.
Each run is sloped 1/4 inch per foot toward the main, traps are positioned close to fixtures, and cleanouts are installed for access and future maintenance.
Pressure testing and leak checks before wall closure
Prior to closing walls, the plumbing system is pressure tested and inspected for leaks to guarantee long-term integrity.
Certified methods—air or hydrostatic tests—are applied to drain, waste, and vent lines. Fittings, joints, and fixtures are monitored with gauges and visual checks for a specified dwell time.
Any leaks are repaired, retested, and documented before drywall or framing proceeds.
Framing walls and building the shower/tub enclosure
After confirming that all plumbing tests passed and rough-ins are accurately located, the project moves to framing the partition walls and constructing the shower or tub enclosure. This sequence establishes the room layout, supports fixtures, and provides the substrate for waterproofing and finishes.
Studs are laid out to accommodate doorways, niches, and valve access. Blocking is added for fixtures, and the shower pan or tub flange is set and secured.
Installing cement board, waterproofing membrane, and tile backer
Begin by layout and verification of framed surfaces, ensuring studs are straight, blocking is solid, and all plumbing fixtures align with rough-ins; this establishes the substrate before installing cement board, waterproofing membrane, and any additional tile backer.
Measure, cut, and fasten cement board with corrosion-resistant screws, tape joints, apply thinset, then install a continuous waterproof membrane per manufacturer instructions, flashing penetrations and connections carefully.
Flooring installation options and waterproofing around fixtures
Select a flooring system appropriate for a basement bathroom—ceramic or porcelain tile over a decoupling membrane, luxury vinyl plank with a waterproof underlayment, or a bonded waterproof membrane with tile—then follow a clear, step-by-step sequence that integrates substrate preparation, waterproofing continuity, and fixture changes.
Prepare and level the subfloor.
Install chosen membrane.
Seal seams and penetrations.
Set flooring.
Flash and seal around toilet, tub, and vanity.
Drywall, paint, and trim finishing steps
Install drywall, finish seams, and apply paint and trim in a disciplined sequence that protects finishes and maintains waterproofing continuity.
Hang moisture-resistant drywall, tape and mud joints with appropriate compounds, sand smooth, and prime. Use bathroom-grade paint and allow proper dry times.
Install caulked trim and door casings, sealing joints to prevent moisture intrusion.
Inspect for defects and touch up as needed.
Final fixture installation and sealing (toilet, sink, faucet, showerhead)
With drywall, paint, and trim completed and seams and caulking fully cured, the final fixture installation and sealing sequence can proceed in a systematic order to protect finishes and maintain watertight connections.
Install toilet first, ensuring flange height, wax seal, and secure bolts.
Mount sink and vanity, connect supply lines.
Fit faucet and showerhead, test for leaks, tighten seals, and apply exterior silicone where fixtures meet finished surfaces.
Electrical, Ventilation, and Lighting Integration
Proper integration of ventilation, lighting, and electrical systems is essential for a safe, code-compliant basement bathroom.
The discussion covers fan selection, placement, and wiring requirements alongside lighting layout, outlet placement, and GFCI protection.
It also addresses circuit loads and other safety compliance considerations.
Fan selection, placement, and wiring requirements
Although basement bathrooms present unique moisture and odor challenges, selecting and locating an exhaust fan and planning its wiring are foundational to a safe, code-compliant installation.
Choose a fan sized by cubic feet per minute (CFM) for room volume, prefer inline or ceiling models to simplify duct runs, place near shower/toilet, route ducting to exterior, install GFCI-protected circuit and a dedicated switch or timer.
Lighting layout and electrical outlet considerations in bathrooms
After locating and wiring the exhaust fan, attention turns to the lighting layout and placement of electrical outlets to guarantee functionality, safety, and code compliance.
Plan layered lighting: overhead ambient, task at vanity, and accent as needed.
Position outlets near vanity and optional mirror lighting, maintain clearance from wet zones, route circuits for switches and fixtures, and coordinate lighting placement with ventilation and fixture mounting heights.
GFCI, circuit loads, and safety compliance
Several critical electrical and ventilation safeguards must be integrated to meet code and protect users in a basement bathroom.
Ground-fault circuit interrupters are required for all receptacles and near water sources.
Circuits should be sized for lighting, fan, and dedicated loads like heaters.
Ventilation must be on a switched circuit.
Install labels, AFCIs where mandated, and obtain inspection approval.
Waterproofing and Mold Prevention Strategies
Effective basement bathroom finishes begin with robust waterproofing at wet areas and changes, using membranes and proper slope at shower pans and floor junctions.
Careful sealing of joints and utility penetrations, plus the use of moisture-resistant drywall and mold-rated materials, reduces hidden leak risks.
Continued ventilation and routine inspections complete the strategy by removing humidity and catching problems early.
Wet-area waterproofing methods for shower and floor transitions
Many basement bathrooms concentrate moisture in predictable spots—shower pans, curb junctions, and the seam where tile meets floor—and those changes demand robust waterproofing to prevent leaks and mold growth.
Effective methods include bonded waterproof membranes, liquid-applied coatings, and prefabricated pan liners.
Changeover details require sloped mortar beds, waterproofing overlaps, and proper fastening to maintain a continuous barrier without compromising tile adhesion or drain performance.
Sealing joints and penetrations around fixtures
Seal joints and penetrations around fixtures with materials and details that maintain a continuous waterproof barrier while allowing for movement and service access.
Use flexible, paintable waterproof sealants at fixture bases, backer rods for large gaps, and bonded flashing or membranes at pipe penetrations.
Guarantee tight connections to adjacent waterproofing, install removable access panels where needed, and follow manufacturer cure times for reliable, long-term protection.
Moisture-resistant drywall and mold-resistant materials
A selection of moisture-resistant drywall and mold-inhibiting materials is fundamental to preventing water damage and biological growth in a basement bathroom.
Use greenboard or cement board in wet zones, mold-resistant gypsum elsewhere, and water-resistant joint compound and tape.
Apply vapor barriers behind walls where required and choose mold-resistant paints, caulks, and trim.
Prefer materials with proven antimicrobial additives and manufacturer warranties.
Ongoing ventilation and maintenance tips to prevent mold
Maintain consistent airflow and routine checks to keep a basement bathroom dry and mold-free. Regular ventilation, quick repair of leaks, and humidity monitoring reduce mold risk.
Clean drains and seals, inspect grout, and replace damaged materials promptly. Follow a simple maintenance schedule and use dehumidifiers when needed.
- Inspect vents and fans monthly
- Monitor humidity with a hygrometer
- Address leaks within 24 hours
Troubleshooting Common Issues with Rough-In Finishes
Common rough-in problems—misaligned fittings, low supply pressure, slow drains or venting issues, and insufficient floor height for trap clearance—are addressed with specific corrective steps.
Solutions range from repositioning or using offset fittings, checking and repairing supply valves or lines, clearing vents and traps, to reworking floor substrate or using low-profile traps.
A systematic inspection and targeted fixes minimize costly rework and guarantee code-compliant performance.
Misaligned rough-ins solutions and workarounds
Encountering misaligned rough-ins during basement bathroom finishing requires swift assessment to prevent costly rework.
Measure actual offsets, record deviations, and compare to fixture requirements. Use offset flanges, extension pipes, or wall-hung carrier adjustments where code permits.
Reposition minimal framing or install boxed-in chases for cosmetic concealment. Consult plumber for complex corrections and obtain necessary permits before altering drainage or venting.
Low water pressure or supply line problems
Diagnose low water pressure and supply line problems promptly to avoid functional issues and code violations in a finished basement bathroom.
Inspect valves, manifolds, and shutoffs for partial closure or debris.
Check for undersized piping, long runs, or closed pressure-reducing valves.
Confirm supply line integrity and proper connections; repair leaks, replace corroded sections, and consult a licensed plumber for pressure testing or meter adjustments when required.
Slow drains, backups, and venting problems
Slow drains, backups, and venting problems in a basement bathroom often stem from improper rough-in slope, vent placement, or partial obstructions in the drain line.
Diagnosis involves camera inspection, water tests, and verifying fall toward the stack.
Remedies include correcting pipe pitch, clearing blockages, adding or reconfiguring vents, and ensuring cleanouts are accessible.
Verify work meets local plumbing codes before finishing.
Floor height and trap clearance challenges
When floor framing or slab height does not align with the rough-in, the toilet trap and fixture outlets can end up above or below the finished floor level, creating clearance conflicts and code violations.
Solutions include raising or lowering fixtures, installing offset flange adapters, adjusting framing or slab pours, or rerouting drain lines.
Verify trap seal depths and local code minimums before finishing to avoid rework.
Code Compliance, Inspections, and Final Sign-Off
The author outlines the typical inspection checkpoints for basement bathroom finishes, including plumbing venting, fixture clearances, ventilation, and proper egress and moisture barriers.
Readers are advised to assemble required documentation—permit paperwork, plans, product spec sheets, and contractor receipts—before scheduling inspections.
Guidance is provided on responding to failed inspections, documenting corrections, and obtaining final sign-off once all deficiencies are resolved.
Typical inspection checkpoints for basement bathroom finishes
A clear understanding of typical inspection checkpoints helps guarantee a basement bathroom finish meets code and secures final sign-off.
Inspectors focus on proper venting, correct fixture clearances, trap and cleanout access, backflow prevention, adequate slope on drain lines, vent termination, waterproofing at wet areas, GFCI/AFCI protection, vented combustion air if needed, and evidence of approved materials and workmanship before issuing approval.
Documentation to prepare for inspection and permitting
Several key documents are required to secure permits and pass inspections for a basement bathroom, including detailed plumbing and electrical plans, a site or floor plan showing fixture locations and clearances, product specifications or manufacturer cut sheets for fixtures and waterproofing materials, proof of licensed contractor or trade qualifications where applicable, and completed permit application forms with fee payment.
Additionally, include venting diagrams, GWV calculations, and inspection contact details.
Handling failed inspections and required corrections
After submitting the required plans and documentation, inspectors may identify deficiencies that must be corrected before final approval. Handling these failed inspections efficiently preserves schedule and budget.
The contractor documents violations, obtains clarification, and prioritizes corrective actions. Corrections are completed to code, photographed, and re-inspected promptly.
Maintain communication with the inspector, track costs, and retain final approval paperwork for records and resale.
Timeframe and Cost Estimates for Typical DIY Projects
A concise timeline for a DIY basement bathroom lists rough hours or days per task—framing and rough plumbing, electrical, insulation and drywall, flooring and tile, fixtures and trim—to help plan the project.
Typical material and fixture costs can range widely (basic fixtures and finishes at a few hundred dollars versus mid-range at several thousand), with a brief cost table or ranges guiding budgeting.
The guidance will also note where hiring a licensed plumber, electrician, or a tile pro often saves time, reduces risk, and can be cost-effective compared with DIY attempts.
Timeline breakdown by task for a DIYer
Map out the project into discrete tasks with realistic time and cost ranges so a DIYer can plan resources and avoid surprises.
Break work into permit/inspection, framing and insulation, rough plumbing and electrical, drywall and taping, flooring and waterproofing, fixture installation, trim/painting, and final inspection.
List hours per task, required helpers, contingency days, and estimated labor-only costs for planning.
Cost ranges for materials and common fixtures
With task timelines and labor estimates established, attention shifts to material and fixture costs that will shape the overall budget.
Basic supplies—drywall, framing, insulation, flooring—typically range $500–$2,000.
Fixtures vary: toilet $100–$400, vanity $150–$800, sink and faucet $75–$400, shower kit $300–$1,500.
Miscellaneous finishes, grout, sealant and hardware add $100–$500.
Total DIY material costs commonly $1,200–$6,000.
When subcontracting saves time or money (plumbing, electrical, tiling)
Consider hiring specialists when complexity, code compliance, or time constraints threaten the schedule or budget. Subcontracting plumbing, electrical, or tiling can prevent costly rework, speed completion, and guarantee permits pass. Balance quotes, lead times, and DIY skill. Choose pros for concealed systems, high-risk electrical, or intricate tile layouts.
| Task | Typical benefit |
|---|---|
| Plumbing | Code, leaks avoided |
| Electrical | Safety, inspections |
| Tiling | Speed, finish |
| Permits | Proper paperwork |
| Cost | Upfront vs risk |
Practical Tips, Shortcuts, and Common Mistakes to Avoid
Practical tips highlight time-saving techniques that maintain code compliance and long-term quality.
The section also flags common DIY mistakes—like improper waterproofing or venting—and offers prevention strategies.
Recommended products and materials are suggested for durability and ease of installation.
Time-saving techniques without compromising code or quality
A few targeted shortcuts can shave days off a basement bathroom project without compromising code or long-term performance.
Prefabricated assemblies, bulk ordering materials, and staging tools reduce downtime. Use adjustable jigs for repeat cuts, apply quick-setting compounds where permitted, and pre-plan inspections to avoid rework.
Confirm local code requirements before accelerating tasks and schedule trades to overlap efficiently without violating permits.
Common DIY mistakes and how to prevent them
Speeding the schedule can save days, but DIYers often trade time for avoidable errors that cost more in repairs.
Common mistakes include poor venting, level errors, and improper waterproofing; prevention requires planning, code checks, and test fittings.
- Verify vent and trap placement against code.
- Use levels and dry-fit assemblies before finalizing.
- Apply correct waterproof membranes and flashing.
Recommended products and materials for durability and ease
Choose durable, low-maintenance materials that simplify installation and reduce long-term repairs.
Recommend PVC or PEX for plumbing, moisture-resistant drywall or cement board, and vinyl plank or tile flooring with waterproof underlayment.
Use corrosion-resistant fixtures, tankless or high-efficiency water heaters, and silicone sealants.
Select prehung doors, recessed LED lighting, and easy-clean grout to save time and minimize future maintenance.
Example Project Scenarios and Solutions
The section presents specific basement bathroom scenarios and pragmatic solutions tailored to common site conditions.
It compares the steps for converting a half-rough-in to a full bath, contrasts approaches for mud slab versus framed floor rough-ins, and outlines strategies for working around features like sump pumps or egress windows.
Each example highlights key considerations, required trades, and typical costs or complications.
Converting a half-rough-in to a full bath: steps and considerations
Converting a half-rough-in to a full basement bathroom requires evaluating existing plumbing and structural constraints, planning fixture layout, and confirming local code and venting requirements.
The process includes locating or extending drain lines for a shower or tub, installing a properly trapped and vented toilet connection, ensuring adequate slope and access, upgrading supply lines, and obtaining permits.
Consider costs, waterproofing, and professional inspection.
Dealing with a mud slab vs. framed floor rough-in
After evaluating plumbing and venting for a full bath, attention turns to the foundation and floor type—specifically whether the rough-in sits on a mud slab or within a framed floor—because each dictates different installation methods, access needs, and potential costs.
Mud slabs require concrete cutting or coring for drain adjustments; framed floors allow easier pipe replacement and routing but need structural coordination, joist access, and moisture protection.
Finishing a bathroom around an existing sump pump or egress window
Several common basement layouts require planning around an existing sump pump or egress window, since each feature constrains plumbing locations, floor elevations, and access routes.
Solutions include relocating fixtures to maintain trap arm slopes, installing raised tubs or platformed toilet areas, routing waste around sump pits, and building removable access panels for pumps or egress wells.
Compliance with code and waterproofing is essential.
Final Checklist Before Use and Maintenance Plan
Before opening the basement bathroom for regular use, a concise pre-use checklist should confirm leak tests, adequate ventilation, and functioning safety features.
A routine maintenance schedule covering plumbing inspections and surface care helps prevent small issues from becoming major repairs.
Clear criteria for when to call a professional—persistent leaks, drainage problems, or significant finish damage—should be established and documented.
Pre-use checklist: leak tests, ventilation, and safety features
When all fixtures and finishes are installed, a concise pre-use checklist confirms the bathroom is watertight, ventilated, and safe:
perform pressure and fixture leak tests, inspect grout and seals, verify trap priming and drain flow, test exhaust fan airflow and timer, confirm GFCI and breaker operation, guarantee adequate lighting and slip-resistant surfaces, and place emergency shutoff access and clear ventilation paths before first use.
Routine maintenance schedule for plumbing and finishes
Establish a concise routine maintenance schedule that pairs a final pre-use checklist with recurring tasks to preserve plumbing performance and finish longevity.
Inspect fixtures monthly, run drain-cleaning and trap checks quarterly, and reseal grout or caulk annually. Maintain ventilation, test GFCI outlets, and document actions for warranty compliance.
- Monthly: leaks, ventilation, GFCI
- Quarterly: drains, traps
- Annually: grout, caulk
When to call a pro for repairs or upgrades
The maintenance schedule above outlines routine checks, but some issues and upgrades exceed typical homeowner skills and require professional attention.
Call a licensed plumber or contractor for persistent leaks, sewage backups, gas-related work, code compliance, sump pump failures, major drain clogs, electrical near water, structural modifications, or when installing new fixtures or ventilation.
Documentation, permits, and warranties are best handled by professionals.
Conclusion
Finishing a basement bathroom with rough-in plumbing transforms an empty shell into a useful space, like a seedling pushing through soil toward sunlight. With careful planning, the right materials, and adherence to code, both homeowners and pros can complete the work efficiently and affordably. Attention to sequencing, ventilation, and waterproofing prevents costly mistakes, while a final checklist and routine maintenance keep the new bathroom functional and trouble-free for years to come.