How to Descale a Tankless Water Heater Quickly and Safely (Step-by-Step Guide)
To quickly and safely descale a tankless water heater, follow these steps: First, cut off power and gas, then wear gloves and goggles. Close the isolation valves and set up a pump with hoses and a bucket. Circulate a commercial descaler or a citric-acid solution for 45–60 minutes. After descaling, flush the system and neutralize the solution before reconnecting everything. Keep an eye on the pump, temperature, and any leaks; use a brush for stubborn deposits. Finally, dispose of the neutralized solution according to local regulations. For detailed procedures and troubleshooting, continue reading.
What Descaling a Tankless Water Heater Means and Why It Matters
Limescale in tankless water heaters forms when dissolved calcium and magnesium precipitate onto heat exchangers, creating insulating deposits that restrict water flow.
Left unaddressed, these deposits reduce efficiency, shorten component life, and increase energy bills and repair costs.
Frequency of descaling depends on local water hardness and usage—typically every 6 to 12 months in hard water areas and less often with soft water or low demand.
How limescale forms in tankless systems
When hard water passes through a tankless unit, dissolved minerals—primarily calcium and magnesium—precipitate as the water is heated, forming hard, adherent deposits inside heat exchangers and flow passages.
Over time, mineral layers build where temperatures and turbulence promote crystallization.
Regular maintenance explains how to descale tankless water heater systems: circulating acidic solutions dissolves scale, restoring flow and heat transfer without invasive repairs.
Risks of neglecting descaling (efficiency loss, damage, higher bills)
Any neglected buildup inside a tankless water heater gradually undermines performance: mineral scale reduces heat-transfer efficiency, restricts flow, and forces the unit to work harder to reach set temperatures.
Consequences include reduced hot-water output, frequent cycling, accelerated component wear, shortened equipment lifespan, and higher energy consumption leading to increased utility bills and more frequent repairs or premature replacement.
How often to descale based on water hardness and usage
How often a tankless water heater should be descaled depends primarily on local water hardness and household hot-water demand.
In very hard water areas (over 10–12 gpg), descaling every 3–6 months is typical.
Moderate hardness (4–10 gpg) suggests annual or semiannual service.
Soft water or whole-house water softeners allow descaling every 18–24 months, adjusted for heavy usage.
Quick Safety Checklist Before You Begin
Before starting descaling, the technician guarantees appropriate personal protective equipment is worn and the area is ventilated.
Power and gas are shut off and isolation valves are set so the unit can be worked on safely, after confirming the heater has cooled.
A quick inventory of required tools and materials is completed to avoid interruptions.
Personal protective equipment and ventilation
Wear appropriate personal protective equipment and secure adequate ventilation when descaling a tankless water heater to protect against chemical splashes, fumes, and hot water exposure.
Use chemical-resistant gloves, splash goggles, and long sleeves; consider a face shield for added protection.
Confirm windows open, exhaust fans run, or portable ventilation is used to disperse fumes.
Keep a spill kit and first-aid supplies nearby.
Power and gas shutoff steps
Shut off all electrical and fuel sources to the tankless water heater to eliminate shock, fire, and explosion risks: switch the unit’s dedicated circuit breaker to OFF, unplug any corded connections, and close the gas supply valve by turning it perpendicular to the pipe or following the manufacturer’s valve indicator.
Confirm any secondary fuel lines and downstream breakers are secured; tag controls to prevent accidental reactivation during service.
Verifying the unit is ready for service (cool-down, isolation valves)
A cool unit and closed isolation valves are required before any service begins: allow the tankless water heater to sit until its surface and internal components reach ambient temperature.
Then confirm both the cold- and hot-side isolation valves are fully closed and locked or tagged to prevent flow.
Verify no residual water pressure by opening a nearby hot faucet briefly, then reseal before proceeding.
Tools and materials needed at a glance
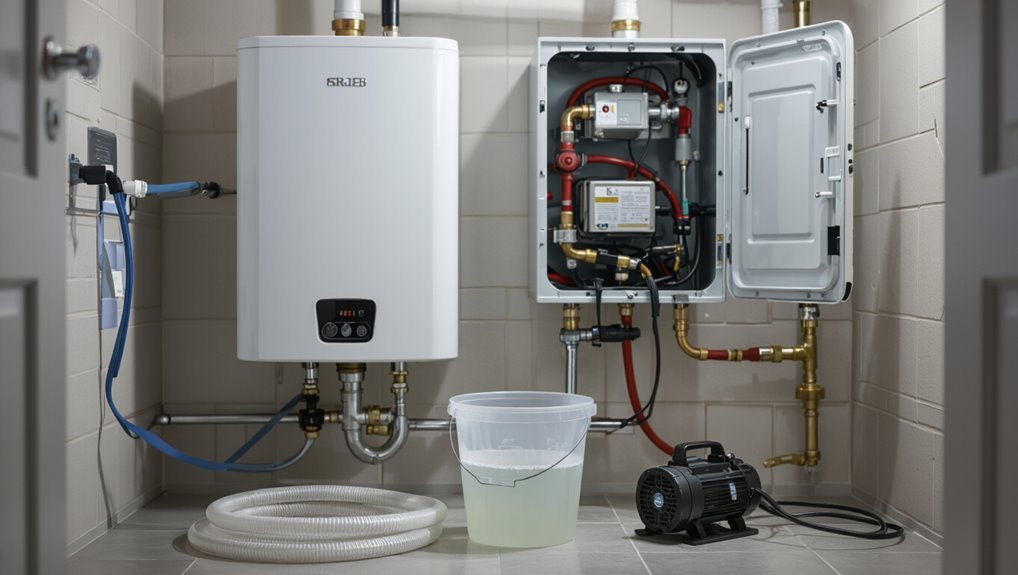
Several essential tools and materials are required before descaling begins: a pump and two hoses for circulating the descaling solution, a bucket or container sized to hold the heater’s loop volume, a compatible descaling agent (vinegar or a commercial product per manufacturer guidance), adjustable wrenches, and rubber gloves and eye protection.
- Pump and hoses
- Bucket/container
- Descaling agent
- Wrenches and PPE
Step-by-Step Fast Descale Procedure (60 to 90 Minutes)
The fast descale routine proceeds through a clear sequence of actions to prepare equipment, isolate the unit, circulate solution, monitor operation, and finish with a rinse and neutralization.
First, the technician readies the pump, hoses, bucket, and fittings, then closes valves and connects a closed-loop to the heater.
Next, the descaling solution is added, circulation is started and observed for temperature, flow, and pump performance, and finally the system is flushed with clean water and neutralized to remove residue.
Step 1 Prepare the descaling setup (pump, hoses, bucket, and connections)
One clear, organized workspace is essential before beginning the descaling process.
The technician gathers a submersible pump, chemical-resistant hoses, a 5–6 gallon bucket, and quick-connect fittings.
Inspect hoses for cracks, confirm pump flow rate matches manufacturer guidance, and place the bucket on a stable surface.
Wear gloves and eye protection.
Verify all connections are tight and that the pump power cord is positioned away from water.
Step 2 Isolate the heater and connect the circulation loop
Shut off the incoming water and power to the unit, then close the cold and hot isolation valves so the heater is completely cut off from the building plumbing.
Open purge valves to relieve pressure.
Attach pump hoses: cold-side hose from pump to cold purge, hot-side return hose from hot purge to pump inlet.
Secure fittings, place bucket beneath returns, and verify all connections are tight and leak-free.
Step 3 Add descaling solution and start circulation
Begin by preparing the descaling solution according to the manufacturer’s concentration instructions and pouring it into the pump feed reservoir; confirm the solution volume matches the heater’s recommended circulation quantity.
Attach pump hoses to the heater’s service ports, secure clamps, and prime the pump to remove air.
Start the circulation pump on low, then set to recommended flow, ensuring closed hot/cold valves direct solution through the heat exchanger.
Step 4 Monitor temperature, flow, and pump operation during circulating
Monitor temperature, flow, and pump operation continuously while the descaling solution circulates to guarantee effective scale removal and safe system performance.
Observe inlet/outlet temperatures, verify steady flow rates, and listen for unusual pump noise or vibration.
Record readings at regular intervals, adjust pump speed or flow controls if needed, and stop circulation immediately if temperatures spike, flow drops drastically, or equipment shows signs of failure.
Step 5 Flush with clean water and neutralize residual solution
After circulation is complete, flush the system with clean water to remove descaling solution and loosened mineral debris.
Run water through the pump and heater until discharged liquid runs clear.
Introduce a neutralizing rinse (baking soda solution or manufacturer-recommended neutralizer) to neutralize any acidic residue, then perform a final clear-water flush.
Verify discharge pH is near neutral before stopping.
Step 6 Reconnect supply lines, restore power/gas, and perform startup checks
Reconnect the cold and hot water lines and reopen any isolation valves that were closed for the descaling cycle, ensuring all fittings and hoses are secure and leak-free.
Restore electrical power or relight the gas pilot per manufacturer instructions.
Inspect for visible leaks, confirm drain and service ports are closed, and run initial startup sequences or diagnostics.
Record system status and any error codes for follow-up.
Step 7 Verify hot-water delivery and check for leaks
Confirm hot-water delivery by opening a nearby hot tap and allowing water to run until temperature stabilizes, observing flow rate and time-to-heat to ascertain performance matches pre-descaling norms.
Inspect all fittings, valves, and hose connections for drips or moisture. Tighten or reseat connections as needed.
Recheck for leaks under normal operating pressure, then document observations and any corrective actions taken.
Choosing the Right Descaling Method and Products
Choosing an appropriate descaling approach requires comparing commercial descalers, white vinegar, and citric acid for effectiveness and material compatibility.
Users should follow recommended concentrations and dilution guidelines to protect the heater and plumbing while ensuring adequate scale removal.
Professional-grade pumps or rental kits are advisable for heavily scaled systems or when faster, controlled circulation is needed.
Commercial descaling solutions vs. white vinegar vs. citric acid
When evaluating descaling options for a tankless water heater, three common choices—commercial descalers, white vinegar, and citric acid—differ in strength, convenience, cost, and material compatibility.
Commercial formulas act faster and target heavy scale but cost more and may need care with alloys.
White vinegar is cheap and accessible though slower.
Citric acid balances effectiveness, safety, and biodegradability for many systems.
Concentrations and dilution guidelines for safe use
Several common descaling agents require specific concentrations and dilution practices to balance effectiveness with equipment safety: manufacturers recommend 3–10% citric acid solutions, 20–50% commercial descalers per product instructions, or undiluted white vinegar for light scaling only.
Always dilute with clean water, measure accurately, avoid stronger mixes that can corrode heat exchangers, and follow contact time and rinse procedures to guarantee safe removal.
When to use a professional-grade pump or rental kit
Why opt for a professional-grade pump or rental kit? A professional pump guarantees consistent flow, faster scale removal, and safer containment of acidic solution.
Choose rental kits for heavy scaling, limited DIY tools, or warranty-sensitive units requiring documented service.
Professionals are recommended when scale is extensive, multiple units exist, or homeowners lack confidence; this minimizes risk and protects heat exchanger longevity.
Troubleshooting Common Problems During Descaling
If circulation is weak or the pump stalls during descaling, the technician checks hoses, pump connections, and flow restrictors before trying a slower flow rate or a different pump.
For heavy scale that resists the solution, the technician considers longer soak times, a stronger but compatible descaler, or gentle mechanical removal following manufacturer guidance.
Unexpected leaks or corrosion discovered during service prompt immediate shutdown, isolation of the unit, and assessment for repair or replacement to prevent further damage.
What to do if circulation is weak or pump stalls
Begin by confirming the pump is receiving power and that all isolation valves in the descaling loop are fully open; weak circulation or a stalled pump most often stems from an electrical fault, closed valves, or an obstructed flow path.
Inspect hoses for kinks, debris, or collapsed sections.
Check pump impeller rotation, reset or replace the pump if electrical tests fail, and clear any visible blockages before restarting.
Dealing with heavy scale that doesn’t dissolve
When heavy, crystalline scale resists standard descaling solutions and circulation, the technician should shift from routine flushing to targeted mechanical and chemical methods.
Use soft-bristled brushes, plastic scrapers, or flexible pick tools to dislodge deposits without damaging heat exchanger fins.
Follow with stronger, manufacturer-approved acidic descalers at controlled concentration and temperature, monitoring progress and neutralizing residues before reassembly and testing.
Handling unexpected leaks or corrosion found during service
After abrasive and chemical methods have loosened stubborn scale, inspection may reveal unexpected leaks or corrosion in the heat exchanger, fittings, or seals.
Technicians should stop the descale, isolate power and water, document damage, and assess repairability.
Small pinholes or loose fittings may be tightened or patched temporarily; significant corrosion requires component replacement or professional service to prevent failure and guarantee warranty compliance.
Maintenance Plan After Descaling
After descaling, a concise maintenance plan helps prolong performance and postpone the next service interval.
Monthly checks of inlet filters, flow rates, and error codes can signal early scale buildup, while installing a water softener or conditioner can reduce mineral load—each option’s benefits and installation considerations should be weighed.
Recommended descaling frequency should then be set according to local water hardness (e.g., soft: every 3–5 years, moderate: annually to biannually, hard: every 3–6 months).
Simple monthly checks to delay next descale
A few simple monthly checks can keep a tankless water heater operating efficiently and postpone the need for a full descale.
Inspect inlet and outlet filters for debris and rinse if needed. Check visible piping and connections for leaks or corrosion.
Monitor error codes and unusual noises. Record water temperature and flow irregularities.
Promptly address minor issues before buildup accelerates.
Installing water softeners or conditioning devices (benefits and considerations)
Many households find that installing a water softener or conditioning device substantially reduces scale buildup in tankless water heaters, extending time between descaling and improving heat-exchanger efficiency. Devices vary by method, cost, maintenance and space; selection depends on water chemistry and household needs.
| Benefit | Consideration |
|---|---|
| Less scale | Upfront cost |
| Improved efficiency | Regular upkeep |
| Longer component life | Space requirements |
| Lower energy use | Water use changes |
Recommended descaling frequency by hardness level
Regularly scheduled descaling intervals should align with local water hardness to keep a tankless water heater operating efficiently and prevent premature wear.
For soft water (0–3 gpg), descale every 18–24 months.
For moderately hard (4–7 gpg), follow 12-month intervals.
For hard water (8–12 gpg), descale every 6–9 months.
For very hard (>12 gpg), schedule descaling quarterly and consider treatment options.
Signs You Should Call a Professional Immediately
If any gas-related smells, pilot light problems, or abnormal burner behavior appear, a qualified technician should be contacted immediately.
Persistent water leaks, visible corrosion, or repeated performance failures also warrant professional inspection.
Additionally, electrical faults or situations covered by warranty or manufacturer instructions that require certified service must not be ignored.
Gas-related issues, persistent leaks, electrical faults
Recognize that certain problems around a tankless water heater—unusual gas odors, persistent water leaks, or electrical faults—require immediate professional intervention.
Gas smell or hissing suggests a leak and fire risk; continuous dripping or pooling indicates failed seals or corrosion; sparking, tripped breakers, or burning smells indicate electrical danger.
Stop using the unit, ventilate space, evacuate if necessary, and contact qualified service immediately.
When warranty or manufacturer instructions require pro service
When warranty terms specify manufacturer-only service or the owner’s manual lists conditions that void coverage if not followed, the homeowner should stop DIY attempts and arrange qualified professional service immediately.
Signs requiring this include explicit manufacturer directives, complex internal component replacement, sealed units, or failure after attempted maintenance.
Certified technicians protect warranty, guarantee correct diagnostics, and prevent further damage or safety hazards.
Cost and Time Estimates
Typical DIY descaling usually involves buying cleaning solution, hoses, and possibly renting a pump, with parts and rental typically totaling $20–$100.
Professional flushing services commonly cost between $150 and $400 and are often completed in 1–2 hours.
Readers should weigh equipment costs and time against hiring a pro for faster, guaranteed results.
Typical DIY cost breakdown (materials, rental pump)
A basic DIY descaling project for a tankless water heater generally requires a few inexpensive consumables and, optionally, a pump rental—most homeowners can expect to spend between $30 and $120 depending on choices.
Typical costs:
1–2 gallons of descaling solution ($10–$30),
hose/adapter kit ($5–$20),
basic tools already owned, and
pump rental ($25–$70 daily).
Total varies by solution strength and rental duration.
Typical professional service cost and time range
Professional descaling services for tankless water heaters generally range from about $100 to $300, with most jobs completed within 1 to 3 hours.
Factors affecting price include unit accessibility, severity of scale, required replacement parts, and local labor rates.
Technicians may charge a trip fee or minimum. Emergency or same-day appointments and warranty inspections can increase costs and extend service time slightly.
Environmentally Responsible Disposal and Safety Notes
When descaling is complete, the used acidic solution should be neutralized according to the product instructions and collected for proper disposal rather than poured down drains.
Readers are advised to check local hazardous-waste regulations and recycling programs for guidance on disposing chemicals and contaminated rinse water.
Following municipal rules and using designated disposal or recycling services minimizes environmental harm and legal risk.
Neutralizing and disposing used descaling solution safely
Because used descaling solution contains concentrated acids and dissolved minerals that can harm plumbing, soil, and aquatic life, it must be neutralized and disposed of with care.
Wear gloves and eye protection; slowly add baking soda or lime to neutralize until pH is near 7, testing with strips.
Collect neutralized liquid in a sealed container and follow local guidance for hazardous-liquid disposal; never pour untreated solution down storm drains.
Local regulations and recycling options for chemicals and rinse water
After neutralization and containment, attention should turn to applicable local regulations and available recycling or take-back programs for chemicals and rinse water.
Municipal wastewater rules, hazardous waste ordinances, and product stewardship programs dictate handling. Contractors should document disposal and use certified transporters when required.
- Check municipal sewer and hazardous-waste rules.
- Use manufacturer take-back programs.
- Employ licensed waste haulers.
- Keep disposal records.
Conclusion
Regular descaling preserves efficiency and lifespan, with tankless units losing up to 20% efficiency from mineral buildup if neglected. Following a quick, safe 60–90 minute descale avoids costly repairs and keeps performance ideal. Homeowners who follow manufacturer guidance, use appropriate cleaners, and inspect filters can prevent recurrence and extend warranty compliance. When scaling is severe or leaks appear, contacting a professional guarantees safety and protects the appliance investment.