How to Insulate Outside Pipes From Freezing: Easy DIY Methods to Protect Your Home
To effectively insulate outside pipes from freezing, homeowners can use several straightforward methods. Foam pipe sleeves, insulated faucet covers, and wrapping pipes with towels and waterproof tape offer quick protection. For problem areas, self-regulating heat tape is effective when used according to the manufacturer’s instructions and combined with insulation. Additionally, ensure that buried pipes are situated below the frost line and use foam board for bedding. Regularly inspect joints and covers to maintain protection. For detailed step-by-step guidance on materials and safety precautions, further assistance is available.
Why Insulating Outside Pipes Matters for Your Home
Frozen exterior pipes can crack and burst, causing water damage and loss of heating that can be costly to repair.
Pipes are most vulnerable during prolonged subfreezing temperatures, when exposed to wind chill or when insulation is missing or damaged.
Visible frost, recurring slow drains, or cold spots on outdoor plumbing are clear signs that insulation is needed now.
Risks of frozen exterior pipes (bursting, water damage, heating loss)
When exterior pipes freeze, the expanding ice can rupture metal or plastic lines, creating costly bursts that may go unnoticed until thawing causes sudden flooding.
Beyond immediate water damage, compromised pipes can interrupt heating systems, reduce water pressure, and allow mold growth in concealed spaces.
Homeowners researching how to insulate outside pipes from freezing should prioritize insulation to prevent loss, repair bills, and secondary damage.
When outdoor pipes are most vulnerable (temperatures, exposure, wind chill)
Vulnerability peaks as outdoor temperatures dip below about 20°F (-6°C).
However, even milder conditions become risky when pipes are exposed to wind, shade, or sudden cold snaps.
Uninsulated piping on exterior walls, in crawlspaces, or along fences cools faster; wind chill and overnight radiational losses accelerate freezing.
Pipes fed from poorly heated areas or with intermittent flow face heightened freeze probability.
Signs you need to insulate outdoor plumbing now
Why wait until a burst to act? Visible frost on exposed pipes, frequent outdoor leaks, or unexplained pressure drops signal vulnerability.
Pipes in unheated garages, along exterior walls, or within crawlspaces show higher risk. Chilly drafts, past freezing incidents, or mounted irrigation components demand insulation.
Addressing these signs promptly prevents costly repairs, water damage, and service interruptions.
Quick Recommended Action Fast Methods to Prevent Freezing
Immediate, short-term measures can reduce the risk of outside pipes freezing, such as fitting hose bib covers, wrapping exposed sections with towels or foam, and applying approved heat tape.
These quick fixes take minutes and can buy time during sudden temperature drops.
If pipes show signs of freezing, bulging, visible ice, or if a freeze persists despite temporary measures, a professional plumber should be contacted without delay.
Temporary fixes you can do in minutes (hose bib covers, towels, heat tape)
Act quickly to protect exposed outdoor faucets and short pipe runs with simple, temporary measures that can be applied in minutes.
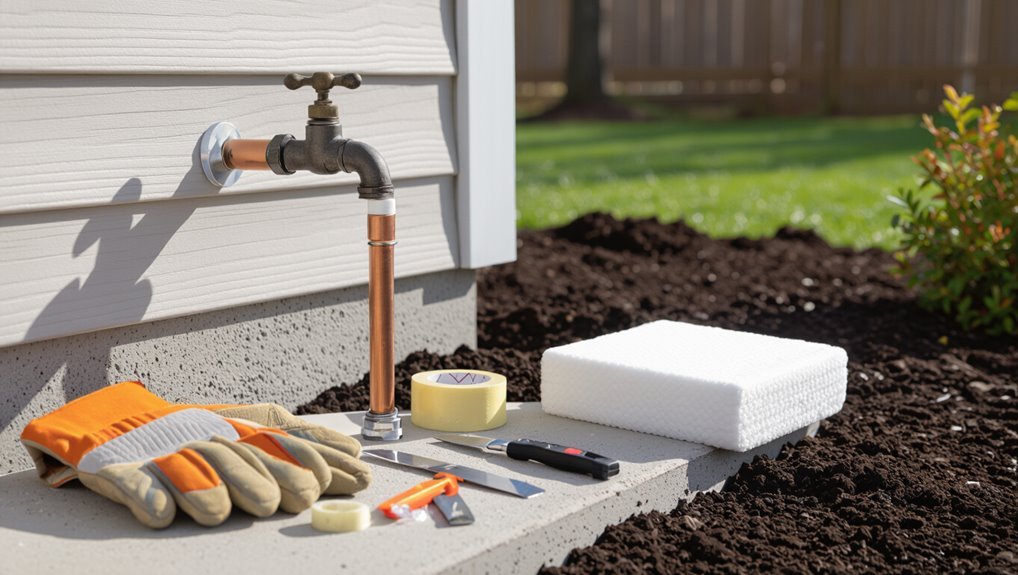
Slip foam hose bib covers over spigots, wrap pipes with towels or old blankets secured with tape or zip ties, and apply self-regulating heat tape to vulnerable sections.
Monitor connections and power sources; these are stopgap solutions until permanent insulation is installed.
When to call a professional immediately
When should a professional be contacted without delay?
A licensed plumber or emergency service is required if pipes are already frozen and leaking, a major burst occurs, water cannot be shut off, gas appliances are affected, or electrical heating systems pose hazards.
Immediate help is also warranted when residents lack safe access, structural damage is present, or DIY measures fail to stop worsening conditions.
Materials and Tools Needed for Insulating Outside Pipes
Common insulation choices include foam pipe sleeves, fiberglass, heat tape, and insulation wrap, each suited to different exposure levels.
Essential tools and accessories such as zip ties, duct tape, insulation cement, and weatherproof boxes make installation secure and durable.
Material selection should be based on pipe type and diameter, matching thickness and flexibility to the application.
Common insulation materials (foam pipe sleeves, fiberglass, heat tape, insulation wrap)
A handful of reliable materials covers most outdoor pipe-insulation needs: closed-cell foam pipe sleeves for quick, weather-resistant coverage; fiberglass with vapor barrier for older or irregular pipes; electrical heat tape for active freeze protection on vulnerable runs; and flexible insulation wrap for tight spots and fittings.
Each offers different R-value, moisture resistance, and ease of installation, so selection depends on pipe condition, exposure, and required maintenance.
Tools and accessories (zip ties, duct tape, insulation cement, weatherproof boxes)
After selecting the appropriate insulation type, attention turns to the small but important tools and accessories that make installation durable and weatherproof.
Zip ties secure sleeves; duct tape seals seams temporarily; insulation cement bonds joints and fills gaps for a long-lasting seal.
Weatherproof boxes protect exposed valves and meters from wind and moisture.
Basic hand tools—knife, scissors, caulk gun—complete the kit.
How to choose materials by pipe type and diameter
Pipe material and diameter determine the insulation type and thickness needed to prevent freezing and condensation.
Metal pipes require closed-cell foam or rubber with higher R-value; PVC can use standard foam sleeves.
For diameters under 1 inch, use pre-slit foam; 1–2 inches need thicker sleeves or tape-on insulation; larger pipes require custom wrap or multiple layers.
Match material to exposure and local freeze risk.
Step-by-Step: How to Insulate Exposed Metal Pipes Outside
The following steps outline practical actions for insulating exposed metal pipes outdoors to prevent freezing.
- Prepare pipes: drain, clean, and shut off water.
- Fit foam sleeves for straight sections; wrap irregular shapes and valves with insulation wrap or fiberglass.
- Secure seams, seal joints, and protect faucets and hose bibs against moisture.
These actions, when performed in order, create a continuous thermal barrier and reduce risk of burst pipes.
Preparing the pipes (draining, cleaning, shutting off water)
Begin by turning off and isolating the outdoor water supply, then drain and clean the exposed metal runs to guarantee insulation fits snugly and adheres properly.
Open faucets and bleed lines until water stops, then dry surfaces with a cloth or compressed air.
Remove rust, loose paint, and debris with a wire brush.
Close shutoffs and tag valves before proceeding to insulation.
Installing foam pipe sleeves for straight runs
Slide pre-cut foam sleeves gently over straight metal runs, aligning seams and ensuring each length fits snugly without gaps.
Cut sleeves to accommodate valves and joints, then secure seams with weatherproof tape or supplied adhesive.
Stagger joints to avoid continuous weak points. Trim excess, check for firm contact along the pipe, and label sections for future inspection or maintenance.
Wrapping irregular shapes with insulation wrap or fiberglass
When pipes bend, join, or run through tight spaces, insulation wrap or fiberglass offers the flexibility foam sleeves cannot. It conforms to valves, irregular fittings, and varying diameters while still providing effective thermal protection.
Cut wrap to length, overlap by half, and spiral around components. Compress fiberglass gently to avoid gaps. Secure temporarily with twine or tape and maintain continuous coverage over contours.
Securing insulation and sealing joints to keep out moisture
Secure the insulation with weatherproof fasteners and seal every seam to prevent moisture entry that leads to corrosion and heat loss.
Use stainless steel or UV-resistant zip ties and adhesive-backed tape designed for outdoor insulation.
Apply foam sealant at joints and around service penetrations.
Inspect connections after storms and replace damaged seals.
Properly secured, insulation maintains effectiveness and prolongs pipe lifespan.
Insulating valves, faucets, and hose bibs
After fastening and sealing pipe insulation, attention should turn to exposed fittings—valves, faucets, and hose bibs—which are common weak points for freezing and heat loss.
Remove hoses, drain spouts, then fit foam faucet covers or wrap fittings with foam tape and waterproof tape.
For valves, use insulated covers or custom-cut foam with zip ties.
Check seals seasonally and replace damaged covers promptly.
Using Electrical Heat Solutions Safely
The section examines safe use of self-regulating heat tape and cable for exterior pipes, explaining how the technology adjusts heat output to prevent overheating.
It outlines installation best practices and key electrical-safety checks, including proper grounding, weatherproof connections, and following manufacturer instructions.
It also describes how to pair heat tape with appropriate insulation to guarantee efficient, continuous protection against freezing.
How to use self-regulating heat tape and cable
Install self-regulating heat tape and cable along exposed piping to maintain temperatures above freezing by automatically adjusting heat output to pipe temperature.
Apply tape in contact with pipe, following manufacturer spacing and overlap recommendations. Secure with compatible fasteners and weatherproof connections.
Wrap with foam insulation or protective covering to improve efficiency.
Test operation before cold weather and monitor periodically for wear or damage.
Installation best practices and electrical safety
Having secured and tested self-regulating heat tape, attention should turn to installation best practices and electrical safety to guarantee reliable, code-compliant operation.
Use manufacturer-approved tape, maintain specified spacing, avoid overlapping, and fasten with non-constricting clips.
Route cables away from sharp edges, grounding per local code, install a GFCI-protected circuit, and inspect connections periodically for wear, moisture intrusion, or overheating.
Combining heat tape with insulation for maximum protection
Combine self-regulating heat tape with appropriate pipe insulation to create a complementary system that keeps water moving and minimizes heat loss without risking overheating.
The installer should secure heat tape per manufacturer instructions, test operation, then wrap with foam or fiberglass insulation and weatherproof jacketing.
Use GFCI protection, avoid overlapping tape, and inspect periodically for wear, damage, or moisture intrusion to guarantee safe, reliable performance.
Protecting Buried and Underground Pipes
For buried and underground pipes in unheated areas, guidance on proper burial depth and suitable insulation is essential to prevent freezing.
Practical methods include installing rigid foam board in the trench and applying continuous trench insulation to limit cold transfer.
Additional recommendations cover insulating runs in crawlspaces and basements with foam sleeves, pipe wrap, and sealing air leaks.
Recommended burial depth and insulation for unheated areas
Several factors determine how deep to bury pipes in unheated areas, but the primary goal is to place them below the local frost line and add insulating layers where needed.
Burial depth varies by climate; consult local codes for frost-line measurements.
Use continuous pipe bedding, avoid air gaps, and add thermally reflective or moisture-resistant insulation over the pipe run.
Guarantee proper drainage and access points for maintenance.
Using foam board and trench insulation methods
Install foam board and trench insulation to create a continuous thermal barrier around buried pipes, reducing heat loss and preventing frost penetration into the surrounding soil.
Cut rigid foam to fit pipe trenches, overlap seams, and seal edges with waterproof tape.
Backfill with insulating soil or sand above boards.
For deeper frost lines, add extra foam layers or insulated sleeves to maintain warmth and prevent freezing.
Tips for insulating pipes in crawlspaces and basements
When pipes run through crawlspaces or basements they are vulnerable to cold air, drafts, and conductive heat loss from nearby concrete.
So insulating them requires a combination of air sealing, thermal wrap, and thoughtful routing.
Use closed‑cell foam sleeves, wrap irregular fittings with fiberglass or self‑adhesive tape, seal gaps with caulk or spray foam, raise lines off cold surfaces, and consider heated tape where necessary.
Weatherproofing Fixtures and Outdoor Spigots
Attention to fixtures and spigots can prevent many freeze-related failures by addressing exposed connection points.
Recommendations include installing frost-free spigots and interior shutoff valves, fitting insulated faucet covers properly, and winterizing irrigation and sprinkler systems to remove standing water.
The following section outlines installation steps, proper use of covers, and seasonal shutdown procedures.
Installing frost-free spigots and shutoff valves
Replacing a standard outdoor faucet with a frost‑free spigot and adding an interior shutoff valve prevents standing water in the exposed section of pipe, reducing burst risk during freezes.
These valves allow winter shutoff and draining from inside the building, isolating exterior fixtures.
Properly pitched and sealed connections prevent leaks; periodic checks guarantee operability.
Installation may require basic plumbing tools and local code compliance.
How to install and use insulated faucet covers
Install an insulated faucet cover over the exterior spigot to reduce heat loss and protect against freezing; these covers are simple, inexpensive, and effective for short periods of cold weather.
Select a foam or hard-shell model sized to fit, secure it with built-in straps or tape, and remove only when temperatures rise.
Inspect annually for damage and replace worn insulation promptly.
Winterizing outdoor irrigation and sprinkler systems
After protecting individual spigots with insulated covers, attention shifts to the broader outdoor irrigation system, where trapped water in valves, pipes, and sprinkler heads can freeze and cause costly damage.
Winterizing requires shutting off the supply, draining lines, and blowing out remaining water with compressed air or using automatic drain valves.
Store aboveground components and insulate exposed backflow preventers.
Regular checks prevent burst pipes.
Cost, Lifespan, and Maintenance of Insulation Methods
A brief comparison of costs, expected lifespans, and simple maintenance routines helps homeowners choose the most practical insulation for outdoor pipes. Below is a compact visual to suggest relative cost, durability, and seasonal tasks. A concise checklist of inspections and repairs concludes the discussion.
| Material/Action | Typical Note |
|---|---|
| Foam tubing vs. fiberglass | Foam: low cost, moderate life; fiberglass: higher cost, longer life |
| Seasonal checklist | Inspect for cracks, moisture, and UV damage; replace or reseal as needed |
Cost comparison of common materials and installations
Cost and durability vary widely among insulation options, so homeowners should weigh upfront material and labor expenses against expected lifespan and routine maintenance needs.
Foam pipe sleeves are low-cost and DIY-friendly; heated tape is moderate-priced with electrical use; fiberglass wrap is inexpensive but needs protective cladding; professional buried-pipe insulation or rerouting carries higher installation costs.
Evaluate replacement frequency and inspection time when choosing.
Expected lifespan and durability in outdoor conditions
Material and installation choices directly influence how long outdoor pipe insulation will perform under weather exposure and mechanical stress.
High-density closed-cell foam and rubber typically last 5–15 years outdoors with UV-resistant jackets; polyethylene wraps and fiberglass can degrade faster, often 3–8 years.
Proper seals and protective cladding extend life.
Expect shorter lifespans in extreme sun, temperature swings, or where physical abrasion occurs.
Seasonal inspection and maintenance checklist
Seasonal inspections guarantee outdoor pipe insulation continues to protect against freezing while revealing wear that affects cost and lifespan.
Inspect insulation for cracks, compression, mold, and UV damage; check seals, tape, and fasteners; test exposed valves and drains for leaks; replace degraded sections; reapply waterproofing or UV tape as needed.
Record dates, materials, and replacement costs for budgeting and lifespan tracking.
Common Mistakes and How to Avoid Them
Common failures often occur at joints, fittings, and support points where gaps allow heat loss and moisture entry.
Selecting insulation unsuited for wet conditions or UV exposure accelerates degradation and reduces protection.
Incorrectly applied electrical heat tape—misrated, overlapped, or left unprotected—creates fire hazards and unreliable freeze protection.
Overlooking joints, fittings, and supports
Many homeowners focus on straight runs of pipe and neglect the vulnerable spots where they connect; joints, fittings, and support brackets are frequent pathways for heat loss and freezing.
Insulation must be cut and fitted around elbows and unions, sealed with tape or appropriate sealant, and padded at bracket contact points.
Regular inspection prevents gaps and guarantees consistent thermal protection.
Using the wrong insulation for wet or UV-exposed locations
Choose insulation rated for the environment rather than relying on a one-size-fits-all product.
Materials not rated for wet conditions will absorb water, lose R-value, and promote corrosion. UV-sensitive foam degrades, cracking seams and exposing pipe.
Select closed-cell, waterproof, and UV-stabilized insulation or use protective jacketing.
Inspect periodically and replace compromised sections to maintain thermal protection and prevent freeze damage.
Improper electrical heat tape installation pitfalls
When electrical heat tape is installed incorrectly, it can fail to prevent freezing or create serious safety hazards; improper routing, overlapping, or using the wrong type for a specific application are frequent causes.
Common mistakes include wrapping tape over itself, omitting thermostat-compatible models, and ignoring manufacturer spacing.
To avoid risks, follow instructions, secure tape without crushing, use GFCI protection, and verify outdoor or wet-location ratings.
Energy and Water-Saving Benefits Beyond Freeze Protection
Insulating outdoor pipes reduces heat loss from heated lines, lowering energy use and ongoing heating costs.
It also decreases the risk of pipe bursts and leaks that can lead to costly water damage.
These savings on utility bills and emergency repairs make insulation a practical investment beyond freeze protection.
Reduced heat loss for heated outdoor lines
Reducing heat loss on heated outdoor lines preserves the energy input that maintains water above freezing, lowering fuel or electricity consumption and cutting utility costs.
Proper insulation and sealing minimize conductive and convective losses along exposed runs. This improves heat-tracer efficiency, shortens warm-up times, and reduces thermostat cycling.
Over time, cumulative savings justify initial insulation costs while supporting more consistent system performance.
Preventing costly water damage and emergency repairs
Preventing frozen pipes from bursting not only avoids the immediate expense of emergency repairs but also reduces prolonged water damage to structures, landscaping, and personal property.
Insulating and sealing outdoor lines minimizes leaks, mold growth, and structural deterioration. This proactive approach lowers insurance claims, repair labor and material costs, and water waste, preserving home value and reducing long-term maintenance and emergency response expenses.
Practical Winter Prep Schedule and Checklist
A clear seasonal checklist helps guarantee outside pipes remain protected before, during, and after cold weather.
Suggested action items include quick inspections, materials to install, monitoring steps, and post-thaw repairs:
- Inspect insulation, fittings, and exposed valves before the first freeze
- Install or upgrade pipe wrap, heat tape, and weatherproof covers
- Monitor temperatures and apply quick fixes (seal drafts, add temporary heat) during cold snaps
- Evaluate damage and replace failed insulation or components after thaw
Pre-winter tasks (what to inspect and install)
Before the first freeze, homeowners should perform a focused inspection and install targeted safeguards on exterior plumbing to minimize freeze risk and simplify winter maintenance.
Check exposed pipes, hose bibs, and joints for cracks, corrosion, or inadequate insulation.
Install foam pipe sleeves, insulated faucet covers, and heat tape where permitted.
Secure loose pipes, seal gaps where cold air enters, and drain outdoor hoses.
In-season monitoring and quick fixes
Begin weekly checks once temperatures dip below freezing.
Inspect exposed lines, joints, and valve covers for frost, cracks, or loose insulation.
Run water briefly to confirm flow and detect slow freezes.
Apply temporary heat tape or wrap towels and secure with waterproof tape for emergencies.
Note problem locations, increase monitoring after storms, and contact a professional if freezing recurs or insulation fails.
Post-winter evaluation and repairs
Conduct a systematic post-winter evaluation to identify damage, assess insulation performance, and prioritize repairs based on risk and cost.
Inspect exposed pipes, joints, and supports for corrosion, cracks, or shifting. Check insulation integrity and moisture intrusion.
Record findings, photograph issues, and note materials needed.
Schedule urgent repairs for leaks and compromised sections; plan budgeted upgrades like thicker insulation or heat tape where warranted.
When Professional Help Is Recommended
If pipes show recurring freezing, visible damage, or complex routing that resists basic insulation, a DIY approach may be insufficient.
A professional insulation or plumbing service can assess risk, recommend materials or heat tracing, and perform repairs or installations to code.
Before hiring, homeowners should request written estimates, verify licenses and insurance, and ask about warranties and expected timelines.
Signs a DIY approach is insufficient
When should a homeowner call a professional rather than rely on DIY fixes? Signs include recurring freezes despite insulation, visible pipe damage or leaks, complex or inaccessible pipe runs, inadequate heating or electrical issues affecting heat tape, and uncertainty about local codes.
If attempts fail or risks of burst pipes and water damage increase, a licensed plumber or insulation specialist should be contacted promptly.
What to expect from a professional insulation or plumbing service
After deciding professional help is warranted, homeowners can expect an initial assessment that identifies vulnerable pipe runs, insulation needs, and any underlying plumbing issues contributing to freeze risk.
The service will propose targeted solutions—pipe insulation, heat tape installation, rerouting, or enclosure—and provide a timeline, safety precautions, and warranty details.
Work is performed to code, with post-installation checks and documentation.
Questions to ask and estimates to get before hiring
Where should homeowners focus their questions and what estimates should they request before hiring a professional to insulate exterior pipes?
They should ask about licensing, insurance, experience with outdoor pipe insulation, materials recommended, project timeline, and warranty.
Request detailed written estimates breaking down labor, materials, permits, and disposal.
Ask for references and confirm emergency response and post-installation inspection policies.
Helpful Product and Material Comparison for Common Scenarios
A concise comparison of common insulation products helps homeowners choose the right solution for exposed metal, PVC, or long runs. The table below highlights top choices, pros, and typical uses to guide quick decisions. Further notes explain when trade-offs or combined approaches are appropriate.
| Scenario | Recommended Product | Typical Advantage |
|---|---|---|
| Exposed copper/metal pipes | Closed-cell foam sleeves or pipe wrap | High thermal resistance, resists moisture |
| PVC and plastic pipes | Foam insulation with adhesive seam or heat-shrink sleeves | Flexible, snug fit without damaging plastic |
| Long runs | Tubular foam with taped seams or continuous heat-trace with insulation | Cost-effective for length, consistent protection |
| Isolated fixtures | Self-sealing foam sleeves or removable insulation jackets | Easy access for repairs and winter removal |
Best option for exposed copper or metal pipes
Evaluate the best insulation for exposed copper or metal pipes by comparing heat retention, ease of installation, durability, and protection against condensation.
Closed-cell foam sleeves offer excellent R-value, water resistance, and simple slip-on fit.
Rubber foam provides superior flexibility and condensation control for irregular runs.
For long-term exposed runs, consider insulated metal jacketing over foam for UV and mechanical protection, secured with stainless clamps.
Best option for PVC and plastic pipes
While closed-cell and rubber foams work well on metal lines, PVC and other plastic pipes have different thermal and expansion characteristics that change insulation needs.
For PVC, use flexible polyethylene foam sleeves sized to avoid compressive stress and allow slight movement.
Add heat tape rated for plastic when temperatures drop severely. Seal joints with waterproof tape and protect with UV-resistant outer wrap to prevent cracking.
Best option for long runs vs. isolated fixtures
Consideration of run length and fixture isolation determines insulation strategy: continuous long runs favor tubular foam or closed-cell continuous wrap paired with intermittent heat tape, while isolated fixtures are best served by short pre-formed sleeves, localized heat trace, or insulated valve covers.
Long runs benefit from uniform R-value, fewer seams, and ease of installation; isolated points demand targeted protection and easy access for maintenance.
Conclusion
Protecting outside pipes matters: nearly 250,000 burst-pipe insurance claims occur annually in the U.S., often from winter freezes. Simple DIY insulation, foam sleeves, heat tape, and smart winter prep drastically reduce that risk, save energy and water, and prevent costly repairs. For most homeowners, these straightforward steps are attainable; however, persistent freezing, complex systems, or past damage warrant professional assessment to guarantee reliable, long-term protection and peace of mind.