How to Daisy Chain Rain Barrels: Step-by-Step Guide to Increase Water Storage and Prevent Overflow
To effectively daisy chain rain barrels and maximize your water storage while preventing overflow, follow these steps:
- Connect Barrels: Link multiple barrels in series using overflow fittings or hoses positioned at staggered heights, allowing runoff to flow smoothly from one barrel to the next.
- Install Downspout Diverter: Begin with a downspout diverter connected to the first barrel to capture rainwater efficiently.
- Add Bulkhead Fittings: Install bulkhead fittings or spigots near the bottom of each barrel for easy water access.
- Ensure Proper Slope: Position connections with a slight downhill slope to facilitate gravity flow between barrels.
- Incorporate Overflow Lines: Include overflow lines to manage excess water and prevent flooding.
- Prevent Backflow: Use backflow prevention devices to avoid contamination of the water supply.
- Include Shutoff Valves: Add shutoff valves for easier maintenance and control over water flow.
- Test for Leaks: After setup, check all connections for leaks and ensure everything is functioning correctly.
- Winterize if Necessary: Prepare your system for winter to avoid damage from freezing temperatures.
For detailed diagrams and troubleshooting tips, continue reading.
How Daisy Chaining Rain Barrels Works and Why It Helps
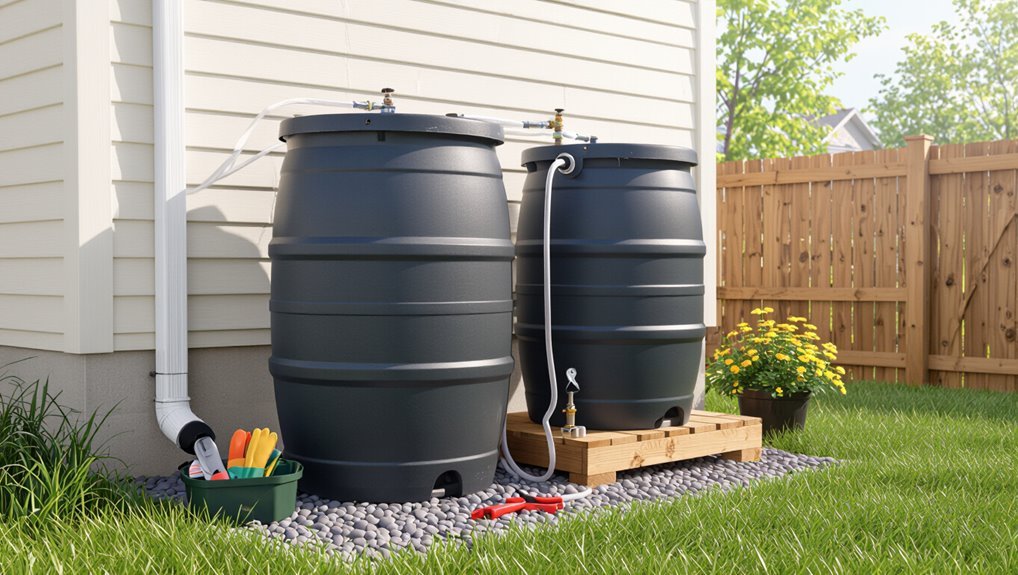
Daisy chaining rain barrels links multiple containers so water flows from one barrel to the next, effectively creating a single larger storage system.
This arrangement increases total capacity, helps manage overflow by distributing excess between barrels, and can affect available water pressure for outlets or gravity-fed irrigation.
Home gardeners and those preparing for drought or emergencies commonly use chained barrels for garden watering, landscape irrigation, and supplemental emergency storage.
Basic concept of daisy chaining rain barrels
Several barrels linked in series capture and store runoff from a single downspout, allowing water to move from one container to the next as each fills.
The basic concept of how to daisy chain rain barrels uses overflow fittings or interconnecting hoses at staggered heights so excess flows sequentially.
Valves or connectors control flow and isolation for maintenance or redistribution between barrels.
Benefits: increased storage, overflow prevention, water pressure considerations
A linked series of rain barrels increases usable capacity, reduces overflow risk, and can improve outlet pressure for certain uses.
Connecting barrels balances storage so excess runoff moves downstream into available tanks, lowering overflow at the downspout.
Additional head from stacked or elevated barrels can modestly boost discharge pressure; practical gains depend on elevation differences, hose length, and connector sizing.
Common use cases for gardens, irrigation, and emergency water storage
Gardeners, landscapers, and homeowners repurpose linked rain barrels to supply steady water for beds, drip systems, and potted plants, as well as to hold a reserve for short-term emergency needs.
Daisy-chained barrels enable gravity-fed irrigation, staggered release to prevent runoff, and portable reserves for hygiene or cooling during outages.
They suit xeriscaping, orchards, and seasonal watering demands while reducing municipal use and stormwater strain.
Legal and Safety Considerations Before You Start
Before installing a daisy-chained rain barrel system, the author recommends verifying local regulations and any homeowner association restrictions that could affect placement or water collection.
They note the importance of backflow prevention and clear warnings against connecting rainwater to potable supplies.
They also advise evaluating the structural capacity of decks or stands to safely support the combined weight of full barrels.
Local regulations and homeowner association rules
While daisy chaining rain barrels is a practical water-conservation measure, homeowners should first verify local regulations and any homeowners association (HOA) covenants that may restrict placement, visible plumbing, or alterations to roof drainage.
Confirm permit requirements, setback rules, and aesthetic guidelines. Document approvals, adhere to stormwater ordinances, and consult HOA management to avoid fines, required modifications, or removal orders.
Backflow prevention and potable water warnings
After confirming regulatory and HOA requirements, attention should turn to preventing backflow and protecting potable water supplies.
Install approved anti‑siphon or check valves and air gaps between rainwater systems and household plumbing.
Clearly label all nonpotable lines and educate occupants about reuse limits.
Regularly inspect fittings for leaks or cross‑connections and consult local authorities if potable connection risks exist.
Structural and weight safety for placement surfaces
Because a filled rain barrel can weigh several hundred pounds, the chosen surface must be evaluated for load capacity and stability. This includes checking the foundation type, joist and slab ratings, and any signs of settling or moisture damage.
Placement on patios, decks, or elevated platforms requires reinforcement, level concrete pads, or compacted gravel bases. Verify local codes and consult a structural professional if unsure.
Materials and Tools Needed
The section lists suitable rain barrel types and key features to evaluate, then summarizes connector options such as hoses, PVC, bulkhead fittings, and downspout diverters.
It also outlines the essential tools—drill with hole saw, thread seal tape, wrenches, and a level—plus recommended optional accessories like overflow diverters, first-flush filters, spigots, and a stand.
Readers are encouraged to match materials and fittings to their chosen barrels and site conditions before beginning.
Types of rain barrels and preferred features
Selecting the right rain barrel begins with understanding common types—plastic, wood, metal, and repurposed containers—and the features that affect durability, safety, and ease of use.
Choose UV-resistant, food-grade plastics for low maintenance; sealed lids and screens to prevent debris and mosquitoes; reinforced wooden barrels for aesthetics; coated metals for corrosion resistance; and secure spigots and overflow outlets for reliable operation.
Connector types: hoses, PVC, bulkhead fittings, downspout diverters
For connecting rain barrels into a reliable system, essential materials and basic tools include flexible garden hoses, rigid PVC pipe and fittings, watertight bulkhead fittings for spigot and inter-barrel connections, and downspout diverters to channel roof runoff;
complementary items are hose clamps, Teflon thread tape, silicone sealant, screen mesh, and primer/cement for PVC.
Select connectors for leak resistance, durability, and ease of maintenance.
Required tools: drill, hole saw, thread seal tape, wrenches, level
Moving from connector choices to the tools needed for installation, a compact kit will make drilling, fitting, and aligning components fast and accurate.
Essential items include a power drill with a hole saw sized for bulkhead fittings, adjustable wrenches, plumber’s (thread) seal tape, and a small level to guarantee proper drainage slope.
Gloves and safety glasses are recommended.
Optional accessories: overflow diverters, first-flush filters, spigots, stand
A few optional accessories can improve performance and convenience when daisy-chaining rain barrels: overflow diverters keep excess water away from foundations, first-flush filters reduce debris entering the system, spigots provide controlled access to stored water, and a stand raises barrels to increase gravity-fed pressure.
Additional useful items include flexible hoses or PVC connectors, quick-connect fittings, shutoff valves, mesh screens, and a durable tarp for winter protection.
Site Selection and Preparation
Site selection begins with choosing the downspout and barrel locations that maximize runoff capture while remaining clear of obstructions.
Proper elevation and a level, stable base—such as a concrete pad, pavers, or stacked blocks—are essential to guarantee reliable gravity flow between barrels.
Barrels should also be positioned for easy access to spigots and routine maintenance.
Choosing the best downspout and barrel location
Where should the downspout and barrels be placed to combine efficiency with accessibility?
The ideal location sits close to the gutter outlet, on stable ground, and near planting or irrigation use.
Position away from foundations, utility lines, and low spots prone to pooling.
Guarantee clear access for maintenance, overflow routing, and seasonal disconnection.
Consider property runoff patterns and local regulations when selecting the site.
Elevation and leveling for gravity flow
Moving from placement considerations to how elevation affects flow, the setup must use gravity to move water between barrels without pumps.
Each successive barrel should sit slightly lower than the previous, with a consistent downward slope and level individual tops to prevent tipping.
Small grade changes maximize flow; guarantee connections remain straight, tight, and free of kinks to maintain steady gravity-driven transfer.
Preparing a stable base: concrete pad, pavers, or stacked blocks
A firm, level foundation is essential before assembling a daisy-chained rain barrel system; it supports the weight of full barrels, maintains alignment for gravity flow, and prevents settling that can kink connectors or tip containers.
Choose a concrete pad for permanence, interlocking pavers for adjustable leveling, or stacked concrete blocks for economical elevation.
Verify compaction, proper drainage beneath, and a flat, stable surface for each barrel.
Positioning for access to spigots and maintenance
Position barrels so spigots and access points face outward and remain reachable without lifting or contorting heavy containers.
Arrange barrels with clear gaps for hose connection, valve operation, and sediment inspection.
Elevate individual barrels slightly to allow gravity flow and drainage.
Guarantee enough room for routine cleaning, winterization, and quick repairs.
Maintain a stable, level surface and unobstructed pathways for safe maintenance access.
Step-by-Step Daisy Chain Installation
The installation begins with inspecting and preparing each barrel: clean the tanks, remove lids, and install inlet and outlet fittings.
The primary barrel is then attached to the downspout via a diverter or direct connection, and additional barrels are linked in series using hoses or PVC with bulkhead fittings.
Finally, installers must maintain a downward slope, secure tight connections, and add overflow lines that route excess water away from foundations.
Step 1 Inspect and prepare barrels (cleaning, remove lids, install fittings)
Before connecting barrels, inspect each for cracks, residues, and functional fittings to guarantee safe, leak-free operation.
Clean interiors with mild detergent and rinse thoroughly to remove algae or contaminants.
Remove lids or cut access ports for overflow and inlet fittings.
Install bulkhead fittings, spigots, and screen filters securely, using plumber’s tape and sealant as needed.
Test fittings for tightness before placement.
Step 2 Attach primary barrel to downspout using diverter or direct connection
Begin by choosing a method—diverter or direct connection—based on downspout type, desired overflow control, and maintenance access.
For diverters, cut the downspout, mount the unit, and route overflow back to the downspout.
For direct connections, install an elbow and secure with a slip adapter into the barrel inlet.
Confirm watertight seals, proper slope, and accessible shutoff or overflow fittings.
Step 3 Connect barrels in series using appropriate hoses or PVC with bulkhead fittings
Attach each additional barrel so water flows from the primary into the next without restriction, using either flexible hose or rigid PVC paired with watertight bulkhead fittings.
Install bulkheads at matched inlet/outlet heights, secure connections with thread sealant or rubber gaskets, and clamp hoses over barbed fittings.
Use appropriately sized fittings to match flow rates and avoid sharp bends or kinks that impede transfer.
Step 4 Ensure proper slope and connection tightness for gravity flow
A slight, consistent downhill pitch between barrels is essential to maintain steady gravity-driven flow; aim for at least a 1% slope (1 foot drop per 100 feet) or, for typical backyard setups, a more practical 1–2 inches drop per 5–10 feet of run.
Confirm fittings are snug and sealed with thread tape or gaskets.
Check hose alignment, tighten clamps, and test for leaks before finalizing placement.
Step 5 Install overflow lines and route excess water safely away from foundations
Plan the overflow so excess water is carried away from foundations, low spots, and walkways using properly sized lines and secure connections.
Use rigid PVC or flexible corrugated hose rated for outdoor use, slope lines away from structures, and terminate at a dispersed outlet or dry well.
Include screened vents to prevent debris, anchor piping to prevent sagging, and test during heavy runoff.
Step 6 Add spigots, shutoff valves, and optional filtration components
Begin by fitting each barrel with a spigot and a shutoff valve to control flow between tanks and to external hoses or irrigation lines.
Position valves at accessible heights, sealing fittings with plumber’s tape and appropriate gaskets.
Install a basic debris screen at each inlet and consider inline mesh filters or activated-carbon units for potable-use conversion.
Label valves for easy operation and maintenance.
Step 7 Test the system with water and check for leaks and flow issues
Turn on the water slowly and observe each connection and valve for leaks, drips, or unexpected pooling.
Water should flow steadily through the daisy chain without backing up or overflowing tanks.
Inspect seams, fittings, and filters; tighten or replace faulty parts.
Verify shutoff valves operate smoothly and that overflow paths direct excess away from foundations.
Document adjustments and retest until stable.
Troubleshooting Common Problems
Common issues with daisy-chained rain barrels include low flow between barrels due to clogs, improper slope, or airlocks, and leaks at fittings that require tightening, sealant, or replacement.
Persistent overflow can signal incorrect overflow placement or undersized capacity and should be diagnosed by checking inlet/overflow paths and adjusting connections or adding more storage.
Mosquito breeding and algae growth are prevented by screening inlets, keeping fittings sealed, and shading or treating stored water as needed.
Low flow between barrels and causes (clogs, improper slope, airlocks)
Low flow between daisy-chained rain barrels often signals a blockage, improper alignment, or an airlock in the connectors.
Inspect screens, plumbing, and inlet/outlet ports for debris or sediment. Confirm a consistent slight downhill slope between barrels and tighten fittings to prevent siphon interruptions.
Bleed trapped air by opening a connector or installing a small vent to restore steady inter-barrel flow.
Leaks at fittings and how to fix them
After checking for clogs, slope, and airlocks, attention should shift to how fittings perform under pressure: leaks at hose, spigot, or connector joints are a frequent source of water loss and can undermine a daisy-chained system’s effectiveness.
Inspect seals, tighten fittings, replace cracked adapters, and use plumber’s tape or silicone gasket compound.
Test under full flow and retighten as needed to confirm repairs.
Overflow still occurring diagnosis and solutions
Diagnose persistent overflow by systematically isolating likely causes and observing system behavior during a heavy rain event or controlled fill.
Check inlet capacity, clogging in downspouts or elbows, incorrect slope between barrels, and separator valve function.
Verify overflow outlet size and routing. Temporarily bypass sections to locate backups.
Implement fixes: clean debris, enlarge connections, regrade piping, or add a diverter/third barrel to increase capacity.
Mosquito prevention and algae control
Addressing overflow issues often uncovers standing water pockets or slow drains that also create ideal breeding grounds for mosquitoes and conditions favorable to algae growth.
Regularly inspect and seal gaps, use fine mesh screens on inlets and vents, and introduce bacterial or enzyme treatments safe for plants to limit nutrient buildup.
Shade barrels, clean debris, and rotate or treat stored water to deter larvae and algae.
Enhancements and Variations
The discussion moves to enhancements and variations that optimize a daisy-chained rain barrel system, including when parallel versus series layouts are most appropriate.
It also covers options like pumps for pressure or uphill transfer, first‑flush diverters, filters, and water‑level indicators.
Finally, seasonal maintenance and winterizing practices are considered to protect components and preserve water quality.
Parallel vs. series configurations and when to use each
Many homeowners choose either parallel or series configurations when linking rain barrels, each arrangement offering distinct flow, capacity, and maintenance implications. Parallel keeps equalized levels, easier maintenance, better for wide catchment. Series increases usable head, good for gravity feed to lower beds, but risks upstream overflow and requires careful shutoffs.
| Configuration | Best use |
|---|---|
| Parallel | Equal storage, simple |
| Series | Gravity feed, staged use |
| Maintenance | Parallel easier |
| Overflow risk | Higher in series |
| Flow control | Series needs valves |
Using pumps to increase pressure or transfer water uphill
Install pumps to boost pressure or move stored rainwater uphill, enabling irrigation, filtration systems, or household uses that gravity alone cannot serve.
Select a pump sized for desired flow and head, install on stable, dry base, prime and protect against dry run, and include check valves to prevent backflow.
Guarantee electrical safety, frost protection, and accessible maintenance points for reliable operation.
Integrating first-flush diverters, filters, and water level indicators
Enhance system reliability and water quality by adding first-flush diverters, inline filters, and visible level indicators to a daisy-chained rain barrel array.
First-flush units divert initial roof runoff, protecting stored water from debris and contaminants.
Install sediment or mesh filters at downspouts and between barrels for ongoing filtration.
Float or sight-tube indicators provide quick level checks, aiding management and preventing accidental overflow.
Seasonal maintenance and winterizing tips
After adding diverters, filters, and visible level indicators, regular seasonal care preserves performance and prevents damage from freeze-thaw cycles.
Empty or lower barrels before first hard freeze, detach hoses and pumps, and drain spigots. Clean debris, sanitize interiors if storing potable-use water, and inspect seals and fittings.
Store lids loosely to vent, or remove and invert barrels for dry storage to avoid cracks and pests.
Cost, Capacity Planning, and ROI
A practical assessment begins by estimating total storage needs and the number of barrels required to meet typical household rainfall and irrigation demands.
Next, the review compares common material and installation cost ranges—from basic barrels and connectors to pumps and overflow fittings—to establish upfront expenses.
Finally, calculations of expected water savings and reduced municipal or irrigation use frame the likely return on investment and environmental benefits.
Estimating total storage capacity and number of barrels needed
Estimating total storage capacity and the number of barrels required begins with matching local water needs and rainfall patterns to realistic capture volumes.
This process converts household or garden demand (gallons per week/month) and average seasonal rainfall into a target storage volume.
Then, it determines how many standard 55–60 gallon barrels must be linked to meet that target while accounting for overflow, dead storage, and practical siting constraints.
Calculate safety margin, seasonal reserve, and linkage losses to finalize barrel count.
Typical material and installation cost ranges
With the target storage and barrel count established, attention turns to typical material and installation costs to assess affordability and payback.
Single barrels range $50–$200; fittings, hoses, and diverters $15–$60 each.
Professional installation adds $100–$400 per barrel or a flat $300–$1,000 for multi-barrel systems.
Estimated total for modest setups: $150–$800; larger arrays: $800–$3,000.
Water savings and environmental impact considerations
Conservation benefits and financial returns from daisy-chained rain barrels hinge on local rainfall patterns, roof catchment area, and household water use. These factors determine how much potable water consumption is displaced and how quickly installation costs are recouped.
Calculations should estimate seasonal capture, irrigation demand offset, and reduced runoff. Consider maintenance, lifespan, and potential incentives to calculate net savings and environmental return on investment.
Step-by-Step Maintenance Checklist
A concise maintenance checklist keeps a daisy-chained rain barrel system reliable and productive throughout the year.
Key tasks are summarized below to guide routine care and seasonal procedures:
- Weekly and monthly tasks: check screens, clear debris, monitor water levels.
- Annual inspection and repairs: inspect seams, fittings, and overflow connections.
- End-of-season shutdown: drain, disconnect, and winterize components.
- Spring restart procedures: reconnect, flush lines, and test flow before the first storm.
Weekly and monthly tasks
Inspect the daisy-chained rain barrel system every week and perform scheduled monthly checks to guarantee reliable water collection and safe storage.
Weekly: clear debris from gutters, screens, and inlets; verify connections, valves, and overflow paths; remove standing water near bases.
Monthly: inspect lids, filters, and first-flush devices; flush sediment from the first barrel; test spigot operation and correct minor leaks promptly.
Annual inspection and repairs
After completing weekly and monthly checks, an annual inspection and repair checklist guarantees the daisy-chained system remains safe and fully functional for the year ahead.
Inspect barrels, connectors, and seals for cracks, leaks, UV damage, and corrosion. Test overflow paths and valves, flush sediment from spigots, tighten fittings, replace worn parts, and document repairs.
Schedule professional service for persistent issues.
End-of-season shutdown and spring restart procedures
When temperatures consistently drop and rainfall patterns shift, the daisy-chained rain barrel system should be methodically winterized and then carefully recommissioned in spring to prevent freeze damage, blockages, and microbial growth.
Drain and disconnect barrels, clear gutters and screens, remove spigots or insulate fittings, and store hoses.
In spring, inspect seals, flush lines, reattach connections, test flow, and treat standing water as needed.
Example Daisy Chain Configurations and Scenarios
The article presents three practical daisy chain examples tailored to different needs: a small-yard setup with 2–3 barrels and a concise parts list, a medium garden layout of 4–6 barrels accompanied by a simple sketch, and a large or commercial-style array featuring pump integration and overflow management.
Each scenario outlines key components, connection sequences, and space considerations to guide implementation. Readers can compare options and choose the configuration that fits their site and water-use goals.
Small-yard setup (2 to 3 barrels) with parts list
A compact daisy chain for a small yard typically links two to three barrels to balance storage capacity with limited space and downspout flow. This paragraph outlines common configurations, key components, and simple scenarios to help homeowners choose the right layout.
Typical parts: barrels with lids, overflow fittings, flexible PVC or hose connectors, downspout diverter, elbow joints, shutoff valves, risers, and simple supports.
Medium garden setup (4 to 6 barrels) with layout sketch
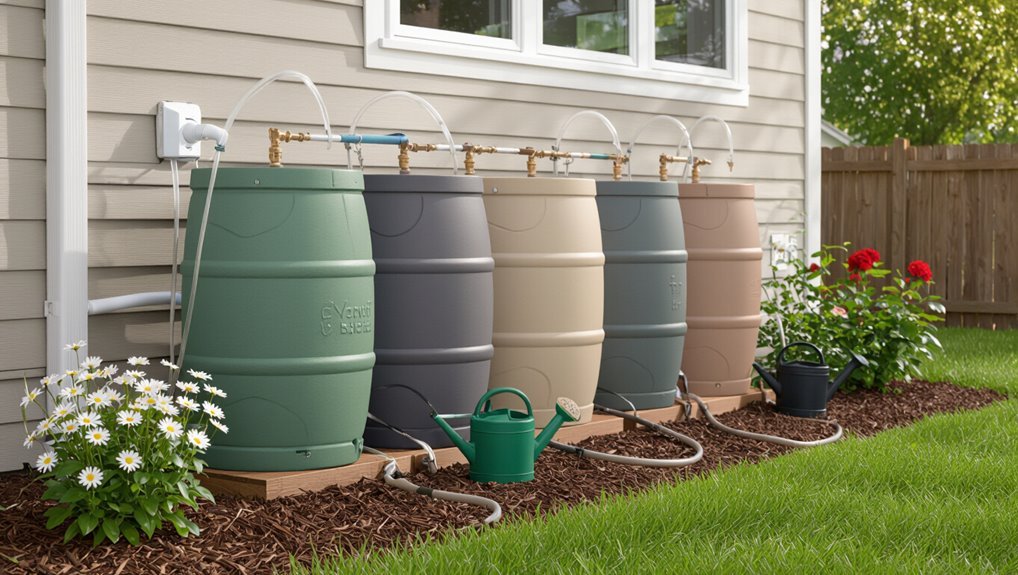
Medium setups typically link four to six barrels to increase storage while keeping plumbing manageable and footprint moderate.
A central downspout feeds the first elevated barrel; inline connectors and short PVC runs cascade to successive barrels.
Include a primary overflow at the last barrel and individual shutoff valves for isolation.
Arrange barrels in a slight step-down or linear row for gravity flow and easy maintenance.
Large or commercial-style array with pump integration and overflow management
Moving from a moderate four-to-six barrel arrangement, planning for a large or commercial-style array requires scaled piping, active pumping, and robust overflow controls to handle greater volumes and variable demand. Systems use centrifugal pumps, check valves, automated siphons, and multiple overflow routes to protect structures and maintain delivery pressure.
| Component | Purpose |
|---|---|
| Pump station | Maintain pressure |
| Overflow manifold | Prevent flooding |
| Control panel | Automate flows |
Conclusion
In a world where single rain barrels sulk beneath the downspout’s tyranny, the daisy chain emerges like a bureaucratic parade: barrels linked in solemn procession, passing water along with all the pomp of a conga line. This clever plumbing choreography turns overflow into teamwork, stacking storage like tiny aquatic skyscrapers. Practical, legal-minded, and slightly smug, the daisy chain promises calmer gutters, fuller gardens, and the smug satisfaction of outwitting a cloud.