How to Clean the Heat Exchanger on a Furnace: Step-by-Step Guide for Safe, Effective Maintenance
To clean the heat exchanger on your furnace effectively, follow these steps: First, power down and cool the unit. Wear appropriate personal protective equipment (PPE). Next, remove the access panels and inspect for any cracks or corrosion. Gently vacuum and brush away soot, using low-pressure air and manufacturer-specific cleaners if necessary. Rinse and dry the components thoroughly before reassembling the unit. Finally, test the combustion and carbon monoxide (CO) levels to ensure safe operation. For additional guidance on tools, safety checks, and when to seek professional help, continue reading.
What a Furnace Heat Exchanger Is and Why It Matters
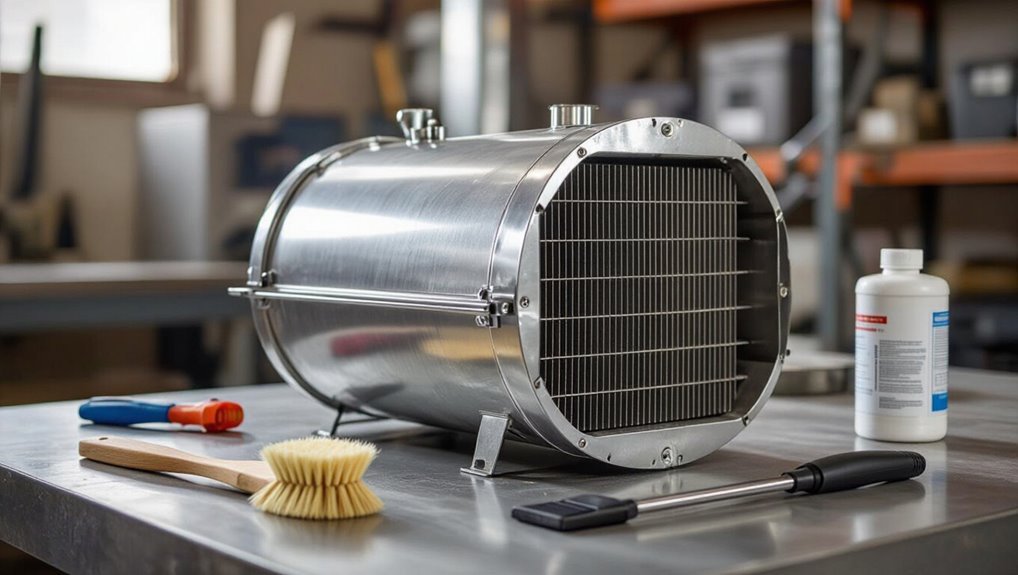
The heat exchanger is the furnace component that transfers heat from combustion gases to the home’s air without mixing the two streams.
It is typically made from steel or stainless steel and comes in designs such as folded-tube or modular sections to maximize surface area.
A cracked or soiled heat exchanger can leak carbon monoxide and reduce system efficiency, making inspection and cleaning essential.
Function and role in furnace operation
A furnace heat exchanger is a metal assembly that transfers combustion heat to household air while keeping exhaust gases and combustion byproducts confined to the burner chamber. Its integrity directly affects both heating efficiency and indoor air safety.
It channels heated air into ductwork, isolates combustion byproducts, and supports pressure and airflow balance. Regular inspection ties to how to clean the heat exchanger on a furnace.
Common materials and designs
Moving from how the heat exchanger functions to what it is made of and how it is built clarifies why different furnaces behave differently over time.
Heat exchangers commonly use aluminized steel, stainless steel, or cast iron.
Designs include tubular, serpentine, and sectional cast forms.
Material and geometry affect durability, thermal transfer, corrosion resistance, expansion behavior, and serviceability, guiding maintenance approaches.
Risks of a damaged or dirty heat exchanger (carbon monoxide, efficiency loss)
Neglecting a furnace heat exchanger can lead to serious safety and performance consequences.
A cracked or clogged exchanger can leak combustion gases, including carbon monoxide, into living spaces, posing acute poisoning risk.
Reduced heat transfer and airflow obstruction lower efficiency, increasing fuel consumption and wear on components.
Early inspection and cleaning prevent hazardous leaks, maintain performance, and extend system lifespan.
Signs You Need to Clean or Service the Heat Exchanger
Declining furnace performance—such as reduced heat output and frequent on/off cycling—can indicate a dirty or failing heat exchanger.
Visible signs like soot buildup, scoring, or unusual discoloration on the exchanger or burner area also signal the need for cleaning or inspection.
If cracks, persistent combustion odors, or suspected carbon monoxide exposure are present, a qualified technician should be called immediately.
Performance indicators (reduced heat, frequent cycling)
Watch for clear performance changes that signal the heat exchanger may need cleaning or servicing: reduced heat output, longer warm-up times, uneven room temperatures, and more frequent on/off cycling are common indicators.
Persistent drops in furnace efficiency, rising energy bills without increased use, or audible short cycling suggest restricted heat transfer or airflow issues requiring inspection and possible cleaning to restore proper operation.
Visible symptoms (soot buildup, discoloration)
Soot, discoloration, and visible residue on or around the furnace are clear visual cues that the heat exchanger may require cleaning or service.
Dark streaks, flaky deposits, or oily film on surfaces, vents, or access panels indicate combustion byproducts escaping or poor combustion.
Persistent staining, sudden appearance of soot after startup, or uneven discoloration warrant inspection and routine maintenance to prevent deterioration.
When to call a professional immediately
When should a homeowner call a professional immediately?
Immediate contact is warranted if there’s a gas smell, carbon monoxide alarm activation, persistent soot or flames irregularities, visible cracks in the heat exchanger, or unexplained pilot/light failures.
Also call if the furnace cycles unusually, emits loud bangs, or produces yellow instead of blue flames.
These signs indicate dangerous malfunction requiring qualified inspection and repair.
Required Tools, Materials, and Safety Gear
Before beginning work on the heat exchanger, a clear checklist of tools and materials is provided to guarantee the job proceeds efficiently.
Recommended cleaning products and consumables are listed alongside specific personal protective equipment requirements.
Ventilation precautions and other safety measures are emphasized to protect the technician and prevent contamination.
Tools checklist
A concise inventory of tools, consumables, and protective equipment guarantees the heat exchanger cleaning proceeds safely and efficiently.
The checklist lists essential items, focusing on function and safety while excluding specific cleaning brands or chemicals reserved for the next section.
- Screwdrivers and nut drivers for access panels
- Flashlight or inspection scope
- Stiff brushes and small picks
- Vacuum with brush attachment
- N95 respirator, gloves, and safety glasses
Recommended cleaning products and consumables
Several specific consumables and cleaning agents are recommended to effectively remove soot, scale, and light corrosion from a furnace heat exchanger without risking damage.
Recommended items include mild, noncaustic cleaners and abrasion-safe brushes. Use manufacturer-approved solvents and replacement gaskets as needed. Replace consumables after heavy use to maintain effectiveness.
- Mild detergent or specialty heat-exchanger cleaner
- Soft-bristle brush set
- Nonmetallic scrapers
- Solvent wipes
- Replacement gaskets
Personal protective equipment and ventilation precautions
Don personal protective equipment and guarantee adequate ventilation to protect against soot, metal dust, chemical fumes, and accidental burns when servicing a furnace heat exchanger.
The technician should prepare workspace ventilation, barrier protection, and emergency measures before starting.
- NIOSH-approved respirator (N95 or P100)
- Heat-resistant gloves
- Safety goggles or face shield
- Disposable coveralls
- Portable exhaust fan and fresh-air intake
Pre-Cleaning Safety Steps and Preparations
Before beginning any work, the technician confirms that electrical power and fuel supply to the furnace are fully shut off following manufacturer and local code procedures.
The unit is allowed to cool to a safe temperature and the work area is ventilated to prevent buildup of combustion gases or dust.
A concise record of the furnace’s current condition and control settings is made to guarantee proper reassembly and troubleshooting.
Power and gas shutoff procedures
Shut off the furnace’s electrical and fuel supplies to eliminate ignition and shock hazards before any inspection or cleaning begins.
Next, isolate power at the breaker and confirm the switch near the unit is off.
Close the gas valve at the service line and tag it.
Verify shutdown with a non-contact voltage tester and guarantee no pilot lights remain lit before proceeding.
Allowing the system to cool and ensuring ventilation
Although the furnace was powered down and the gas isolated, the heat exchanger and adjacent components retain high temperatures and trapped combustion gases; allow the system to cool completely (typically 30–60 minutes) and ventilate the work area by opening windows or running exhaust fans until surfaces are cool to the touch and any lingering fumes have dissipated.
Verify with bare-hand-safe touch or an infrared thermometer before proceeding.
Documenting current furnace condition and settings
With the unit cooled and the work area ventilated, the technician should record the furnace’s current condition and settings before any cleaning begins.
Inspect and note visible corrosion, soot, cracks, or odors.
Log thermostat and control settings, service panel positions, gas and electrical shutoff status, filter type and condition, and any diagnostic error codes.
Photograph key areas for reference.
Step-by-Step Heat Exchanger Cleaning Procedure
The technician first gains safe access by removing panels and clearing surrounding space to expose the heat exchanger.
A careful inspection follows to identify cracks, corrosion, or leaks before any cleaning begins.
Cleaning proceeds from dry brushing and vacuuming to controlled low‑pressure compressed air use, with approved cleaners or chemical treatments applied only when appropriate.
Accessing the heat exchanger (panel removal and clearance)
Begin by ensuring the furnace is completely powered down and cooled; this prevents electrical hazards and burns while accessing internal components.
Remove the access panel(s) per manufacturer instructions, keeping fasteners organized. Clear surrounding area for unobstructed work and adequate lighting.
Use gloves and eye protection. Note component locations before disassembly, avoid forcing parts, and maintain a clean path for reassembly.
Inspecting for cracks, corrosion, and leaks before cleaning
After panels are removed and the area is prepared, the technician should perform a careful visual and tactile inspection of the heat exchanger for cracks, corrosion, or signs of combustion gas leakage before any cleaning begins.
Document defects, noting location, size, and severity.
Check seams, welds, and tube ends under good lighting.
Any suspected breach warrants repair or replacement and combustion testing prior to further service.
Dry brushing and vacuuming technique
Using a soft-bristled brush and a high-efficiency vacuum, the technician loosens and removes soot and debris from accessible surfaces of the heat exchanger in controlled, systematic passes.
Attention focuses on seams, crevices, and accessible tube interiors while avoiding forceful probing. Collected particulates are contained with a sealed dust bag.
Progress is periodically inspected to confirm thorough removal without disturbing seals or registers.
Using low-pressure compressed air safely
The technician prepares low-pressure compressed air as a controlled tool to dislodge settled soot and dust from the heat exchanger while minimizing risk to components and indoor air quality.
Air pressure is set below 30 psi, nozzle kept several inches away, and short bursts directed along seams and crevices.
Protective filters, containment sheeting, and PPE capture debris and prevent spread into ductwork and living spaces.
Applying approved cleaners or chemical treatments (if applicable)
Apply only manufacturer-approved cleaners or chemical treatments when addressing stubborn deposits on a heat exchanger, and verify compatibility with the furnace model and materials before proceeding.
Technicians should follow labeled dilution ratios, contact times, and application methods. Avoid abrasive or unlisted solvents.
Use personal protective equipment, guarantee ventilation, and prevent chemical contact with seals, wiring, or insulation.
Document products used for future maintenance.
Rinsing, drying, and final debris removal
Begin rinsing the heat exchanger only after all chemical contact times have elapsed and loose residues have been mechanically removed.
Use low-pressure water or manufacturer-approved rinse solution to flush remaining cleaner and particulates, directing flow toward a drain.
Allow thorough air drying or use low-heat forced air; inspect for trapped debris, wiping accessible surfaces with lint-free cloths.
Confirm dryness before proceeding.
Reassembling panels and restoring power/gas
Reattach access panels and guards in the reverse order of disassembly, ensuring all gaskets seat properly and fasteners are torqued to manufacturer specifications.
Verify that control covers and service ports are securely closed to maintain combustion integrity.
Restore electrical power, then reopen gas valves following the unit’s restart sequence.
Observe pilot/ignition operation, check for leaks, confirm normal blower and burner cycling before leaving the system.
Post-Cleaning Inspection and Functional Tests
After cleaning, the technician performs a visual re-check for missed deposits, cracks, or other damage to the heat exchanger.
The furnace is then run while observing combustion indicators, listening for unusual noises or smells, and confirming normal operation.
Recommended safety checks include carbon monoxide monitoring and flue-gas testing to verify proper combustion and venting.
Visual re-check for missed deposits and damage
Once cleaning is complete, the technician conducts a careful visual re-check of the heat exchanger to confirm all deposits were removed and to identify any damage such as cracks, warping, or erosion.
The inspector uses good lighting and magnification, documents findings with photos, notes remaining soot or pitting, and flags any structural defects for immediate repair or replacement before restoring the furnace to service.
Running the furnace and checking combustion indicators
Start the furnace and observe its operation through a planned sequence of functional checks to verify safe combustion and proper heat exchanger performance.
Confirm steady ignition, consistent flame pattern, and correct burner color.
Monitor vent draft and flue gas temperature for expected ranges.
Check for error codes on the control board and verify thermostat response.
Record findings and address anomalies before returning the system to normal service.
Monitoring for unusual smells or noises
Having confirmed steady ignition, proper flame characteristics, and acceptable venting, the technician should next focus on detecting any unusual smells or noises that could indicate lingering debris, leaks, or mechanical issues.
Inspect for burning, musty, or chemical odors and note intermittent or continuous sounds: rattles, squeals, bangs, or hissing.
Document findings, isolate sources, and schedule repairs or further diagnostics as warranted.
Carbon monoxide and flue-gas testing recommendations
Proceed to conduct carbon monoxide (CO) and flue-gas testing immediately after cleaning to verify combustion safety and proper draft.
Use a calibrated CO analyzer and combustion analyzer to measure CO, O2, CO2, and exhaust temperature at the draft hood or flue.
Compare readings to manufacturer limits and local codes.
Record results, correct abnormalities, and retest after adjustments before returning the furnace to normal operation.
How Often to Clean and Maintain the Heat Exchanger
Manufacturer guidelines and warranty terms should determine the baseline for heat exchanger cleaning intervals to avoid voiding coverage.
Actual frequency varies with usage patterns, fuel type, and environmental factors such as dust or airborne contaminants.
A concise seasonal maintenance checklist can help guarantee timely inspections, cleaning, and record-keeping.
Manufacturer guidelines and warranty considerations
Although specific intervals vary by make and model, most manufacturers include recommended inspection and cleaning schedules in the owner’s manual and often require documented adherence to preserve warranty coverage.
Typically, heat exchangers should be visually inspected annually and cleaned every one to three years depending on usage, fuel type, and local conditions.
Owners should follow factory instructions, retain service records, and use authorized technicians to avoid voiding warranties.
Frequency based on usage, fuel type, and environment
With manufacturer guidance and documented service forming the baseline for warranty compliance, the recommended frequency for cleaning a furnace heat exchanger then depends on actual usage patterns, the fuel burned, and surrounding environmental conditions.
High-use systems or wood and oil burners require annual inspections and possibly biannual cleaning; clean-burning natural gas may need biennial checks.
Dusty, humid, or pet-heavy environments justify more frequent attention.
Seasonal maintenance checklist
Create a simple seasonal checklist that aligns inspection and cleaning tasks with the heating cycle:
perform a thorough heat exchanger visual inspection and basic cleaning each fall before heavy use.
schedule a mid-season quick check for soot, corrosion, or abnormal odors.
arrange a spring follow-up to address any moisture-related deposits and to document condition for warranty records.
- Fall: full inspection and cleaning
- Mid-season: quick soot/odor check
- Spring: moisture deposit removal
- After repairs: recheck seals and flue
- Annually: professional combustion and safety test
When to Repair or Replace the Heat Exchanger
When visible damage such as cracks or warping is present, cleaning alone will not restore the heat exchanger and repair or replacement should be considered.
Homeowners should weigh repair costs against replacement, factoring in furnace age, efficiency loss, and long-term reliability.
Seeking assessments and written quotes from qualified HVAC professionals helps determine the safest, most cost-effective option.
Signs that cleaning is insufficient (cracks, warping)
Inspecting a heat exchanger for cracks, warping, or other structural damage reveals whether cleaning alone will suffice or if repair/replacement is required.
Visible hairline or through-cracks, distorted or separated seams, and pronounced warping indicate compromised integrity and potential combustion gas leakage.
Such defects necessitate professional assessment; cleaning cannot restore structural fitness, and continued operation risks safety and reduced performance.
Cost vs. replacement considerations
Evaluate repair versus replacement by weighing the heat exchanger’s condition, age, and the costs involved. Consider remaining service life, repair feasibility, and safety risks; minor surface defects may justify repair, while cracks, extensive corrosion, or units nearing end-of-life favor replacement. Use cost-benefit logic and warranty status to decide.
| Factor | Implication |
|---|---|
| Age | Shortens value of repair |
| Damage | Determines safety need |
Working with HVAC professionals and obtaining quotes
Contact certified HVAC professionals to obtain reliable assessments and multiple quotes before deciding on heat exchanger repair or replacement.
Professionals evaluate crack severity, corrosion, and overall furnace condition, provide cost estimates, warranty details, and timeline.
Compare bids for scope, parts quality, and labor.
Prioritize licensed contractors with insurance and references.
Decisions should balance safety, long-term efficiency, and budget.
Common Mistakes and How to Avoid Them
Common mistakes during heat exchanger maintenance include using unsafe cleaning methods that can damage the unit or create fire and carbon monoxide risks.
Technicians or homeowners may also overlook related components such as burners, the flue, and the blower, which can leave underlying problems unaddressed.
Misdiagnosing symptoms and delaying professional inspection can turn a minor issue into a costly or hazardous repair.
Unsafe cleaning methods and their consequences
Using improper tools or shortcuts when cleaning a furnace heat exchanger can quickly create hazards that outweigh any perceived time savings.
Abrasive methods, pressurized water, or flammable solvents can damage metal, warp surfaces, or leave residues that impair sealing and heat transfer.
Electrical or structural harm may cause leaks, carbon monoxide risk, or premature failure; professional inspection is advised for uncertain or severe conditions.
Overlooking related components (burners, flue, blower)
After warning against unsafe cleaning methods, attention should shift to related components that affect heat exchanger performance: burners, the flue, and the blower.
Failure to inspect and clean burners causes inefficient combustion and soot buildup; a clogged flue restricts exhaust, raising corrosion risk; a dirty blower reduces airflow and heat transfer.
Regular checks and simple maintenance prevent compounded damage.
Misdiagnosing symptoms and delaying professional help
Misinterpreting noises, soot, or reduced heat as minor issues can lead homeowners to postpone calling a technician.
However, such delays often allow small problems to escalate into cracks, corrosion, or dangerous carbon monoxide leaks.
Recognizing when symptoms exceed DIY fixes and seeking professional diagnosis promptly prevents costly repairs and safety hazards.
Timely inspection preserves warranty coverage, guarantees proper combustion, and confirms safe operation, avoiding emergency replacements.
Tips for Prolonging Heat Exchanger Life and Improving Efficiency
Proper air filter selection and a consistent replacement schedule reduce debris buildup and maintain airflow.
Using high-quality fuel, ensuring correct combustion tuning, and providing adequate ventilation minimize corrosion and soot formation.
Regular professional inspections with documented records catch early issues and guide maintenance to extend heat exchanger life and efficiency.
Air filter selection and replacement schedule
A handful of well-chosen air filters and a consistent replacement routine greatly reduce airborne contaminants that accelerate heat exchanger wear and lower furnace efficiency.
Recommend MERV 8–11 for most homes; higher MERV can strain some systems.
Inspect monthly, replace every 1–3 months depending on occupancy, pets, and dust.
Record dates, use correct size and airflow-rated filters to maintain performance and longevity.
Fuel quality, combustion tuning, and proper ventilation
Alongside regular filter maintenance, fuel quality, combustion tuning, and adequate ventilation determine how cleanly a furnace operates and how long its heat exchanger lasts.
Using clean, appropriate-grade fuel minimizes deposits; precise combustion tuning reduces soot and corrosive byproducts; and ensuring proper venting prevents backdrafting and moisture buildup.
Together these measures lower corrosion, reduce thermal stress, and extend heat exchanger life while maintaining efficiency.
Regular professional inspections and records tracking
Schedule routine professional inspections and keep detailed service records to catch early wear, document repairs, and track trends that affect heat exchanger longevity and furnace efficiency.
Records guide preventive actions, warranty claims, and component life assessments.
- Note inspection dates and technician notes
- Log repairs, parts replaced, and costs
- Record combustion test results
- Track operating hours and anomalies
- Review trends annually with a technician
Quick Troubleshooting Guide for Post-Cleaning Issues
After cleaning the heat exchanger, a few common issues may appear that warrant quick checks before calling a technician. The following list highlights likely causes and simple actions to try for low heat output, lingering soot or smoke, and any safety switches or error codes that appear.
These steps help isolate whether the problem is a minor post-cleaning residue or a sign of a deeper issue.
- Verify airflow: check filters, vents, and blower for blockages or loosened connections.
- Inspect burner and pilot areas for residual soot or misalignment after cleaning.
- Re-seat any panels and wiring to clear false safety switch trips or error codes.
- Confirm thermostat settings and power supply to rule out control issues causing low output.
- If smoke persists or safety codes continue, shut down the furnace and contact a qualified service technician.
Low heat output after cleaning
If a furnace produces noticeably less heat after the heat exchanger has been cleaned, verify a few likely causes before calling for service:
Check that gas supply and pilot/ignition function correctly.
Confirm thermostat settings and wiring.
Make sure airflow isn’t restricted by closed vents or a clogged filter.
Verify burner ports and flame pattern are proper.
If issues persist, contact a technician.
Persistent soot or smoke
While reduced heat can point to airflow or ignition problems, persistent soot or smoke after cleaning usually indicates incomplete combustion or residual deposits dislodged during the service.
Inspect burner ports, flame pattern, and venting for blockages or misalignment. Clean or replace clogged components, recheck fuel supply and air shutter settings, and run the furnace briefly to verify clean combustion.
If smoke persists, consult a technician.
Triggering safety switches or error codes
Check the furnace control panel and note any fault codes or illuminated safety indicators before further troubleshooting.
The technician interprets codes against the manual, resets tripped limits, and verifies safety switch positions (pressure, flame, door).
If a code persists after resets and correct switch positions, inspect wiring, sensors, and venting for faults.
Escalate to a qualified technician for persistent or unclear errors.
Recommended Professional Services and Certification Standards
A certified HVAC inspection should include a visual and pressure test of the heat exchanger, combustion analysis, and a written report of findings and recommended repairs.
Homeowners are advised to verify technician credentials such as NATE certification, state HVAC license, and insurance coverage.
Key questions to ask before hiring include scope of work, warranty on labor and parts, and whether permits or follow-up testing are included.
What to expect from a certified HVAC inspection
Expect a certified HVAC inspection to be systematic, document-driven, and focused on safety and performance: technicians will visually and instrumentally assess the heat exchanger for cracks or corrosion, verify combustion integrity and venting, test airflow and static pressure, check ignition and safety controls, and record findings with recommended repairs or replacements.
The report should include prioritized actions, estimated costs, parts condition, and clear next-step timelines.
Relevant certifications and licenses to look for
Credentials matter when hiring for heat-exchanger work: homeowners should verify that technicians hold state-issued HVAC licenses and industry certifications such as NATE (North American Technician Excellence) or HVAC Excellence, and that companies maintain proper business licenses and insurance.
- NATE-certified technician
- HVAC Excellence credential
- State HVAC contractor license
- Liability and workers’ comp insurance
- Manufacturer training or OEM certification
Questions to ask a technician before hiring
Why ask specific questions before hiring a technician? Homeowners should verify experience, licensure, and insurance.
Ask about heat exchanger cleaning methods, warranty or guarantee terms, parts and labor costs, expected timeline, and references.
Request proof of certifications (NATE, local HVAC license), written estimates, and safety procedures.
Confirm permit handling and post-service inspection documentation before committing.
Safety Resources and Regulatory References
Safety resources and regulatory references provide essential guidance for anyone performing heat exchanger maintenance, outlining required precautions, applicable codes, and where to find authoritative information.
They direct safe practices, certification requirements, and reporting obligations while reducing liability and risk.
- Manufacturer manuals
- Local building codes
- OSHA and NIOSH guidance
- EPA combustion rules
- Professional certification standards
Conclusion
A furnace’s heat exchanger, likened to the home’s beating heart, requires thoughtful care to keep its pulse steady. Regular cleaning prevents cracks and inefficiency from silently creeping in like rust on old armor, preserving warmth and safety for occupants. By treating maintenance as stewardship rather than chore, homeowners extend lifespan, cut energy waste, and avert hazards—ensuring the furnace continues to breathe cleanly through every season, reliable as dawn after a long night.