How to Locate a Gas Line Safely: Step-by-Step Guide for Homeowners
To locate gas lines safely before any digging, homeowners should first confirm the necessity of locating these lines. Look for meters, markers, unusual odors, hissing sounds, or signs of dead vegetation. Always call the local one-call center (811) for utility marking to avoid accidents. If any signs of a leak arise, stop work immediately. Utilize personal protective equipment (PPE), basic probes, or handheld gas detectors, and consider hiring a licensed professional for complex tracing. Additionally, make sure to document the locations of meters and valves. Detailed step-by-step procedures, tools, and safety protocols are outlined below.
How to Confirm You Need to Locate a Gas Line on Your Property
Homeowners often seek gas line locations before landscaping, building additions, or installing pools to prevent accidental strikes.
Visible cues such as utility markers, meter placement, unusual odors, hissing sounds, or dead vegetation can indicate a nearby gas line or a leak.
Before any digging, local laws and utility company procedures require notification and, in many jurisdictions, a professional markout to guarantee safety and compliance.
Common reasons homeowners search for gas lines
Many property owners seek out gas lines for a handful of clear reasons: planning construction or landscaping, confirming utility locations before digging, investigating a suspected leak, or preparing for appliance installation or service.
Homeowners often research how to locate a gas line to avoid damage, meet permitting requirements, coordinate with contractors, or verify service boundaries.
Practical, timely locating prevents costly delays and safety issues.
Signs of a nearby gas line or gas leak
A combination of visual, olfactory, and auditory cues can indicate the presence of an underground gas line or a leak that warrants locating it.
Dead or discolored vegetation, bubbling in standing water, hissing or whistling sounds near the ground, and the distinctive rotten-egg odor of mercaptan suggest gas.
Sudden unexplained fog, dirt disturbances, or persistent pressure fluctuations in appliances also merit investigation.
Legal and safety obligations before digging
Before digging, property owners must confirm whether a gas line could be affected and meet specific legal and safety obligations to prevent hazards and liability.
They should contact the local one-call center (call811), review utility maps, obtain required permits, notify neighbors if shared lines exist, and hire qualified locators when necessary.
Compliance reduces risk, fines, and emergency disruptions.
Immediate Safety Actions Before Starting Any Search
Before beginning any search, the individual should recognize signs of an active leak and stop immediately to call emergency services if there is a strong odor of gas, hissing sounds, or evidence of physical damage.
They should guarantee basic personal protective measures are in place and consult a concise equipment checklist—gloves, eye protection, and intrinsically safe tools—before proceeding.
Finally, the person must notify local utility authorities and confirm required marking or clearance procedures for the area.
When to stop and call emergency services
If the smell of gas is strong, or if anyone detects dizziness, nausea, or ringing in the ears, stop all activity immediately and evacuate the area.
Call emergency services from a safe distance. Report the exact location, symptoms, visible leaks, and any sparks or flames.
Follow dispatcher instructions, keep others away, and do not re-enter until authorities declare it safe.
Personal protective measures and equipment checklist
Several essential personal protective measures and a compact equipment checklist must be verified before any search for a suspected gas line leak begins.
Individuals should wear flame-resistant clothing, safety glasses, gloves, and sturdy boots.
Carry a calibrated combustible gas detector, non-sparking tools, flashlight, and a charged mobile phone.
Confirm ventilation, maintain distance from potential ignition sources, and work with a partner.
Notification and utility marking requirements in your area
After confirming personal protective measures and equipment, the next step is to notify the appropriate utility authorities and request official marking of underground lines in the work area.
The homeowner should contact the local one-call center, provide site details, and wait required clearance time.
Accept only verified markings; document the ticket number and scheduled inspection before proceeding with any excavation or probing activities.
Gather Necessary Tools and Resources
Before beginning a search, assemble the basic tools for visual inspection and non-invasive detection, such as flashlights, probe rods, and handheld gas sniffers.
If complexity or risk is high, include advanced detection equipment used by professionals, like electronic combustible gas detectors and ground-penetrating radar.
Also obtain and review documentation and maps—utility plans, permits, and as-built drawings—to confirm locations and avoid excavation errors.
Basic tools for visual inspection and non-invasive detection
A concise kit of visual inspection and non-invasive detection tools enables safer, faster identification of potential gas line issues without immediate excavation.
The homeowner should use a flashlight, inspection mirror, utility probe (non-invasive), magnet or stud finder to trace buried conduit, flexible measuring tape, chalk for marking, and a handheld combustible gas sniffer or detector rated for residential use.
Advanced detection tools professionals use
Professionals rely on specialized instruments that extend beyond homeowner-grade tools to accurately locate, map, and assess underground gas lines while minimizing risk.
Typical equipment includes electromagnetic locators, ground-penetrating radar, pipe and cable locators, tracer gas detection systems, combustible gas detectors with calibration, and acoustic leak correlators.
These tools enable precise depth, path, and leak assessments, reducing excavation and ensuring safety during utility work.
Documentation and maps to obtain (utility plans, permits)
When preparing to locate or work near gas lines, obtaining accurate documentation and maps—utility plans, as-built drawings, and permit records—is essential to establish known line routes, depths, ownership, and legal constraints.
The homeowner should request utility company records, municipal permits, and recent survey maps, review easements and markers, and retain copies.
Cross-reference documents with physical markers before any excavation or contractor engagement.
Step-by-Step Process to Locate an External Gas Line
The step-by-step process begins with consulting utility maps and property records to learn known line locations.
Next, the individual should contact the local one-call/811 service for official markings and then inspect exterior features that suggest the gas route.
Finally, they may employ a probe, shovel, or non-invasive locator with care and mark valves, meters, and connection points.
Step 1 Check utility maps and property records
Before any ground is disturbed, consult utility maps and property records to identify existing gas mains, service lines, and easements.
Review municipal or utility GIS, subdivision plats, and recorded easements for line locations and right-of-way boundaries.
Note meter and service lateral positions relative to structures, fences, and driveways.
Record distances, reference points, and any discrepancies for later verification before physical work begins.
Step 2 Call your local one-call/811 service for markings
Contact the local one-call or 811 service to request utility markings before any digging begins.
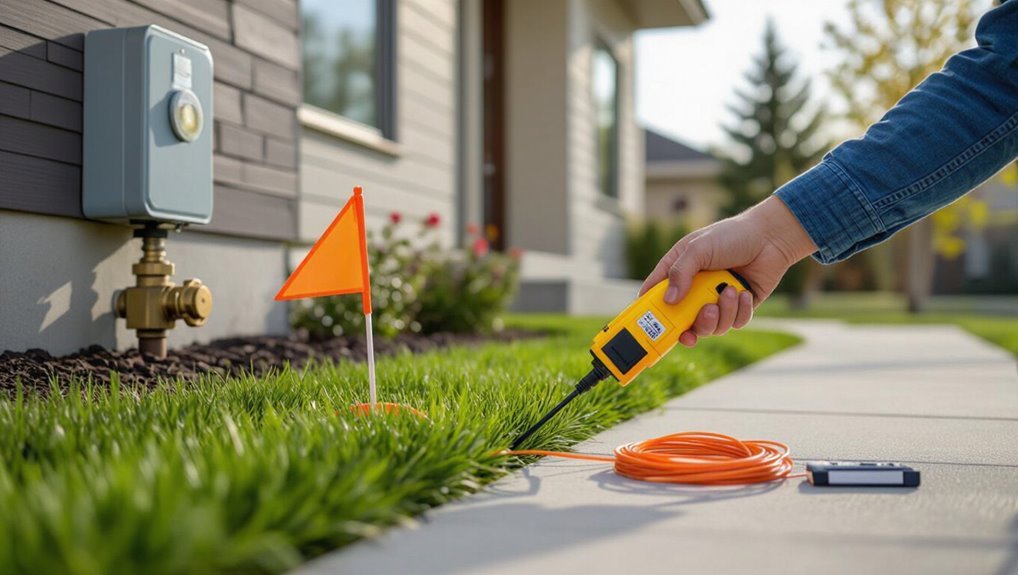
A request triggers professional locators to mark buried utilities with standardized color codes and flags.
Provide accurate site details, planned excavation dates, and contact information.
Wait the required notification period; do not disturb marks.
Respect marked areas and follow any guidance from the utility operators.
Step 3 Inspect exterior features that indicate gas line routes
Several visible exterior features can help pinpoint likely gas line routes around a property. Observers should note meter locations, regulator assemblies, service risers, sidewalk or driveway edges where lines often run, utility easements, and older surface repairs or depressions.
Gas appliances, exterior vents, and buried valve markers also indicate direction. Document observations with photos and notes for reference during professional locating.
Step 4 Use a probe, shovel, or non-invasive locator safely
Begin probing the ground only after confirming utility marking and wearing appropriate PPE, because careful, methodical steps minimize risk when locating an external gas line with a probe, shovel, or non-invasive locator.
Proceed slowly, angling the probe to avoid puncture. Use hand tools near marked zones, maintain visual contact with locator readouts, and stop immediately on any unexpected resistance or the detection of a metallic signal.
Step 5 Identify and mark valves, meters, and connection points
Once the main line is exposed and its route confirmed, the technician methodically locates and marks valves, meters, and connection points to guarantee safe access and future identification.
Each component is labeled with durable, weatherproof markers and recorded on a site map. Critical isolation points receive bright flags and GPS coordinates.
Photos and notes document condition, orientation, and any needed repairs for handoff to the homeowner.
Step-by-Step Process to Locate an Internal Gas Line
The process begins by locating the gas meter and main shutoff to establish control points before any inspection.
Next, the route of supply lines to appliances and their branch runs should be traced while observing joints and connection points.
Finally, conduct gas leak checks with an electronic detector and soapy water, and guarantee safe access when inspecting crawlspaces, basements, and utility rooms.
Step 1 Identify the gas meter and main shutoff location
A clear understanding of where the gas meter and main shutoff are located is essential before attempting to trace any internal gas line.
The homeowner should locate the exterior meter, note the service entrance, and identify the readily accessible shutoff valve.
Record its orientation (open/closed), photograph for reference, and keep clear access.
Contact the gas utility if the shutoff is obstructed or unclear.
Step 2 Trace appliance supply lines and branch runs
Begin by visually following each appliance’s visible piping from its connection point back toward common runs, noting pipe material, diameter, and any fittings or unions that indicate branch junctions.
Track routes through basements, crawlspaces, and walls where accessible, marking tee fittings and shutoff valves.
Record parallel runs and securements, and sketch a simple map showing branch locations relative to the meter for reference.
Step 3 Use a gas leak detector and soapy water test on joints
With branch runs identified and a map sketched, attention shifts to verifying joint integrity using a handheld gas leak detector and a simple soapy water test.
The detector scans fittings, valves, and connection points for elevated readings. For confirmation, a mild soap solution is brushed on joints; persistent bubbling indicates leakage.
Any confirmed leak prompts immediate shutoff and professional repair.
Step 4 Safe access to crawlspaces, basements, and utility rooms
Before entering confined spaces, the inspector confirms that the gas supply is shut off at the meter and that combustible gas readings at the entrance are at background levels using a calibrated detector.
The inspector wears PPE, verifies ventilation, uses a tripod or harness if needed, illuminates with intrinsically safe lights, avoids disturbing suspected lines, documents locations, and exits immediately if readings rise or conditions worsen.
When to Hire a Professional and What to Expect
Signs of complex or potentially hazardous issues — such as suspected leaks, unclear as-built plans, or work that requires shutoff of service — warrant hiring a licensed plumber or utility technician.
Professionals typically perform pressure tests, use electronic gas detectors or tracer gas, and locate buried lines with magnetic or ground-penetrating equipment.
Homeowners should ask about certifications, insurance, method of detection, expected costs, and request written estimates, scope of work, and proof of permits or qualifications.
Criteria that require a licensed plumber or utility technician
When gas line issues extend beyond minor visual checks or simple odor detection, a licensed plumber or utility technician should be engaged promptly.
These professionals have the training, calibrated equipment, and legal authority to perform pressure testing, leak pinpointing, and safe repairs or shutoffs.
Engage a pro for suspected leaks, unexplained pressure drops, post-excavation work, appliance replacements tied to gas, or municipal code compliance and permits.
Typical professional services and detection methods
Contacting a qualified technician typically initiates a structured response: the professional will first interview the occupant about odors or performance issues.
Then, they will perform calibrated leak detection (soap testing, combustible gas detectors, or electronic sniffers), pressure testing of the system, and visual inspection of accessible fittings and appliances.
They may use tracer gas, line-locators, or thermal imaging, document findings, and recommend repairs or utility coordination.
Questions to ask and documentation to request from contractors
After a professional inspection and any recommended repairs are proposed, homeowners should know which questions to ask and which documents to obtain before work begins.
Request contractor license, insurance certificates, written estimates, scope of work, timeline, permit responsibilities and warranty terms.
Ask about experience locating underground utilities, testing methods, safety protocols, subcontractors, and post‑work verification.
Keep copies for records and municipal inspections.
Common Hazards and How to Avoid Them
Homeowners often misread utility maps, ignore local marking services, or rely on metal detectors alone when locating gas lines, which can lead to dangerous errors.
DIY excavation and improper pressure or soap testing increase the risk of severing a line or failing to detect leaks.
If damage or a suspected leak occurs, evacuate the area, call the gas company and emergency services, and avoid using electronics or open flames until professionals declare the site safe.
Typical mistakes homeowners make when locating gas lines
What common errors lead to unnecessary risk when locating a gas line? Homeowners often rely on guesses, ignore utility markings, or neglect to contact local locators. They use inappropriate tools, disturb meter areas, or misinterpret plans. Failure to document findings, skip inspection, or assume buried lines follow obvious routes increases danger. Following protocols and confirming with professionals prevents these mistakes.
Risks of DIY excavation and improper testing
Strike, probe, or test without proper training and the consequences can be severe: DIY excavation and improper gas-line testing risk fires, explosions, carbon-monoxide exposure, and serious injury from ruptured pipe segments or displaced fittings.
Untrained attempts can also damage nearby utilities, create costly repairs, and impede emergency response. Properly trained technicians, correct locators, and adherence to regulations minimize these hazards.
How to respond to accidental damage or suspected leaks
After an accidental hit or the smell of gas, immediate and measured actions greatly reduce risk to people and property.
Evacuate occupants, avoid flames, electronics, or vehicle engines, and shut off gas only if trained and sure of the valve location.
Call the gas company and emergency services from a safe distance.
Ventilate if instructed, keep others away, and document the incident for professionals.
Maintaining and Documenting Gas Line Locations
Maintaining clear, accurate records of gas line locations begins with visible, durable markers and a mapped plan showing route, depth, and connection points.
Records should be updated promptly after installations, repairs, or relocations and shared with local utility records when required.
A routine inspection and maintenance schedule—documenting dates, findings, and actions—helps guarantee long-term safety and regulatory compliance.
Best practices for marking and mapping gas line routes on your property
Clear, consistent marking and accurate maps are essential for reducing excavation risks and ensuring long-term safety around gas lines.
Use durable, color-coded markers and stake flags at regular intervals, noting depth where known.
Create a scaled map showing pipe routes, fittings, meters, and surface references.
Store digital and printed copies, label versions with dates, and share copies with contractors and utility services.
How to update records after installation or repairs
Document changes to gas line locations promptly whenever installations, modifications, or repairs occur to preserve accurate records and reduce future excavation risk.
Update as-built drawings, GPS coordinates, and property maps; note date, contractor, and description of work.
Submit revisions to utility companies and local permitting agencies, retain digital and hard copies, and inform homeowners or occupants.
Guarantee future contractors access the updated records before digging.
Long-term inspection and maintenance schedule recommendations
A regular, risk-based inspection and maintenance schedule helps guarantee gas line locations remain accurate and safe over time.
Inspections should occur annually for visible lines and every 3–5 years for buried mains, with immediate checks after ground disturbance or suspected damage.
Document dates, findings, repairs, and GPS coordinates. Retain records long-term and review schedules after incidents, changes in use, or regulatory updates.
Comparison of Detection Methods and Tools
When comparing visual inspection, electronic locators, and professional services, each approach offers distinct trade-offs in cost, accuracy, and required expertise. The following table highlights a simple comparison to guide method selection based on project needs. Consideration of site complexity and risk will determine whether a quick inspection, instrument use, or licensed contractor is most appropriate.
| Method | Typical Accuracy | Best Use Case |
|---|---|---|
| Visual inspection | Low | Preliminary checks, visible markers |
| Electronic locators | Medium–High | Tracing buried lines on-site |
| Professional services | Highest | Complex sites, legal/permit requirements |
Visual inspection vs. electronic locators vs. professional services
Choosing the right method to locate a gas line depends on site conditions, required accuracy, and available resources.
Visual inspection suits simple, visible runs but misses buried or obstructed lines.
Electronic locators offer greater precision for metallic or tracer-equipped pipes yet require calibration and skill.
Professional services combine experience, advanced equipment, and liability coverage, advisable for complex, uncertain, or high-risk situations.
Practical Tips and Preventive Measures for Future Projects
Practical precautions reduce the risk of striking a gas line during future landscaping or construction. Coordination with utility companies and nearby residents, along with attention to seasonal and weather impacts, helps guarantee safe planning and execution.
A concise safe-digging checklist supports consistent on-site practice and compliance.
- Confirm utility locates, mark lines, and follow local one-call center guidance before any excavation.
- Notify neighbors of planned work, schedule joint inspections if shared easements exist, and document permissions.
- Account for freeze/thaw cycles, heavy rains, and seasonal ground movement when timing projects and choosing excavation methods.
Safe digging checklist for landscaping and construction
A concise, step-by-step checklist helps landscapers and contractors confirm utility locations, obtain required permits, and prepare safe excavation methods before breaking ground.
The checklist includes contacting local utility locate services, marking lines, using hand digging within tolerance zones, planning shoring and erosion controls, scheduling inspections, briefing crews on emergency shutoff and evacuation, documenting permits and clearances, and verifying weather and equipment readiness.
How to coordinate with utilities and neighbors
After completing the pre-dig checklist, coordinating with utility companies and neighboring property owners becomes the next priority to prevent damage and delays.
Contact the local one-call center, schedule markouts, and obtain written confirmations.
Notify adjacent owners of planned work, agreed access, and timelines.
Share contact information for emergencies, document permissions, and confirm utility responses before any excavation begins to guarantee safety and accountability.
Seasonal and weather considerations affecting gas line safety
Because soil conditions and weather patterns directly influence excavation safety, planning around seasonal variations is essential for any gas-line work.
Cold freezes harden ground, complicating digs and increasing tool stress. Wet seasons cause unstable trenches, erosion, and shifting markers. High winds and storms raise leak risk and delay detection.
Schedule projects for stable, dry periods; inspect and secure sites after extreme weather.
Conclusion
Homeowners should treat gas line location as a safety-critical task requiring care, proper tools, and, when unsure, professional help. One striking statistic underscores the stakes: the U.S. Consumer Product Safety Commission estimates that unintentional natural gas explosions cause hundreds of injuries annually. By confirming the need, taking immediate precautions, using reliable detection methods, documenting findings, and maintaining clear records, property owners reduce risk and guarantee safer future projects.