Pipe Thread Guide: Types, Sizes & How to Identify Them Easily
This concise guide provides essential information on common pipe thread types, including NPT, BSPT, BSPP, GHT, and metric. It covers how to measure major diameters and pitch/TPI, as well as quick visual checks to differentiate between taper and parallel forms. For accurate identification, it recommends using calipers, pitch gauges, and go/no-go rings, along with simple leak tests. Additionally, it discusses sealing options like PTFE tape, paste, or gaskets that correspond to the thread form. Safety considerations for gas and high-pressure systems are emphasized, and users are directed to explore more detailed sizing, standards, and troubleshooting if needed.
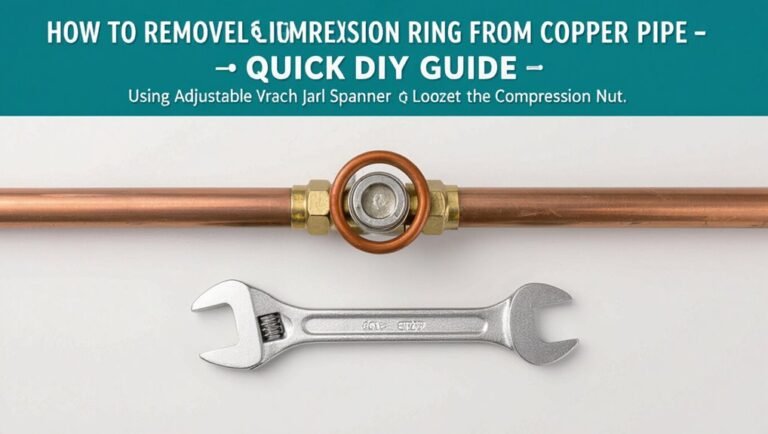
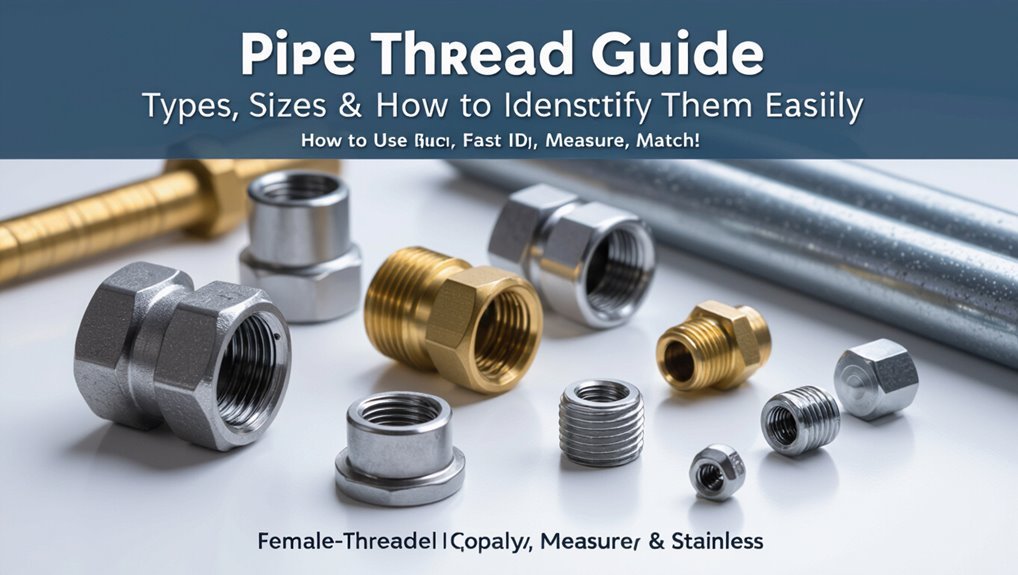
How to Use This Guide: Fast ID, Measure, Match
When identifying a pipe thread quickly, the reader should first perform a visual inspection to note thread shape and any markings, then measure outer or inner diameter and pitch with calipers and a thread gauge, and finally compare those measurements to a labeled reference chart to select the matching standard.
The guide organizes standards by profile, pitch units, and nominal size, with common series grouped for rapid scanning.
Photographs show real samples alongside measurement overlays.
A troubleshooting checklist addresses ambiguous marks, damaged threads, and adapters.
Recommended tools, tolerances, and conversion tables are provided to guarantee consistent identification and correct replacement selection.
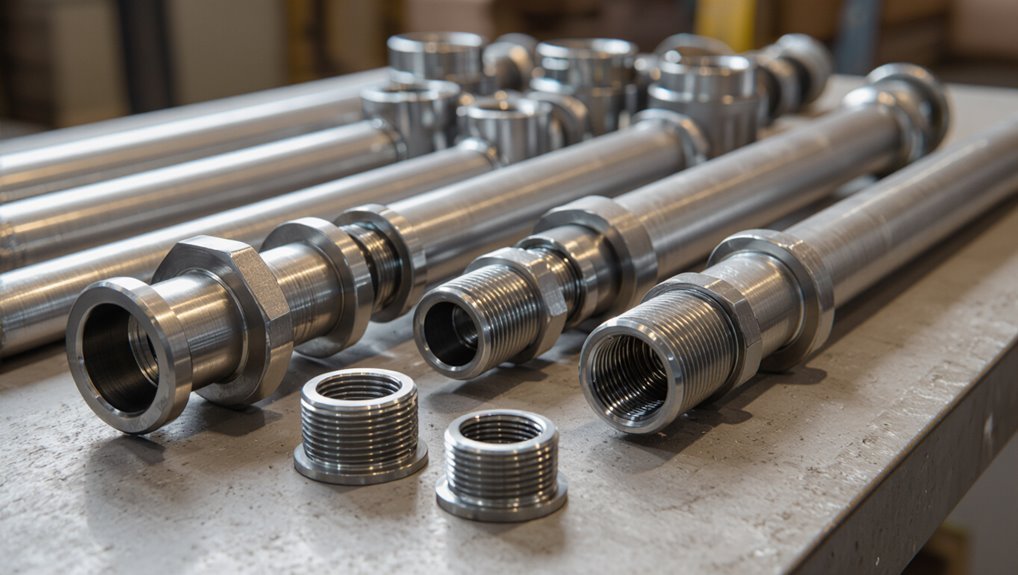
What Is a Pipe Thread?
A pipe thread is a helical ridge on a fitting or pipe designed to create mechanical engagement and, when required, a pressure-tight seal between components.
Threads may be male (external) or female (internal), with matching profiles that control fit and sealing method.
Understanding whether a thread is purposed for mechanical support, sealing with tape or compound, or metal-to-metal sealing guides correct selection and installation.
Thread Purpose Explained
Used to join and seal sections of tubing, a pipe thread is a helical ridge cut or rolled onto the outside or inside of a pipe that provides mechanical engagement and a pressure-tight joint. It transfers axial and torsional loads, aligns components, resists vibration, and maintains fluid containment under pressure. Selection depends on pressure rating, material compatibility, thread form, and sealing method. Proper taper, pitch, and surface finish guarantee reliable sealing with or without sealant. Inspection detects wear, damage, and contamination that compromise integrity. Maintenance and correct installation extend service life and prevent leaks.
| Function | Benefit |
|---|---|
| Mechanical grip | Prevents separation |
| Sealing | Prevents leaks |
| Alignment | Ensures fit |
| Load transfer | Distributes stress |
| Vibration resistance | Maintains joint integrity |
Male vs Female
In pipework, “male” and “female” describe complementary threaded ends: the male thread is external, protruding from the pipe or fitting, while the female thread is internal, cut or formed inside a receiving part.
Male threads typically screw into female counterparts to create mechanical joints and, when tapered, pressure-tight seals.
Identification relies on visual inspection and feel: external ridge profile indicates male, internal groove profile indicates female.
Proper matching requires identical thread standard, size, and hand (right- or left-hand).
Incorrect pairing causes leaks, cross-threading, or damage.
Adapters convert between genders or standards when necessary.
Why Pipe Thread Type Matters for Sealing and Safety
Different pipe thread types affect which thread sealants are compatible and how they bond to the joint. They also influence the pressure rating a connection can safely hold and the risk of stress-related failures.
Appropriate selection and testing methods, including visual inspection and pressure-leak testing, are consequently essential for reliable leak detection and safety.
Thread Sealant Compatibility
Recognizing the specific thread form and sealing method is essential because pipe thread type determines which sealants will create a reliable, pressure-tight joint and which can cause leaks or safety hazards.
Compatibility depends on thread geometry (tapered vs. parallel), material (metal, plastic), and service media (gas, water, chemicals).
PTFE tape suits many tapered metal threads but can embed in soft plastics; pipe dope offers chemical-resistant options and better fill for damaged threads.
Anaerobic sealants cure where air is excluded and work well for metal threads but are unsuitable for some plastics and dissimilar metal joints.
Manufacturer guidance and testing guarantee safe, durable seals.
Pressure Rating Impact
For pipe systems subject to pressure, thread type directly influences the joint’s allowable working pressure and failure modes. Tapered threads (e.g., NPT) create mechanical interference that increases sealing strength as torque rises, but rely on proper sealant and correct mating to prevent overstress.
Parallel threads (e.g., BSPP) depend on a separate gasket or O-ring for pressure containment, concentrating load on the seal element rather than thread engagement. Material compatibility, thread accuracy, and assembly torque determine burst and leakage thresholds. Selecting appropriate thread form for fluid type, temperature, and system pressure reduces fatigue, galling, and catastrophic failure risk.
Leak Detection Methods
Because thread form governs how a joint seals and where leaks originate, selecting appropriate leak-detection methods must account for whether a connection is tapered or parallel. Inspectors prioritize methods that reveal thread-face gaps, sealant failures, and micro-cracks without disturbing sealing geometry. Visual inspection and pressure testing indicate gross failures; soap-solution testing and ultrasonic detection expose small leaks and leak paths through threads or fittings. Choice depends on fluid, system pressure, and access.
- Visual inspection for thread damage and sealant application.
- Hydrostatic or pneumatic pressure testing for system integrity.
- Soap/bubble testing for small external leaks.
- Ultrasonic/infrared for pressurized or inaccessible leaks.
Quick ID: Tell NPT From BSP in 60 Seconds
Want to tell NPT from BSP in under a minute? Observe thread angle and taper: NPT uses a 60° thread angle and tapered male/female faces; BSP typically uses 55° (BSPT or BSPP) with BSPP often parallel.
Count threads per inch or measure pitch: NPT uses UNC-style pitches, BSP uses metric or Whitworth-derived pitches—compare to reference chart.
Check sealing method: NPT seals on the threads (tapered interference), BSPP seals with a gasket or O-ring when parallel.
Inspect marking or origin: fittings stamped “NPT” or “BSP” often indicate standard.
These quick checks distinguish systems reliably.
Essential Tools for Identifying Pipe Threads
Having distinguished NPT from BSP by angle, taper, pitch, and sealing method, a small set of tools makes those visual checks quick and reliable.
The list below outlines compact, practical instruments used to inspect threads without performing dimensional verification. Each tool supports visual or tactile confirmation and helps document findings before measurement.
- Thread pitch combs for rapid pitch matching and coarse/fine differentiation.
- Optical loupe or magnifier to inspect crest/valley shapes and minor damage.
- Go/no‑go threaded plugs and rings for basic engagement feel.
- Thread charts and reference gauges with clear diagrams for on‑site comparison.
Quick Checks With Calipers and Thread Gauges
Using a digital caliper and a small set of thread gauges, a technician can quickly verify major thread characteristics before committing to full inspection.
Measure outside or inside diameter with the caliper, record to the nearest hundredth millimeter or thousandth inch, and compare to nominal sizes.
Use coarse gauges to match pitch range, confirming metric versus imperial form.
Check thread angle visually against known standards and note hand (right or left).
Assess engagement depth and damage areas to decide if precision gauging is warranted.
Log results and select appropriate full inspection tools if dimensions fall near tolerance limits.
How to Use a Thread Pitch Gauge (Step-by-Step)
The procedure begins by selecting the correct pitch gauge sized for the thread series being measured.
The gauge leaves are then matched to the thread profile until one fits cleanly without gaps.
Finally, the user counts the threads per inch or measures the pitch to confirm the specification.
Choose The Correct Gauge
Select the correct thread pitch gauge by matching its teeth to the crest and valley pattern of the pipe threads; this initial alignment determines whether the gauge will read an accurate pitch and prevents damage to both gauge and pipe.
The inspector chooses a metric or imperial set based on known system, then selects a range covering expected pitches.
Clean threads of debris and lightly dry them to expose profile.
Hold the gauge blade flat against the thread flank without rocking; a perfect fit sits flush along crests and valleys.
Note the marked pitch on the blade for later verification.
- Identify system (metric/imperial)
- Pick appropriate blade range
- Clean and dry threads
- Seat blade flat and read pitch
Match Threads And Count
1 or 2 light taps with the gauge blade confirm engagement before counting: the inspector aligns the chosen blade with the pipe thread profile, ensuring each tooth seats evenly in crests and valleys without gaps or rocking.
Once seated, the inspector counts threads across a known length or uses the gauge marking directly to read threads per inch (TPI) or millimeters per thread.
Multiple measurements along the length verify pitch consistency and detect damaged threads.
If mismatch occurs, alternative blades are tried until one fits perfectly.
Record the identified pitch, note handedness and thread form, then match to standard charts for size and type.
Measuring Thread Diameter and Length Accurately
Accurate measurement of thread diameter and length begins with proper tools and a consistent method: calipers for major and minor diameters, a thread micrometer or pitch gauge for crest-to-crest spacing, and a depth micrometer or ruler for thread length.
The procedure records major, minor, and pitch measurements, noting thread direction and engagement limits. Measurements should be taken at multiple points to detect wear or deformation.
Clean threads and steady pressure improve repeatability. Documented results enable correct identification against standard charts and guarantee fittings match without trial-and-error.
- Clean threads, zero instruments
- Measure major and minor diameters
- Determine pitch with gauge
- Measure usable thread length
How to Test Whether a Thread Is Tapered or Parallel
When inspecting a threaded fitting to determine whether it is tapered or parallel, the examiner should first note that tapered threads reduce diameter along their length while parallel threads remain constant; this fundamental difference guides the choice of measurement points and gauges.
Measure major diameter near the thread start and again several turns in; a measurable decrease indicates taper.
Use a thread gauge to confirm pitch consistency and compare measurements to manufacturer taper specifications (e.g., 1:16).
For fittings that cannot be measured easily, a calibrated caliper and visual alignment with a straight reference along the thread flank reveal convergence or uniformity.
Male vs Female Pipe Threads: Tell Them Fast
The section compares male and female pipe threads to help readers identify each quickly.
Male threads are characterized by external ridges that spiral outward, while female threads are internal grooves cut into a fitting or opening.
Clear visual and tactile checks make distinguishing them fast and reliable.
Identifying Male Threads
Identify a male pipe thread by its external ridges and projecting form: male threads protrude from the fitting and mate with inward-facing female threads.
Observation focuses on visible peaks, thread direction, and exposed lead-in.
Touch confirms outward profile and uninterrupted spiral.
Measurements verify size and pitch using calipers or a thread gauge.
Common male types include tapered and parallel; taper narrows toward the end, creating mechanical seal when tightened.
Visual cues prevent mistaken connections and protect sealing surfaces.
Handle male fittings by gripping non-threaded areas to avoid damage.
- Visible external ridges
- Outward spiral profile
- Measurable pitch and diameter
- Taper versus parallel
Recognizing Female Threads
Many female pipe threads can be recognized by their recessed spiral grooves and inward-facing profile that accept a mating male thread.
Observers note the hollow end, internal threading depth, and smoother entry chamfer that guides the male.
Measurements use calipers to determine inner diameter and thread pitch gauges to match threads per inch or pitch in millimeters.
Common standards include NPTF, BSPP, and BSPT; sealing methods vary by taper, straight form, and use of sealant.
Visual inspection for wear, corrosion, or damaged crests helps decide reuse.
Correct identification prevents leaks and assures compatible fittings during installation or maintenance.
Nominal vs Actual Pipe Diameters
When comparing nominal and actual pipe diameters, nominal size functions as a convenient label that often does not match the pipe’s measured internal or external dimensions.
The nominal system links to historical flow capacity and standard fittings rather than precise millimeter or inch measures.
Understanding the discrepancy prevents mismatched joints and incorrect material selection.
Specifiers must consult standards and manufacturer charts to determine true inside and outside diameters for a given nominal designation.
Threaded fittings rely on those true measurements combined with thread form to seal properly; verify compatibility before assembly.
- Nominal = label, not measured dimension.
- Actual ID varies by schedule.
- OD is more consistent than ID.
- Use standards/charts to confirm.
Thread Pitch, TPI, and How to Read Them
Thread pitch and threads per inch (TPI) are two ways to describe how tightly threads are spaced on a pipe fitting, with pitch typically given as the distance between crests and TPI as the number of threads in one inch.
Accurate identification requires measuring either the linear pitch with a caliper or counting threads over a known length to calculate TPI.
Clear understanding of these measures guarantees proper matching of male and female threads to prevent leaks and cross-threading.
Thread Pitch Vs. TPI
How does one distinguish between pitch and TPI on a pipe fitting? Pitch is the linear distance between adjacent thread crests, expressed in millimeters (metric) or inches; TPI (threads per inch) counts how many thread peaks occur within one inch (imperial). They describe the same spacing differently: higher TPI equals finer, smaller pitch; larger pitch equals coarser, fewer TPI. Compatibility requires matching the same system and value. Simple conversion connects them: TPI = 1 / pitch (in inches).
Practical identification relies on visual comparison and specification labels rather than assumed standards.
- Pitch: distance between crests.
- TPI: thread count per inch.
- Higher TPI = finer threads.
- Match system and value.
Measuring Thread Pitch
Measuring pitch and TPI on a pipe fitting requires simple tools and careful alignment to guarantee an accurate reading.
A thread gauge or caliper measures distance between adjacent crests; metric threads use pitch (millimeters per thread) while imperial threads use TPI (threads per inch).
To read pitch, count one full thread span and measure its length with a caliper, dividing length by thread count.
For TPI, count threads along one inch or measure a shorter length and scale to one inch.
Make certain gauge teeth seat fully without deformation and verify against manufacturer’s charts for correct identification.
How Taper Angle Affects Pipe-Thread Sealing
When a pipe thread’s taper angle changes, the rate at which male and female flanks compress and contact along the length shifts, directly influencing seal quality and leak propensity.
A steeper taper causes earlier flank engagement, concentrating deformation near the entry and increasing reliance on sealant or washers.
A shallower taper spreads contact over more threads, improving metal-to-metal bearing but requiring greater torque for full engagement.
Mismatch between mating tapers reduces effective contact area and raises leak risk.
Careful selection of taper suited to pressure, material, and installation practice optimizes sealing performance without over-stressing components.
- Steeper taper: early contact
- Shallower taper: distributed contact
- Mismatch: reduced sealing
- Selection: balance pressure and material
Threaded vs Machine Threads: The Key Differences
Changes in taper and contact behavior highlight how variations in geometry affect sealing, but threaded and machine threads differ in purpose and design beyond taper alone.
Threaded (pipe) threads are optimized for assembly, sealing under pressure, and often incorporate taper, crest/trough shapes, and thread form choices that manage interference and sealants.
Machine threads prioritize alignment, load distribution, and repeatable clamping in bolted joints; they are typically parallel with standardized profiles for fasteners and fittings.
Manufacturing tolerances, pitch, flank angles, and class of fit diverge to suit function: one seals fluids, the other secures components without relying on thread-induced sealing.
Tapered vs Parallel Pipe Threads: What Changes
In comparing tapered and parallel pipe threads, the most immediate difference is how they achieve a seal: tapered threads rely on interference as the male and female tapers compress together, while parallel threads depend on an external gasket, O‑ring, or metal-to-metal face seal to stop leakage. The contrast affects assembly, pressure behavior, and sealing practice.
Tapered threads require careful torque and sometimes sealant; parallel threads allow accurate alignment and often use a separate sealing surface. Selection hinges on connection type, desired reusability, and sealing method rather than thread profile alone.
- Assembly torque and sealing method differ.
- Alignment and orientation control.
- Reusability and maintenance considerations.
- Suitability for fittings and sealing hardware.
NPT: Features, Sizing, and Common Uses
Built on a tapered 60° thread form, National Pipe Taper (NPT) threads achieve a pressure-tight seal by wedging male and female threads together, often with the aid of thread sealant or tape to fill minor gaps and prevent leakage. NPT sizing uses nominal pipe size; actual thread OD and pitch vary by size and are standardized (e.g., 1/8″–2″). Common uses include plumbing, compressed air, gas lines, and hydraulic applications where tapered sealing is acceptable. Proper installation torque and sealant selection are important to avoid leaks or thread damage.
| Size (nominal) | Threads per inch | Typical use |
|---|---|---|
| 1/8″ | 27 | Instrument lines |
| 1/2″ | 14 | Plumbing fixtures |
| 1″ | 11.5 | Gas/hydraulics |
| 2″ | 8 | Industrial piping |
BSP: BSPT vs BSPP Explained
The section contrasts BSPT (tapered) and BSPP (parallel) thread forms, noting how their geometry affects sealing and fit.
It explains that BSPT typically seals on the threads while BSPP relies on a separate gasket or metal-to-metal seat.
Direction and thread pitch are specified to clarify compatibility and prevent mismatched connections.
BSPT Versus BSPP Basics
When comparing British Standard Pipe threads, two main types appear: BSPT (tapered) and BSPP (parallel). The distinction rests on thread form and sealing method. BSPT tapers toward the end, allowing threads to wedge and provide mechanical seal when paired with appropriate fittings.
BSPP maintains constant diameter and relies on a separate seal—such as an O-ring or washer—at the face. Both share the same 55° thread angle and similar pitch series, but are not interchangeable without adapters. Correct selection depends on system design, pressure, and compatibility with mating components.
- BSPT: tapered thread, self-sealing on thread.
- BSPP: parallel thread, requires face seal.
- Shared 55° angle and pitches.
- Not directly compatible; adapters needed.
Thread Seal And Direction
How does thread direction and sealing method affect BSP connections? Thread direction (handedness) is typically right-hand for BSPP and BSPT; left-hand threads exist for specific applications and must be identified before mating.
BSPP uses parallel threads and relies on a gasket, O-ring, or bonded seal at the face for pressure-tight joints.
BSPT employs tapered threads that create a metal-to-metal or thread-compression seal often augmented with sealant tape or paste.
Mixing BSPP and BSPT risks leaks or damage because parallel and tapered forms seal differently.
Proper matching of thread type, seal method, and installation torque guarantees reliable, leak-free connections.
Metric Pipe Threads: When You’ll See Them
Where are metric pipe threads most common? Metric pipe threads appear primarily in countries using the metric system and in industries adopting ISO standards.
They are specified on equipment imported from Europe or Asia and on technical drawings that reference ISO 228 or ISO 7. They show up in replacement parts, factory fittings, and machinery plumbing where metric specifications simplify manufacturing.
Installers encounter them when servicing exported appliances or international systems. Identification relies on measuring pitch and diameter and checking standard marks rather than imperial labels.
Common contexts include:
- European household plumbing
- Asian-manufactured valves and pumps
- Industrial machinery connections
- Automotive fluid fittings
Garden Hose and GHT/NH Standards
In discussions of hose fittings, garden hose thread (GHT), also known as national hose (NH) or simply hose thread, denotes a family of coarse, straight external threads with a 3/4‑inch nominal diameter and 11.5 TPI (threads per inch) in U.S. practice, designed primarily for low-pressure water delivery and quick hand-tight connections.
GHT is non-tapered; sealing relies on a washer or gasket in the mating coupling. Standards from ASME/ANSI and ASTM define dimensions, tolerances, and materials for compatibility. Adapters exist for converting to NPT or BSP, but care is required to avoid cross-threading and improper sealing.
When SAE or UN Threads Mimic Pipe Threads
Why do some SAE and UN fastener threads resemble pipe threads and cause confusion?
SAE and UN threads can share similar diameters, thread counts, and flank angles with pipe standards, leading to mistaken interchange. Manufacturing tolerances and common tooling amplify overlap.
Functionally they differ: SAE/UN are fastener systems for clamping; pipe threads seal fluids, sometimes with taper. Mismating can cause leaks or mechanical failure.
To illustrate common scenarios:
- Close diameter match between UNF and small pipe sizes.
- Identical threads-per-inch for certain SAE and BSP parallels.
- Use of tapered UN fittings in hydraulic assemblies.
- Reused tooling cutting ambiguous profiles.
Visual Cues: Identify NPT, BSPT, BSPP by Sight
Mistaken interchange between fastener and pipe threads often prompts inspection by eye, so recognizing visual cues for NPT, BSPT, and BSPP becomes practical.
NPT shows a pronounced taper and slightly rounded thread crests with visible gap narrowing toward the male end; female NPT sockets appear conical.
BSPT similarly tapers but uses Whitworth-style rounded roots and crests with a 55° thread angle, giving a subtly different profile.
BSPP is parallel, with uniform thread pitch and constant major diameter along the length; mating relies on a sealing face or O‑ring rather than taper.
Visual inspection also notes thread lead-in geometry and overall straightness for quick differentiation.
Common Markings and Stamps on Fittings
The section outlines the typical markings found on fittings and how they are used to verify compatibility and quality.
Material grade stamps indicate composition and pressure ratings, while manufacturer logos help trace provenance and certify standards compliance.
Recognizing these marks aids in proper selection and safe installation.
Material Grade Stamps
In identifying fittings, material grade stamps provide a compact, reliable indication of the alloy, heat treatment, and applicable standard.
These stamps are abbreviated codes (e.g., 304, A105, 316L) or ASTM/ASME references that inform selection, pressure temperature limits, and corrosion resistance.
They appear on bodies, flanges, and couplings, often near size markings or batch numbers.
Inspectors use them to verify compatibility with system fluids and welding procedures.
Legibility, location, and consistency with mill certificates are critical for acceptance during installation and maintenance.
- Alloy number or grade
- Heat/lot or trace code
- Standard designation (ASTM/ASME)
- Temperature/pressure class
Manufacturer Logos
Manufacturer logos stamped on fittings serve as concise identifiers of origin, enabling traceability and warranty verification throughout a pipeline’s life. These marks are typically abbreviated names, symbols, or registered trademarks applied by casting, stamping, or laser etching.
Inspectors use logo placement, style, and accompanying codes to confirm manufacturer, production batch, and compliance with specifications. Logos assist procurement, maintenance, and failure analysis by linking a part to quality records and certifications.
Corrosion, overpainting, or machining can obscure marks; measured verification and cross-referencing with documentation are standard practices to guarantee accurate identification and accountability.
Matching Threads: Confirm Compatibility Before Assembly
How can a reliable joint be achieved without verifying that male and female threads match precisely? Inspectors confirm pitch, diameter, and form before assembly to prevent leaks and damage. Visual checks, gauges, and thread charts reduce mismatches. Matching also considers taper versus straight threads and national or metric standards to guarantee proper engagement. Before tightening, trial engagement by hand reveals cross-threading or interference.
- Measure pitch and major/minor diameters with gauges.
- Verify thread form (rounded, sharp, trapezoidal) against specs.
- Confirm taper or straight type and standard (NPT, BSP, metric).
- Hand-start engagement test to detect cross-threading or binding.
Sealing Pipe Threads: Tape, Compound, and Mechanical Seals
When pressure, fluid compatibility, and thread type demand a leak-resistant connection, appropriate sealing methods — PTFE tape, pipe dope (thread compound), or mechanical seals such as O-rings and metal crush washers — are selected based on application requirements.
PTFE tape provides low-friction, non-reactive sealing for many plumbing and gas joints when applied correctly.
Thread compound fills irregularities and can offer chemical resistance or lubricity where tape is unsuitable.
Mechanical seals create positive metal-to-metal or elastomeric barriers for high-pressure, dynamic, or hardened surfaces.
Correct application, material compatibility, and torque control prevent leaks and preserve thread integrity across sealing choices.
When to Use PTFE Tape vs Pipe Dope
Choosing between PTFE tape and pipe dope depends on the joint’s function, materials, and service conditions. PTFE tape suits clean, threaded metal or plastic fittings where ease of application, corrosion resistance, and future disassembly matter.
Pipe dope fits irregular threads, soft metals, or where lubricating during assembly reduces galling. Compatibility with media and temperatures guides selection; some compounds seal better on wet threads or in slow leaks.
For permanent or vibration-prone joints, dope often provides superior adhesion. Consider manufacturer recommendations and material compatibility before choosing.
- Use PTFE for quick, nonpermanent assemblies.
- Use dope for irregular or damaged threads.
- Prefer dope with soft metals.
- Check chemical and temperature compatibility.
High-Pressure and Gas Applications: Thread Rules
Because gas and high-pressure fluid systems amplify the consequences of leaks and failures, thread selection and sealing technique must meet stricter standards than for ordinary plumbing.
Components should use specified thread forms (often NPT, NPTF, BSPP/BSPT variants) rated for pressure and compatible with the service gas or fluid.
Use tapered threads where mechanical interference plus sealant or thread sealant compounds approved for gas create pressure-tight joints; consider parallel threads with proper O-rings or metal-to-metal seals when required.
Torque to manufacturer limits, inspect for damage, and follow codes (e.g., ASME, ISO, local gas regulations) and leak-testing protocols before service.
Avoiding Cross-Threading and Assembly Mistakes
A technician should visually align male and female threads before engagement to prevent misalignment.
Threads ought to be hand-started to confirm correct seating and to avoid cross-threading under tool torque.
Appropriate thread lubricant or sealant should be applied as specified to ease assembly and protect threads.
Align Threads Before Starting
When preparing pipes for assembly, operators should visually align male and female threads so the first few engaged turns match squarely, preventing cross-threading that can damage threads and compromise seals.
Inspect threads for debris, burrs, and deformities before mating.
Orient components so gravity and access allow straight engagement.
Use light pressure while rotating to sense correct seating; back off if resistance or binding occurs.
Confirm thread pitch and type match to avoid misalignment.
- Clean and inspect threads.
- Align visually and by touch.
- Maintain straight axial pressure.
- Stop and reassess on binding.
Hand-Start Threads First
Usually, operators should always hand-start threads before using tools to make sure the pipe engages smoothly and to prevent cross-threading. The technician tests engagement by turning a few threads by hand; resistance or misalignment signals correction. Proper hand-starting preserves thread form and avoids costly rework. When threads seat easily, tools finish tightening to specified torque.
| Step | Action |
|---|---|
| 1 | Inspect threads |
| 2 | Align components |
| 3 | Hand-start 3–5 turns |
| 4 | Check smooth rotation |
Consistent hand-start practice reduces cross-threading incidents and improves assembly reliability.
Use Proper Lubrication
Proper lubrication complements hand-started threads by reducing friction and helping parts seat without forcing, which lowers the risk of cross-threading and incorrect engagement. Application of appropriate lubricants or thread sealants guarantees uniform torque readings, prevents galling on tapered threads, and aids disassembly later.
Selection depends on material compatibility, pressure, and fluid service; do not mix incompatible products. Clean threads before applying a thin, even coat and avoid excess that can attract debris. Use manufacturer recommendations for torque adjustments when lubrication is present. Inspect assemblies visually and by feel during initial tightening to confirm proper engagement.
- Use correct lubricant type
- Clean threads first
- Apply thin, even coat
- Adjust torque for lubrication
Troubleshooting Leaks From Wrong Thread Type
How can a mismatch in thread type cause a steady drip or sudden blowout? A wrong thread pairing prevents proper engagement and sealing: taper vs straight, pitch differences, or left/right mismatch leave gaps or concentrate stress.
Signs include visible cross-threading, uneven gap at the joint, or fasteners that stop before full engagement.
Troubleshooting steps involve depressurizing the system, inspecting threads for damage, comparing pitch and profile with gauges, and testing fit dry before sealing.
Damaged fittings should be replaced; minor seal failures may respond to correct thread-matched adapters. Never force mismatched threads, as that risks failure and injury.
Converting Between Thread Standards Safely
When adapting fittings between different thread standards, care must be taken to match pitch, diameter, taper, and pressure rating to prevent leaks or failures.
Proper conversion requires verifying thread form (parallel vs tapered), comparing nominal sizes and thread per inch or pitch, and selecting certified adapters rated for the system’s pressure and media.
Sealing methods must suit the thread type; PTFE tape or thread sealant may be inappropriate for gas or high-temperature services.
Torque to manufacturer specifications and pressure-test assemblies before service.
Consider replacing mismatched components with compatible standard fittings when uncertainty exists.
- Confirm thread form and size
- Check pressure rating
- Choose compatible adapter and sealant
- Perform controlled pressure test
Tools and Kits Every DIYer Should Own for Thread ID
For identifying and verifying pipe threads accurately, a small core kit covers most needs: a set of thread gauges (both NPT and BSP/NPTF profiles), calipers for measuring outer and inner diameters, a pitch gauge for threads-per-inch or metric pitch, and a tapered-thread reference mandrel.
Additional useful items include thread identification charts, a set of nut and plug masters, and a digital angle/lead checker for confirming taper. A flashlight and magnifier aid visual inspection.
Organize tools in a labeled case and keep material swatches (brass, steel, plastic) for feel comparison. Regular calibration guarantees reliable measurements.
Buying Tips: What to Check When Buying Fittings Online
What should a buyer verify before clicking “add to cart”? A purchaser should confirm material compatibility, thread standard, and precise dimensions against the intended system. Check finish and corrosion resistance for environment suitability. Verify seller credibility, return policy, and warranty. Review photos and specifications for thread profile and pitch.
- Confirm material and pressure rating match application.
- Match thread type (NPT, BSP, etc.) and measure pitch/diameter.
- Inspect seller reviews, clear photos, and part numbers.
- Understand shipping, returns, and warranty terms before purchase.
When to Call a Pro: Code, Gas, and Complex Systems
Facing jobs that involve building codes, fuel-gas systems, or complex pressurized networks, a homeowner or DIYer should recognize the limits of amateur work and call a qualified professional.
Licensed plumbers or gasfitters guarantee compliance with local codes, permits, and inspections.
Gas fittings, pilot lines, and appliances require certified skills to prevent leaks and carbon monoxide risks.
High-pressure, multi-branch, or commercial systems demand engineering knowledge and pressure testing beyond basic hand tools.
For renovations tied to structural changes or utility meters, utilities may require credentialed contractors.
When safety, liability, or code enforcement are factors, engaging a pro is the prudent choice.
Summary Checklist: Identify, Measure, Match, Seal
How should a DIYer approach the final steps of a pipe-thread project? A concise checklist helps guarantee a reliable finish: identify thread type and handedness, measure diameter and pitch, select matching fittings and materials, and prepare sealing method.
Confirm visual and measured matches before assembly. Use appropriate compound or tape and avoid over-tightening. Test for leaks under controlled pressure and recheck connections. Keep records of sizes and materials for future maintenance.
Safety and code compliance guide when to stop and call professionals. Consistent discipline on these steps reduces leaks and prolongs system life.
- Identify thread type and hand
- Measure diameter and pitch
- Match fittings and materials
- Seal properly and test
Conclusion
Like a map reader tracing faint rivers, the guide leaves the reader equipped to navigate pipe threads with confidence. Knowing what a thread is, how NPT and BSP differ, which tools reveal their secrets, and when to defer to a professional turns confusion into clarity. With measurement, matching, and proper sealing as compass points, a simple checklist guarantees fittings meet function and code—keeping systems safe, watertight, and ready for whatever pressure lies ahead.