What Is a Down Pipe? Easy Guide to Gutters & Drainage Basics
A down pipe is a vertical pipe connected to a building’s exterior that directs rainwater runoff from gutters down to the ground or a storm drain. It is essential for preventing issues such as foundation seepage, soil erosion, and staining by managing where rainwater is discharged. Down pipes can be made from various materials, including PVC, aluminum, copper, and cast iron. Proper sizing is crucial to accommodate the roof area and local rainfall conditions to prevent overflow. Regular inspections can help identify leaks, clogs, or loose brackets, and additional information is available on installation, maintenance, and water harvesting options.
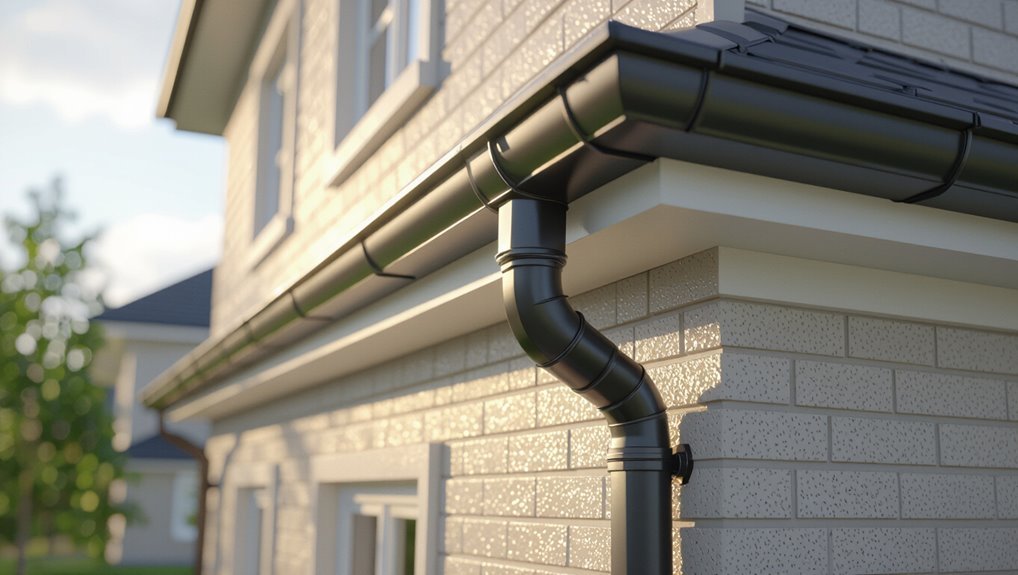
What Is a Down Pipe and Why It Matters

Often mounted along a building’s exterior, a down pipe is the vertical conduit that channels rainwater from gutters to the ground or a drainage system.
It protects foundations, walls, and landscaping by directing runoff away from structures, reducing erosion and moisture infiltration.
Materials vary—PVC, aluminum, steel, copper—selected for durability, climate, and budget.
Proper sizing and placement prevent overflow and backflow during heavy storms.
Regular maintenance—clearing debris, checking joints and fastenings, and repairing leaks—ensures reliability.
Integrated with drainage networks, a down pipe contributes to effective water management, prolonging building integrity and minimizing costly water damage.
Down Pipe vs. Downspout : Does It Matter?
How different are the terms “down pipe” and “downspout” in practice? The distinction is mostly regional and terminological rather than functional. Both refer to vertical channels that move rainwater from gutters to ground or drainage.
Practical differences include material, shape, and local vocabulary, but performance goals align: control flow, prevent erosion, protect foundations.
- Terminology: regional preferences (e.g., British vs. American).
- Material: PVC, metal, or clay options.
- Shape: round, rectangular, or custom profiles.
- Function: guide water safely away from the building.
Understanding naming avoids confusion when specifying repairs or purchasing parts.
How a Down Pipe Fits Into Your Gutter System
A down pipe serves as the vertical channel that carries rainwater from the gutter run down the side of a building.
It must be properly aligned and sealed to guarantee efficient transfer of water without leaks or overflow.
At the base, the down pipe connects to drainage outlets or underground pipes to route water away from the foundation.
Vertical Water Channeling
Connected to gutters by outlets and elbows, the down pipe serves as the vertical conduit that directs roof runoff from the eaves to ground-level drainage, preventing overflow and reducing erosion at the foundation.
It channels water efficiently, maintains flow velocity, and minimizes splashback against walls. Proper sizing and alignment ward off blockages and ice dams. Regular inspection preserves capacity and structural integrity.
- Flow control: maintains steady descent of runoff.
- Debris management: reduces clogs when paired with strainers.
- Material choice: affects durability and freeze resistance.
- Positioning: prevents undermining of soil and landscaping.
Connection To Drains
In practical installations, the down pipe joins the gutter network to surface or subsurface drains, creating a continuous route that carries roof runoff away from the building envelope. It directs flow into splash blocks, storm drains, or buried pipes, minimizing erosion and foundation risk. Connections use adaptors, traps, and inspection chambers to prevent backflow and allow maintenance. Proper slope, secure joints, and debris screens guarantee reliable performance. Integration with existing drainage demands sizing for peak rainfall and local codes. Regular inspection keeps joints watertight and clears blockages before they compromise system function.
| Connection Type | Typical Use |
|---|---|
| Splash block | Surface runoff |
| Buried pipe | Subsurface routing |
| Inspection chamber | Maintenance access |
How to Inspect a Down Pipe in 10 Minutes
A quick exterior visual check looks for loose brackets, cracks, and blockages that could impede drainage.
A brief interior flow test — flushing water from the gutter or using a hose at the inlet — confirms there are no internal obstructions and that joints are sealed.
Together these steps reveal common faults within about ten minutes.
Visual Exterior Check
With a quick walk around the exterior, the inspector can determine whether a down pipe is intact, properly aligned, and free of obvious blockages or leaks.
The observer notes visible damage, secure fastenings, and outlet connections.
Attention focuses on where the pipe meets gutters, wall attachments, and ground discharge.
Signs of staining, damp patches, or corrosion indicate problems.
Record locations and severity for follow-up repair.
- Check joints for gaps or separation.
- Verify brackets are tight and evenly spaced.
- Inspect outlet for debris, misdirection, or pooling.
- Note external damage: dents, cracks, or rust.
Interior Flow Test
After the exterior check confirms fittings and visible condition, an interior flow test provides a rapid assessment of how water moves through the down pipe under simulated load.
A person pours a controlled volume of water into the gutter near the down pipe while another observes the discharge point or internal access cleanout. Timing the flow reveals blockages, constrictions, or slow drainage; irregular surges suggest partial obstructions or airlocks. Notes should record flow rate, leaks, and sounds indicating trapped debris.
If flow is impeded, a focused cleaning or camera inspection follows. The test typically takes under ten minutes and guides next steps.
How to Tell If Your Down Pipe Is Clogged or Damaged
How can one determine whether a down pipe is clogged or damaged? Visual inspection reveals debris buildup, sagging joints, corrosion, or cracks. Listen for unusual noises during rainfall or when testing flow. Check for pooling, wet soil, or stains near the foundation indicating leaks or blockages.
- Observe exterior signs: rust, dents, misalignment.
- Monitor water behavior: slow drainage, overflow, spouting from seams.
- Inspect interior access points for debris, nests, or sediment.
- Note structural issues: separated sections, frozen bulges, or detached outlets.
Document findings and consider professional evaluation if evidence suggests significant impairment.
How to Clear Down Pipe Blockages Safely
Begin by evaluating safety and access before attempting any clearing, since working on gutters and down pipes can involve heights, sharp edges, and contaminated water. The homeowner should use sturdy ladder support, gloves, eye protection, and a mask. Clear debris from gutters first, then attempt to dislodge blockages using a plumber’s snake or high-pressure hose from the top. For stubborn clogs, access the down pipe outlet or remove a section to inspect. If corrosion, cracks, or persistent backup occur, consult a professional. Avoid standing directly beneath the work area and never use bleach in confined sections.
| Tool | Use | Risk |
|---|---|---|
| Ladder | Access gutter | Fall |
| Gloves | Debris handling | Cuts |
| Snake | Dislodge clog | Pipe damage |
| Hose | Flush blockage | Water splash |
| Pro | Complex issues | Cost |
Signs You Need to Repair or Replace a Down Pipe
Visible cracks or holes in a down pipe, persistent slow or clogged flow, and clear signs of rust or corrosion are primary indicators that attention is needed.
Each issue can compromise water routing and lead to leaks or structural damage if left unaddressed.
Evaluating these symptoms helps determine whether repair suffices or full replacement is required.
Visible Cracks Or Holes
When cracks or holes appear in a down pipe, water no longer follows its designed path and can erode foundations, saturate siding, or undermine landscaping.
Visible breaches signal immediate attention: small punctures widen with freeze–thaw cycles, corroded seams split, and impact damage creates leaks.
Left unaddressed, these openings divert runoff unpredictably, causing concentrated soil erosion and damp interiors.
Inspection should note size, location, and surrounding corrosion; temporary patching may stop active leaks, but replacement often guarantees long-term integrity.
Typical indicators include:
- Rusted or perforated metal sections
- Hairline fractures at joints
- Punctures from debris or hail
- Visible gaps where fittings separate
Slow Or Clogged Flow
Flow that slows or stops in a down pipe indicates an obstruction or deterioration that compromises drainage performance.
Accumulated debris—leaves, twigs, sediment—or nests reduce capacity, causing slow runoff and surface pooling.
Intermittent gurgling, water backing up at gutter outlets, or wet streaks on exterior walls signal restricted flow.
Reduced discharge during heavy rain and frequent overflow beneath joints reveal an impaired system.
Regular inspection and clearing often restore function, but persistent blockages, recurring backups, or sections prone to clogging may justify repair or replacement.
Prompt action prevents foundation seepage, landscape erosion, and secondary water damage.
Rust And Corrosion Signs
Frequently, rust and corrosion on a down pipe present as discolored streaks, flaky metal, or small perforations that indicate the protective coating has failed and metal deterioration is underway.
Inspection should note visible rust, holes, and weakened joints. Corrosion often accelerates at seams and brackets where water lingers. Left unchecked, leaks, structural failure, and staining of siding or foundations can follow.
Assessment guides repair versus replacement decisions based on extent and location of damage. Consider professional evaluation for load-bearing sections or hidden rot.
- Surface rust: early, treatable
- Flaking: advanced, repair often required
- Perforations: replacement favored
- Joint failure: urgent attention
DIY vs. Professional Down Pipe Installation: Which to Choose?
Should a homeowner tackle down pipe installation personally or hire a professional depends on skill level, available time, and the project’s complexity.
A DIY approach suits those with basic carpentry skills, proper tools, and straightforward rooflines; it saves labor and allows schedule control.
Complex systems, multi-story homes, unusual roof geometry, or integration with underground drainage favor professionals who make certain correct pitch, secure mounts, watertight joints, and compliance with local codes.
Safety considerations—working at height and with ladders—also guide the choice.
Ultimately the decision balances confidence, risk tolerance, and desired warranty or workmanship assurance.
How Much Does Down Pipe Replacement Cost?
Typical down pipe replacement costs vary by region and material, with homeowners often seeing a moderate range for standard jobs.
Price depends on factors such as pipe material, length, accessibility, and any required repairs to adjoining gutters or fascia.
The choice between a DIY approach and hiring a professional also affects total cost through labor savings or workmanship guarantees.
Average Replacement Cost
Replacement cost for down pipes typically ranges from a modest DIY expense to a larger professional job, depending on materials, length, and complexity. Typical totals fall into clear brackets that reflect common scenarios and help budgeting.
- Basic DIY repair or short replacement using PVC or similar: $50–$200.
- Standard professional replacement for a single-story house with mid-range materials: $200–$600.
- Multi-story or longer runs requiring ladder work and safety measures: $400–$1,200.
- Premium materials or full system renewal including fittings and warranties: $800–$2,000.
Factors Affecting Price
After outlining common cost brackets, attention shifts to the specific factors that drive those price ranges. Material choice, pipe length, and roof complexity directly influence labor and parts. Access difficulty and required fittings raise installation time. Local labor rates and permit needs affect final invoices. Warranty and finish options can add modest premiums. Seasonal demand may alter quotes. Below are concise categorizations of primary considerations.
| Factor | Impact |
|---|---|
| Material (PVC, metal) | Varies unit cost and longevity |
| Labor & Access | Raises hourly charges |
| Additional fittings/permits | Adds fixed expenses |
DIY Versus Professional
Who should tackle a down pipe replacement—homeowner or pro? A decision hinges on skill, safety, and complexity. Simple sections and basic materials suit competent DIYers; multi-storey access, concealed runs, or integrated drainage favor professionals.
- Cost: DIY saves labor but adds tools; pro quotes include materials, labor, and warranty.
- Time: DIY may take longer; pros work efficiently with experience.
- Risk: Falls, roof damage, improper seals risk leaks and higher future costs.
- Compliance: Professionals guarantee code compliance and proper connections to stormwater systems.
Choose based on confidence, height, and long-term reliability.
Step-by-Step: Install a New Down Pipe
Begin by measuring the wall height and mapping the down pipe route from the gutter outlet to the ground drain or splash block to guarantee correct pipe length, bracket spacing, and outlet alignment before cutting materials or drilling fixings.
Next, cut pipe sections to measured lengths, deburr edges, and assemble using appropriate connectors and seals.
Position brackets at regular intervals, mark fixing points, and secure brackets to the wall ensuring vertical alignment.
Mount pipe sections into brackets, checking joints for straightness and secure fit.
Fit the bottom outlet or splash block adaptor, test runoff during a water trial, and adjust as required.
Securely Connect a Down Pipe to Gutters
When connecting a down pipe to a gutter outlet, make sure the junction is watertight and mechanically secure to prevent leaks and sagging under flow; proper alignment, correct use of connectors and seals, and firm attachment of the outlet adaptor are essential to maintain flow and avoid stress on the gutter run.
The installer should verify fit, slope, and support before finishing.
Key steps include:
- Inspect outlet and pipe for damage or misalignment.
- Seat pipe fully into outlet adaptor; use compatible gasket or sealant.
- Fasten pipe to wall with brackets near the junction.
- Test with water to confirm no leaks or movement.
Use Adapters, Elbows, and Fittings Correctly
After verifying the down pipe is properly seated and secured at the gutter outlet, attention turns to the adapters, elbows, and fittings that route water around corners and obstacles. Proper selection guarantees leak-free joints and unobstructed flow. Use compatible materials, confirm fit tolerances, and apply sealant or gaskets where specified. Align elbows to avoid sharp turns that trap debris. Support fittings with straps to prevent shear at joints. Inspect connections after heavy rain and tighten or replace compromised pieces promptly.
| Component | Guidance |
|---|---|
| Adapter | Match material, check slip fit |
| Elbow | Use gradual bends when possible |
| Coupling | Secure with clips or screws |
| Seal | Apply compatible sealant or gasket |
Standard Down Pipe Sizes : How to Measure Yours
Many homes use a few standard down pipe diameters, so measuring the existing pipe accurately determines replacement parts and flow capacity. A tape measure and caliper provide external diameter; measure across the widest points. For rectangular or box gutters, record width and depth. Note material—PVC, aluminum, or cast—since wall thickness affects internal diameter. Check connection type (slot, round, square) to match fittings. Record measurements and photograph joints for reference.
- Measure external diameter at two points.
- Measure internal diameter if accessible.
- Note shape and wall thickness.
- Photograph connections and labels.
How to Size Down Pipes for Heavy Rain
Sizing down pipes for heavy rain requires matching roof catchment area and peak storm intensity to pipe capacity. The guide quantifies runoff using rainfall intensity (mm/hr) and roof area (m²), converting to litres/sec to select pipe diameter and slope that prevent surcharge. Material, debris load, and outlet restrictions affect capacity; safety margins are recommended for extreme events. Regular inspection guarantees performance. Example quick-reference:
| Roof Area (m²) | Rainfall (mm/hr) | Suggested Diameter (mm) |
|---|---|---|
| 50 | 50 | 65 |
| 200 | 100 | 100 |
How Many Down Pipes Does My Roof Need?
Determining the number of down pipes begins with calculating the roof area served by each gutter run.
That area is then compared against local rainfall intensity to estimate peak runoff volume.
Finally, the required down pipe count is chosen to match gutter capacity and guarantee the system can convey that peak flow.
Roof Area Calculation
Roof area calculation begins by measuring the plane of roof that drains to each gutter run, since the amount of water directed into a downpipe depends on that contributing area and the local rainfall intensity. The method converts measured lengths and widths into square meters, adjusts for slopes by multiplying by the roof pitch factor, and aggregates areas feeding each gutter segment.
From these areas, one can select downpipe capacities matched to expected flow. Steps include:
- Measure plan dimensions for each roof plane.
- Apply slope multiplier for pitch.
- Sum areas per gutter run.
- Compare totals to downpipe capacity charts.
Rainfall Intensity Consideration
After calculating the roof areas that feed each gutter run, the next consideration is how much rainfall those areas will need to shed; local rainfall intensity — usually expressed in millimeters per hour — determines the peak flow rate a downpipe must carry. Designers consult regional intensity values (e.g., 10, 50, 100 mm/hr) to compute volumetric flow and decide downpipe count. Higher intensities or large contributing areas raise required capacity. Conservative planning uses design storms and runoff coefficients. Example quick-reference:
| Intensity (mm/hr) | Area (m²) | Approx. flow (L/s) |
|---|---|---|
| 10 | 50 | 0.14 |
| 50 | 100 | 1.39 |
| 100 | 200 | 5.56 |
Gutter Capacity Matching
A practical step in matching gutter capacity is to translate calculated roof runoff into the number and size of downpipes required to safely convey peak flows.
The designer compares peak flow (gallons per minute or liters per second) against manufacturer capacity charts for gutter and pipe sizes.
Placement balances roof geometry and gravity drainage to avoid long unsupported runs.
Consideration is given to debris screens and maintenance access.
Typical practice follows local code and conservative safety factors.
- Calculate roof area × rainfall intensity = peak runoff.
- Select downpipe size with matching capacity.
- Divide total flow by single-pipe capacity.
- Round up and position pipes for even distribution.
Down Pipe Slope and Flow: Simple Rules
Make certain down pipes maintain a steady, uninterrupted slope so water moves by gravity without pooling or backflow. The installer sets slope to promote self-clearing flow, typically a slight pitch (about 1–2%); steeper runs clear debris faster but need secure supports. Maintain consistent diameter and avoid abrupt bends; each elbow reduces capacity and encourages clogging. Regular inspection guarantees joints remain tight and slope unchanged. Use the table for quick reference on slope, effect, and recommendation.
| Slope | Effect | Recommendation |
|---|---|---|
| 0.5% | Slow flow | Short runs only |
| 1–2% | Peak | Standard practice |
| 3%+ | Fast flow | Secure supports |
Route Down Pipe Runoff Away From Your Foundation
To prevent basement seepage and foundation damage, down pipe runoff should be directed several feet away from the building using extensions, splash blocks, or underground drains that discharge to grades, swales, or storm systems.
The homeowner evaluates soil type, slope, and local codes, then selects a reliable method to move water off-site. Regular inspection prevents pooling and erosion near footings. Consider durable materials and proper joints to avoid leaks. Maintain clear outlets and test during heavy rain to confirm performance.
- Extend rigid or flexible downspout pipes
- Install concrete or plastic splash blocks
- Tie into underground drains
- Grade soil away from foundation
Best Placement for Down Pipes Around Your Home
Place down pipes at corners and along roof valleys where runoff concentrates to guarantee swift, unobstructed drainage away from walls and foundations. Placement should consider roof slope, gutter discharge points, landscaping, and access for maintenance. Pipes are best near structural drains, away from windows and vents, and positioned to minimize long horizontal runs that clog. Multiple short runs often outperform one long run. Consistent spacing prevents overflow during heavy rain. Securely fastened pipes reduce stress at joints. Consider freezing climates and slope for gravity flow. Assess aesthetic impact and coordinate with underground drainage plans before final installation.
| Location | Benefit | Consideration |
|---|---|---|
| Corners | Collects concentrated flow | Easy access |
| Roof valleys | High runoff capture | Larger pipe size |
| Near structural drains | Direct discharge | Avoids surface pooling |
| Away from openings | Prevents splashback | Maintains ventilation |
| Short runs | Reduced clogging | More outlets needed |
Add Splash Blocks, Diverters, or Extensions
After down pipes are routed to preferred discharge points, attention turns to managing the water where it leaves the pipe: splash blocks, diverters, or extensions control dispersion, protect soil and foundations, and guide flow toward drains or landscaped areas.
Choices depend on slope, soil type, and aesthetics.
Simple concrete or plastic splash blocks prevent erosion; flexible extensions reach farther; diverters redirect flow to swales or planted beds.
Regular inspection prevents clogging and undermining.
Installation should guarantee positive slope away from the foundation and secure connections to resist displacement by runoff.
- Select by distance needed
- Match to soil and slope
- Secure to prevent movement
- Inspect seasonally
Turn a Down Pipe Into a Rainwater Collection Point
Converting a down pipe into a rainwater collection point transforms runoff into a useful resource by channeling roof water into barrels, cisterns, or underground tanks. It explains simple fittings: diverter kits, screened inlets to block debris, and first-flush devices to divert contaminants. Proper positioning prevents overflow and preserves foundation grading. Regular maintenance—cleaning screens, inspecting seals, and testing for leaks—ensures water quality and system longevity. Storage size should match roof area and rainfall. Consider local regulations before installing. A basic comparison:
| Component | Purpose | Maintenance |
|---|---|---|
| Diverter | Directs flow | Clean monthly |
| Screen | Excludes debris | Inspect weekly |
| Tank | Stores water | Check seals quarterly |
Common Down Pipe Materials: Pros and Cons
Several common materials—PVC, aluminum, galvanized steel, copper, and cast iron—are used for down pipes, each offering distinct trade-offs in cost, durability, appearance, and maintenance. Selection depends on climate, budget, and desired longevity.
Typical pros and cons include:
- PVC: inexpensive, corrosion-resistant, lightweight; less UV-stable, can become brittle in cold.
- Aluminum: lightweight, rust-proof, easy to install; dent-prone, moderate lifespan.
- Galvanized steel: strong, affordable; susceptible to rust over time where coating fails.
- Copper and cast iron: long-lasting and attractive (copper) or exceptionally durable (cast iron); higher cost and heavier installation requirements.
Eco-Friendly Materials and Coatings to Consider
The discussion shifts to environmentally conscious options for downpipes and gutters, highlighting recycled plastic downpipes as a durable, resource-saving alternative to virgin materials.
Attention is given to low‑VOC protective coatings that reduce harmful emissions during application and service life.
Biodegradable gutter linings are introduced as a temporary, compostable solution for reducing long‑term waste.
Recycled Plastic Downpipes
Many homeowners and builders are increasingly turning to recycled plastic downpipes for durable, low-maintenance rainwater drainage that reduces environmental impact. Recycled plastic options offer corrosion resistance, lightweight handling, and simplified installation compared with metal alternatives.
Key considerations include material grade, UV stability, joinery methods, and local recycling credentials. Benefits often include longevity and resistance to chemical runoff.
Potential drawbacks are heat sensitivity and aesthetic limitations versus traditional metals. Maintenance is minimal: periodic debris clearing and inspection for UV-related brittleness.
Selection should balance performance, cost, and verified recycled content to guarantee genuine environmental advantages.
- Material grade and source
- UV stabilization
- Joinery type
- Verified recycled content
Low‑VOC Protective Coatings
In choosing protective coatings for downpipes and gutters, low‑VOC formulations offer effective corrosion and UV resistance while minimizing indoor and outdoor air pollution.
These coatings include water‑based acrylics, elastomeric sealants, and hybrid polyurethane systems designed for metal and PVC substrates.
They adhere well, resist chalking and fading, and extend service life without heavy solvent emissions.
Application methods suit brushes, rollers, or sprayers, and many cure quickly in moderate temperatures.
Maintenance intervals depend on exposure; periodic inspection and touch‑up preserve integrity.
Selection should consider substrate compatibility, expected weathering, local regulations, and manufacturer environmental certifications.
Biodegradable Gutter Linings
Several biodegradable gutter lining options now blend durability with reduced environmental impact, offering alternatives to traditional PVC and solvent‑based coatings. They prioritize natural polymers, plant‑based resins, and mineral‑reinforced composites that resist moisture and UV without toxic additives.
Performance varies by climate and maintenance; expected service lives are shorter than some synthetics but acceptable where end‑of‑life disposal matters. Selection should consider compatibility with existing gutters and runoff quality.
Common eco-friendly choices include:
- Starch‑derived biopolymer coatings
- Hemp or flax fiber‑reinforced liners
- Soy‑based resin sealants
- Mineral‑filled clay composite layers
Prevent Ice Dams and Freezing in Down Pipes
When temperatures drop below freezing, homeowners must address ice dams and frozen down pipes promptly to prevent roof damage and blocked drainage.
Inspecting gutters and down pipes for debris and ensuring proper slope reduces standing water that forms ice.
Installing drip edges or heat cables near vulnerable roof edges and downspout inlets can interrupt freeze formation without major alteration.
Clearing snow from roof eaves minimizes meltwater refreezing at gutters.
Temporary measures include gently melting localized ice with warm water or a roof raking tool; avoid chopping ice, which risks roofing.
Prompt restoration of flow prevents structural and interior water damage.
How to Winterize Down Pipes Seasonally
As temperatures fall and freeze-thaw cycles become routine, homeowners should prepare down pipes for winter by removing debris, securing fittings, and ensuring unobstructed flow to prevent ice buildup and water back-up.
Inspect joints and brackets for looseness, clear leaves and nests, and test flow with a hose before the freeze.
Consider short extension removal where pooling occurs and protect exposed sections with industry-approved insulation or heat tape rated for outdoor use.
Monitor gutters during thaw periods and clear small blockages promptly.
- Clear debris and flush lines
- Tighten and replace loose fittings
- Insulate or apply heat tape
- Remove problematic extensions
Long-Term Down Pipe Maintenance Checklist
A clear long-term maintenance checklist outlines a routine inspection schedule to catch wear, blockages, and leaks before they escalate.
It also specifies seasonal cleaning tasks—such as removing debris after autumn and checking for ice damage after winter—to keep down pipes functioning year-round.
Regular documentation of inspections and cleanings helps track issues and plan timely repairs.
Routine Inspection Schedule
Regularly scheduled inspections form the backbone of long-term down pipe maintenance, ensuring issues are detected before they escalate into costly repairs.
Inspections follow a predictable cadence, documenting condition, fasteners, joints, and discharge points. Frequency varies by climate, building age, and nearby vegetation.
Inspectors note corrosion, misalignment, blockages at the base, and splash block integrity, scheduling repairs or monitoring as needed.
Records include date, findings, photos, and recommended actions to track trends over time.
A simple numeric checklist helps standardize reviews:
- Visual exterior assessment
- Joint and fastener check
- Base and outflow evaluation
- Recordkeeping and scheduling follow-up
Seasonal Cleaning Tasks
Typically, seasonal cleaning tasks focus on removing accumulated debris, flushing sediment from joints, and verifying clear outflow to prevent blockages and corrosion.
The checklist includes clearing gutters and down pipes of leaves and nests, using water jets to dislodge compacted material, and inspecting joints and brackets for leaks or looseness.
Roof guards, strainers, and outlet connections are cleaned and tested.
Any corrosion, dents, or misalignment are documented for repair.
Downstream drains are checked for pooling and root intrusion.
Records of dates, findings, and actions support long-term maintenance planning and timely contractor engagement when needed.
Prevent Repeated Overflow: Troubleshooting Tips
Often homeowners encounter repeat gutter overflow caused by a few common, diagnosable issues: clogged downspouts, misaligned gutters, inadequate capacity for roof runoff, or blocked outlets at the base.
A systematic approach isolates causes: inspect downspouts for debris, verify gutter slope and secure hangers, calculate roof runoff versus gutter capacity, and clear or extend discharge points away from foundations.
Regular checks after storms prevent recurrence.
Recommended troubleshooting steps:
- Check and clear downspout clogs with a plumber’s snake.
- Confirm gutters slope 1/4″ per 10′.
- Compare roof area to gutter capacity.
- Make certain outlet drains discharge freely away from house.
Common Mistakes That Shorten Down Pipe Lifespan
After troubleshooting overflow and ensuring clear discharge, attention turns to habits and installations that prematurely degrade down pipes.
Common mistakes include poor attachment—loose brackets and inadequate supports that allow movement and stress—plus improper slope causing standing water and corrosion.
Using incompatible materials or mixing metals speeds galvanic corrosion.
Painting without proper priming traps moisture; oversizing outlet holes concentrates stress at joints.
Ignoring nearby vegetation promotes root intrusion at discharge points.
Frequent impact damage from ladders or lawn equipment dents and cracks.
Skipping regular inspections lets small issues escalate into leaks, rust, and failure, shortening service life.
How to Clear Blockages Without Damaging Pipes (Tools & Technique)
Start by evaluating the blockage visually and from the ground-level outlet to determine location, severity, and likely cause before inserting any tools. A cautious approach protects pipes and fittings: use gloves, eye protection, and a camera if available. Prefer mechanical, non-corrosive methods before chemicals. Follow steps:
- Remove visible debris from gutters and outlet by hand or scoop.
- Use a soft plumber’s snake, pushing gently and rotating to dislodge material.
- Flush with a garden hose at moderate pressure, working upward if possible.
- Finish with a camera inspection to confirm clearance and check for damage.
Stop and consult a professional if resistance persists.
When to Upgrade Down Pipes for Better Performance
A homeowner should consider upgrading down pipes when increased water volume from roof or landscape changes exceeds the existing system’s capacity.
Frequent overflow issues during storms signal that current pipes or connections cannot handle peak flow.
Visible corrosion damage indicates compromised integrity and warrants replacement to restore reliable performance.
Increased Water Volume
Experiencing heavier runoff during intense storms often reveals the limits of existing down pipes, signaling when an upgrade is needed to prevent overflow and foundation risks.
Increased water volume demands assessment of capacity, pipe diameter, and outlet routing to guarantee timely removal from rooflines.
Consider peak flow rates, watershed size, and gutter slope when sizing replacements.
Material durability and connection integrity matter for sustained performance.
- Calculate peak runoff based on roof area and rainfall intensity.
- Match down pipe diameter to required flow capacity.
- Verify outlets and discharge paths handle higher volume.
- Inspect joints and fastenings for increased stress.
Frequent Overflow Issues
Frequently, persistent overflow from gutters and down pipes signals that existing components are undersized, clogged, or improperly configured for site conditions. Signs prompting upgrade include repeated pooling at eaves, overflow during moderate rain, backups at fittings, and water near foundations. Upgrading options: larger-diameter pipes, additional downpipes, improved outlet placement, or smoother-run piping reduce blockages and increase capacity. Maintenance remains essential, but capacity upgrades prevent chronic failures. The table below summarizes typical triggers, recommended upgrade actions, and expected benefits.
| Trigger | Upgrade Action | Expected Benefit |
|---|---|---|
| Pooling | Add downpipe | Faster drainage |
| Frequent clogging | Larger pipe | Fewer backups |
| Foundation wetness | Relocate outlet | Safer runoff |
| Moderate rain overflow | Add capacity | Reduced overflow |
Visible Corrosion Damage
Often, visible corrosion on down pipes indicates advanced material degradation that compromises flow capacity and structural integrity, signaling the need for prompt evaluation and likely replacement to restore reliable drainage performance.
Inspection should identify rust holes, flaking seams, weakened joints, and interior pitting. Corroded sections reduce capacity, trap debris, and cause leaks that damage fascia and foundations. Replacement choices depend on severity, budget, and longevity goals; stainless steel, aluminum, or PVC offer differing benefits.
Maintenance or targeted repair may suffice for minor surface rust, but pervasive corrosion usually warrants upgrade to guarantee consistent performance and lower long-term costs.
- Assess extent of damage
- Check for leaks and holes
- Weigh material replacement options
- Prioritize long-term durability
Cost-Saving Tips for Down Pipe Repairs and Upgrades
Homeowners can reduce expenses on down pipe repairs and upgrades by prioritizing preventive maintenance, choosing cost-effective materials, and scheduling work during off-peak seasons to secure lower labor rates.
Regular cleaning, clamp tightening, and prompt small-patch repairs prevent larger failures. Salvaging sections or fittings when possible lowers replacement costs.
Compare quotes from multiple reputable contractors and request bundled pricing for related gutter and drainage tasks.
Consider durable, low-maintenance materials that balance upfront cost and lifespan.
Use community tool libraries or rental equipment for DIY tasks within safe skill limits.
Keep records of work to optimize future maintenance budgeting and avoid unnecessary repeat spending.
Matching Down Pipe Style to Your Home Exterior
How should a down pipe be chosen so it complements rather than clashes with the house? The selection balances material, color, profile and scale to reinforce architectural character. Consider matching or contrasting thoughtfully to highlight features without overwhelming them.
- Material: choose copper for traditional, aluminum for modern, or painted steel for durability.
- Color: coordinate with trim or siding; use muted tones for subtlety, bold for accent.
- Profile: round suits classic styles, square or rectangular fits contemporary facades.
- Scale: size the pipe proportionally to eaves and facade elements to maintain visual harmony and functional flow.
Local Codes and Permits That Affect Down Pipe Work
Where required by local jurisdictions, permits and codes dictate down pipe placement, size, materials and connections to stormwater systems. Compliance prevents fines, protects public drains and guarantees safe discharge distances from foundations. Installers should verify municipality standards, required inspections and approved materials before starting work. Variances or historical-district rules may limit visible pipe types or colors. Records of permitted alterations help future owners. Failure to obtain permits can trigger removal or costly remedial work.
| Requirement | Typical Rule | Consequence |
|---|---|---|
| Placement | Minimum setback from property line | Rework/penalty |
| Materials | Approved corrosion-resistant types | Rejection |
| Connections | Approved storm system tie-ins | Enforcement |
Questions to Ask a Contractor Before Hiring for Down Pipe Work
When hiring a contractor for down pipe work, ask targeted questions that clarify qualifications, scope, cost, timeline, and compliance. The homeowner should verify licenses, insurance, references, and experience with local codes.
Proposals must list materials, placement, connection to drainage, and responsibilities for permits. Confirm warranties, inspection schedules, and cleanup. Discuss payment terms and change order procedures.
- Are you licensed, insured, and familiar with local codes?
- What exactly is included in the written estimate?
- What is the project timeline and milestone schedule?
- What warranties and post‑installation services are provided?
Conclusion
A properly functioning down pipe is a small investment that prevents costly water damage, and homeowners should not dismiss routine checks as unnecessary hassle. Even if someone fears DIY inspection will reveal expensive repairs, early detection often means simple, affordable fixes like clearing debris or resealing joints. By scheduling quick inspections and addressing minor issues promptly, property owners protect foundations and landscaping while avoiding the larger expenses and disruptions of neglected drainage problems.