How to Unsweat a Copper Pipe: Easy DIY Fixes for Leaks and Condensation
To unsweat a copper pipe, first, isolate and drain the line, then wear heat- and chemical-safe personal protective equipment (PPE). Identify the wet spot using a cloth or flashlight. For quick fixes, apply epoxy putty, self-fusing silicone tape, or a repair clamp. For more permanent solutions, use a push-fit coupling or cut out the damaged section and replace it, ensuring to sweat the new fitting with proper cleaning and flux. Finally, insulate the pipe and add a vapor barrier to prevent future issues. Follow these steps carefully for effective leak repairs and safety precautions.
Quick Decision Checklist: DIY vs. Call a Plumber
When faced with a sweating copper pipe, homeowners should quickly weigh skill, tools, and risk: if the leak is minor, the individual has basic plumbing experience, and a torch, flux, and solder are on hand, a DIY repair can save time and money; if the leak is large, the pipe sits near combustibles, the person lacks confidence with a torch, or the home’s water shutoff is unclear, calling a licensed plumber is the safer choice.
Assess leak size, accessibility, and visibility of corrosion.
Confirm possession of appropriate tools and spare parts.
Consider time, warranty implications, and local code requirements before proceeding.
Safety Steps Before You Start Unsweating Copper
Before unsweating a copper pipe, the reader should confirm appropriate personal protective equipment is on hand, including gloves, eye protection, and heat-resistant clothing.
The water supply must be shut off and the line drained to prevent sudden flows when joints are disturbed.
Adequate ventilation and basic fire precautions should be established to manage flux fumes and any open flame or hot work.
Personal Protective Equipment
For work involving heat and metal joints, appropriate personal protective equipment reduces the risk of burns, eye injury, and inhalation hazards. The practitioner selects gear to protect skin, eyes, lungs, and hands before unsweating copper. Inspecting PPE for damage and correct fit is essential.
- Heat-resistant gloves: protect against torch flame and hot metal; gauntlet style preferred.
- Eye protection: safety goggles or a full-face shield to block sparks and flux splatter.
- Respiratory protection: N95 or respirator when ventilation is limited or flux fumes are present.
- Flame-resistant clothing: long sleeves and non-synthetic fabrics to minimize burn risk.
Shut Off Water Supply
After donning appropriate PPE, the next step is to stop the water supply to the circuit containing the copper joint to be unsweated.
Locate the nearest shutoff valve—typically a ball or gate valve—serving that branch. Turn the valve fully clockwise until it seats, or close the service stop.
Verify isolation by opening a downstream faucet and confirming flow has ceased. If no local valve exists, shut the main water supply and drain the system via low points.
Relieve residual pressure by opening a nearby tap. Tag the shutoff if others might restore supply, then proceed only when dry and depressurized.
Ventilation And Fire Safety
Make certain adequate ventilation and establish fire-safe conditions prior to heating any copper joint: open windows and doors or run a powered exhaust fan to remove combustion gases and flux fumes, clear the work area of flammable materials, and position a fire-resistant heat shield behind the joint.
The operator should wear eye protection, gloves, and avoid inhaling fumes. A fire extinguisher rated for class B/C hazards must be immediately available and checked for charge.
Confirm smoke detectors are functional and alert others nearby before starting work.
- Ventilate area thoroughly
- Remove combustibles
- Position heat shield
- Keep extinguisher ready
How to Locate the Exact Source of Sweating or a Leak
Begin by visually inspecting the pipe along its entire run, focusing on joints, fittings, and nearby insulation where condensation or a pinhole leak is most likely to form.
Run a dry cloth along the pipe to reveal wet spots, then mark damp areas. Use a bright flashlight to catch tiny drips or beads and look for mineral deposits or corrosion that indicate past leaks.
If unsure, wrap tissue or paper towel around suspect sections and check after a short period.
For intermittent sweating, observe during temperature changes or appliance use. Record locations and patterns before proceeding to repairs.
How to Shut Off Water and Drain the Affected Line
Before any repair begins, the homeowner should shut off the main water valve to isolate the affected branch.
After the supply is closed, the line must be drained by opening nearby faucets and any low-point drain valves until flow stops.
Ensuring the pipe is fully depressurized and dry prevents further water damage and allows safe work on the copper joint.
Turn Off Main Valve
Locate and close the home’s main shutoff valve to stop the water supply to the affected copper line; this prevents flow while repairs are made. The homeowner confirms valve type (gate, ball, or curb), turns it clockwise until fully closed, and notifies occupants before proceeding.
After closure, the person checks nearby faucets for reduced pressure to verify isolation.
- Identify the main valve location quickly.
- Use the correct tool or hand operation to avoid damage.
- Record valve position and time for reference.
- Keep a wrench and flashlight handy in case the valve is stiff.
Drain The Line
With the main valve closed, the affected copper line should be emptied to prevent water remaining in the pipe from interfering with repairs or creating pressure surges. The technician opens nearest faucets and a high drain point to vent air, then opens downstream valves to capture residual water. A bucket and towels collect drips; compressed air or a wet/dry vacuum can speed drying if available. Confirm no flow before cutting or unsweating. Recheck after a few minutes for trapped pockets. Document shut valves and notify household members before restoring service.
| Step | Tool | Purpose |
|---|---|---|
| Open faucets | Bucket | Drain water |
| Use vacuum | Wet/dry vacuum | Remove residual |
| Check valves | Wrench | Verify closed |
How to Stop Condensation Fast: Simple Cold-Water Fixes
Addressing condensation quickly on a cold water pipe requires eliminating the temperature differential that draws moisture from the air; simple, fast fixes usually focus on insulating the pipe, reducing surrounding humidity, or diverting airflow.
A detached observer notes practical steps that can be done immediately to stop dripping and surface sweat without major tools.
- Wrap foam pipe insulation snugly, sealing seams with tape to block cold-to-warm contact.
- Apply self-adhering rubber tape over fittings for tight coverage.
- Run a dehumidifier or improve ventilation in the space to lower ambient moisture.
- Redirect warm air away using a small fan aimed to prevent moist air pooling.
How Long Will Temporary Repairs Last? When to Upgrade
Usually, temporary fixes—like foam insulation sleeves, rubber tape wraps, or a quick fan and dehumidifier setup—hold up for a few weeks to a couple of years depending on materials, installation quality, and environmental conditions.
Performance declines faster in high humidity, outdoor exposure, or where abrasion and UV occur.
Visible signs—persistent sweating, dripping, mold, corrosion, or adhesive failure—indicate replacement is due.
Short-term patches suit emergencies or testing solutions; long-term reliability requires proper insulation, permanent sealing, or rerouting.
Upgrade sooner when repairs repeatedly fail, when water damage appears, or when pipe age and corrosion suggest a permanent solution will prevent greater cost.
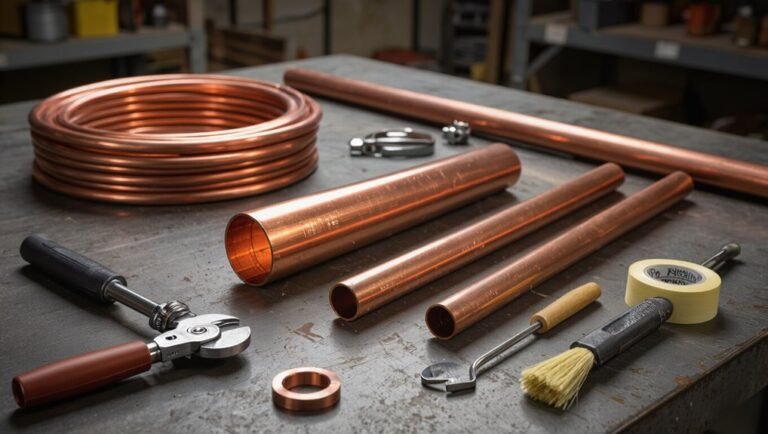
Tools and Materials You’ll Need for Unsweating a Pipe
To unsweat a copper pipe safely and effectively, the article outlines the essential hand tools, appropriate sealants and materials, and required safety gear.
The list includes cutters, soldering or brazing tools, flux, replacement fittings, and pipe-specific sealants.
Personal protective equipment such as gloves, eye protection, and ventilation are emphasized to prevent injury and contamination.
Essential Hand Tools
Gather the right hand tools before attempting to unsweat a copper pipe to guarantee safety and efficiency: a propane or MAP gas torch, a heat-resistant glove, a pair of adjustable pliers or a pipe wrench, a tubing cutter, a set of flat-tip and Phillips screwdrivers, soldering picks or awls, a wire brush or emery cloth for cleaning, and a damp cloth or heat sink to protect nearby fittings.
Essential hand tools focus on control, access, and cleanup. Recommended compact list:
- Tubing cutter and deburring tool
- Adjustable pliers or pipe wrench
- Wire brush/emery cloth and soldering picks
- Heat-resistant glove and damp cloth
Sealants And Materials
After listing the necessary hand tools, attention turns to the sealants and materials required for unsweating a copper pipe.
Flux paste, rosin-core solder, and lead-free soft or hard solder are primary choices; flux guarantees proper wetting, solder provides the joint seal. Cleaners—emery cloth or wire brush—and a degreasing solvent prepare surfaces. Thread sealant tape and pipe dope suit threaded fittings. For temporary fixes, epoxy putty and silicone sealant can stop minor leaks until proper joints are made. Copper fittings, replacement tubing, and spare compression rings complete the kit. Materials should be rated for potable water when applicable.
Safety Gear Needed
Because unsweating a copper pipe involves heat, sharp edges, and chemical cleaners, appropriate personal protective equipment is essential: heat-resistant gloves, safety goggles or a face shield, and flame-retardant clothing protect against burns and sparks; a respirator rated for organic vapors should be used when working with flux, solvents, or solder fumes; and hearing protection is recommended when using power tools.
The following list summarizes required gear and useful extras for safe unsweating:
- Heat-resistant gloves, long sleeves, and flame-retardant clothing.
- Safety goggles or face shield and hearing protection.
- Organic-vapor respirator and disposable gloves for solvents.
- Closed-toe boots and first-aid kit nearby.
How to Fix Minor Pinhole Leaks Without Soldering
When a small pinhole appears in a copper pipe, many homeowners can stop the leak temporarily without soldering by choosing one of several quick, reliable fixes; options include epoxy putty, pipe repair clamps, self-fusing silicone tape, or a compression coupling, each suited to different pipe locations and pressure conditions.
Assessment begins by shutting off water and drying the area. Clean metal with emery cloth for adhesion. Apply chosen repair per product instructions, ensuring overlap and firm seating. Test under normal pressure and inspect for seepage.
These methods provide interim service until a permanent repair or professional replacement is arranged.
How to Use Epoxy or Repair Putty on a Leaking Copper Pipe
If a homeowner opts for epoxy or repair putty as a temporary fix instead of clamps or tape, the process focuses on creating a clean, dry surface and applying the material so it bonds tightly around the pinhole.
First, shut off water and drain the pipe.
Second, sand or file the area to bright copper, then clean with solvent and let dry.
Third, knead or mix the product per instructions, press firmly over the leak, shaping a smooth seal that overlaps 1–2 inches each side.
Fourth, allow full cure time before restoring pressure and check for drips.
How to Replace a Short Pipe Section With Compression Fittings
For a durable, semi-permanent repair where a damaged copper section must be removed, replacing the short run with compression fittings offers a solder-free solution that can be completed with basic tools.
The process begins by shutting off water and draining the line. Cut out the damaged segment squarely, deburr ends, and slide nuts and ferrules onto each pipe end. Insert a matching length of copper or adaptor tubing, seat ferrules, and tighten nuts evenly with two wrenches to compress seals. Test for leaks at operating pressure, retightening slightly if needed.
Compression fittings permit future disassembly and are suitable for accessible runs.
How to Cut and Replace Copper Pipe Using Push-Fit Fittings
Using a push-fit fitting simplifies replacing a short run of copper pipe by eliminating soldering and most specialty tools.
The technician measures and marks the damaged section, then shuts off water and drains the line.
A clean, square cut is made with a tube cutter; burrs are removed and the pipe is deburred and cleaned.
The push-fit fitting is pushed onto the pipe until it seats fully; alignment and depth markings guarantee proper insertion.
After restoring water, the joint is checked for leaks and pressure-tested briefly.
Push-fit fittings allow rapid, reliable repairs without heat or flux.
- Measure and mark
- Cut and deburr
- Insert fitting
- Test for leaks
How to Sweat-Solder a Copper Joint Safely (Step-by-Step)
The section outlines the essential tools and materials required for sweat-soldering copper, including flux, solder, a torch, fittings, and safety gear.
It then describes the preparation steps—cutting, cleaning, fluxing, and proper joint alignment—followed by the controlled heating and solder application technique.
Safety precautions for working with open flame and hot metal are emphasized throughout.
Tools And Materials Needed
Before beginning a sweat-soldering job, a clear inventory of tools and materials is essential to guarantee safety and a proper joint.
The list below covers essentials for unsweating and rejoining copper: proper sizing, safety, heat, and clean-up.
Protective gear prevents injury; correct fittings and flux insure a leak-free seal; a suitable torch and solder and solder enable proper heat control; and cleaning tools prepare surfaces for adhesion.
Consumables and spare parts reduce delays. Store items safely and verify local codes before starting.
- Torch, solder, and flux
- Pipe cutter, emery cloth, and brush
- Safety goggles, gloves, and fire blanket
- Replacement fittings and joint compound
Preparing And Soldering Joints
With tools and materials assembled and safety gear in place, attention turns to preparing and soldering the joint itself.
Surfaces are cleaned with emery cloth or a wire brush until bright; flux is applied sparingly to both pipe and fitting.
The pipe is fully inserted to the fitting shoulder and held steady.
Heat is applied to the fitting, not the solder, moving the torch to distribute heat evenly.
When flux sizzles, touch solder to the joint; capillary action draws it in.
Allow cooling naturally, then wipe excess flux.
Inspect for continuous fillet and test under pressure for leaks.
How to Prevent Flux and Solder From Causing Future Sweating
To prevent flux residues and excess solder from wicking and creating future leaks, a careful cleanup and controlled application are essential.
After soldering, wipe joints with a damp cloth to remove flux; use a brass brush for stubborn residue. Inspect for solder blobs that can trap moisture and file smooth if present.
Apply minimal flux—just enough to coat the mating surfaces—to avoid overflow. Use proper heat to draw solder into the joint rather than pushing it.
Finally, test and dry joints thoroughly, then apply a thin protective coating or insulation to reduce condensation and prevent rewetting.
- Clean immediately
- Use minimal flux
- Smooth excess solder
- Dry and protect
How to Deal With Corroded Copper That Causes Recurring Leaks
Address corroded copper promptly to prevent recurring leaks, starting with a careful assessment of the affected area to determine whether corrosion is superficial, pitted, or has compromised wall thickness.
Clean light surface corrosion with a wire brush and nonabrasive pad, then apply a corrosion inhibitor or protective coating to slow recurrence.
For localized pitting, consider using a plumber’s epoxy or a cold weld compound rated for potable water after drying and removing loose material.
Monitor repaired spots regularly for seepage.
Avoid high-pressure testing immediately after patching; allow cure times per product instructions and recheck connections for integrity.
When to Replace Whole Sections or Re-Route Piping
When corrosion, repeated repairs, or extensive mechanical damage have compromised multiple fittings or long runs of copper, replacing entire sections or rerouting the piping becomes the most reliable option.
Assessment should note leak frequency, access difficulty, water quality, and future renovation plans.
Whole-section replacement reduces hidden failures and simplifies maintenance; rerouting avoids damp areas or structural conflicts.
Decisions weigh material cost, labor, and code compliance.
Professional inspection is advised for complex layouts or gas lines.
Planned replacement includes testing for pressure, isolating affected zones, and choosing compatible joining methods to guarantee long-term integrity.
- Inspect scope and pattern of damage
- Compare repair vs. replacement costs
- Evaluate reroute feasibility and clearances
- Confirm permits and code requirements
Install Pipe Insulation to Stop Sweating Long-Term
After deciding whether sections must be replaced or rerouted, attention turns to ensuring condensation on remaining copper runs through proper insulation.
The installer measures each exposed run, cuts insulation to length, and fits it snugly around pipes, sealing seams and joints with compatible tape or adhesive to maintain a continuous vapor barrier. Insulation should cover valves and fittings where practical, and be secured with zip ties or clamps without compressing the material. Regular inspection for damage or gaps ensures long-term performance. Properly installed insulation reduces surface cooling, prevents sweating, and protects surrounding structures from moisture damage.
How to Choose the Right Insulation for Copper Pipe
For selecting pipe insulation, consider the pipe’s temperature range, location, and exposure to moisture and physical damage to match material, thickness, and R-value to the job. Choose closed-cell foam for cold pipes to prevent condensation; rubber or elastomeric for flexibility and higher temperature ranges; fiberglass with a vapor barrier for hot lines; and polyethylene for budget indoor use.
Compare thickness to expected dew point and local code requirements. Use vapor barriers where moisture is present. Inspect fittings and joints compatibility. Replace degraded insulation promptly. Prefer UV-resistant or jacketed options outdoors to prevent breakdown and maintain thermal performance.
- Material compatibility
- Thickness/R-value
- Moisture protection
- Durability and UV resistance
Step-by-Step: Wrap Foam Insulation on a Copper Pipe
Begin by gathering the correct closed-cell foam insulation, a utility knife, a measuring tape, adhesive or insulation tape, and safety gloves; working with the pipe clean and dry guarantees a snug, moisture-resistant fit. Measure pipe length, cut foam slightly long, slit along seam, and fit halves around pipe. Seal seam with adhesive or tape, compressing edges for continuity. Secure joints and valves with short foam pieces, taping firmly. Inspect for gaps and smooth edges. Allow adhesive to set before testing. Maintain neat wrapping to reduce condensation and prolong pipe life.
| Calm | Relief | Confidence |
|---|---|---|
| Precise | Secure | Dry |
| Simple | Protective | Quiet |
| Clean | Safe | Durable |
| Ready | Assured | Lasting |
Install Fiberglass or Rubber Sleeve Insulation
Having finished a snug closed-cell foam wrap, attention shifts to installing fiberglass or rubber sleeve insulation for added thermal and acoustic protection.
The installer measures pipe length and diameter, selects a sleeve with appropriate R-value and vapor barrier, and cuts pieces slightly longer than each coated section.
Fit sleeves over joints and valves where possible, ensuring seams align on the pipe’s underside.
Secure ends with non-corrosive metal clamps or plastic ties, avoiding compressing the insulation.
Inspect for gaps, compressions, or exposed copper.
Replace damaged sections promptly to maintain continuous coverage and prevent future sweating or heat loss.
- Measure diameter and length precisely
- Choose fiberglass or closed-cell rubber sleeves
- Fit with seams down and avoid compression
- Secure ends with corrosion-resistant clamps
How to Apply Self-Sealing Insulating Tape Correctly
When preparing to apply self-sealing insulating tape, the installer inspects the cleaned, dry copper surface and the surrounding insulation to make certain a continuous, contaminant-free contact area. The tape is stretched slightly while wrapped spirally with 50% overlap, covering joints and ends. Seams are pressed firmly to activate adhesion and eliminate air pockets. For bends, tape follows the curve without lifting. Excess is trimmed; overlaps are sealed by smoothing. Curing time is observed before restoring service. Regular inspection assures integrity and replaces sections showing delamination or wear.
| Step | Tip |
|---|---|
| Clean | Remove oil and debris |
| Wrap | 50% overlap |
| Press | Smooth seams firmly |
| Inspect | Check after cure |
How to Add a Vapor Barrier for High-Humidity Areas
In high-humidity environments, adding a vapor barrier prevents moisture from condensing on insulated copper pipes by stopping warm, moist air from reaching the cold surface. A proper barrier reduces sweating and prolongs insulation life.
Steps emphasize clean, dry surfaces and overlapping seams sealed with compatible tape. Perforations defeat the barrier, so fasteners should be minimized and sealed.
- Choose a vapor-retardant material rated for plumbing, such as foil-backed or polyethylene wrap.
- Clean and dry pipe and insulation before application.
- Wrap with 2–3 inch overlaps and seal seams with waterproof tape.
- Inspect periodically for damage or gaps.
How to Insulate Elbows, Joints, and Hard-to-Reach Spots
Attention to elbows, joints, and cramped runs prevents thermal bridging and condensation.
The practitioner selects flexible insulation and pre-formed elbow pieces for tight corners, cutting and fitting material to maintain full coverage.
Changes in plane are sealed with vapor-proof tape or mastic to guarantee continuous protection.
Insulating Tight Corners
Maneuvering tight corners on a copper plumbing run demands small, precise insulation solutions that maintain thermal protection without compromising accessibility. The installer selects segmented foam, adhesive-backed strips, or thin wrap to fit elbows and compact spaces. Cuts are measured to preserve snug coverage; seams are staggered to reduce thermal bridging. Fastening uses heat-resistant tape and minimal clips so joints remain serviceable.
- Pre-measure bends and mark cut lines.
- Use segmented or slit-foam for 90° and compound angles.
- Stagger seams and wrap overlaps by 25–50%.
- Secure with heat-resistant tape; avoid permanent adhesives.
Sealing Pipe Transitions
Having fitted insulation around tight corners, the installer now focuses on sealing elbows, joints, and other confined spots where gaps or compressed material can undermine thermal performance.
Small preformed elbow covers or split foam sections are trimmed to fit and glued with weatherproof adhesive. Flexible tape or self-sealing insulation tape secures seams, preventing moisture ingress. For threaded joints, removable foam collars allow access while maintaining coverage. In very tight areas, closed-cell spray foam or rubberized mastic fills voids without absorbing water.
All connections receive a continuous vapor barrier and smooth finish to preserve insulation integrity and reduce condensation risk.
Improve Ventilation to Stop Copper Pipe Sweating
By increasing airflow around chilled copper lines, condensation is reduced because warm, moist room air is less likely to contact the cool pipe surface.
Ventilation alters local humidity and temperature near pipes, lowering dew point risk.
Simple, targeted measures often stop sweating without insulation changes.
- Install a small inline or oscillating fan aimed along the pipe run to keep air moving.
- Open or add passive vents in cabinets and enclosures to prevent stagnant pockets.
- Unblock nearby return-air pathways and make sure HVAC registers circulate air in the area.
- Use continuous mechanical ventilation for basements or crawlspaces with persistent moisture.
Is Sweating From Cold Water or Poor Ventilation? How to Tell
How can a homeowner tell whether a copper pipe is sweating because the water inside is exceptionally cold or because the surrounding air is too humid and stagnant?
Visual clues: uniform beading along a long run suggests high relative humidity; localized droplets near a single fixture or chilled supply line indicate cold water.
Time patterns matter: sweating during constant cold-water use points to temperature; sweating only during warm, still weather points to ventilation.
Measure: a thermometer on the pipe and a simple hygrometer in the room confirm temperature and humidity.
Addressing the dominant factor—insulation for cold lines or airflow for humidity—resolves sweating.
How to Test Your Repair for Leaks and Condensation Afterwards
After completing insulation or ventilation fixes, the homeowner should inspect the work under realistic conditions to verify there are no leaks and that condensation has stopped.
The tester observes the pipe while running cold water, watches for dripping, and checks insulation contact.
Allow time for temperature and humidity to stabilize; condensation may recur briefly.
Use a tissue or paper towel to detect slow seepage and a flashlight for joints.
Monitor the area over 24–48 hours to verify conditions mimic normal use.
Document findings and re-tighten clamps or reseal joints if any moisture appears during the observation period.
- Run cold water and watch.
- Use tissue for slow leaks.
- Inspect insulation contact.
- Monitor 24–48 hours.
Common Mistakes That Make Sweating or Leaks Come Back
Many recurring failures stem from avoidable errors such as poorly applied insulation that leaves gaps, neglecting proper surface preparation before joining or sealing, and choosing an incompatible sealant.
Each of these mistakes undermines the repair’s ability to stop condensation or hold pressure. Addressing them directly increases the chance that the fix will be permanent.
Poorly Applied Insulation
Poorly applied insulation often undermines attempts to stop a sweating copper pipe because gaps, crushed material, or inconsistent coverage allow moist air to reach the cold surface and condense.
Common faults recreate the problem quickly and mask small leaks until corrosion starts. Properly fitted, continuous insulation prevents dew and reduces thermal bridging.
Inspect joints, bends, and valves where errors concentrate; replace flattened foam and secure seams with tape or adhesive designed for HVAC.
Typical mistakes include:
- Using undersized or compressed tubing sleeves.
- Leaving seams open or poorly sealed.
- Ignoring fittings and elbows.
- Mixing incompatible materials without proper sealing.
Ignoring Surface Preparation
Failing to clean and prep a copper pipe before insulation or repairs invites recurring sweating and hidden leaks because residues, corrosion, and uneven surfaces prevent proper adhesion and create thermal bridges.
Neglecting to remove oxidation, old tape, paint, or mineral buildup leaves gaps where moisture collects and insulation cannot form a continuous vapor barrier.
Surface irregularities hinder clamps, wraps, and coatings, causing localized cold spots and stress points that encourage future failure.
Proper preparation—degreasing, light abrasion, rust treatment, and thorough drying—ensures materials bond uniformly and thermal continuity is restored, reducing condensation and prolonging repair effectiveness.
Using Wrong Sealant Type
Choose a sealant that matches both the copper surface and the service conditions, because using the wrong type is a common cause of recurring sweating and leaks. The wrong chemistry can fail adhesion, resistances, or flexibility, allowing moisture or pressure to reopen joints. Selection must consider temperature, immersion, vapor barrier needs, and compatibility with flux or solder residues.
- Use sealants rated for copper and potable water if applicable.
- Avoid silicone on surfaces needing paint or where solvent attack occurs.
- Prefer PTFE or thread-specific tape for threaded fittings.
- Replace incompatible compounds and retest under operating conditions.
Cost and Time Comparison: DIY Fixes vs. Hiring a Plumber
Although small sweating issues can sometimes be addressed with a few dollars of materials and an hour or two of labor, the decision to DIY or hire a plumber depends on skill level, the scope of the problem, and local labor rates.
DIY fixes (insulation wrap, drip tape, basic soldering) typically cost $5–$50 and occupy 30–120 minutes, but risk improper repair.
A licensed plumber may charge $75–$200 per hour plus parts, with diagnostic time and guaranteed workmanship reducing long‑term cost for complex leaks or inaccessible piping.
Choose DIY for simple condensation or visible minor leaks; hire a pro for uncertain causes or safety concerns.
Maintenance Tips to Keep Copper Pipes Dry Year-Round
Regularly scheduled inspections and simple preventative measures keep copper pipes dry and extend their service life.
Routine checks reveal loose fittings, insulation gaps, or nearby humidity sources before condensation forms.
Maintain stable indoor temperatures and control humidity with exhaust fans or dehumidifiers in basements and bathrooms.
Make certain proper ventilation around pipes and avoid plumbing runs near cold exterior walls when possible.
Flush systems seasonally to remove sediment that can promote corrosion.
Apply corrosion-resistant insulation where needed and secure pipes to prevent vibration.
- Inspect fittings monthly.
- Monitor indoor humidity.
- Insulate vulnerable runs.
- Schedule annual professional review.
Quick Troubleshooting: Fixes for the Five Most Common Sweating Scenarios
The section outlines quick troubleshooting steps for common pipe sweating issues.
It covers how to identify condensation sources, distinguish them from drips, and address minor leaks promptly.
Recommended fixes include targeted insulation and improving ventilation to prevent recurrence.
Identify Condensation Sources
In diagnosing a sweating copper pipe, start by pinpointing where and when moisture appears, since condensation is a symptom with distinct, traceable causes.
Observe pipe location, surrounding air temperature, and humidity patterns over several hours to distinguish intermittent from constant sweating.
Check for cold-water flow, nearby insulation gaps, and duct or vent proximity that alters local climate.
Note any visible frost, dripping, or pooling that indicates severity.
Use these focused checks to identify whether the issue is environmental or installation-related before choosing mitigation.
- Location mapping
- Time-of-day pattern
- Insulation inspection
- Airflow and vents
Repair Minor Leaks
When small leaks accompany a sweating copper pipe, addressing them promptly prevents water damage and reduces ongoing condensation by restoring proper sealing and insulation.
First, shut off water and dry the area. Clean corrosion and mineral buildup with a wire brush; sand lightly to bright copper.
For pinholes, apply epoxy putty or a silicone-based leak sealant per instructions; allow full cure before testing.
For loose joints, tighten fittings or replace worn compression rings and ferrules.
After repair, inspect for underlying corrosion or stress that could indicate a need for section replacement. Test under pressure and monitor for recurrence.
Insulate And Ventilate
For persistent condensation on copper pipes, improving insulation and room airflow is the most direct remedy: wrap exposed runs with closed-cell pipe insulation sized to fit, seal seams with appropriate tape, and leave a small gap at fittings that are actively maintained.
Recommended actions focus on barrier integrity and environmental control. Install vapor-retardant insulation on cold lines, add foam around hangers, and avoid compressing pads.
Increase ventilation to lower humidity using fans or dehumidifiers. Check attic and crawlspace vents for blockage.
- Fit closed-cell insulation
- Seal seams and joints
- Improve room ventilation
- Use dehumidification
Conclusion
When copper pipes sweat, a calm, methodical approach untangles the problem like a needle through thread. By prioritizing safety, locating the source, shutting off water, and choosing the right stopgap or permanent repair, most condensation and small leaks can be handled by a confident DIYer. Avoid common mistakes, weigh time and cost against a plumber’s expertise, and follow simple maintenance to keep pipes dry—preventing future trouble before it gathers.