DIY Tips: How to Keep Outdoor Water Pipes From Freezing This Winter
To prevent outdoor water pipes from freezing this winter, homeowners should take several proactive measures. Insulate exposed pipes with foam sleeves or heat tape, drain and store hoses, and close and drain any exterior shutoffs. Additionally, seal any gaps where pipes enter the building. During extreme cold, open a nearby faucet to relieve pressure and consider using insulated faucet covers. If you suspect a freeze, shut off the outdoor valve and gently apply heat to the affected area. For more effective long-term solutions, consider upgrading your insulation and pipe protection methods.
How To Tell If Outdoor Pipes Will Freeze
How can one tell whether outdoor pipes are at risk of freezing? Observers check temperature, exposure, insulation, and recent flow.
Temperatures near or below 32°F increase risk, especially during prolonged cold spells.
Pipes exposed to wind or shaded areas lose heat faster.
Lack of insulation, visible cracks, or thin-walled materials raises vulnerability.
Infrequently used lines that remain full are more likely to freeze than those with steady flow.
Signs such as frost on fittings, reduced water pressure, or ice buildup near spigots indicate developing freeze.
Regular monitoring during cold weather, combined with simple insulation checks, reveals risk before failure occurs.
Which Outdoor Pipes Freeze Most Often And Why
Typically, exposed, infrequently used, and poorly insulated lines freeze most often because they lose heat fastest and have no compensating flow. Outdoor hose bibs, irrigation supply lines, and detached garage or shed plumbing are common victims.
Shallow buried pipes near foundations or under uninsulated crawlspaces also freeze due to limited earth shielding. Narrow-diameter lines and dead-end branches are particularly vulnerable because friction and volume offer little thermal inertia.
Metal pipes conduct cold more rapidly than plastic. Pipes on windward sides of buildings chill faster. Understanding location, material, diameter, and usage patterns explains which lines freeze and why preventive focus varies accordingly.
Quick DIY Fixes To Do Before The First Freeze
Having identified which outdoor lines are most prone to freezing and why, attention should turn to straightforward measures that can be completed before the first hard freeze.
Insulate exposed pipes with foam sleeves or wrap them with heat tape rated for outdoor use. Drain and store garden hoses; close and drain exterior shutoff valves, then open outdoor faucets briefly. Seal gaps where pipes enter the home with caulk or expanding foam to reduce cold air entry. Add a simple insulated cover to exterior faucets. Test insulation and tape for secure fit. Label shutoffs and keep a basic toolkit accessible for quick adjustments.
Emergency Steps If You Suspect A Frozen Outdoor Pipe
If a freeze is suspected, the water supply should be shut off immediately to limit pressure and potential bursts.
The next priority is to thaw the affected pipe using safe methods such as warm towels or a hair dryer, avoiding open flames.
If thawing does not restore flow or damage is suspected, a professional plumber should be called.
Shut Off Water Supply
Locate and close the main outdoor water shutoff valve immediately when a frozen outdoor pipe is suspected to prevent further pressure buildup and potential bursting.
After shutting off, open nearby faucets to relieve trapped pressure and drain remaining water from outdoor lines and hose bibs. Disconnect hoses and drain them separately to avoid backflow into the system.
Notify household members that the supply is off and post a visible reminder at the shutoff location. If the shutoff is inaccessible or damaged, contact a qualified plumber promptly. Record the event and any visible damage for repairs once temperatures permit.
Thaw Pipes Safely
After shutting off the outdoor supply and relieving pressure, attention should turn to safely thawing any suspected frozen pipe to restore flow and prevent rupture.
Inspect exposed sections for frost, bulging, or leaks.
Apply heat gradually using a hair dryer, heat gun on low, or electric heating tape; wrap from the faucet toward the frozen area. Never use open flame.
If access is limited, warm the surrounding air with a space heater placed safely outside and away from combustibles.
Monitor for thawing and slow water flow; stop if plumbing shows cracks or active leaks.
Once thawed, restore supply and check for damage.
Call A Professional
Recognizing the limits of DIY measures, one should contact a licensed plumber immediately when signs point to a frozen outdoor pipe that may be damaged. A professional assesses risks, locates frozen sections, and determines if thawing, repair, or replacement is required.
Until help arrives, shut off water at the main valve, drain exposed faucets, and avoid open flames or electrical heaters near the pipe. Communicate observed symptoms—bulging, reduced flow, unusual noises—to expedite diagnosis.
If a leak is suspected, turn off power to nearby outlets, contain escaping water with buckets, and document damage for insurance. Follow the plumber’s guidance for safe restoration.
How To Locate Hidden Or Buried Outdoor Water Lines
Tracing the path of buried or concealed outdoor water lines begins with gathering documentation—site plans, past utility maps, and municipal records—to establish likely routes, then combining that paperwork with visible surface clues (valves, hose bibs, lawn depressions) and noninvasive tools such as a soil probe, metal detector, or electronic line tracer to confirm positions before any digging.
Once located, mark lines clearly with paint or flags and measure depth at multiple points. Proceed cautiously near other utilities; call local one‑call services to verify. Keep records of discoveries for future reference and coordinate repairs or insulation work with accurate line maps.
Insulation Basics: What Prevents Pipe Freezing And Why
By slowing heat loss and blocking cold air, proper insulation keeps water in outdoor pipes above freezing long enough to prevent ice formation and the pressure spikes that cause ruptures. Insulation works by trapping a layer of still air around the pipe, reducing conductive and convective heat transfer.
It also limits radiant heat loss and shields pipes from wind-driven chill. Effective installation seals gaps and overlaps to maintain continuous coverage. Combined with thermal mass and occasional heat sources, insulation raises the time-to-freeze, allowing routine flow to prevent ice. Material selection and fit determine performance, but the core principle is reducing energy exchange.
Choosing The Right Pipe Insulation For Outdoor Use
Selecting appropriate pipe insulation for outdoor use requires balancing material properties, environmental exposure, and installation constraints.
Durable closed-cell foam resists moisture and offers consistent R-value; flexible rubber insulation suits irregular fittings and temperature swings. For exposed areas, UV-resistant jacketing or conduit protects foam from sun and abrasion.
Consider thickness: thicker insulation retains heat longer, but size and clearance matter. For metal pipes, corrosion-inhibiting liners or vapor barriers prevent galvanic issues.
Evaluate local climate, freeze risk, and expected lifespan when choosing product grade. Professional-grade supplies may cost more but reduce maintenance and failure likelihood.
How To Wrap Outdoor Pipes With Foam And Tape Correctly
After choosing insulation suited to the climate and pipe material, the next step is a precise wrapping technique that guarantees continuous coverage and a tight seal.
Measure lengths, cut closed-cell foam sleeves slightly longer than pipe runs, and slide them over fittings where possible.
For joints and bends, slit foam lengthwise and wrap snugly, overlapping seams by at least 1 inch.
Secure seams and ends with weather-resistant HVAC or polyethylene tape, stretching slightly to compress foam and eliminate gaps. Tape spirals should overlap by half their width.
Seal exposed ends with tape and install pipe hangers to avoid compression points that compromise insulation.
Using Fiberglass Or Mineral Wool For Exposed Pipe Sections
For exposed outdoor runs where foam sleeves are impractical, fiberglass or mineral wool offers a flexible, heat-retaining alternative that resists moisture when properly protected. These fibers compress around irregular shapes, provide excellent thermal resistance, and tolerate higher temperatures than foam. Install with a weatherproof vapor barrier, secure with tape or stainless steel bands, and seal seams to prevent water ingress. Check insulation after heavy wind or rain. Maintenance includes inspecting for compression and replacing wet sections. Use appropriate gloves and mask during installation to avoid irritation.
| Material | R-value | Best use |
|---|---|---|
| Fiberglass | 3.0–4.2 | Irregular runs |
| Mineral wool | 3.0–3.3 | High-temp areas |
Heat Tape And Heat Cable: How They Work And When To Use Them
When applied directly to pipes or wrapped around them, heat tape and heat cable deliver controlled warmth to prevent freezing by supplying electrical heat along vulnerable sections.
They supplement insulation where ambient temperatures and exposure create risk, restoring or maintaining above-freezing temperatures.
Installation follows manufacturer instructions: secure to dry, clean pipes, avoid overlap, and protect connections with weatherproof materials.
Use on exposed outdoor lines, unheated crawlspaces, and service stops; avoid buried or submerged pipes unless rated.
Power source access and thermostat or manual control determine suitability.
Regular inspection for wear, damage, and secure attachment guarantees continued effectiveness and safety.
Comparing Self‑Regulating Vs. Constant‑Watt Heat Cable
Following the overview of heat tape and heat cable usage, attention turns to two common product types that behave differently under varying conditions: self-regulating and constant-watt heat cable.
Self-regulating cable adjusts its output as temperature changes, reducing power near warm spots and increasing it in cold areas; this lowers energy use and risk of overheating when overlapped.
Constant-watt cable delivers a fixed heat per foot regardless of ambient temperature, offering simpler design and predictable heat output but higher energy use and potential hot spots if overlapped.
Selection depends on pipe material, installation complexity, required control, and budget.
Battery‑Powered Pipe Heaters And Low‑Voltage Options
How might homeowners keep pipes warm in areas without accessible household power? Battery-powered pipe heaters offer portable, low-current solutions for isolated lines. These units typically use sealed rechargeable batteries or replaceable cells and provide gentle, intermittent heat suitable for short runs and occasional freeze risk.
Low-voltage (12–24V) systems, often paired with DC power supplies or solar panels, reduce shock hazards and allow longer run times. Installation requires insulation, proper mounting, and adherence to manufacturer output limits to prevent overheating.
For extensive or continuous protection, professionals recommend evaluating load, expected cold duration, and reliable recharging or backup power plans.
Adding A Thermostat To Heat Tape: When And How
A thermostat on heat tape is recommended when pipes are exposed to prolonged freezing temperatures or when precise control is needed to save energy and prevent overheating.
Installation involves mounting the thermostat sensor against the pipe, wiring the control between the heat tape and its power source, and following the manufacturer’s wiring diagram and local electrical codes.
Proper placement and correct wiring guarantee the thermostat cycles the tape only when necessary, extending equipment life and improving safety.
When To Use A Thermostat
Often, a thermostat is added to heat tape systems to prevent overheating, reduce energy use, and extend product life. It is recommended when pipes run through unheated spaces, when variable temperatures occur, or when long runs of tape risk heat buildup. A thermostat activates only below a set threshold, saving energy during mild weather and protecting insulation and tubing. It suits homeowners seeking automated control and lower utility bills. Consider placement away from direct sunlight and moisture. Typical decisions depend on pipe location, climate severity, accessibility, maintenance needs, and cost-benefit.
| Condition | Recommendation |
|---|---|
| Unheated attic | Use thermostat |
| Exposed pipe | Use thermostat |
| Mild climate | Optional |
| Short run | Optional |
| Remote location | Use thermostat |
How To Install One
Before beginning installation, the homeowner should verify power is off, the heat tape model supports an external thermostat, and local codes permit the modification. A professional may be consulted if uncertain.
Steps include selecting a temperature-rated thermostat, locating a protected mounting point, and running sensor and power leads per manufacturer instructions. Make sure all connections are watertight and strain-relieved.
Test operation before final insulation and secure wiring with clips or conduit.
- Choose compatible thermostat and sensor placement
- Mount sensor against pipe under insulation
- Follow wiring diagram and use GFCI protection
- Test at target temperature, then insulate tightly
How To Seal Gaps And Joints That Let Cold Air Reach Pipes
When cold air reaches pipes through gaps and joints, heat loss accelerates and the risk of freezing rises; sealing those openings is a straightforward, high-impact prevention step. Inspect seams, threaded joints, and where fittings meet walls. Use exterior-grade caulk for small gaps, foam sealant for larger voids, and rubber gaskets or plumber’s tape on threaded connections. Allow sealants to cure before exposing to weather. Recheck annually and after temperature extremes. Avoid blocking necessary ventilation. Simple tools—caulk gun, utility knife, rag—suffice.
| Area | Recommended seal |
|---|---|
| Small gap | Exterior caulk |
| Large void | Expanding foam |
| Threaded joint | Plumber’s tape |
| Flange | Rubber gasket |
Weatherproofing Pipe Entry Points At Exterior Walls
At exterior walls where pipes enter the building, properly weatherproofing the penetration prevents air, moisture, and pests from compromising the pipe or the wall assembly; this requires selecting compatible sealants, flashing, and collars sized to the pipe and wall material and installing them so the barrier remains continuous and drainage-directed.
A concise approach limits heat loss and water intrusion: inspect gaps, remove debris, and choose materials rated for UV and freeze cycles. Make certain joints slope away from the wall and allow movement. Regularly check seals for cracking and reseal as needed.
- Use polyurethane or silicone sealant
- Install a metal or PVC flashing
- Fit a rubber pipe collar
- Maintain drainage clearance
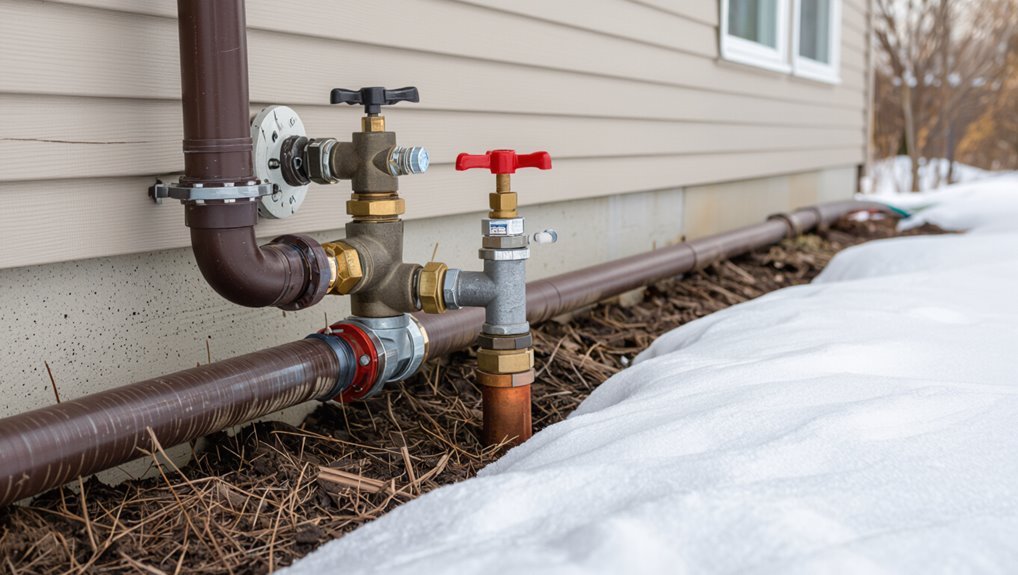
How To Protect Outdoor Faucets And Spigots From Freezing
Protect outdoor faucets and spigots from freezing by isolating, insulating, and draining them so standing water cannot freeze inside the valve or adjacent pipe.
Shut off the indoor supply to exterior outlets if possible, then open the hose bib to relieve pressure and drain remaining water.
Remove hoses and store them indoors.
Apply foam faucet covers or wrap lines with pipe insulation, securing with tape or zip ties to eliminate gaps.
For exposed short runs, add tubular insulation or heat‑tape rated for outdoor use, following manufacturer instructions.
Check covers periodically for moisture accumulation and replace damaged insulation before the next freeze.
How To Install Frost‑Free Sillcocks Correctly
For a reliable long‑term defense against frozen outdoor taps, proper installation of frost‑free sillcocks guarantees the shutoff valve sits well inside the heated wall where water cannot freeze. The installer measures depth to position the valve within conditioned space, selects the correct length sillcock for wall thickness, and makes certain a slight downward slope toward the exterior to drain residual water.
Secure mounting prevents stress on piping, and use of plumber’s tape and approved sealants makes certain a watertight connection.
- Measure wall thickness and choose matching sillcock length
- Slope piping slightly toward outside
- Tighten with proper fittings and sealant
- Secure mounting to framing
How To Winterize Hose Bibs And Remove Garden Hoses Properly
Before cold weather arrives, the outdoor water supply should be shut off at the interior valve to prevent backflow into exterior bibs.
After shutting off the supply, hose bibs must be drained and insulated to block residual moisture and cold air.
Garden hoses should be disconnected, emptied, coiled, and stored indoors to avoid cracking and freezing.
Shut Off Outdoor Water Supply
Shut off the outdoor water supply and drain any attached hoses to prevent trapped water from freezing and rupturing exterior pipes.
The homeowner locates the interior shutoff valve for exterior spigots, turns it off, then opens the outdoor bib to relieve pressure.
After removing hoses, a quick check for residual drip confirms lines are clear.
If there is an inline shutoff, it is used instead of the main.
Winter preparations are completed by verifying valves hold and noting location for spring reopening.
- Locate interior shutoff valve
- Turn off and open bib
- Remove and drain hoses
- Inspect for leaks and mark valve location
Drain And Insulate Bibs
Prepare hose bibs for winter by draining any remaining water and insulating exposed fittings to prevent freezing and pipe damage.
After shutting off the outdoor supply, open each bib to relieve pressure and let residual water exit.
Disconnect and cap hose connections at the spigot; leave the valve open inside to allow trapped water to escape.
Apply foam bib covers or wrap insulating tape around exposed pipes and fittings, ensuring a snug fit without compressing insulation.
Check for cracks or loose connections and repair as needed.
Label any insulated bibs for seasonal inspection and remove insulation only after temperatures consistently rise.
Store Hoses Properly
Storing garden hoses correctly prevents trapped water from freezing, reduces wear, and makes spring use easier. Remove hoses from bibs, drain fully, and coil loosely to avoid kinks. Disconnect quick-connect fittings and store clamps or washers together. Keep hoses indoors or in insulated storage to prevent temperature extremes and UV damage.
- Drain and elevate coils to shed residual water
- Inspect and replace worn washers or damaged sections
- Store in a dry, frost-free area such as a garage or shed
- Label and organize fittings for easy reattachment
Proper storage extends hose life and prevents frozen backups at hose bibs.
How To Shut Off And Drain Outdoor Supply Lines
Locate the outdoor supply shutoff and close it fully, then open the faucet outside to relieve remaining pressure.
Afterward, drain the line by opening any inline drain valves or disconnecting the hose at the spigot and allowing water to run out.
If accessible, open the indoor shutoff to let trapped water escape into a bucket or floor drain.
Tilt detachable components to encourage complete drainage.
Inspect valves and spigots for leaks, tighten packing nuts, and replace worn washers.
Leave outdoor faucets slightly open to indicate they are off.
Cap or insulate exterior valves to prevent accidental reactivation and freezing.
Using Blow‑Out Methods To Clear Irrigation And Sprinkler Lines
Before using a blow‑out, the system should be prepared by shutting off the water supply, opening drain and test ports, and isolating zones. Select an air compressor with the correct pressure and CFM ratings for the irrigation layout and use a pressure regulator and quick‑disconnects to avoid overpressurizing components.
After blowing out each zone, close valves, remove adapters, and perform a final inspection to guarantee traps and low points are free of water for winter storage.
Prepare System For Blow‑Out
Begin by shutting off the main water supply and draining any backflow preventer or valve assemblies to isolate the irrigation system; this prevents fresh water from entering lines during the blow-out.
The operator should open all zone valves and manual drains, tag controller circuits, and remove inline filters or pressure regulators to avoid damage.
Inspect aboveground components, caps, and emitters for cracks.
Purge low spots and verify drain flow before pressurizing with air.
Follow local codes and safety practices throughout.
- Open zone valves and manual drains
- Remove filters and regulators
- Inspect visible pipes and fittings
- Tag controllers and document zones
Choose Proper Air Compressor
With the system isolated and lines drained, attention shifts to selecting an air compressor capable of safely and effectively performing the blow-out. The technician evaluates required pressure (psi), airflow (CFM), and tank size relative to pipe length and zone complexity. Too high pressure risks damage; too low leaves water trapped. Use pressure regulators, inline gauges, and quick-connect fittings. Prioritize oil-free compressors for cleaner lines and portable units for yard access. Confirm compatible hose diameter and avoid continuous high-speed runs. Table summarizes typical target ranges and considerations for common residential irrigation setups.
| Parameter | Typical Range | Consideration |
|---|---|---|
| Pressure | 30–80 psi | Regulate to avoid damage |
| Airflow | 3–10 CFM | Matches zone size |
| Tank | 4–20 gal | Larger reduces runtime |
Post‑Blow‑Out Winterizing
After completing the blow-out, the technician inspects each zone and service point to confirm lines are dry, valves are closed, and quick-connects are removed or capped.
Post-blow-out winterizing guarantees residual moisture won’t freeze, damage components, or cause blockages.
The technician documents system status, tags any damaged parts, and advises on follow-up checks.
Recommended actions include:
- Drain low spots and open drain valves to release trapped water.
- Remove and store aboveground timers, backflow devices, and removable risers.
- Apply biodegradable antifreeze only where appropriate and labeled for irrigation.
- Schedule a pre-season inspection to verify integrity before reactivation.
Insulating Underground Pipes : Depth, Materials, And When To Reburi
In cold climates, properly insulating underground water lines requires attention to burial depth, choice of materials, and conditions that warrant reburial. Pipes should be below local frost depth—often 12–48 inches depending on region—to prevent freezing. Use closed‑cell foam sleeves, insulated pipe wrap, or foam board around conduits; tar‑sealed seams and waterproof tape reduce moisture intrusion. Gravel or sand bedding improves drainage and thermal stability. Rebury and lower lines when repeated freeze incidents, shallow original placement, or erosion expose pipes. Trenches must be compacted to avoid future settling. Follow local codes and consider professional assessment for challenging soils or climates.
How To Build An Insulated Box For Exposed Outdoor Pipe Runs
For exposed outdoor pipe runs that cannot be buried, an insulated box provides a durable, weatherproof barrier that reduces heat loss and prevents freezing.
The builder measures pipe length, allows service access, and selects rigid foam or insulated board sheathed with plywood or PVC.
Seal seams with exterior caulk and tape; add removable access panels and ventilation to prevent condensation.
Elevate the box slightly off the ground and slope the top to shed water.
- Measure and plan for access
- Use closed-cell foam or insulated panels
- Seal seams and weatherproof exterior
- Provide removable panels and drainage
Using Heat Lamps And Portable Heaters Near Vulnerable Pipes Safely
When an insulated box is impractical or additional heat is needed, carefully placed heat lamps or portable heaters can protect vulnerable outdoor pipes from freezing. The user should choose outdoor-rated, thermostatic units, keep clearances per manufacturer instructions, and mount devices to prevent contact with insulation, vegetation, or water. Electrical connections must be GFCI-protected and weatherproof. Regularly inspect cords, housings, and heaters for damage, and never leave high-wattage devices unattended for extended periods. Monitor temperatures with a sensor and set a low cutoff. Follow local codes and prioritize fire safety to protect property and peace of mind.
| Warmth | Caution | Relief |
|---|---|---|
| Glow | Distance | Hope |
| Light | Watch | Calm |
| Heat | Inspect | Trust |
| Safety | Code | Comfort |
How To Reroute Or Relocate Exposed Pipes As A DIY Project
The homeowner should first assess alternative pipe routes, considering distance, slope, and access to existing water lines.
When feasible, relocating lines below the frost line or placing them in shallow trenches with proper bedding decreases freeze risk.
Plans must account for local codes and permits before any excavation or rerouting begins.
Assess Pipe Route Options
Considering available routes and constraints, a homeowner should map existing pipe locations, noting lengths, junctions, access points, and nearby obstacles such as framing, vents, or electrical runs.
Once mapped, evaluate alternative trajectories that minimize exposure, reduce bends, and use existing wall cavities or protected soffits. Check material compatibility, required supports, and permit needs. Prioritize routes that allow future access for maintenance and insulation upgrades.
Use the list below to compare options quickly:
- Shorter runs with fewer fittings to limit freeze points
- Routes within conditioned or sheltered spaces
- Paths avoiding electrical or vent interference
- Accessibility for repair and insulation upgrades
Move Pipes Underground
Moving pipes underground provides a durable way to protect water lines from freezing while keeping exterior walls clear for other utilities.
A DIYer should plan trench depth below the local frost line, confirm utility locations, and obtain permits.
Use rigid PVC or insulated PEX rated for burial, with proper slope for drainage and threaded fittings sealed with tape and primer where required.
Lay gravel bedding, backfill in layers, and compact to avoid future settling.
Install access points or frost-proof hydrants for maintenance.
Pressure-test the system before final backfill.
Follow local codes and consult a professional if uncertainties arise.
Insulating Cold Walls And Headers With Foam Board And Reflective Wrap
Against cold exterior walls and over uninsulated headers, rigid foam board paired with reflective wrap forms an effective thermal barrier that reduces heat loss and lowers the risk of pipe freezing.
The method involves cutting foam to fit, sealing seams with tape or foam sealant, and fastening reflective wrap outward to deflect radiant heat loss.
Attention to vents and service penetrations prevents thermal bridging.
Periodic inspection guarantees fasteners and seals remain intact through freeze-thaw cycles.
- Cut foam board to fit header cavities precisely
- Seal edges and joints with compatible tape or spray foam
- Secure reflective wrap with corrosion-resistant fasteners
- Inspect seals seasonally and after storms
How To Winterize Pump Systems And Outdoor Water Features Connected To Supply Lines
When protecting pump systems and outdoor water features tied to supply lines, the goal is to prevent freeze damage and minimize moisture-related deterioration by draining, insulating, and isolating vulnerable components before cold weather sets in.
Shut off and isolate supply valves, then drain lines and pump housings; open low points and use compressed air if needed.
Remove and store submersible pumps or elevate and insulate above frost lines.
Disconnect hoses, empty basins, and cover fountains with breathable covers to prevent trapped moisture.
Wrap exposed pipes, valves, and backflow preventers with heat tape and foam.
Label components for spring reassembly and inspect seals.
Temporary Vs. Permanent Solutions: When To DIY And When To Call A Pro
A clear assessment separates quick temporary fixes—like insulating exposed spigots or using heat tape—from long-term permanent options such as rerouting lines below frost depth or upgrading to insulated enclosures.
Homeowners can handle simple, low-risk measures themselves, but complex work involving buried service lines, gas-powered heat, or permitting should be left to licensed professionals.
Deciding between DIY and pro help depends on skill level, safety risks, cost of failure, and local code requirements.
When To Call A Pro
Decide whether a fix is temporary or permanent by evaluating the cause, the risk to property, and the homeowner’s skill level. When scopes exceed basic insulation or simple repairs, a professional guarantees correct diagnosis and lasting solutions. Call a licensed plumber or contractor if structural access, frozen blockages inside walls, repeated failures, or code compliance are involved. Professionals offer permits, proper materials, and warranty-backed work that prevent recurrence and liability.
- Visible pipe damage inside walls or ceilings
- Repeated freezes despite DIY measures
- Jobs requiring permits or electrical work
- Uncertainty about proper insulation or routing
Quick Temporary Fixes
If the problem appears limited—an exposed outdoor hose bib, a short run of pipe, or a localized frost—temporary fixes can stop immediate damage while a plan for permanent repair is arranged.
Apply foam pipe insulation, heat tape with proper outdoor rating, or wrap pipes in insulated blankets secured with zip ties. Turn off and drain external faucets, remove hoses, and plug hose bibs indoors if possible. For frozen sections, gently warm with a hair dryer or warm towels; avoid open flames. Monitor for leaks after thawing.
These measures are stopgaps only; document locations and schedule lasting solutions before the next cold snap.
Long-Term Permanent Options
When planning permanent protection for outdoor pipes, homeowners should weigh durable options—insulation upgrades, rerouting or burying lines below frost depth, installing freeze-resistant valves, and adding professionally rated heat systems—against cost, skill required, and site constraints.
Long-term choices prioritize reliability and reduced maintenance. Professionals may be needed for trenching, electrical heat tracing, or code-compliant valve installation.
Permits, drainage, and material longevity influence decisions. Consider future landscaping and access for repairs. Evaluate energy use and warranty terms when selecting powered solutions.
- Bury lines below local frost depth
- Upgrade to closed-cell foam insulation
- Install electric heat tracing with thermostat
- Fit freeze-resistant or frost-proof valves
Cost‑Effective Materials And Tools For Winter Pipe Protection
Gathering a few basic, inexpensive materials—foam pipe wrap, self‑adhesive rubber insulation, heat tape, and weatherproof sealant—covers most winter pipe protection needs without large expense.
Additional useful items include pipe hangers to prevent sagging, insulated faucet covers, and weatherproof electrical tape for sealing seams. A temperature‑rated thermostat controller for heat tape adds efficiency.
Basic tools: utility knife, measuring tape, caulk gun, and a multimeter for checking power continuity.
Prioritizing correct sizing and proper sealing yields better performance than premium brands. Purchasing local generic products or bundled kits often reduces cost while maintaining reliable freeze protection for outdoor plumbing.
How To Test Your Protections Before A Cold Snap Arrives
Before temperatures drop, the homeowner should simulate freezing conditions around vulnerable outdoor pipes to confirm heat tape and temporary heaters respond as expected.
They should inspect for leaks by running water and checking joints, valves, and meter readings for unexpected loss.
Finally, a close visual and tactile check of insulation integrity will reveal gaps, compressed sections, or moisture that require repair before a cold snap.
Simulate Freezing Temperatures
To confirm that insulating wraps, heat tape, and shutoff measures will hold up, one should simulate freezing conditions around vulnerable pipes using controlled methods.
A photographer’s thermometer and infrared gun track surface temperatures while a fan or ice packs create localized cold. Tests last long enough to reach near-freezing readings, revealing gaps in insulation or weak heat-tape coverage. If automated controls exist, exercise them during the test.
Record results and adjust materials or placement, then retest.
- Use a digital thermometer and IR gun to monitor
- Apply ice packs or a cold chamber briefly
- Run heat tape and check responsiveness
- Note weak insulation zones and rewrap
Inspect For Leaks
After simulated cold confirms insulation and heat tape performance, the next step is a careful inspection for leaks that could safeguard those protections.
The inspector examines fittings, valves, and splices for moisture, corrosion, or drips. Pressure tests are run where feasible, watching gauges for drops that signal hidden breaches.
Exterior hose bibs and backflow preventers receive close attention; packing nuts and vacuum breakers are probed for seepage.
Any detected leaks are repaired promptly—tightening, replacing seals, or swapping damaged sections—then retested.
Documenting locations and fixes safeguards readiness and a quicker response if freezing conditions arrive unexpectedly.
Check Insulation Integrity
With winter approaching, a focused inspection of pipe insulation and heat-trace systems verifies that thermal protections will perform when temperatures drop.
A technician or homeowner should examine wraps, foam, and tape for compression, tears, or gaps. Electrical heat tape needs intact insulation and functional thermostats; test by feeling for warmth when powered. Check seams, joints, and supports where heat loss concentrates. Replace degraded foam and reseal edges to maintain continuous coverage. Confirm that protective jackets are dry.
Follow this checklist before the first freeze:
- Inspect for cracks, gaps, or compressed areas
- Test heat-trace for warmth and proper controls
- Verify dry, intact protective jackets
- Reseal and replace damaged insulation promptly
How To Spot Early Signs Of Freezing Inside A Pipe
How can one tell a pipe is beginning to freeze before a burst occurs? Early signs include reduced or intermittent water flow, unusually cold pipe surfaces, and frost or condensation on exposed sections.
Taps may sputter or emit air instead of steady water. Listen for unfamiliar creaks or ticking as metal contracts. Check nearby valves and fittings for icy buildup or dampness indicating partial blockage.
Sudden pressure drops at fixtures can signal ice forming further along. Regular visual inspections during cold snaps and simple flow tests help detect problems early so repairs or preventive measures can be applied before significant damage develops.
Emergency Steps To Take If A Pipe Has Frozen
Noticing early signs of a freeze should prompt immediate corrective action to prevent a burst. If a pipe is frozen, the homeowner should shut off water at the main valve and open nearby faucets to relieve pressure. Inspect accessible sections for cracks or bulging and note locations for repair. If leakage is present, isolate the area and collect water to limit damage. For unsafe conditions or visible rupture, contact a licensed plumber and a restoration professional.
- Shut off main water supply
- Open faucets to reduce pressure
- Inspect and document damage
- Call professionals for leaks or bursts
How To Thaw Frozen Pipes Safely Without Causing Damage
Before attempting thawing, a homeowner should confirm the pipe is frozen (no flow at faucets and cold-to-the-touch sections) and shut off the main water supply if there is any sign of cracking or leakage.
Next, restore gentle heat: apply a hair dryer, heat gun on low, or electric heating pad steadily along the pipe toward the faucet to encourage melting and movement of trapped ice. Never use open flames.
For exposed outdoor lines, wrap with warm towels or use thermostatically controlled cable heat.
Monitor progress, keep nearby drains open, and call a plumber if warming does not restore flow promptly.
How To Repair A Burst Outdoor Pipe Yourself (Temporary Fixes)
First, the homeowner should shut off the main outdoor water supply to stop flow and prevent further flooding.
Next, any remaining water should be contained and drained from the damaged section to reduce pressure and ice formation.
Finally, simple temporary patches — such as rubber and hose-clamp wraps, epoxy putty, or pipe repair tape — can be applied to hold the pipe until a permanent repair is made.
Shut Off Water Supply
Locate and shut off the water supply immediately to prevent further flooding and reduce pressure in a burst outdoor pipe. One should find the main shutoff valve—often at the meter, inside a crawlspace, or near the foundation—and turn it clockwise until fully closed. After shutting off, verify cessation of flow at outdoor faucets. Notify household members and, if applicable, the water utility. Temporary measures follow only after shutoff.
- Identify the main valve location quickly
- Use an adjustable wrench if the valve is stiff
- Label the valve for future emergencies
- Keep a flashlight and valve map accessible
Contain And Drain
With the main supply shut off and outdoor faucets checked, attention turns to containing the leak and removing standing water to limit damage and make a temporary repair possible.
The area should be cleared of valuables and electrical hazards; small buckets and towels capture dripping water while sandbags or rags divert flow away from foundations.
Low spots are dug or channels created to guide water to a safe drain.
Remaining water in exposed pipe sections is drained by opening nearby faucets or loosening fittings, catching water in containers.
Surfaces are dried to reduce freezing risk and to allow assessment before a temporary patch.
Temporary Patch Methods
When a burst outdoor pipe cannot wait for a professional, temporary patch methods can stop active leaks and prevent further water damage until permanent repairs are made.
The homeowner should shut off water, drain the line, and assess the rupture.
Temporary fixes are stopgaps: they reduce flow, limit freezing, and buy time for proper replacement.
Apply short-term solutions only when safe, and schedule a licensed plumber promptly.
- Rubber and hose clamp: wrap rubber patch, tighten clamp securely
- Epoxy putty: knead, press over clean, dry area
- Pipe repair tape: stretch and overlap tightly
- Rubber sleeve with stainless band: use for larger splits
Preventing Future Bursts After A Pipe Has Frozen And Thawed
After a pipe has frozen and thawed, the risk of hidden damage persists and should be evaluated promptly. Inspect exposed sections for hairline cracks, corrosion, and weakened joints; use a flashlight and feel for dampness.
Pressure-test the line at low pressure to reveal leaks before normal use resumes. Replace compromised lengths rather than relying on patches; use properly sized, rated materials and soldered or threaded connections per code.
Insulate repaired areas with foam sleeves and heat tape where applicable. Monitor the repaired section during initial freeze cycles and schedule a professional inspection if any irregularities or repeat leaks occur.
Best Practices For Protecting Water Meters And Outdoor Valves
Attention to water meters and outdoor valves can prevent costly winter damage.
Recommended steps include adding proper insulation to meters, securing valves against movement and tampering, and winterizing or upgrading meter boxes to keep cold and moisture out.
Implementing these measures reduces freeze risk and simplifies post-winter inspections.
Insulating Water Meters
For water meters and exposed outdoor valves, applying targeted insulation is the most effective way to prevent freezing and costly damage. Localized wrapping reduces heat loss around the meter body, fittings and service connections. Use weather-resistant foam or insulated meter jackets designed for meter dimensions. Seal seams with waterproof tape and guarantee access panels remain removable for readings or maintenance.
When temperatures drop, check insulation for compression or gaps and replace degraded materials promptly.
- Choose rigid foam or neoprene jackets sized to the meter
- Seal joints and entry points against drafts
- Allow removable access for reading and service
- Replace damaged insulation annually
Securing Outdoor Valves
Alongside insulating meters, securing outdoor shutoff and hose bib valves reduces the risk of freeze damage and unauthorized tampering.
Homeowners are advised to install lockable valve covers, use tamper-resistant screws, and apply weatherproof insulation sleeves that permit access while limiting cold exposure.
Valves should be checked for leaks and operated periodically to guarantee mobility before hard freezes.
For exposed yard hydrants, add frost-proof extensions or insulated enclosures anchored against wind.
Clearly label valve locations and keep a simple tool kit nearby for emergency shutoffs.
Routine inspection and prompt repair of worn seals and packing prevent water intrusion and subsequent freezing.
Winterizing Meter Boxes
As winter approaches, protecting meter boxes becomes a priority to prevent frozen pipes and damaged valves.
The meter box should be inspected, insulated, and secured to reduce heat loss and block drafts.
Small, targeted measures extend meter life and maintain water access during freezes.
- Add rigid foam or fiberglass insulation around the meter, avoiding contact with wiring or mechanical parts.
- Seal gaps in the box lid and sides with weatherproof caulk or foam tape.
- Elevate the meter if pooling water can freeze beneath it.
- Install a removable insulated cover for easy access while retaining thermal protection.
How Landscape And Drainage Increase Pipe Freeze Risk
Under certain yard configurations, soil, vegetation, and grading can create microclimates that expose outdoor pipes to colder air and slower drainage, increasing freeze risk. Low spots collect cold air and water, shallow soil offers less insulation, and sparse vegetation reduces windbreaks. Compacted or poorly draining soil holds moisture that freezes, while overhanging branches shade areas and slow thawing. Identifying vulnerable runs and addressing grading, planting, or soil depth reduces exposure. Nearby hardscape can reflect cold toward pipes. Simple changes redistribute water and warmth to lower freeze likelihood.
| Vulnerability | Effect |
|---|---|
| Low grade | Water pooling, colder soil |
| Sparse cover | Less insulation, more wind |
Seasonal Maintenance Checklist For Outdoor Plumbing Winter Prep
Prepare an outdoor plumbing winter checklist that targets the highest-risk systems and tasks first: shut off and drain exterior faucets and irrigation lines, insulate exposed pipes and hose bibs, clear gutters and downspouts, store hoses and detachable equipment, and inspect valve operation and backflow preventers.
A concise seasonal checklist reduces freeze damage risk and guides efficient winter prep. Prioritize vulnerable zones, confirm insulation continuity, and schedule repairs before the first hard freeze.
- Verify exterior shutoff valves and drain lines
- Apply pipe insulation and heat tape where needed
- Remove debris from gutters, downspouts, and drainage paths
- Secure and store hoses and outdoor fixtures
How To Document And Label Outdoor Valves And Shutoffs For Winter
How should outdoor valves and shutoffs be documented and labeled to streamline winterization and emergency response? A clear, concise map of all outdoor plumbing features should be created, noting locations, valve types, and flow directions.
Durable, weatherproof labels affixed to valves and nearby structures reduce confusion. Numbered markers correspond to the map and include contact info and last service date.
Keep a digital copy accessible to household members and emergency responders; print a waterproof version for the toolbox. Update labels after maintenance or changes.
Train occupants to read the map and operate shutoffs safely to minimize freeze damage and speed emergency action.
How To Insulate And Protect Backflow Preventers And Hose Reels
When exposed to freezing temperatures, backflow preventers and hose reels require targeted insulation and protection to prevent damage and maintain system integrity.
Protective measures include insulating covers, draining and storing hoses, and creating simple heat barriers.
Routine checks verify seals and fastenings remain secure before cold snaps.
- Fit foam or neoprene insulation wraps around exposed backflow assemblies.
- Remove hoses from reels; drain and store indoors to prevent trapped water from freezing.
- Build a small insulated box or use rigid foam shields around devices while allowing access.
- Apply pipe-safe heat tape sparingly, following manufacturer instructions and electrical codes.
How To Protect Irrigation Timers, Controllers, And Valves From Cold
Following insulated covers and heat barriers for backflow preventers and hose reels, attention should shift to irrigation timers, controllers, and valves, which are similarly vulnerable to freezing.
Protect plastic enclosures with foam insulation pads and weatherproof sealed boxes; add self-regulating heat tape where recommended by manufacturers.
Drain or blow out exposed valves and clear controller junctions of moisture before shutdown. Elevate or relocate electronic controllers indoors when feasible.
Install valve box insulation and insulated lids; use desiccant packs to reduce condensation.
Test battery backups and program frost-delay settings to prevent automatic cycles during subfreezing conditions.
How Building Codes And Local Rules Affect Outdoor Pipe Work
In many municipalities, outdoor plumbing work is governed by a mix of national building codes, state amendments, and local ordinances that dictate materials, burial depths, insulation requirements, and permit procedures.
Compliance guarantees safety, prevents freeze damage, and avoids fines; professionals often reference code tables for frost lines and approved insulation types.
Permit inspections may require visible trenching, proper slope, and accessible shutoffs.
Homeowners should verify jurisdictional rules before altering lines or installing heat-trace products.
Noncompliance can complicate insurance claims after freezing events.
- Verify required permits and inspection points
- Follow prescribed burial depths and slope
- Use code-approved materials and fittings
- Document work for inspections and claims
Low‑Energy, Eco‑Friendly Methods To Prevent Pipe Freeze
Using passive design and simple behavioral changes, low‑energy eco‑friendly methods reduce freeze risk without relying on continuous electrical heating.
Strategies include insulating exposed pipes with recycled or natural materials, routing lines through conditioned or buffered spaces, and adding thermal mass near vulnerable runs.
Gravity-fed drainback or simple manual shutoff and drain procedures prevent water retention in exposed sections.
Vegetative windbreaks and strategic landscaping lower wind chill around pipe runs.
Routine monitoring and timely repairs preserve system integrity.
These measures minimize energy use, lower emissions, and extend pipe lifespan while remaining suitable for DIY implementation with basic tools and materials.
How To Prioritize Fixes By Risk, Cost, And Ease Of DIY
The homeowner should rank potential fixes by the likelihood and consequence of pipe freezing to address the highest-risk vulnerabilities first.
Next, measures can be compared by material cost and required labor to find solutions that fit budget and skill level.
Combining risk assessment with a cost-and-effort balance helps decide which projects to DIY and which to hire out.
Risk-Based Prioritization
Evaluating fixes by risk, cost, and DIY difficulty lets homeowners direct effort where it prevents the most damage for the least expense.
A simple risk matrix ranks pipe locations, failure impact, and frequency of freezing. High-risk pipes (near foundation, supplying irrigation or critical spigots) rise to the top. Consider quick wins versus projects needing pros; document choices and expected outcomes. Use inspections and local freeze-history to refine priorities.
- High impact, low cost: add insulation, heat tape
- High impact, high cost: reroute or winterize supply lines
- Low impact, low cost: cap unused spigots
- Low impact, high cost: cosmetic upgrades
Cost and Effort Balance
Against a backdrop of limited time and funds, homeowners should weigh likely savings from each winterization action against its cost and required skill level.
Start with low-cost, high-impact fixes: insulating exposed spigots, sealing gaps, and adding faucet covers.
Next, address medium-cost options like pipe sleeves or heat tape where pipes are vulnerable.
Reserve professional services for complex rerouting or buried pipe insulation when failure risk and repair expense justify it.
Maintain a simple checklist ranking actions by likelihood of freeze, repair cost, and DIY feasibility.
Revisit priorities annually based on past issues and changing weather forecasts.
Common Mistakes That Lead To Frozen Outdoor Pipes And How To Avoid Them
Making predictable errors when preparing outdoor plumbing can quickly turn a cold snap into burst pipes and costly repairs.
The section identifies frequent missteps and concise fixes to reduce freeze risk.
Common mistakes include leaving outdoor faucets uninsulated, ignoring exposed supply lines, trusting intermittent heat sources, and improper drainback procedures.
Each issue has straightforward prevention: insulate fixtures, route or shield pipes, maintain steady minimal heat where safe, and fully winterize hoses and valves.
Attention to these points prevents most seasonal failures without major overhaul.
- Uninsulated spigots and hose bibs
- Exposed, unshielded supply lines
- Relying on intermittent heat
- Incomplete drainback and hose removal
Long‑Term Upgrades That Eliminate Recurring Outdoor Pipe Freezes
Long-term solutions focus on eliminating vulnerable cold spots rather than relying on temporary fixes.
Options include adding insulation to exposed piping, installing a frost-protected spigot, or replacing outdoor runs with factory-heated lines. Each choice carries different costs and installation needs, so suitability depends on the property and freeze risk.
Insulate Exposed Piping
Insulating exposed piping is one of the most effective permanent measures to prevent recurring outdoor freezes, because it reduces heat loss and shields pipes from ambient cold.
A detached homeowner should evaluate pipe material, exposure, and access before selecting insulation. Closed‑cell foam, fiberglass with vapor barrier, and preformed foam sleeves suit various situations; thickness depends on local temperatures.
Proper installation seals joints and covers valves. Periodic inspection prevents degradation and moisture intrusion. Consider combining with heat tape where permitted.
- Choose appropriate insulation type and R‑value
- Seal seams and fittings carefully
- Protect insulation from UV and rodents
- Inspect annually for damage
Install Frost‑Protected Spigot
After insulating exposed runs, homeowners seeking a more permanent solution can install a frost‑protected spigot, a specially designed outdoor faucet that resists freezing by locating the valve and seat inside the heated envelope or by using internal drainage and thermal breaks.
These units replace standard hose bibs and are mounted so the shutoff sits several inches inside the conditioned wall, preventing cold infiltration. Installation requires cutting into the wall, setting the spigot at the correct angle and slope for drainage, and securing insulation and flashing.
Properly installed, frost‑protected spigots eliminate standing water in the line and reduce freeze risk with minimal maintenance.
Replace With Heated Lines
As a permanent solution, replacing outdoor runs with factory‑built heated pipe systems removes the recurring freeze problem by integrating electric heat tracing or glycol circulation within the line itself. These systems offer reliable, maintenance‑light protection and reduce emergency repairs; selection depends on climate, access, and budget.
Professional installation guarantees correct insulation, controls, and power supply. Consider durability, warranty, and compatibility with existing plumbing when planning replacement.
- Electric heat‑trace cables factory‑integrated along the pipe
- Factory‑insulated glycol‑filled pre‑insulated lines
- Integrated thermostat and fault monitoring options
- Professional sizing, power, and freeze‑risk assessment
Conclusion
Like a lighthouse cutting through a winter fog, proactive preparation can prevent outdoor pipes from freezing. Homeowners who assess vulnerability, prioritize high‑risk lines, and apply quick DIY fixes or eco‑friendly protections minimize damage and emergency repairs. Knowing how to locate buried lines, act fast on suspected freezes, and avoid common mistakes reduces cost and stress. Long‑term upgrades eliminate repeat problems, turning seasonal worry into reliable, year‑round resilience.