How to Replace a Pressure Relief Valve on a Boiler: Step-by-Step DIY Guide
To replace a pressure relief valve on a boiler, first ensure the system is fully isolated, cooled, and depressurized. This critical safety device should only be handled with proper precautions. Begin by shutting off the water and fuel supply, then drain any residual water. Using appropriate wrenches, remove the old valve. Apply PTFE tape to the threads of the new valve and install it according to the manufacturer’s torque specifications. Gradually repressurize the system, check for leaks, and test the valve operation. For detailed maintenance and testing steps, or if you’re uncertain, consider consulting a professional.
What a Boiler Pressure Relief Valve Is and Why It Matters
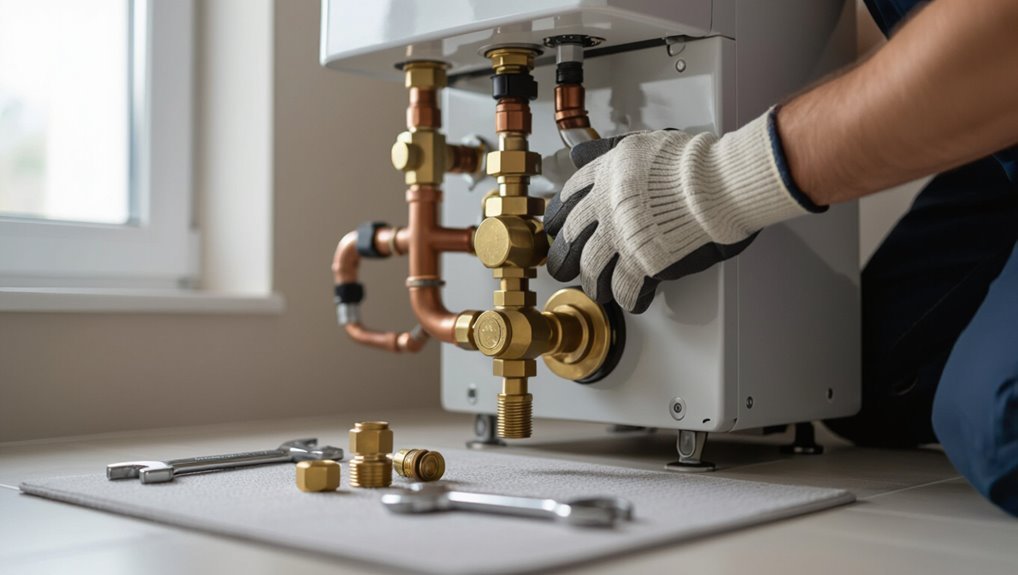
A boiler pressure relief valve is a safety device that opens to release excess pressure and prevent system overpressurization.
Signs of a failing or leaking valve include constant drips, unexplained pressure drops, or frequent activation.
Ignoring a faulty relief valve can lead to water damage, system failure, or in extreme cases pressure-related hazards.
Purpose and function of the pressure relief valve
Serve as a safety fail-safe, the pressure relief valve on a boiler prevents dangerous overpressure by opening at a predetermined threshold to release excess steam or water.
It monitors system pressure, resets or vents automatically, and protects vessels and piping from rupture.
Understanding this function is essential before attempting how to replace a pressure relief valve on boiler, ensuring correct selection and safe installation.
Common symptoms of a failing or leaking relief valve
Knowing how the relief valve functions helps identify when it stops performing correctly.
Common symptoms include steady or intermittent drips from the discharge pipe, visible corrosion or mineral buildup around the valve, unusually frequent pressure fluctuations on the gauge, and hissing noises during operation.
Persistent wetness on surrounding components, combined with repeated manual releases, also indicates potential valve degradation needing attention.
Safety risks of ignoring a faulty relief valve
Neglecting a faulty pressure relief valve can quickly escalate routine maintenance into a dangerous emergency: without a properly functioning relief valve, excess steam or water pressure can build to levels that compromise boiler integrity, leading to ruptured pipes, vessel explosions, scalding discharge from failed fittings, and secondary fire or flood hazards.
Consequences include catastrophic equipment loss, severe injury or death, costly repairs, regulatory liability, and prolonged service interruption.
Tools, Materials, and Safety Equipment Needed
A concise inventory of the tools and replacement parts required will be provided, including wrenches, pipe tape, and a compatible relief valve.
Recommended personal protective equipment such as gloves, safety glasses, and hearing protection will be covered.
Guidance on selecting the correct replacement valve—matching pressure rating, connection size, and suitable materials for the boiler system—will be explained.
List of required tools and replacement parts
Before beginning the replacement, assemble the necessary tools, materials, and safety equipment to guarantee the job proceeds efficiently and safely.
Essential items include a compatible pressure relief valve, Teflon tape or pipe dope, and replacement discharge piping.
Recommended tools:
- Adjustable wrench, pipe wrench, pliers.
- Screwdrivers, tubing cutter, tube brush.
- Bucket, rags, thread sealant.
Recommended personal protective equipment (PPE)
With the tools and parts gathered, attention turns to appropriate personal protective equipment to reduce injury risk during pressure relief valve replacement.
Recommended PPE includes safety goggles, chemical-resistant gloves, hearing protection if power tools are used, and steel-toe footwear.
A long-sleeve, flame-resistant work shirt and pants protect against hot water and steam.
A respirator is advised when corrosion or debris is present.
How to choose the correct replacement valve (pressure rating, size, material)
How should the correct replacement pressure relief valve be selected to secure safe, reliable boiler operation?
The installer compares boiler nameplate pressure to valve set pressure, matches outlet size and connection type, and verifies temperature rating.
Choose corrosion-resistant materials (brass, stainless) compatible with system fluid.
Confirm certification (ASME/CSA) and select a valve with equal or lower set pressure than boiler maximum to guarantee proper protection.
Pre-Work Safety Checks and Preparations
Before any valve work begins, the technician verifies the boiler is cold and powered off and isolates the unit by shutting off water and fuel supplies.
They then relieve system pressure and drain the sections required for safe access.
Finally, they confirm compliance with local codes and obtain any permits needed before proceeding.
Verifying system is cold and powered off
Confirm the boiler and surrounding piping are cold and the power supply is disconnected before any work begins.
Verify absence of steam, condensation, and hot surfaces by careful touch at multiple points using insulated gloves.
Confirm electrical isolation at the boiler control panel and any upstream breakers; tag or label the disconnect if possible.
Use a non-contact thermometer for confirmation when uncertainty exists.
Isolating the boiler and shutting off water and fuel supplies
Isolate the boiler by shutting off its feed water and fuel supplies, and by closing any inlet and outlet valves that could allow flow into the unit; all closures should be completed before any valve removal or relief valve work begins.
Confirm isolation visually and with tags or locks, and verify associated pumps, automatic fills, and fuel feeds are disabled.
Notify occupants and post warning signage.
Relieving system pressure and draining necessary sections
Depressurize the boiler system methodically by venting trapped steam and water to a safe discharge point and then draining the sections required for access to the relief valve.
Verify gauges read zero, allow cooling, and wear PPE.
Open low-point drains and isolation valves slowly to control flow.
Collect and dispose of discharged water safely, and cap or plug exposed fittings before beginning valve replacement.
Confirming local codes and permit requirements
Before any physical work begins, the technician must verify applicable local codes, manufacturer instructions, and permit requirements to guarantee legal and safe replacement of the pressure relief valve.
They should contact the authority having jurisdiction, review municipal plumbing and boiler regulations, confirm permit necessity and inspection schedules, and document approvals.
Compliance prevents fines, voided warranties, and safety violations.
Step-by-Step Valve Replacement Procedure
The technician begins by locating the pressure relief valve, evaluating its accessibility, and isolating the boiler.
They then remove the old valve, prepare the replacement with proper sealing, and install the new unit following specified torque and fastening guidance.
Finally, the system is refilled, repressurized, and bled to confirm proper operation and absence of leaks.
Locating the pressure relief valve and assessing accessibility
Locating the pressure relief valve begins with a visual inspection of the boiler’s accessible sides and piping near the top or along the heat exchanger outlet.
Identify the valve by its discharge pipe, label, or brass body.
Note surrounding clearances, insulation, and nearby controls or wiring.
Confirm reachability with basic tools and whether components must be moved for safe access before proceeding.
Removing the old valve safely
Shut off power and fuel, then isolate and depressurize the boiler to create a safe working environment before touching the valve.
Wear gloves and eye protection.
Place a bucket and rags under the valve, open a nearby drain slightly to relieve residual pressure, then use the correct wrench to loosen the relief valve.
Remove slowly, catching any remaining water; cap or plug the opening temporarily.
Preparing the new valve and sealing connections
Prepare the replacement valve on a clean work surface, inspecting its inlet threads, seating surface, and any included gasket for defects or debris.
Select appropriate thread sealant—PTFE tape or pipe joint compound—compatible with potable water and boiler temperatures.
Cut tape squarely, wrap three to four turns clockwise on male threads, or apply a thin, even coat of compound.
Keep mating surfaces clean and dry.
Installing the new valve and torque/fastening guidance
Begin by confirming the boiler is fully cooled, depressurized, and isolated from the water supply; then position a bucket and rags beneath the valve to catch residual water.
Thread the new relief valve hand-tight, make certain tape or compound remains aligned, then tighten with a wrench to manufacturer torque specification.
Secure any mounting brackets and inspect for straight alignment.
Verify no visible leaks before restoring service.
Refilling, repressurizing, and bleeding the boiler system
Once the new relief valve is confirmed tight and aligned, attention turns to bringing the boiler back to operating pressure and removing trapped air.
Close drain and open cold-water fill valve slowly, monitoring pressure gauge. Repressurize to manufacturer’s recommended PSI.
Bleed radiators and high points using valves until steady water flows and gauge stabilizes.
Recheck fittings for weeps and top up if necessary.
Initial test and leak inspection procedures
With the system repressurized and radiators bled, the technician performs a methodical initial test and leak inspection to confirm the new relief valve and surrounding fittings hold under operating conditions.
They gradually raise boiler pressure to normal setpoint, observe joints and valve body for seepage, check discharge line for proper routing, and monitor pressure gauge for stability.
Any leak prompts shutdown and tightening or reassembly.
Post-Installation Checks and Testing
After installation, the article describes both manual and automatic functional pressure tests to confirm the relief valve operates under simulated overpressure conditions.
It instructs verification of the valve’s setpoint and discharge performance against manufacturer specifications and local codes.
Finally, it outlines a plan for long-term monitoring, including periodic inspections and logging to guarantee continued reliability.
Functional pressure test methods (manual and automatic)
Begin by verifying that the boiler has reached normal operating temperature and pressure before any functional tests commence.
For manual testing, slowly lift the relief valve lever to confirm immediate, steady discharge and resealing.
For automatic testing, follow manufacturer procedures: simulate overpressure with calibrated test equipment, observe valve opening and closing cycles, check for leaks, and document results for compliance and future reference.
Verifying setpoint and discharge performance
Once installed, the relief valve’s setpoint and discharge performance must be verified under controlled conditions to guarantee it opens at the specified pressure and vents the required flow without leakage or excessive chatter.
A calibrated pressure source raises system pressure to setpoint while observing pop-open pressure, reseat behavior, and discharge flow.
Record readings, compare to OEM tolerances, and correct or replace if deviations occur.
Long-term monitoring after replacement
With setpoint and discharge performance confirmed, the focus shifts to long-term monitoring to guarantee the replacement valve maintains reliability over its service life.
Scheduled inspections, periodic lift tests, and logbook entries track performance trends. Check for leaks, corrosion, and seat wear; verify pressure readings against baseline.
Implement remote telemetry where feasible and establish replacement intervals based on observed degradation and manufacturer guidance.
Troubleshooting Common Problems During Replacement
The section outlines common issues encountered during pressure relief valve replacement and practical steps to address them.
It covers techniques for removing stuck or corroded valves, methods to stop and repair leaks at the connection, and diagnostic checks and remedies when a new valve trips immediately.
Each problem is paired with concise, safety-minded fixes and when to call a professional.
Stuck or corroded valve removal techniques
Struggling to move a stuck or corroded pressure relief valve is a common obstacle when replacing a boiler safety device; addressing it requires careful assessment of corrosion severity, appropriate penetrating lubricants, and the correct mechanical techniques to avoid damaging the valve body or adjacent piping.
Apply penetrating oil, allow dwell time, use properly sized wrenches with steady force, and tap fittings gently.
If immobile, cut and replace the valve assembly.
Leaks at the connection after installation
Address leaks at the connection promptly to prevent water damage and pressure loss: most post-installation leaks stem from improper sealing, loose fittings, or damaged threads.
Inspect joint, tighten fittings to specified torque, drain system pressure before retightening.
If leaking persists, remove valve, clean threads, apply proper thread sealant or PTFE tape, then reinstall.
Replace valve or fitting if threads are stripped.
Valve trips immediately after replacement causes and fixes
Following inspection and repair of connection leaks, attention must turn to a pressure relief valve that trips immediately after replacement. A newly installed valve that opens right away signals system or installation issues rather than gradual wear.
Possible causes include excessive system pressure, incorrect valve rating, trapped air, or thermal expansion without an expansion tank.
Diagnose pressure, verify valve specifications, purge air, and install expansion solutions or adjust controls.
When to Call a Professional
If the boiler exhibits persistent leaks, unusual noises, pressure that repeatedly spikes, or visible corrosion, a licensed HVAC or plumbing professional should be called.
Work that affects building codes, municipal inspections, or voids the equipment warranty also requires a certified technician.
Homeowners are advised to stop and consult a pro when safety, compliance, or warranty concerns arise.
Signs the job requires licensed HVAC/plumbing intervention
When should a homeowner stop and call a licensed HVAC or plumbing professional?
Persistent leaks after valve replacement, visible corrosion or pipe damage, recurring pressure spikes, unclear source of discharge, gas appliance interactions, or inability to isolate and depressurize the system merit professional intervention.
Also call if required diagnostic tools, soldering, brazing, or code interpretation exceed homeowner skill or available equipment.
Regulatory or warranty situations that mandate professionals
After obvious signs of damage or system complexity prompt professional help, homeowners should also be aware that certain regulatory and warranty conditions make hiring a licensed HVAC or plumbing contractor mandatory.
Local codes, permit requirements, and utility company rules may prohibit DIY replacement.
Manufacturer warranties often require certified technicians to perform or certify work; failure to comply can void coverage and risk code violations or insurance denial.
Maintenance Tips to Prolong Valve Life
A concise maintenance plan helps extend the service life of a boiler pressure relief valve.
It should include a regular inspection schedule noting signs of corrosion, leaks, or stiffness, plus seasonal checks and preventive actions such as exercising the valve and flushing the system.
Clear recordkeeping and labeling of the valve with its installation or replacement date guarantee timely future maintenance.
Regular inspection schedule and what to look for
Although often overlooked, a consistent inspection schedule is essential to catch early signs of wear or malfunction in a boiler pressure relief valve.
Inspect monthly for leaks, corrosion, and mineral buildup. Test operation quarterly under safe conditions. Replace or service immediately if anomalies appear.
- Visual check: leaks, rust, deposits
- Functional test: proper opening and resealing
- Documentation: date, findings, actions
Seasonal checks and preventive actions
Perform seasonal checks at the change of each heating and cooling season to catch wear and environmental effects before they compromise the pressure relief valve.
Inspect for corrosion, mineral buildup, leaks, and proper discharge routing. Operate the valve briefly to verify movement and reseating.
Clear surrounding debris, guarantee adequate insulation against freezing, and replace any compromised components promptly to prevent failure.
Recordkeeping and labeling the replacement date
Document replacement dates and key details immediately after replacing the pressure relief valve to create a reliable maintenance history.
Record model, serial number, installation date, installer, and any observed issues in a logbook or digital file.
Label the valve with a durable tag showing date and next inspection.
Retain receipts and photos for warranty claims and future troubleshooting; review records annually.
Common Mistakes to Avoid
Common errors include installing a valve with an incorrect size or pressure rating, which can compromise safety and performance.
Improper sealing or overtightening can cause leaks or damage the new valve.
Neglecting to fully depressurize the boiler before work creates a serious risk of scalding and equipment harm.
Using the wrong valve size or pressure rating
One critical error is selecting a relief valve with incorrect size or pressure rating, which can impair boiler safety and system performance.
Installing an undersized valve may fail to vent excessive pressure, while an oversized valve can cycle improperly or compromise control.
Mismatched pressure settings prevent proper activation.
Properly verify boiler specifications and replace with a valve matching required capacity and pressure rating.
Improper sealing techniques and overtightening
Avoiding leaks and ensuring reliable operation depends heavily on correct sealing and proper torque when installing a relief valve.
Using incorrect sealants, overapplying tape, or overtightening fittings can damage threads, distort valve seats, and create paths for slow leaks or sudden failures.
Installers should use compatible thread sealant sparingly, follow torque specs, hand-start threads to avoid cross-threading, and inspect seals for proper seating.
Failing to fully depressurize the system
Start by fully depressurizing the boiler before loosening any relief valve fittings; leaving pressure in the system can cause hot water or steam to spray unexpectedly, risking burns and equipment damage.
Failure to drain and isolate the system leads to unsafe working conditions, difficulty removing the valve, and potential system contamination.
Verify pressure gauge reads zero and close isolation valves before proceeding.
Quick Reference: Replacement Checklist and Timing
A concise checklist guides technicians through pre-replacement preparations, including isolation, depressurization, and parts verification.
After installation, a post-replacement verification checklist confirms leak-free sealing, proper pressure settings, and operational testing.
Typical time estimates and cost considerations for parts and labor are provided to help plan the job and set realistic expectations.
Pre-replacement checklist
Before removing the old valve, the technician should verify system conditions, gather the correct replacement part and tools, and confirm that service can be performed without risk to occupants or equipment.
The pre-replacement checklist includes:
- Isolate power and shut off boiler feed; relieve system pressure safely.
- Confirm valve specifications and have replacement plus sealant and fittings.
- Guarantee clear work area, proper PPE, and a means to drain residual water.
Post-replacement verification checklist
Verification guarantees the replacement valve functions reliably and the boiler returns to safe operation. The technician should follow a concise checklist covering leak inspection, pressure and temperature readings, relief valve actuation, and system controls response.
Follow these steps for post-replacement verification:
- Visually inspect joints and run the boiler to check for leaks.
- Confirm steady pressure/temperature within specified limits.
- Manually actuate relief briefly and verify proper reseating and control integration.
Typical time estimates and cost considerations
With leak checks, pressure readings, and reseating confirmed, attention turns to typical time and cost expectations for replacing a boiler pressure relief valve. Tasks usually take 30–90 minutes; parts run $20–80; professional labor varies. Consider permits and disposal fees.
| Task | Time | Typical Cost |
|---|---|---|
| DIY replacement | 30–90 min | $20–80 |
| Professional service | 1–2 hrs | $100–300 |
| Additional parts/fees | — | $0–50 |
Conclusion
To sum up, the guide equips a homeowner to replace a boiler pressure relief valve safely and efficiently, blending modern safety practices with practical steps. With proper tools, pre-work checks, and post-install testing, risks are minimized and longevity improved. If uncertainty arises, a licensed technician should be consulted. Remember to log maintenance dates and avoid common errors—lest one find oneself fiddling like a Victorian tinkerer with a smartphone stuck to a steam engine.