How to Insulate Outdoor Water Pipes: Easy Steps & Tips
To insulate outdoor water pipes effectively, start by shutting off and draining the line. Clean and dry the exposed section, then measure the pipe’s outer diameter (OD). Choose closed-cell foam sleeves that fit snugly, or opt for fiberglass wrap or elastomeric rubber for irregular fittings. Apply the insulation securely and seal the seams and ends with waterproof or UV-resistant tape, using zip ties for added security. For areas at high risk of freezing, consider adding outdoor-rated heat cable according to the manufacturer’s instructions. Following these steps will help protect your outdoor water pipes from freezing and damage.
Quick Fix: Insulate One Exposed Outdoor Pipe in 10 Minutes
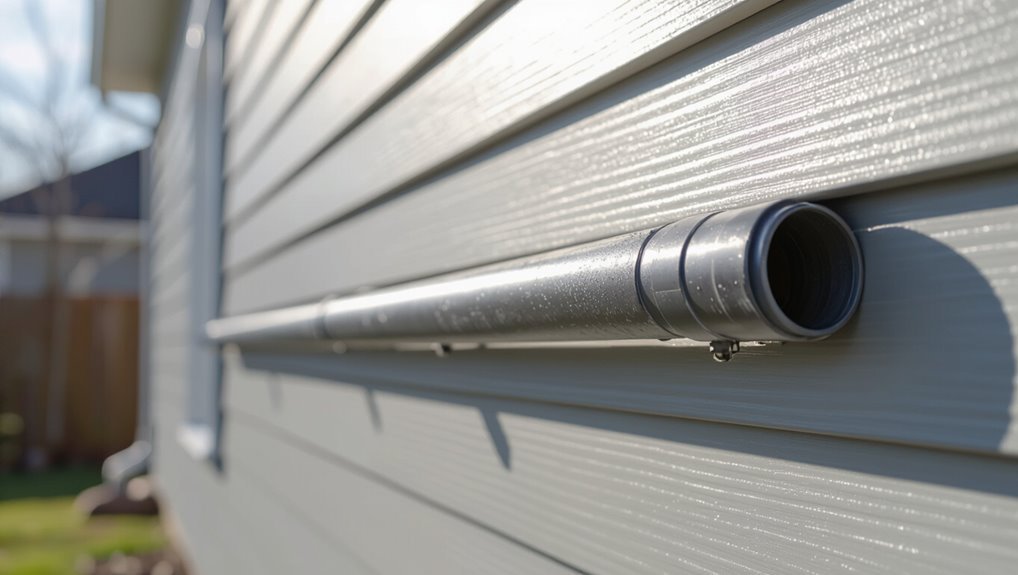
Start by shutting off water to the affected outdoor line and draining any remaining water to prevent pressure buildup.
The person measures the exposed segment, selects pre-slit foam pipe insulation sized to the pipe, and cuts to length.
They slip the foam over the pipe, ensuring seams align, and secure both ends with waterproof tape or zip ties.
For joints or valves, they use small foam pieces and sealant tape to close gaps.
Finally, they restore water and check for leaks.
This quick, single-pipe method reduces freeze risk and heat loss until a more all-encompassing solution is applied.
Do You Need Outdoor Pipe Insulation? Signs and Risk Checklist
A brief inspection for visible pipe damage—cracks, corrosion, or worn insulation—helps determine whether outdoor pipes require added protection.
Attention to freezing risk indicators, such as exposed sections in unheated areas, prolonged subfreezing forecasts, or pipes near wind-exposed walls, further clarifies urgency.
Use this checklist to prioritize which runs need immediate insulation and which can be monitored.
Visible Pipe Damage
Visible signs of pipe deterioration — such as rust, corrosion, cracked insulation, bulging joints, or persistent wet spots — indicate increased risk of leaks and freeze-related failure for outdoor water lines. Observing these defects warrants prompt inspection and often insulating or replacing affected sections.
Surface corrosion may hide thin metal or pinholes; fractured or missing insulation reduces thermal protection and invites condensation. Bulging joints suggest pressure or prior freezing damage needing attention.
Persistent wetness promotes further corrosion and mold. Document locations, photograph conditions, and prioritize repairs where structural integrity is compromised. Professional assessment is recommended when damage is extensive or water flow is impaired.
Freezing Risk Indicators
When rust, cracked insulation, bulging joints, or persistent wet spots are observed, those defects often signal elevated freeze risk for outdoor water lines and should prompt a focused evaluation of freezing indicators.
A checklist includes exposed pipe length, proximity to prevailing winds, overnight low temperatures, historical freeze events, and frequency of water flow.
Vulnerable materials (thin-walled copper or plastic) and high-elevation runs are higher risk.
Accessibility for repair and presence of nearby heat sources matter.
If two or more risk factors are present, insulation plus preventive measures (heat tape, rerouting, increased drainage) is recommended to reduce freeze-related failure.
What to Buy: Best Insulation Types for Outdoor Pipes
Choose insulation based on pipe location, material, and local freeze risk: closed-cell foam sleeves suit exposed metal and PVC for easy slip-on protection.
Rigid foam board works well for buried or clustered pipes, offering high R-value per inch and durability against soil and pests when installed in protective boxes.
Elastomeric rubber is flexible, UV resistant, and adheres to irregular shapes and fittings.
Polyethylene wrap provides economical coverage for large-diameter or inaccessible runs.
For outdoor valves and exposed connections, insulated valve covers and preformed fittings tailored to pipe diameter guarantee complete protection.
Match thickness and UV/weather resistance to local conditions.
Choose Between Foam Sleeves, Fiberglass Wrap, and Heat Cable
The guide compares foam sleeves, fiberglass wrap, and heat cable by highlighting foam sleeves’ ease of use and limitations in very low temperatures.
It outlines fiberglass wrap’s suitability for irregular shapes and exposed runs where higher temperature tolerance is needed.
It then summarizes heat cable installation tips and where active heating is the preferred solution.
Foam Sleeve Pros Cons
Why consider foam sleeves for outdoor pipe insulation? Foam sleeves offer simple, affordable protection against mild freezing and reduce heat loss. They are easy to install without tools, resist moisture to an extent, and suit straight runs.
- Lightweight and inexpensive
- Quick DIY installation with slit design
- Provides basic thermal barrier for moderate climates
- Vulnerable to UV degradation and rodent damage
- Limited effectiveness in extreme cold without supplemental heat
Foam sleeves work best for above-ground sections with minimal exposure. For severe freeze risk or irregular shapes, combining sleeves with other methods improves reliability and longevity.
Fiberglass Wrap Uses
Fiberglass wrap provides a flexible, high-temperature-resistant insulation option for outdoor pipes that need more robust protection than foam sleeves.
It resists flames, tolerates higher ambient temperatures, and performs well where pipes run near heat sources or in exposed attics and crawlspaces.
Fiberglass conforms to irregular shapes and can be layered to increase R-value; a vapor barrier jacket or foil-faced tape is recommended to prevent moisture intrusion.
Installation requires gloves and eye protection due to irritation risk.
It is heavier and more labor-intensive than foam but offers greater durability and fire resistance for demanding outdoor or mixed-environment applications.
Heat Cable Installation Tips
After describing fiberglass wrap’s strengths, attention shifts to when heat cable is a better choice and how to combine it with foam sleeves or fiberglass for maximum freeze protection.
Heat cable suits exposed sections where active heating is needed; pairing cables with foam or fiberglass improves efficiency and protects the wire.
Install per manufacturer instructions, maintain spacing, and avoid overlaps that cause overheating.
Make sure power source and GFCI protection.
Secure with UV-resistant tape and check connections seasonally.
- Select cable rated for outdoor use
- Run cable along pipe length, not tightly coiled
- Cover cable with sleeve or wrap
- Use GFCI-protected circuit
- Inspect annually
How to Measure Pipes and Pick Insulation Size
For accurate insulation selection, measure the pipe diameter and note whether the pipe is measured across the outside (OD) or as nominal size, since many insulation products are sized by outer diameter while plumbing nominal sizes differ.
Use calipers or a tape measure to record OD to the nearest 1/16 inch, or measure circumference and divide by π for awkward fittings.
Match measurements to manufacturer sizing charts, accounting for insulation wall thickness to meet desired R-value.
For irregular shapes or bundled runs, choose flexible, slightly oversized insulation or split-foam types.
Document sizes and locations before purchasing to avoid returns.
Prep Pipes for Insulation: Cleaning, Drying, and Repairs
Before installing insulation, the pipe exterior should be cleaned of dirt, rust, and loose material to guarantee proper adhesion and fit.
The surface must be fully dry to prevent trapped moisture and subsequent corrosion.
Any leaks or drips discovered during inspection should be repaired before insulation is applied.
Surface Cleaning
Begin by thoroughly cleaning the pipe surfaces to guarantee insulation adheres properly and performs as intended.
Remove dirt, grease, and loose rust so sealants and foam fitters bond evenly.
Work methodically along each run, noting areas needing repair (but not performing leak diagnosis here).
Use appropriate cleaners and tools, then rinse and let surfaces dry fully before proceeding.
- Wipe with a rag and mild detergent solution
- Scrub stubborn deposits with a wire brush
- Use solvent degreaser for oily residues
- Rinse with clean water and allow air drying
- Lightly sand flaky paint or corrosion for better adhesion
Leak Inspection
Regularly inspect pipes for leaks and damage prior to insulating to make certain the insulation will not trap moisture or conceal ongoing failures. A thorough visual and tactile check identifies drips, corrosion, loose joints, and hairline cracks. Mark defects, shut off water, drain affected sections, and dry surfaces before repairs. Replace damaged segments or tighten fittings; use appropriate sealants or pipe tape for temporary fixes. Allow repairs to cure fully and recheck for residual moisture. Confirm surfaces are clean and dry to assure insulation adheres and performs.
| Issue | Action |
|---|---|
| Drip | Tighten or replace fitting |
| Corrosion | Cut out and replace |
| Crack | Patch or replace |
| Moisture | Dry and cure before insulating |
Install Foam Sleeve Pipe Insulation (Step‑by‑Step)
Measure the pipe runs and cut closed‑cell foam sleeves to length so each section fits snugly without gaps at joints or valves. The installer slips sleeves onto pipes, aligns seams, and secures ends with polyethylene tape or zip ties.
Around fixtures, pieces are trimmed for a tight fit. Seams overlap minimally and are taped to create continuous coverage. For outdoor exposure, UV‑resistant tape or a weatherproof coating is applied.
- Make sure pipe surface is clean and dry before installation
- Use appropriate sleeve diameter for pipe size
- Avoid compressing insulation when fitting
- Protect exposed ends with tape
- Check for snug, gap‑free joints
Wrap Fiberglass Tubular Insulation Correctly
When wrapping fiberglass tubular insulation around outdoor pipes, the installer fits the preformed sections snugly along the pipe’s length, ensuring the split seam aligns upward to shed water and the insulation fully covers joints and fittings.
Sections are butted tightly without gaps; seams are sealed with foil tape or recommended adhesive to maintain thermal continuity and resist moisture intrusion.
Around flanges, valves, and bends, insulation is cut to fit and layered for consistent thickness.
A weatherproof outer jacket or vapor barrier is applied over the fiberglass, secured with bands or tape, to protect fibers and preserve insulating performance.
Use Heat Tape/Heat Cable Safely: Installation and Limits
Apply heat tape or heat cable only according to the manufacturer’s instructions and local electrical codes to prevent pipe freezing without creating fire or shock hazards.
The installer should verify power source, cable type (self-regulating vs. constant-watt), and maximum exposed length.
Limit use to compatible pipe materials and avoid overlapping or bundling cables.
Inspect connections, GFCI protection, and weatherproofing at entry points.
Replace damaged sections and follow replacement intervals.
- Confirm cable rating for outdoor use
- Mount cable along pipe length, not buried under insulation
- Use manufacturer-approved fasteners
- Provide GFCI protection at the circuit
- Test before freezing temperatures arrive
Seal Joints, Valves, Fittings, and Elbows Properly
With attention to seams and shifts, joints, valves, fittings, and elbows are common weak points where heat loss and moisture intrusion begin; properly sealing these areas preserves insulation continuity and prevents freezing.
Inspect each connection, removing debris and drying surfaces.
Use foam or fiber wrap cut to fit irregular shapes, overlapping seams.
Apply pipe-specific adhesive or silicone sealant at edges and junctures.
For threaded fittings, use PTFE tape before assembly.
Secure wraps with corrosion-resistant tape or zip ties, avoiding compression of insulation.
Recheck seals after thermal cycling and replace degraded materials promptly to maintain effective protection.
Insulate Hose Bibs and Outdoor Spigots (Quick Method)
After sealing joints, valves, and elbows to maintain continuity, attention turns to the hose bib and outdoor spigot, which protrude from the building envelope and remain highly vulnerable to freezing.
A quick method uses compact, removable covers and simple insulating steps. Recommended actions include:
- Install foam spigot covers sized to fit tightly over the bib.
- Wrap exposed pipe with self-adhesive polyethylene or neoprene tape.
- Secure insulation with zip ties or weatherproof tape to prevent wind displacement.
- Add a small foam sleeve around the shutoff stub inside the wall for added protection.
- Remove covers in warm weather to inspect and dry fittings.
Protect Pipes Under Decks and in Crawl Spaces
Under decks and inside crawl spaces, pipes face prolonged exposure to cold, moisture, and airflow that accelerates heat loss, so insulating and sealing these areas is essential to prevent freezing and deterioration. Pipes should be wrapped with closed-cell foam or heating cable where needed, joints sealed with waterproof tape, and vents reduced to limit drafts. Elevate pipes off cold ground with insulated hangers and add rigid foam to crawlspace walls. Regular inspections for condensation or rodent damage preserve insulation. Local codes may require access panels or venting modifications.
| Action | Benefit |
|---|---|
| Wrap with foam | Reduces heat loss |
| Add heat cable | Prevents freeze |
| Seal gaps | Limits drafts |
| Elevate pipes | Avoids cold contact |
Insulate Pipes That Run Along Exterior Walls
When pipes run along exterior walls, selecting the right insulation material and thickness is essential to prevent heat loss and freezing.
Openings where pipes pass through the wall should be carefully sealed with appropriate foam or caulk to stop drafts and moisture.
Properly fitted insulation combined with sealed penetrations reduces freeze risk and extends pipe lifespan.
Choose Proper Insulation
Select insulation that matches the pipe material, exposure level, and local climate to guarantee reliable freeze protection and heat retention. For exterior-wall runs, choose materials rated for outdoor use and UV resistance.
Consider insulation thickness for R-value needs and allowance for heat-traced lines. Closed-cell foam prevents moisture absorption; fiberglass with vapor barrier suits sheltered areas. Secure fittings and joints with appropriate tape or clamps to maintain continuous coverage.
- Closed-cell rubber foam: flexible, water-resistant
- Fiberglass with jacket: high-temperature tolerance
- Polyethylene foam: economical, easy to install
- Self-sealing wrap: quick application
- Insulated conduit for heat trace: integrated solution
Seal Wall Penetrations
After choosing appropriate insulation materials, attention must turn to points where pipes pass through exterior walls, since unsealed penetrations are common paths for cold air and moisture. The installer inspects each penetration and removes debris. Gaps around pipes are measured, then filled with low-expansion spray foam or backer rod plus silicone caulk for larger voids.
Flashing or metal collars are fitted where pipes exit siding to shed water. Interior and exterior seals are continuous with pipe insulation to prevent thermal bridging. Finally, weatherproof tape or elastomeric sealant protects joints and guarantees a durable, watertight barrier against drafts and pests.
Insulating PVC vs. Copper: Material‑Specific Tips
How should insulation strategies differ for PVC and copper pipes to address their distinct thermal and mechanical properties? PVC and copper require tailored approaches: PVC is more susceptible to brittle fracture in cold and expands differently; copper conducts heat faster and can sweat or corrode. Proper materials and installation extend service life and prevent freezing.
- Use closed-cell foam sleeves on PVC to block moisture and allow some flex.
- Attach insulation to PVC with UV-resistant tape to reduce sun degradation.
- For copper, wrap with polyethylene or rubber insulation plus vapor barrier.
- Secure copper insulation tightly to prevent gaps and condensation.
- Inspect joints and supports for differential expansion.
Insulate Flexible Hoses and Braided Lines
For flexible hoses and braided lines, select insulation rated for the hose diameter and compatible with the line material.
Fasten insulation with corrosion‑resistant clamps or zip ties at regular intervals to prevent shifting.
Where exposed to sun, add a UV‑resistant wrap or paint to protect foam or rubber coverings.
Choose Appropriate Insulation
Flexible hoses and braided lines require insulation that conforms closely to irregular shapes and resists abrasion while maintaining thermal performance; foam tubing, split rubber sleeves, and closed-cell polyethylene are common choices because they compress to seal bends and fittings without trapping moisture. The selection depends on exposure, UV resistance, and temperature range. Consider layered protection for very cold climates and choose materials rated for outdoor use. Installation should avoid gaps and allow for movement.
Typical options include:
- Closed-cell polyethylene for water resistance and low thermal conductivity
- Split foam tubing for easy retrofit
- Rubber sleeves for abrasion resistance
- UV-stabilized foam for sun exposure
- Insulation with adhesive flap for snug fit
Secure With Clamps
When insulating flexible hoses and braided lines, securement with appropriately sized clamps prevents shifting, gaps, and abrasion that compromise thermal performance; clamps should compress the insulation evenly without deforming the tubing beneath.
Install clamps at intervals recommended by the insulation manufacturer and near fittings or bends to maintain continuous coverage.
Use corrosion-resistant stainless steel or plastic-clad spring clamps for outdoor exposure, and avoid sharp edges that can cut insulation.
Trim insulation snugly before clamping and use protective sleeves or tape under metal clamps.
After securing, inspect joints for gaps and test for movement; re-tighten or reposition clamps as needed.
Protect From UV
After clamps have been secured to hold insulation in place, attention should turn to protecting flexible hoses and braided lines from ultraviolet exposure, which degrades both the outer jacket and many insulation materials.
The inspector recommends selecting UV‑resistant covers and securing them with UV‑stable ties. Regular inspections catch cracking early. Consider heat‑reflective wraps where sunlight is intense.
- Use UV‑rated neoprene or silicone sleeves.
- Install reflective tape over insulation seams.
- Add braided stainless steel coverings where abrasion and sun combine.
- Fasten with stainless or UV‑resistant clamps.
- Inspect annually and replace any brittle or discolored sections.
Cold‑Climate Upgrades: Extra Layers and Active Heat
Because standard passive insulation can fall short in prolonged subfreezing conditions, cold‑climate upgrades combine thicker physical barriers with controlled heat to prevent freezing and reduce burst risk.
Install high‑R foam or fiberglass wrap with sealed seams, and add an outer weatherproof layer to block wind chill.
Incorporate self‑regulating heat tape along vulnerable runs, wired to a ground‑fault interrupter and thermostatically controlled to activate below set temperatures.
Insulate joints, valves and exposed fittings thoroughly.
Guarantee power sources are protected and accessible.
Periodic inspection verifies adhesion, electrical integrity and that heating elements engage when needed to keep water flowing.
Add Weatherproof Jackets and UV‑Resistant Covers
The section examines selection of UV‑resistant materials for long‑lasting exterior protection.
It outlines correct jacket installation to guarantee full coverage and secure seals at joints and fittings.
Guidance on routine inspection and maintenance is provided to catch wear, UV damage, and fastener failures before leaks occur.
Choose UV‑Resistant Materials
Often overlooked, UV exposure markedly degrades standard pipe insulation and can cause cracking, brittleness, and loss of insulating value over time.
Materials chosen should resist sunlight, temperature swings, and moisture while maintaining flexibility and R‑value.
Durable outer layers extend service life and reduce maintenance.
- Use UV‑stabilized PVC or polyethylene jackets for exposed runs.
- Select elastomeric foam with a UV‑resistant coating for insulated pipes.
- Favor reflective, UV‑rated tapes and sealants at seams and ends.
- Choose materials rated for local sun intensity and temperature extremes.
- Verify manufacturer UV testing data and warranty terms before purchase.
Proper Jacket Installation
Install weatherproof jackets and UV‑resistant covers so outdoor pipe insulation remains effective and durable under sun, rain, and temperature swings. The installer measures lengths, fits jackets snugly, and seals seams with manufacturer‑recommended tape or closures. End caps and joints receive extra overlap and sealant to prevent water ingress. Straps or stainless clips secure jackets without compressing insulation. For exposed fittings, use molded covers sized to maintain thermal continuity. Regularly choose materials rated for local UV exposure and temperature extremes to extend service life and prevent degradation.
| Material | Use | Benefit |
|---|---|---|
| PVC jacket | Straight runs | Waterproofing |
| Silicone cover | Fittings | UV protection |
| Stainless clips | Fastening | Corrosion resistance |
Maintain And Inspect Regularly
Regularly scheduled inspections verify that weatherproof jackets and UV‑resistant covers remain intact, securely fastened, and free of damage that could compromise insulation performance.
The inspector notes wear, seals, and attachment points, replacing or tightening as needed to preserve thermal protection and prevent moisture intrusion.
Routine checks after storms and seasonal changes reduce failure risk and extend service life.
Recommended actions include:
- Check seams and closures for gaps or fraying.
- Replace cracked or brittle covers promptly.
- Clean surfaces of debris and mold to prevent deterioration.
- Make sure fasteners and straps maintain tension.
- Record inspection dates and corrective measures for tracking.
Prevent Condensation on Insulated Outdoor Pipes
To prevent condensation on insulated outdoor pipes, one must control both surface temperature and ambient humidity so moisture does not form on the insulation exterior. Select closed-cell foam or vapor-barrier insulation to block moisture migration.
Make certain seams, joints, and penetration points are tightly sealed with compatible tape or mastic. Provide a breathable outer jacket or UV-resistant cladding to shed water while allowing any trapped vapor to escape.
Reduce surrounding humidity by improving drainage, increasing airflow around the run, and avoiding vegetation crowding. Monitor for wet spots, corrosion, or mold and repair compromised insulation promptly to maintain dry, effective protection.
Test Your Work: Pressure Checks, Ice Tests, and Touch Tests
After sealing seams and ensuring insulation remains dry, verification of performance through simple tests will confirm reliability under real conditions.
The installer performs pressure checks, ice simulations, and tactile inspections to validate integrity before cold weather.
Recommended steps include:
- Conduct a pressure test to detect leaks and weak joints.
- Simulate freezing by applying ice packs briefly to suspect sections.
- Run water to confirm steady flow and observe for temp drops.
- Touch the insulation surface and fittings to feel for cold spots.
- Recheck exposed connections after tests and repair as needed.
Document results and retest if any irregularity appears.
Inspect and Maintain Outdoor Pipe Insulation Annually
Annually, a thorough inspection and targeted maintenance of outdoor pipe insulation guarantees continued protection against freeze damage and heat loss.
The homeowner or technician checks for tears, compression, UV degradation, animal nesting, and water intrusion. Seams and adhesive bonds are examined; loose sections are resecured with appropriate tape or clamps. Damaged foam or wrap is patched or removed to prevent moisture trapping.
Fasteners and supports are tightened to avoid rubbing and wear. After repairs, surfaces are cleaned and any exposed metal treated to reduce corrosion.
Records of inspection date and actions taken aid future maintenance planning.
Lifespan of Insulation Types and When to Replace Them
Following the inspection and maintenance steps, understanding how long different insulation materials last and when they should be replaced helps prioritize repairs and plan budgets.
Common materials age differently: foam tubing degrades from UV and compression, fiberglass can settle and lose R-value when wet, rubber remains flexible longer but can crack, and tape or wrap wears at seams. Replacement timing depends on exposure and condition.
- Foam tubular insulation: 5–10 years outdoors
- Fiberglass with jacket: 10–15 years if dry
- Rubber (EPDM) sleeves: 8–12 years
- Self-sealing tape: 3–6 years
- Heat-trace cable insulation: per manufacturer, often 10+ years
Common Mistakes That Still Let Pipes Freeze
In cold weather, seemingly small oversights still allow outdoor pipes to freeze. Common mistakes include leaving gaps at fittings or joints when applying insulation, compressing or securing foam too tightly so it loses insulating value, and neglecting exposed valves, hose bibs, or short pipe sections.
Using damaged or wet insulation, failing to seal seams and tape edges, and ignoring wind-driven cooling at exposed runs also increase risk. Relying solely on occasional dripping without addressing insulation shortcomings can fail during extreme drops.
Regular inspections and attention to continuous, dry coverage prevent these frequent errors and reduce freezing incidents.
Cost Checklist: Materials, Time, and When to Hire a Pro
How much will insulating outdoor water pipes actually cost in materials and time? A practical checklist outlines typical expenses, estimated labor, and signs that a professional is warranted. Materials vary by pipe size and method; foam sleeves and tape are inexpensive, while specialized jackets raise costs. Time depends on length and accessibility; simple runs take an hour, complex jobs several. Consider hiring a pro for extensive runs, damage, or uncertain connections.
- Foam sleeves: low cost, DIY-friendly
- Fiberglass wrap: mid-range, weather-resistant
- Sealant/tape: minimal expense
- Labor time: 1–4 hours typical
- Hire pro if leaks, corrosion, or complex routing
Electrical Safety and Installation Rules for Heat Tape
When pipe runs require more than passive insulation or a professional is called for complex routing, electric heat tape is often used to prevent freezing; however, it introduces specific electrical hazards and installation rules that must be observed.
Install only manufacturer-approved tape for pipe type, follow temperature sensors and thermostat placement, and avoid overlapping or crossing the tape. Use ground-fault circuit interrupter (GFCI) protection and weatherproof, outdoor-rated outlets and cords. Secure tape with recommended fasteners and cover with approved insulation and waterproof jacketing. Inspect periodically for damage, replace compromised sections, and consult a licensed electrician for uncertain wiring or load calculations.
Winterize for Long Shutdowns and How to Upgrade Later
For extended shutdowns, prepare outdoor plumbing by draining lines, isolating and blowing out irrigation and sprinkler systems, and removing or bypassing backflow devices as required to prevent trapped water from freezing. The homeowner should winterize, label shutoffs, and insulate exposed valves. Leave access points obvious for later work.
When reopening, inspect for damage, replace degraded insulation, and consider upgrades such as better frost-proof fixtures or heated enclosures. Plan upgrades during the first spring service to minimize disruption.
- Drain and relive pressure
- Shut and tag isolation valves
- Protect or remove backflow assemblies
- Inspect for cracks at restart
- Upgrade to frost-proof components
Conclusion
Properly insulating outdoor water pipes prevents costly ruptures and keeps homes functional through cold snaps. For example, a homeowner in Maine wrapped an exposed yard line with foam sleeve and heat tape before a forecasted freeze; the line stayed intact despite prolonged subzero temperatures, avoiding a $1,200 repair. With basic measures—correct insulation type, secure fittings, and following heat-tape manufacturer instructions—most outdoor pipes can be protected quickly and affordably, though extreme conditions may still warrant professional help.