How to Install a Rheem Tankless Water Heater: Step-by-Step Guide for DIY & Pros
Installing a Rheem tankless water heater involves several key steps: sizing the flow and temperature rise, preparing the installation site, mounting the unit, and connecting the necessary water and gas or electrical lines according to manufacturer specifications. For gas models, ensure proper venting and combustion air; electric models need sufficient panel capacity. Always check clearances, test for leaks, purge air from the system, and conduct startup diagnostics. Regular descaling and filter maintenance will help maintain efficiency. For a comprehensive guide, including detailed steps, code compliance tips, and troubleshooting advice, continue reading.
Overview of Rheem Tankless Water Heaters and Installation Options
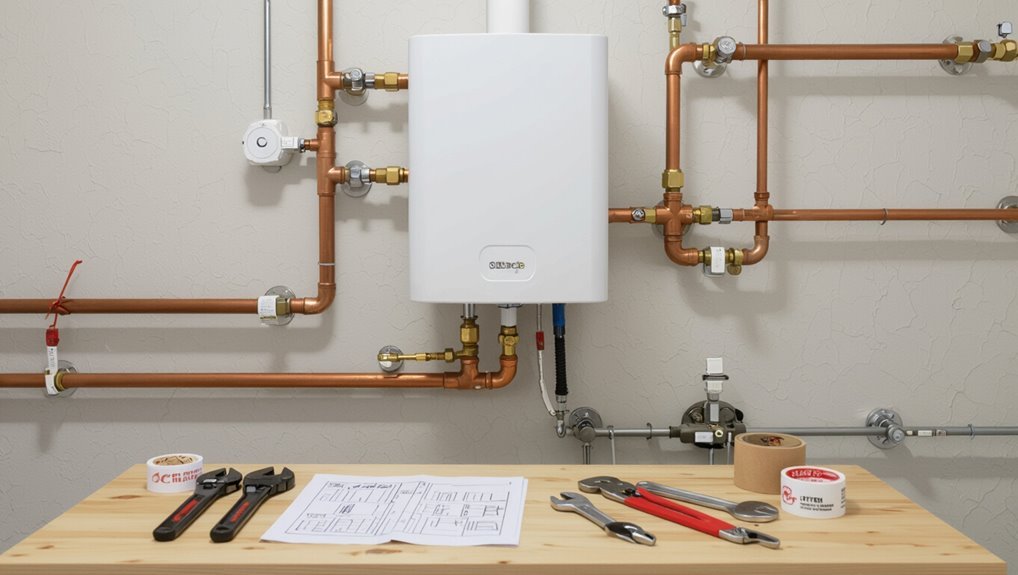
Rheem offers electric, gas, and high-efficiency condensing tankless models to suit different fuel sources and demand profiles.
Tankless units save space and energy compared with tanks, and choosing Rheem often means reliable warranty support and broad accessory options.
Homeowners should weigh complexity, local permit and code requirements, and warranty conditions when deciding whether to DIY or hire a licensed installer.
Types of Rheem tankless units (electric vs. gas vs. condensing)
Choosing a tankless model begins with understanding three primary configurations: electric, gas (non-condensing), and condensing gas units.
Electric units simplify ventilation and suit smaller homes but demand substantial electrical service.
Non-condensing gas offers high flow with standard venting.
Condensing gas recovers heat for greater efficiency but needs stainless or PVC venting and condensate management.
Consider capacity and site when planning how to install Rheem tankless water heater.
Benefits of tankless systems and why choose Rheem
Because tankless systems heat water on demand rather than storing it, they deliver continuous hot water, reduced standby losses, and a smaller physical footprint—advantages that translate into lower energy use and more flexible installation locations.
Rheem offers reliable efficiency, durable components, smart controls, and a range of flow capacities and venting options, making its units suitable for varied household sizes and retrofit or new-construction installations.
When to DIY vs. hire a professional
When should a homeowner tackle a tankless water heater installation and when is a licensed contractor the safer bet?
A homeowner may DIY if comfortable with plumbing, electrical/gas basics, and straightforward wall-mounting.
Hire a licensed contractor for complex gas hookups, venting challenges, electrical panel upgrades, multi-unit sizing, or unfamiliar code issues.
Professional work reduces risk, guarantees proper performance, and limits liability.
Permits, codes, and manufacturer warranty considerations
Deciding whether to DIY or hire a pro affects more than labor: permits, local codes, and manufacturer warranty rules often determine what work is allowed and how it must be performed.
Homeowners should verify local permitting, ventilation, gas and electrical requirements, and inspection schedules.
Rheem warranty terms may require licensed installation for full coverage; documentation and adherence to installation manuals preserve warranty eligibility and safety compliance.
Tools, Materials, and Site Preparation
Before beginning installation, the installer should confirm all required tools and safety gear, along with the specific plumbing fittings and materials for the chosen model.
For gas units, this includes approved gas piping and venting components; for electric units, it requires appropriate wiring, breakers, and conduit rated to the unit’s specifications.
A concise work-area checklist should verify clearances, mounting surface suitability, and access for future service.
Required tools and safety equipment
A concise set of tools and proper safety equipment is essential for a safe, code-compliant Rheem tankless water heater installation.
Necessary items focus on secure mounting, safe electrical and gas work, and personal protection.
- Drill and masonry/metal bits
- Adjustable wrenches and pipe cutters
- Voltage tester and multimeter
- Gas leak detector and thread sealant
- Safety glasses, gloves, respirator, ear protection
Plumbing materials and fittings required
When planning the plumbing connections for a Rheem tankless water heater, select corrosion-resistant materials sized to match the unit’s inlet and outlet requirements and local plumbing code.
Necessary plumbing materials and fittings include shutoff valves, pressure relief components, dielectric unions, proper pipe (copper/PEX/CSST as allowed), and fittings.
Suggested items:
- Isolation ball valves
- Pressure relief valve
- Dielectric union
- Appropriate pipe
- Thread sealant and fittings
Gas components and venting materials (for gas units)
Gas installations for a Rheem tankless water heater require properly sized and rated gas components plus a venting system compatible with the unit’s combustion and clearance specifications.
Required materials include durable gas piping, shutoff valves, pressure regulators, and UL‑listed venting rated for sealed combustion.
Key considerations:
- Gas line sizing and pressure
- Manual shutoff valve
- Appliance regulator
- Condensing‑rated vent pipe
- Proper termination clearances
Electrical requirements and materials (for electric units)
Several specific electrical provisions are essential for installing an electric Rheem tankless water heater: appropriately sized branch circuits, a dedicated breaker or breakers in the main panel, proper grounding, and wiring rated for the unit’s amperage and voltage.
Required materials and considerations include:
- Conductor size per nameplate amperage
- Double-pole breakers sized to manufacturer specs
- Wire type (THHN/THWN or equivalent)
- Grounding conductor and bonding
- GFCI/AFCI protection if mandated
Recommended work area and mounting location checklist
A clear, unobstructed work area is essential for installing a Rheem tankless water heater: it should provide safe access to plumbing and electrical connections, adequate clearance for ventilation and service, and a stable mounting surface rated for the unit’s weight.
Recommended checklist includes:
- Wall strength and stud locations
- Clearance to combustibles and service access
- Proper ventilation path and termination
- Nearby electrical and gas access
- Drip/condensate routing and floor drainage
Pre-Installation Planning and Sizing
Before installing a Rheem tankless unit, the installer must calculate the household’s required flow rate and temperature rise to determine capacity needs.
They should then match those numbers to an appropriate Rheem model while evaluating existing plumbing, gas line capacity, and the electrical panel for compatibility.
Finally, venting options and manufacturer clearances must be reviewed to confirm the chosen location meets code and performance requirements.
How to calculate required flow rate and temperature rise
Determine the correct flow rate and temperature rise to confirm the Rheem tankless unit can meet the household’s hot water demand.
Calculate peak simultaneous fixture flow (gallons per minute) by summing fixture GPM ratings.
Compute temperature rise: subtract incoming groundwater temperature from desired outlet temperature.
Use peak GPM and required rise to verify heater capacity charts and guarantee consistent supply without oversizing.
Selecting the correct Rheem model for your household
Which Rheem model fits a household depends on matching the calculated peak GPM and required temperature rise to the unit’s documented output curves and fuel type.
Compare model specifications for flow at specific temperature rises, prioritize units with modest headroom for simultaneous fixtures, and select fuel-compatible models (gas, electric).
Factor in efficiency ratings and warranty terms to balance performance, cost, and longevity.
Assessing existing plumbing, gas line capacity, and electrical panel
When planning installation, a homeowner should evaluate the existing plumbing layout, gas supply, and electrical service to confirm compatibility with the chosen Rheem tankless model.
Inspect pipe sizes, flow rates, and distance to fixtures; verify gas line diameter, pressure, and BTU capacity against unit requirements; and confirm electrical panel amperage, circuit availability, and grounding to determine needed upgrades or permit requirements before scheduling installation.
Venting options and clearances for different models
Although venting requirements vary by model and fuel type, selecting the proper venting configuration and observing manufacturer clearances is critical to safe, efficient operation of a Rheem tankless water heater.
Options include direct vent, concentric, or power-vented systems; materials and termination clearances differ for stainless steel, PVC, or polypropylene.
Follow model-specific diagrams for clearances to combustibles, intake spacing, and horizontal/vertical run limits.
Step-by-Step Installation Plumbing and Mounting
Before any work begins, utilities must be shut off and the existing water heater drained to prevent leaks and hazards.
The old unit is removed and the wall or mounting surface prepared, then the Rheem is mounted with required clearances observed.
Cold and hot plumbing are connected with isolation valves and a pressure-relief line, and any water treatment devices or bypasses and filters are installed as needed.
Turning off utilities and draining existing water heater
Shut off all utilities to the existing water heater—power, gas, and the main cold-water supply—then relieve system pressure to prevent leaks or injury.
Close the cold inlet and open a hot faucet.
Attach a hose to the drain valve and route it to a safe drain.
Open the valve and a pressure-relief valve to fully drain the tank before disconnecting plumbing.
Removing old heater and preparing wall or mounting surface
With the tank fully drained and utilities secured, removal of the old heater can begin by disconnecting remaining plumbing, venting, and electrical or gas lines per local codes.
The unit is detached, weighing and disposal planned.
Inspect and repair studs, sheathing, and wall studs for rot or corrosion.
Clean the mounting area, mark stud locations, and guarantee a flat, level surface ready for the new unit.
Mounting the Rheem unit and ensuring proper clearances
Begin by positioning the Rheem unit on the prepared wall, aligning its mounting bracket with marked stud locations and confirming the appliance sits level and plumb.
Secure fasteners per manufacturer torque, attach anti-vibration pads if specified, and verify clearance: maintain required distances from combustibles, service access, and venting components.
Recheck level, bracket integrity, and unobstructed access before proceeding.
Connecting cold water inlet and hot water outlet (including isolation valves and pressure relief)
After verifying the unit is level, secure, and clear of obstructions from the mounting stage, attention turns to the plumbing connections for the cold water inlet and hot water outlet.
Install isolation valves on both lines, use appropriate fittings and pipe sealant, and guarantee proper flow direction.
Fit a temperature and pressure relief valve per code, slope piping for drainage, and pressure-test all joints.
Installing water filters, softeners, or bypasses if needed
If water quality issues are present or local codes require treatment, install appropriate filtration, softening, or a bypass assembly upstream of the tankless unit to protect heat exchangers and maintain warranty coverage.
Select media compatible with flow and temperature, install shutoff valves and a bypass for maintenance, follow manufacturer and code specifications, purge air, check for leaks, and document installations for warranty and service records.
Step-by-Step Installation Gas and Venting (Gas Units Only)
For gas-fired Rheem tankless models, proper gas and venting work is critical for safe, efficient operation.
This section covers installing a gas shutoff and correctly sizing and connecting the gas line with required leak-testing, choosing and installing an approved venting system (direct vent, concentric, PVC or metal), and meeting combustion-air and termination-clearance requirements.
It also addresses condensate drain installation for condensing units.
Installing gas shutoff and sizing gas line
Begin by locating the main gas supply and marking a clear, accessible point for the dedicated shutoff valve that will serve the tankless unit.
Select valve type per local code.
Calculate required gas BTU demand for the Rheem model and total appliances.
Size the pipe length and diameter accordingly, accounting for pressure drop and fittings.
Use approved materials and permit-compliant installation.
Connecting gas piping and leak testing procedures
With the dedicated shutoff in place and the gas line sized, the installer proceeds to connect the unit to the household gas system, following the manufacturer’s piping diagram and local code.
Use proper fittings, thread sealant for gas, and flexible connectors where allowed.
Pressurize the system and perform a soap-bubble or electronic leak test at all joints.
Repair any leak and retest until fully sealed.
Selecting and installing venting system (direct vent, concentric, PVC/metal)
How should the installer choose and route the venting to guarantee safe, efficient operation of a gas tankless water heater? The installer assesses appliance model, fuel type, and local code, then selects direct vent, concentric, or approved PVC/metal systems.
Proper slope, support, and sealed joints prevent leaks. Key priorities:
- Manufacturer compatibility
- Code compliance
- Minimum bends
- Condensate management
- Secure termination
Combustion air requirements and termination clearances
Because combustion air directly affects flame stability, efficiency, and safety, the installer must verify required fresh-air quantities, intake locations, and termination clearances before connecting the gas and venting.
The installer should follow manufacturer and code specifications for room ventilation, minimum distances from openings, and obstruction-free terminations.
Sealed or outdoors installations require dedicated air intakes; document compliance and label termination points.
Condensate drain installation for condensing models
Install the condensate drain before completing vent and gas connections to guarantee proper slope, secure fittings, and a sealed discharge path for acidic condensate produced by condensing units.
Mount a condensate trap at the unit, use corrosion-resistant tubing, maintain 1/8–1/4″ per foot slope, run to approved drain or neutralizer, avoid backflow, and test for leaks and proper flow before finalizing installation.
Step-by-Step Installation Electrical and Controls (Electric and Gas Units)
The electrical and control phase addresses service capacity, breaker sizing, and the specific wiring, grounding, and bonding required for both electric and gas Rheem tankless models.
It also covers installation of remote controllers, thermostats, and optional Wi‑Fi modules.
Finally, the procedure includes configuring unit settings and completing the initial software setup to guarantee safe, reliable operation.
Electrical service requirements and breaker sizing
Electrical service capacity and correct breaker sizing are critical to safe, reliable operation of a Rheem tankless water heater.
The installer must verify available service voltage, phase, and amperage against unit specifications.
Calculate continuous-load requirements, apply NEC derating, and size breakers and conductors accordingly.
Confirm panel capacity for added load and consult local codes or a licensed electrician for approval before proceeding.
Wiring the unit, grounding, and bonding
Before any connections are made, confirm power is fully disconnected and verified at the service panel, and the unit’s wiring diagram and local codes are at hand.
Mount conduit and route appropriately sized conductors per diagram.
Connect line, neutral and ground to specified terminals, tighten to torque specs.
Bond gas piping if applicable.
Verify continuity of grounding and correct phasing before energizing.
Installing remote controllers, thermostats, and Wi’Fi modules
With power confirmed disconnected and grounding verified, attention shifts to installing remote controllers, thermostats, and optional Wi‑Fi modules.
Mount controllers per manufacturer location guidelines, run low‑voltage wiring to designated terminals, and secure connections with proper ferrules or terminal screws.
Install thermostat sensors where representative of return temperature.
For Wi‑Fi modules, insert per instructions, connect antenna if required, and verify solid physical connections before restoring power.
Configuring unit settings and initial software setup
Begin by powering only the control circuits (keeping main gas and water supplies off) and accessing the unit’s front panel interface or connected remote to enter the configuration menu.
Select language, units (°F/°C), maximum temperature limit, and eco or performance mode.
Configure inlet/outlet temperature sensors, enable Wi‑Fi and remote access, set diagnostic logging level, save settings, then power down control circuits.
Startup, Testing, and Commissioning
The installer begins commissioning by filling the system, purging air, and performing an initial power-up to run onboard diagnostics.
They then inspect for water and gas leaks, confirm proper vent operation, and verify hot water temperature, flow, and any error codes.
Finally, the installer documents the installation details and registers the warranty before handing the unit over to the owner.
Filling the system and purging air
Flush the lines and open valves systematically to fill the tankless unit and remove trapped air.
A technician slowly opens inlet and outlet service valves, opens nearby hot faucets, and runs water until steady, bubble-free flow appears.
Inspect isolation valves, pressure relief, and condensate traps for leaks.
Close faucets, recheck connections, and document flow rates before proceeding to electrical startup.
Initial power-up and diagnostics
Power is applied to the unit only after verifying correct wiring, proper voltage at the disconnect, and that all gas and water isolation valves are in their operating positions; this prevents damage and guarantees safe startup.
The installer observes the unit’s diagnostic LEDs, checks error codes on the display, verifies ignition sequence and flame stability, confirms proper flow sensor readings, and records initial temperature differentials for commissioning.
Testing for leaks, gas tightness, and proper vent operation
Following verification of ignition, sensor readings, and initial temperature differentials, attention shifts to confirming system integrity and safe operation under normal conditions.
Inspect all water connections for drips under pressure, apply soapy solution to gas joints and observe for bubbles, and verify venting is unobstructed with proper draft.
Record any anomalies, tighten fittings, and retest until no leaks and vents function correctly.
Verifying hot water temperature, flow, and error codes
Begin by initiating a controlled hot-water draw to verify the heater’s delivered temperature, flow rate, and any diagnostic codes displayed during operation.
Measure outlet temperature with a calibrated thermometer, confirm flow meets setpoint and system demand, and observe the unit’s display for fault codes.
Record readings, clear transient alerts, and repeat multiple draws to guarantee consistent performance before concluding commissioning.
Documenting installation and registering the warranty
Document all installation details and complete warranty registration promptly after successful startup and testing.
Photographs, serial numbers, installation date, installer contact, gas/electric connections, venting and water hookup notes should be recorded.
Retain receipts and permit approvals.
Register the unit with Rheem online or by phone within the warranty period, supplying required documentation.
Maintain copies for owner and installer records.
Common Problems During Installation and How to Avoid Them
Common installation issues include undersized gas or electrical service causing fluctuating performance, venting errors that lead to backdrafting, and poor water quality that promotes scaling and premature component failure.
Technicians should verify supply capacities, inspect and correct vent runs, and assess water hardness before commissioning.
Incorrect temperature or flow settings are usually resolved by following manufacturer specifications and reconfiguring controls during startup.
Undersized gas line or electrical service symptoms and fixes
How can one tell if the gas line or electrical service is undersized for a Rheem tankless water heater?
Common symptoms include weak flame, frequent flame failure, unit cycling, error codes, low hot water flow, voltage drops, or tripped breakers.
Fixes: verify required BTU and amperage, measure supply pressure/voltage, upsize gas piping or service conductors, install dedicated circuit or pressure regulator, and consult a licensed plumber or electrician.
Venting mistakes and troubleshooting backdrafting
Several installation errors involving venting can cause serious performance and safety issues with a Rheem tankless water heater, most importantly backdrafting where combustion gases are drawn back into the room.
Incorrect vent length, improper slope, blocked terminations, or using wrong materials fosters poor draft.
Troubleshoot by inspecting clearances, seals, and flue integrity; correct configurations per manufacturer specifications and test combustion ventilation.
Water quality issues causing scale or premature failure
Because mineral-laden or chemically imbalanced water accelerates scale buildup and corrosion, water quality is a primary determinant of a Rheem tankless water heater’s lifespan and reliability.
Installers should test hardness, pH, and total dissolved solids before commissioning.
Where hardness or corrosive chemistry exists, recommend scale inhibitors, softeners, or inline filters and schedule regular descaling and inspections to prevent efficiency loss and premature component failure.
Incorrect temperature or flow settings and how to correct them
Why are incorrect temperature or flow settings a frequent cause of poor performance and user complaints with Rheem tankless water heaters?
Improper temperature limits or minimum flow rates cause cycling, insufficient hot water, or error codes.
Correct by consulting the manual, setting temperature within recommended range, adjusting flow restrictors, verifying minimum GPM activation, and testing multiple fixtures.
Recheck settings after commissioning and seasonal changes.
Maintenance, Service Intervals, and Troubleshooting Tips
Routine maintenance for a Rheem tankless water heater includes scheduled flushing, filter and valve inspection, and replacement of sacrificial parts to prevent buildup and guarantee efficient operation.
Flushing and scale-prevention procedures, along with filter maintenance, address mineral accumulation before it impairs flow or heat exchange.
A basic guide to interpreting common error codes and performing safe DIY fixes will help diagnose issues quickly and indicate when professional service is required.
Recommended routine maintenance steps
Maintain a regular maintenance schedule to preserve performance, extend service life, and prevent common failures in a Rheem tankless water heater.
Technicians or experienced owners should inspect, test, and document condition at set intervals.
Recommended routine tasks include:
- Visual inspection for leaks and corrosion
- Check venting and combustion air ports
- Verify water and gas connections
- Test temperature settings and controls
- Clean accessible filters and strainers
Flushing and scale prevention procedures
Flush the heat exchanger at regular intervals and implement scale-prevention measures to protect efficiency and prevent premature failure.
Use vinegar or manufacturer-approved descaling solution with a pump to circulate and remove mineral buildup.
Inspect inlet water hardness and install a softener or magnetic/conditioning device where necessary.
Maintain a six- to twelve-month flushing schedule, increasing frequency in hard-water areas to avoid flow restriction and heat transfer loss.
Replacing filters, valves, and sacrificial parts
Inspect and replace wear-prone components such as inlet water filters, pressure-relief valves, and anode rods on a regular schedule to guarantee reliable operation and prevent damage.
Follow manufacturer intervals, use OEM or equivalent parts, and document dates and parts replaced.
Inspect seals and O-rings; lubricate or replace as needed.
Test valve operation after reinstalling.
Dispose of sacrificial parts per local regulations.
Interpreting common error codes and DIY fixes
A few common error codes on Rheem tankless water heaters correspond to specific, often diagnosable issues—such as ignition failure, flame loss, sensor faults, or scale buildup—and understanding their meanings enables many straightforward DIY remedies before calling a technician. Owners can reset units, clean sensors, descale, and check connections; persistent faults require professional service.
| Code | Likely Cause | DIY Fix |
|---|---|---|
| E1 | Ignition | Reset/clean electrodes |
| E2 | Overheat | Descale/check flow |
Cost Estimates, Timeframe, and When to Call a Pro
The section outlines typical cost differences between a DIY installation and hiring a professional, including parts, permits, and labor.
It also provides estimated time for site preparation, mounting, plumbing and venting, and system startup.
Clear indicators for hiring a licensed plumber or HVAC technician—such as gas line work, complex venting, or code compliance issues—are highlighted.
Typical DIY vs. professional installation cost breakdown
Many homeowners weigh DIY installation against hiring a professional based on costs, time, and skill requirements; DIY can cut labor expenses but may add complexity and risk, while professional installation raises upfront cost but typically guarantees code compliance and reliable performance. Typical breakdown:
| Item | Typical Cost |
|---|---|
| Unit | $700–$1,500 |
| DIY materials | $200–$600 |
| Pro labor | $500–$1,500 |
| Permits/inspection | $50–$300 |
Estimated time for each installation stage
Installing a Rheem tankless water heater typically progresses through distinct stages—preparation, removal of the old unit, mounting and plumbing, venting and gas/electrical hookup, and final testing—each with predictable time ranges and cost implications.
Preparation: 1–3 hours.
Removal: 1–2 hours.
Mounting/plumbing: 3–6 hours.
Venting/gas or electrical hookup: 2–5 hours.
Final testing and adjustments: 1–2 hours.
Signs you should hire a licensed plumber or HVAC technician
When should a licensed plumber or HVAC technician be called for a Rheem tankless water heater replacement?
A professional is advised for complex gas line or venting modifications, electrical upgrades beyond 120V, permit-required work, suspected carbon monoxide issues, persistent leaks, inadequate hot water after installation, or unclear local code compliance.
Expect cost estimates, realistic timelines, and warranty protection when hiring a licensed expert.
Additional Resources and Documentation
The article provides pointers to Rheem manuals, wiring diagrams, and venting guides to guarantee correct component selection and safe connections.
It also highlights where to find permit requirements and local code resources so installations meet legal standards.
A printable checklist is offered to guide each step of the installation and verify completion of key tasks.
Where to find Rheem manuals, wiring diagrams, and venting guides
Locate Rheem’s official resources through their website and authorized distributors to guarantee access to up-to-date manuals, wiring diagrams, and venting guides specific to each tankless model.
Technical documentation is available in PDFs and model-specific service sheets. For installation, reference the latest revision and local requirements.
- Owner’s manuals
- Installation guides
- Wiring diagrams
- Venting specifications
- Service bulletins
Links to permit information and local code resources
One useful step is consulting local building department websites and state plumbing or mechanical code offices to determine permit requirements, inspection schedules, and any jurisdiction-specific amendments that affect tankless water heater installations.
Relevant links include municipal permitting portals, state code libraries, and utility rebate pages.
Also check national model codes (IRC, IPC, IMC) and manufacturer compliance statements to verify installation standards and documentation needed for inspections.
Checklist to print and follow during installation
Before beginning work, a concise, printed checklist organizes required tools, safety gear, permits, materials, and sequential tasks so installers can follow code-compliant steps without guesswork.
The checklist should be laminated and placed with the work permit. It guides inspections, testing, and final documentation, reducing errors and omissions.
- Tools and PPE
- Permits and codes
- Materials and fittings
- Step-by-step tasks
- Testing and sign-off
Conclusion
In closing, the Rheem tankless water heater installation guide serves as a roadmap, enabling confident, efficient work whether undertaken by a skilled DIYer or a professional. When followed carefully—like a compass steering through technical terrain—proper planning, correct sizing, precise plumbing and gas connections, and routine maintenance guarantee long life and reliable performance. If uncertainty arises, consulting a licensed technician prevents costly mistakes and safeguards safety and warranty coverage.