How to Drain a Water Heater Tank in an RV: Step-by-Step Guide for Safe Winterizing
To effectively drain your RV water heater and prevent freeze damage during winter, follow these essential steps: First, turn off the power and water supply. Next, open the pressure-relief valve and adjust the bypass valves. Open hot faucets to relieve any built-up pressure. Then, attach a hose to the drain fitting, open the drain valve, and let the water flush until it runs clear. Don’t forget to inspect the anode rod and drain screen. Once everything is clear, close the valves and winterize your system with RV antifreeze as necessary. For additional winterizing tips and troubleshooting, continue reading.
What Draining an RV Water Heater Means and Why It’s Necessary for Winterizing
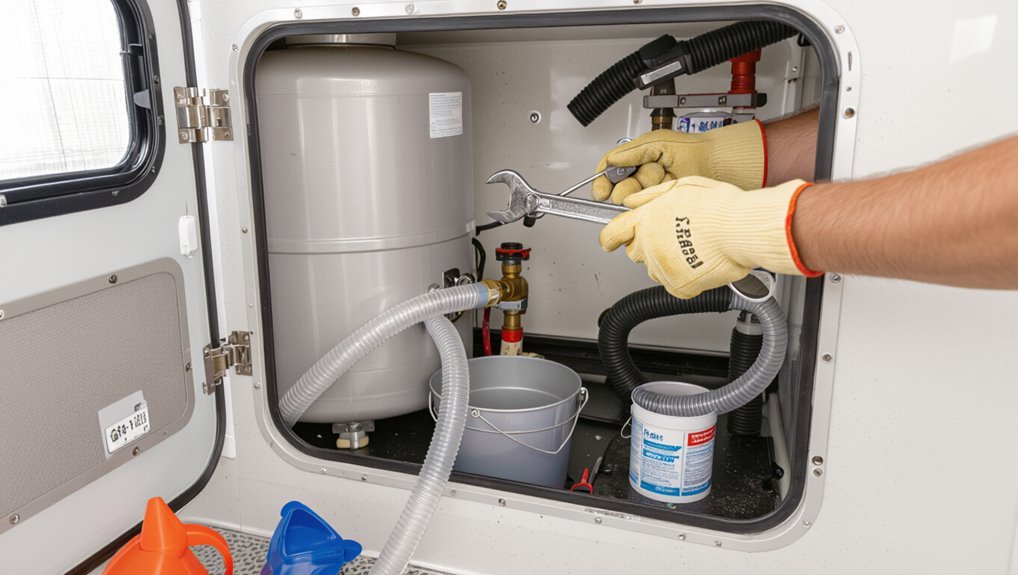
An RV water heater consists of a tank, heating element or burner, and inlet/outlet valves that circulate and heat potable water.
If residual water is left in the tank during freezing temperatures, expansion can crack the tank, plumbing, or fittings and cause costly damage.
Properly draining the unit before winter preserves components, prevents freeze damage, and helps maintain warranty coverage and long-term reliability.
How an RV water heater works (basic components and operation)
A typical RV water heater consists of a tank, heating element or gas burner, cold-water inlet, hot-water outlet, pressure-relief valve, and a drain fitting; together they store and heat potable water for onboard use. It operates by filling, heating, and pressurized delivery; draining via the drain fitting is central to how to drain water heater tank in rv.
| Component | Function | Location |
|---|---|---|
| Tank | Stores water | Interior |
| Heater | Heats water | Adjacent |
| Valves | Control flow | Connections |
| Inlet/Outlet | Move water | Piping |
| Drain | Empty tank | Bottom fitting |
Risks of leaving water in the tank during freezing temperatures
Because water expands when it freezes, leaving liquid in an RV water heater tank during cold weather risks cracks in the tank, burst fittings, and damaged plumbing that can lead to leaks and costly repairs.
Frozen water can warp valves, damage insulation, and compromise seals. Resulting leaks may cause mold, electrical issues, and structural deterioration, increasing repair complexity and expense.
Benefits of proper draining for long-term maintenance and warranty protection
Following the risks of freeze damage, proper draining protects the water heater and the RV’s broader plumbing system by removing residual water that can corrode tanks, sediment pockets, and fittings over time. Regular draining extends component life, prevents odors, aids performance, and supports warranty compliance when documented.
| Benefit | Effect | Action |
|---|---|---|
| Corrosion prevention | Longer tank life | Drain annually |
| Sediment removal | Improved efficiency | Flush system |
| Warranty support | Coverage maintained | Keep records |
| Odor control | Sanitary water | Dry and ventilate |
Quick Overview: Total Time, Tools, and Safety Precautions
This task typically takes 30–60 minutes for a moderately skilled person and rates as easy to moderate in difficulty.
Required items include basic hand tools, a garden hose, a bucket, and personal protective equipment such as gloves and eye protection.
Safety steps include isolating power and gas, relieving pressure, and working on a level surface to prevent slips or accidental scalding.
Estimated time and difficulty level
A straightforward drain-and-flush of an RV water heater typically takes 30–60 minutes for someone with basic tools and experience; more thorough descaling or repairs can extend the job to 2–3 hours.
Difficulty is low to moderate: homeowners familiar with simple plumbing, valves, and electrical/gas safety can complete it.
Novices should allow extra time and consider professional help for complex issues.
Required tools and materials
Gathering the right tools and materials prepares the job for a safe, efficient drain-and-flush: expect to spend 30–60 minutes, have basic hand tools (adjustable wrench, pliers, screwdriver), a garden hose, bucket, rags, and Teflon tape, and include safety items such as gloves and eye protection.
Additionally, confirm a water shutoff key or wrench for city hookups, a voltage tester for electric models, and descaling supplies (vinegar or a commercial tank cleaner) if mineral buildup is suspected.
- Adjustable wrench
- Garden hose
- Bucket and rags
- Teflon tape and screwdriver
- Vinegar or tank cleaner
Safety precautions and personal protective equipment
Before starting any work on an RV water heater, verify that power and water supplies are fully shut off and that the unit has cooled to a safe temperature.
Use insulated gloves, eye protection, and sturdy footwear. Guarantee adequate ventilation when using chemicals.
Keep a fire extinguisher and first-aid kit nearby. Follow manufacturer instructions and avoid working alone when possible.
Preparing Your RV Before Draining the Water Heater
Before beginning, the technician locates the water heater and visually confirms the drain, pressure relief valve, and any bypass valves.
They then shut off all power sources—electric, propane, and battery—and turn off the incoming water supply while relieving system pressure.
Finally, they open faucets and drain fixtures as needed to reduce backflow and empty lines.
Locating the water heater and identifying drain, pressure relief valve, and bypass valves
Locating the RV’s water heater and its service components is the first practical step in draining the tank. The heater commonly sits in an exterior compartment or interior closet.
Identify the drain valve at the tank’s base, the temperature-pressure relief (TPR) valve on the upper side, and any winterizing bypass valves on inlet/outlet lines.
Note valve orientations and access clearances before proceeding.
Shutting off power sources: electric, propane, and battery
Shut off all energy sources to the water heater to prevent heating elements or burners from operating while the tank is empty.
Disconnect shore power or flip the dedicated breaker, turn the propane valve to off and disable the water heater’s gas control, and disconnect or switch off the RV battery supply.
Confirm indicator lights are off before proceeding.
Turning off the water supply and relieving system pressure
With all power sources disabled, attention turns to stopping the inflow of water and releasing built-up pressure so the heater can be drained safely.
The fresh water supply valve to the RV should be closed.
Open a hot tap to relieve line pressure and locate the water heater’s pressure relief valve; partially open it to vent trapped pressure, then close once pressure is released.
Draining water from other fixtures to reduce backflow
Before draining the water heater, all accessible faucets and fixtures throughout the RV should be opened to allow trapped water to escape and reduce backflow into the heater. Then, sinks, showers, and external hoses are drained to lower system pressure and prevent contamination. Close fixtures after draining and verify water flow is minimal before proceeding.
| Fixture | Action |
|---|---|
| Kitchen sink | Open and drain |
| Bathroom sink | Open and drain |
| Shower | Open and drain |
| Exterior hose | Open and drain |
Step-by-Step Guide to Draining a Tank-Type RV Water Heater
The procedure begins by ensuring the water heater is powered off and cooled, then isolating inlet and outlet lines or engaging a bypass if present.
Next, vent the tank via the pressure relief valve, attach a hose to the drain outlet routed to a safe disposal point, and open the drain.
Finally, flush the tank until the water runs clear before closing valves and restoring connections.
Step 1 Turn off the water heater and allow it to cool
Shut off power and gas to the water heater and let the tank cool fully before any drainage work begins.
The operator confirms electrical breakers and propane supply are disconnected, waits until the exterior is cool to touch, and verifies indicator lights are off.
Cooling prevents scalding and pressure-related hazards, ensuring a safe, controlled start to the draining procedure without risking burns or equipment damage.
Step 2 Close intake and outlet lines or enable bypass if equipped
With the heater powered down and cooled, attention moves to isolating the water lines to prevent inflow or cross-contamination during drainage.
The cold and hot supply valves are closed at the tank or manifold; if an RV bypass kit is installed, its valves are set to route antifreeze around the heater.
Confirm seals and stopcock positions before proceeding.
Step 3 Open the pressure relief valve to vent the tank
Open the pressure relief valve to allow trapped air and water to escape, preventing a vacuum and making drainage faster. The technician stands clear, uses a cloth or glove, and slowly lifts the lever to vent. Listen for rushing air and small water discharge; reseat if leaking excessively. Monitor until flow slows, indicating tank pressure equalization.
| Action | Purpose |
|---|---|
| Lift lever slowly | Vent air |
| Use glove | Protect hand |
| Observe flow | Confirm equalization |
Step 4 Attach hose to the tank drain and route to appropriate disposal point
Attach a garden hose to the heater’s drain fitting and direct it to a suitable disposal point—such as a designated RV dump station, gray-water receptacle, or a permitted outdoor area—ensuring the connection is secure and the hose runs downhill or is supported to prevent kinks.
Fasten clamps if needed, check for leaks, and route the hose away from walkways and electrical components. Confirm legal disposal before proceeding.
Step 5 Open the tank drain and flush until clear
Turn the tank drain valve slowly to start the flow and allow the water to empty; once draining begins, briefly run a few gallons of fresh water through the heater via the cold inlet or by briefly opening a nearby faucet to help loosen sediment.
Continue flushing until the discharge runs clear, monitoring hose placement and flow rate, then close the cold inlet when clarity is achieved.
Step 6 Use the hot and cold taps to help evacuate remaining water
With the tank mostly drained, operate both the hot and cold faucets inside the RV to equalize pressure and encourage any trapped water to flow out.
This promotes air entry and helps purge pockets of residual water. Leave faucets open while observing drain flow; alternate opening nearby fixtures if necessary.
Close faucets once steady, minimal dripping indicates evacuation is fundamentally complete.
Step 7 Inspect and clear the drain screen/anode if accessible
After the faucets have been used to purge most of the water, attention shifts to the heater’s internal protection: the drain screen and sacrificial anode. The technician visually inspects, removes debris, and replaces corroded anodes if needed. Careful clearing improves flow and longevity.
| Item | Action | Notes |
|---|---|---|
| Screen | Inspect/clean | Remove sediment |
| Anode | Check/replace | Corrosion indicator |
Step 8 Close drain, reseat valves, and verify tank is empty
Close the drain valve and methodically reseat any shutoff and bypass valves to restore normal plumbing configuration.
Confirm tank isolation is removed and outlets are returned to service.
Open a hot water faucet to purge residual air and check for steady flow.
Inspect surrounding fittings for leaks.
Verify the tank drains fully by feeling the underside for coldness and monitoring water output until it runs clear.
Additional Steps for Winterizing After Draining
After draining, the next winterizing steps include bypassing the water heater to avoid wasting antifreeze, adding the correct amount of non-toxic RV antifreeze through the plumbing system, and protecting exposed components such as pipes, the external shower, and faucets.
The bypass prevents antifreeze from filling the tank while the antifreeze quantity and application method guarantee lines are fully protected.
External fixtures should be insulated or otherwise sealed to prevent freeze damage.
Bypassing the water heater to prevent antifreeze waste (how and why)
When winterizing an RV, bypassing the water heater prevents antifreeze from filling the tank, saving product and avoiding unnecessary disposal.
A dedicated bypass kit or valve arrangement reroutes antifreeze around the heater via inlet and outlet lines. This reduces required antifreeze volume, speeds system fill, and avoids heating element immersion.
Properly installed, it remains closed during normal use and open only for winterizing.
Adding non-toxic RV antifreeze: amount and application method
Pour a measured amount of non-toxic RV antifreeze into the emptied system to protect pipes, fittings, and appliances from freeze damage.
Calculate volume by summing tank, supply lines, and fixture traps; typically 2–4 gallons suffice for most RVs.
Use the city-water inlet or a hand pump to circulate antifreeze through all interior fixtures until pink fluid appears, then close valves and label the system.
Protecting external components (pipes, external shower, and faucets)
Several simple measures protect external plumbing and fixtures from freeze damage once interior lines are drained. External pipes should be insulated, faucets left slightly open, and the external shower drained and protected with a cover. Secure exposed fittings and apply RV-rated antifreeze to external traps.
| Item | Action | Benefit |
|---|---|---|
| Pipes | Insulate | Prevent freezing |
| Shower | Drain/cover | Stops ice buildup |
| Faucets | Slightly open | Relieve pressure |
Troubleshooting Common Problems During Draining
Common issues encountered while draining an RV water heater include a tank that won’t empty, leaking valves or fittings, and buildup from corrosion or sediment.
Remedies range from opening alternate drain points and clearing clogs to applying temporary seals or replacing damaged valves, with permanent repairs recommended for compromised fittings.
If flushing and basic repairs do not restore proper flow or corrosion is extensive, a professional inspection and service should be scheduled.
Tank won’t drain causes and fixes
When an RV water heater tank refuses to drain, diagnosing the cause quickly prevents corrosion, freezing, and prolonged downtime.
Common culprits include a clogged drain valve, trapped air, a faulty pressure relief or shutoff valve, sediment buildup, or improper winterization procedures.
Inspect and clean the drain valve, open hot and cold faucets to relieve air locks, flush sediment via garden hose, and test valves for proper operation.
Leaking valves or fittings temporary and permanent repairs
Inspect the water heater’s valves and fittings for visible drips or wetness before continuing a drain procedure. Temporary fixes include tightening, thread seal tape, or hose clamps; permanent repairs require replacing valves or fittings. Monitor after repair for leaks and test under pressure.
| Issue | Fix |
|---|---|
| Small drip | Tighten |
| Thread leak | Tape |
| Loose hose | Clamp |
| Failed valve | Replace |
| Test | Pressure check |
Corrosion, sediment buildup, and when to schedule professional service
Corrosion and sediment accumulation can severely reduce an RV water heater’s efficiency and lifespan, so users should watch for rust-colored water, reduced hot-water flow, unusual noises during draining, or visible flaking inside the tank.
Minor sediment can be flushed; persistent buildup, pitting, leaks, or failed anode rods warrant professional inspection.
Schedule service if problems recur after flushing or if structural corrosion is suspected.
Maintenance Checklist After Draining and Before Recommissioning
After draining, a concise maintenance checklist guarantees the heater is safe and functional before recommissioning.
It should include inspection and testing of the pressure relief valve and anode rod, careful reassembly, and correct restoration of water and power.
Finally, the system must be sanitized and flushed following manufacturer guidelines prior to regular use.
Inspecting and testing pressure relief valve and anode rod
Verify the temperature-and-pressure (T&P) relief valve and the sacrificial anode rod for proper operation and wear before refilling the tank.
Test the T&P by lifting its lever to confirm immediate flow and reseal; replace if sticky, corroded, or leaking.
Inspect the anode for heavy corrosion or thinning; replace when substantially consumed to prevent tank corrosion and extend service life.
Reassembling and restoring water and power safely
Once the tank is drained and inspected, the technician follows a concise sequence to reassemble fittings, restore water supply, and re-energize systems while minimizing risk.
Threads and seals receive proper torque and fresh gaskets; valves are set closed, then slowly opened to pressurize the heater while checking leaks.
Electrical and propane power are reconnected last, with circuit breakers and control thermostats verified before full operation.
Steps to sanitize and flush the system before regular use
Begin by preparing a sanitized workspace and collecting required supplies—non-toxic RV-safe bleach or sanitizer, a measured container, a funnel, fresh potable water, and a clean hose—so the technician can perform a controlled disinfecting cycle; this guarantees concentration and contact times are accurate before flushing and returning the system to regular use.
Mix solution to manufacturer ratio, introduce via fresh-water inlet, run faucets until sanitizer appears.
Allow dwell time, then thoroughly flush until no taste or odor remains, test with reagent strip, and restore normal operation.
When to Call a Professional and Cost Considerations
If leaks, faulty heating elements, persistent odors, or inability to purge air are present after draining, a professional RV technician should be contacted.
Common service tasks include pressure testing, element replacement, valve repair or replacement, and anode inspection or replacement, with typical costs ranging from $75–$250 for diagnostics and minor repairs to $300–$800 for part replacement and labor.
Owners should weigh repair estimates against the age and remaining life of the water heater when deciding whether to proceed.
Signs you should hire an RV technician
When an owner encounters persistent leaks, failed heating elements, unusual noises, or repeated attempts to flush and drain the tank that do not resolve the issue, professional intervention is warranted.
Other signs include unexplained pressure loss, cold water after heating cycles, corrosion around fittings, or gas smell near propane heaters.
Safety, diagnostic tools, and warranty concerns justify hiring an RV technician.
Typical service tasks and approximate cost ranges
Following signs that warrant professional help, a breakdown of common service tasks and their typical cost ranges helps owners decide whether to call a technician.
- Thermocouple or pilot assembly replacement: $75–$200
- Anode rod or element replacement: $100–$300
- Pressure relief valve replacement: $50–$150
- Tank repair or replacement: $300–$1,200
- Leak diagnosis and labor: $80–$250
Common Mistakes to Avoid When Draining an RV Water Heater
A few common mistakes can turn a routine RV water heater drain into a safety or maintenance problem.
Not cutting electrical and gas power before opening the tank, failing to bypass the heater when adding RV antifreeze, and improperly disposing of hot water or antifreeze are frequent causes of damage and contamination.
Each error is avoidable with a quick safety checklist and proper waste handling.
Forgetting to shut off power sources
Many RV owners underestimate the risk of leaving power sources connected before draining the water heater, which can lead to electric heating elements energizing or propane systems cycling unexpectedly.
Failure to switch off shore power, inverter, and propane supply risks shock, burned elements, or gas activation.
Always isolate electrical and fuel sources, confirm controls are off, and lock breakers to prevent accidental re-energizing during draining.
Failing to bypass the heater before using antifreeze
Neglecting to bypass the water heater before pumping in RV antifreeze allows the pink solution to fill the tank and its heating elements, wasting antifreeze and risking contamination of components not meant for permanent exposure.
Technicians should engage the bypass valve or remove the heater element per manufacturer instructions so antifreeze routes directly through domestic lines, preventing unnecessary tank fill and simplifying later flushing and system checks.
Improper disposal of hot tank water or antifreeze
Dispose hot tank water and RV antifreeze responsibly to prevent environmental harm, legal violations, and damage to campground systems.
The operator should never dump hot water or antifreeze onto soil, storm drains, or potable water sources.
Use designated dump stations, follow local disposal regulations, capture and transfer fluids into labeled containers, and contact waste facilities for hazardous-liquid guidance to guarantee compliance and protect ecosystems.
Quick Reference Cheat Sheet
A compact cheat sheet presents a condensed step-by-step checklist for draining and winterizing the RV water heater, highlighting key valve positions, sequence order, and safety checks.
It also lists emergency contacts and resources for RV owners, such as roadside assistance, certified RV technicians, and manufacturer hotlines.
This quick reference aims to provide clear, actionable guidance when time or conditions are limited.
Condensed step-by-step checklist for draining and winterizing
Begin by confirming the RV is parked on level ground and the fresh water pump and 120V/propane power to the water heater are switched off; this guarantees safe, controlled draining and prevents accidental heating while the tank is open.
Follow this condensed checklist:
- Drain tank via drain valve and open pressure relief.
- Flush with city water until clear.
- Attach antifreeze kit and pump until lines clear.
- Bypass water heater if installed.
- Close valves, document completion.
Emergency contacts and resources for RV owners
Compile a concise list of emergency contacts and essential resources every RV owner can access quickly when problems arise.
This quick-reference cheat sheet lists critical numbers and links for roadside assistance, RV repair, propane leaks, and medical emergencies, plus documentation pointers to speed help.
- Roadside assistance and towing
- RV service centers and mobile techs
- Propane supplier and leak response
- Local emergency services (911)
- Insurance and registration contacts
Conclusion
Properly draining an RV water heater is an essential winterizing step that prevents freeze damage and costly repairs. Following the outlined procedure—shutting off power, relieving pressure, opening the drain and pressure-relief valves, and flushing—ensures an empty, protected tank. Investigating the theory that detailed draining alone guarantees no winter damage reveals it’s incomplete: insulation, antifreeze where needed, and exterior protection also matter. Extensive winterizing combining these measures most reliably preserves the heater.