How to Drain a Hot Water Heater Quickly: Step-by-Step Fast and Safe Method
To quickly drain a hot water heater, start by cutting off the power or fuel supply and closing the cold-water inlet. Attach a high-flow garden hose to the drain valve, directing it to a safe discharge point. Open a hot faucet to vent air and enhance flow, then fully drain the tank. Keep an eye on fittings for leaks, and use a pump or larger hose if sediment is stubborn. Finally, refill the tank slowly before restoring power. Follow these detailed steps and safety tips for efficient draining.
How to Drain a Hot Water Heater Quickly and Safely
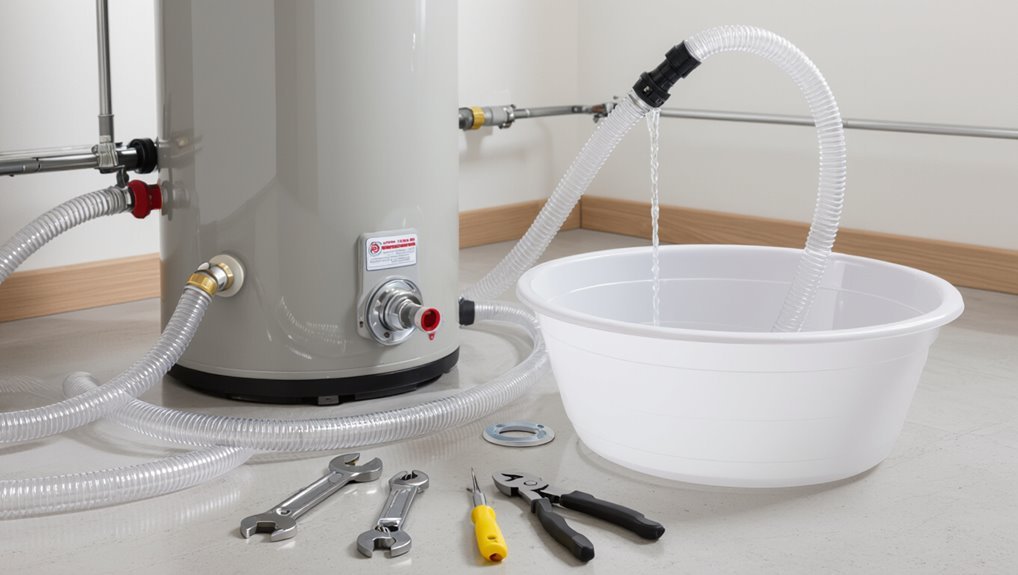
A quick drain is recommended when sediment buildup, discolored water, or reduced heating efficiency is noticed, or when a leak or imminent repair requires rapid emptying.
Prompt flushing restores performance, prevents damage, and reduces the risk of scalding or appliance failure.
The following steps outline how to drain the tank safely and efficiently.
Immediate overview when and why you should drain a water heater quickly
Recognize the urgency of draining a hot water heater when signs like discolored water, rumbling noises, reduced capacity, or an active leak appear, since prompt flushing can prevent corrosion, sediment buildup, and potential tank failure.
A concise assessment advises immediate action: follow how to drain a hot water heater quickly steps to restore efficiency, reduce repair risk, prevent contamination, and extend tank life while ensuring safety.
Safety Precautions Before You Start
Before beginning, the technician should don appropriate personal protective equipment such as gloves and eye protection.
Power and fuel sources must be secured by switching off the electric breaker or shutting off the gas supply, and confirming the system is de-energized.
Finally, the cold-water inlet should be shut off and tank pressure relieved via a pressure-relief valve or by opening a hot-water faucet.
Required personal protective equipment
Proper personal protective equipment (PPE) isolates the body from hot water, sharp metal, and chemical residues during a water heater drain.
Recommended gear includes heat-resistant gloves, safety goggles or a face shield, long-sleeve clothing, closed-toe non-slip footwear, and a durable dust mask if sediment is disturbed.
Inspect PPE for damage and guarantee a proper fit before beginning to drain the tank.
Turning off power and fuel sources (electric and gas)
When servicing a water heater, power and fuel must be shut off to eliminate shock, fire, and scald hazards; for electric units this means switching off the dedicated circuit breaker at the main panel, and for gas models it requires closing the gas shutoff valve and setting the thermostat or pilot to “off.”
Verify labels, test for absence of electricity, and confirm gas is secured before proceeding.
Shutting off the cold-water supply and relieving tank pressure
With power and fuel confirmed off, attention turns to the water side: shut the cold‑water shutoff valve feeding the heater to stop incoming flow, then relieve tank pressure to prevent scalding and spurting during drain operations.
Open a hot faucet at a nearby sink, then open the heater’s pressure relief valve slightly or use the drain valve to admit air; confirm flow has slowed before proceeding.
Tools and Materials You’ll Need
A concise list of essential tools and supplies helps guarantee the job is completed safely and efficiently.
Core items include a garden hose, bucket, adjustable wrench, screwdriver, gloves, and eye protection.
Optional items such as a wet/dry vacuum, hose adapter, and a pressure-reducing valve can speed the process or enhance safety.
List of essential tools and supplies
Preparation begins with assembling the right tools and supplies to confirm the draining process is safe and efficient. Essential items include basic plumbing tools, a sturdy hose, and safety gear. These guarantee control, containment, and personal protection during draining.
- Adjustable wrench, pliers, screwdriver
- Garden hose or drain hose, bucket
- Gloves, eye protection, work light
Optional items to speed up the process or improve safety
After gathering the basic tools and safety gear, consider optional items that can speed the job and reduce risk. These enhance efficiency and limit hazards during draining and flushing.
- Electric submersible pump with long hose for faster water removal.
- Garden hose adapter and quick-connect fittings to speed setup.
- Infrared thermometer and heat-resistant gloves to monitor and handle hot surfaces.
Fast Step-by-Step Draining Method
The technician prepares the work area, connects a high-flow hose, and verifies the hose leads to a suitable drain.
Water and power are shut off, a hot faucet is opened, and the hose is attached to the tank’s drain valve.
Venting is provided by opening the pressure-relief valve or faucet, and the drain valve is opened fully to maximize flow.
Step 1 Prepare the area and connect a high-flow hose
Clear the immediate area around the water heater of tools, floor coverings, and combustible materials.
Then position a high-flow garden hose to a nearby drain or outside outlet to handle the volume. Make certain the hose is rated for hot water and long enough to reach a safe discharge point below the level of the heater.
Wear heat-resistant gloves; inspect fittings and clamps for leaks.
Coil excess hose neatly.
Step 2 Turn off water and power and open a hot water faucet
Shut off the cold-water supply valve at the top of the tank and switch the heater’s power to the OFF position—turn the breaker off for electric units or set the gas control to pilot for gas models—to prevent refilling and heating while draining.
Then open a nearby hot water faucet to relieve pressure and allow air into the tank; verify stagnant flow before proceeding.
Step 3 Attach hose to drain valve and route to an appropriate drain
Attach a garden hose to the tank’s drain valve by threading the hose end firmly onto the male spout and tightening by hand until snug.
Then secure with pliers or a hose clamp if needed to prevent leaks.
Route the hose downhill, avoiding kinks, to a safe discharge point—floor drain, outside area, or utility sink—ensuring hot water won’t damage surfaces or create hazards.
Step 4 Open pressure-relief valve or hot faucet to vent air
With the hose secured and routed, venting the tank allows water to flow freely through the drain.
The technician opens the temperature-and-pressure relief valve or a nearby hot faucet to admit air, preventing vacuum formation. They monitor for steady, continuous flow and listen for gurgling.
If no air enters, they briefly crack a second hot tap until drainage normalizes, then proceed.
Step 5 Open drain valve fully to maximize flow
The technician fully opens the drain valve to maximize flow, turning it all the way counterclockwise so the opening is unobstructed.
Water exits rapidly; flow should be steady. The technician watches for leaks at the valve connection and hose, ensuring fittings remain tight.
If flow slows unexpectedly, the technician confirms venting is maintained and that the cold-water supply remains shut before proceeding to the next step.
Step 6 Use bucket flushing or garden hose backflow to dislodge sediment
To dislodge compacted sediment more effectively, the technician alternates rapid flushes using a bucket and brief reverse-flow bursts through the garden hose: filling and dumping the bucket near the drain speeds agitation of settled particles, while momentarily reversing the hose (or directing a strong backflow from a secondary supply) forces trapped grit toward the outlet.
This targeted agitation loosens deposits, improving discharge without overpressurizing fittings.
Step 7 Monitor flow and complete draining; use steps to speed remaining sludge removal
Begin monitoring flow rate immediately after the agitation steps, observing both the drain outlet and any discharged water for clarity and sediment presence.
If flow slows, gently reopen and close the cold-water inlet briefly to stir remaining sludge, or use short bursts of backflow with a hose.
Continue until water runs clear and sediment settling stops, then keep draining until flow ceases.
Step 8 Close valves, refill the tank, and restore power or gas safely
After confirming the discharged water runs clear and flow has stopped, attention shifts to sealing the system and restoring normal operation.
Close the drain valve and any garden hose, then shut the hot-water outlet valve.
Open the cold-water supply slowly to refill the tank, venting nearby faucets until steady water appears.
Once full, restore power or relight the gas pilot per manufacturer instructions, checking for leaks.
Techniques to Drain Faster and Remove Sediment
To speed draining and remove sediment, several targeted techniques are effective.
A wet/dry vacuum can extract sludge from the drain with care to avoid tank damage or electrical hazards, while intermittent cold-water bursts help dislodge settled material for easier flushing.
Using a larger-diameter hose or a dedicated pump further increases flow rate and reduces the time required to clear heavy deposits.
Using a wet/dry vacuum on the drain (procedure and cautions)
Using a wet/dry vacuum on the drain can accelerate flushing and help extract stubborn sediment that resists gravity flow; however, it requires careful setup to avoid equipment damage or creating a vacuum seal that prevents proper water flow.
The vacuum is attached to the drain spigot with a tight but vented adapter, run on wet mode, and monitored to prevent overheating, suction blockages, or backflow into the unit.
Flushing technique with intermittent cold-water bursts
Introduce intermittent cold-water bursts while the heater drains to agitate and flush settled sediment without stopping the outflow.
The operator briefly opens the cold inlet for a few seconds, creating pulses that loosen deposits and carry particles toward the drain.
Repeat several times, monitoring clarity of discharge.
Use caution to avoid overpressurizing fittings and guarantee continual drainage to prevent backflow or tank disturbances.
Using a larger-diameter hose or dedicated pump
Consider swapping the standard garden hose for a larger-diameter hose or a purpose-built pump to speed drainage and more effectively evacuate sediment.
- Increase flow: a 1.5–2″ hose reduces backpressure and clears particulates faster.
- Use a submersible or utility pump with debris-tolerant impeller for stubborn sludge.
- Monitor discharge and secure fittings to prevent leaks, ensuring safe, efficient sediment removal.
Troubleshooting Common Problems
Common issues encountered when draining a hot water heater include a clogged or leaking drain valve, little or no flow, and stubborn sediment.
Simple fixes for a sticky valve and checks for closed faucets, kinks, or airlocks often restore flow.
If sediment resists flushing, professional tools or a plumber may be required.
Drain valve is clogged or leaking quick fixes
Inspecting the drain valve is the first step when water flow is slow or a small leak appears at the connection; mineral buildup, debris, or a worn seal are the usual causes.
Flush by attaching a hose and briefly opening the valve to dislodge sediment.
Tighten or replace the valve cartridge or use a new ball/washer-style valve if leaks persist.
Test for proper drainage.
No or slow flow diagnosing closed valves, kinks, or airlocks
Begin by checking simple mechanical causes when the drain produces little or no flow: verify the drain valve and any inline shutoffs are fully open, inspect the garden hose for kinks or collapsed sections, and listen for signs of an airlock (gurgling or sputtering).
If closed valves or hose issues are found, correct them.
To relieve airlocks, briefly open the hot water tap inside the house to restore continuous flow.
Sediment that won’t budge when to use professional tools or call a plumber
If opening valves and clearing hose kinks fail to restore flow, stubborn sediment may be the cause and will require stronger measures.
The homeowner should attempt gentle flushing and a longer drain cycle first.
If deposits remain, recommend using a plumber’s snake, high-pressure flush, or powered descaler only if experienced.
Otherwise, advise hiring a licensed plumber to prevent tank damage and guarantee safe, effective removal.
When Not to Attempt Rapid Draining
Visible rust, bulging, persistent leaks, or water that appears contaminated indicate a failing tank or severe corrosion and should halt any attempt at rapid draining.
If structural damage, a compromised relief valve, or concerns about sediment-related blockages are present, the situation requires a licensed technician.
Proceeding without professional assessment in these cases can risk flooding, scalding, or sudden tank failure.
Signs of a failing tank or dangerous corrosion
Rust, bulging seams, and persistent leaks are clear indicators that a water heater tank may be failing and should not be drained hastily.
Flaking interior rust, corrosion around fittings, sediment pushing out discolored water, and warped or softened metal surfaces signal structural weakness.
Rapid draining can worsen ruptures or cause sudden collapse; defer aggressive actions and avoid pressurizing the compromised vessel.
Situations that require professional service
When signs of structural failure are present, homeowners should stop any DIY draining and seek professional service immediately.
Professionals are required for compromised tanks, active leaks, bulging or cracking, gas-line or combustion-chamber issues, electrical faults, or suspected carbon monoxide.
Also call a licensed technician when sediment removal reveals hidden damage, when pressure-relief valves fail, or when local codes demand certified handling to guarantee safety and warranty compliance.
Post-Draining Checks and Maintenance
After draining, a technician should inspect the drain valve for leaks, check the anode rod for corrosion, and test the temperature-and-pressure (T&P) valve for proper operation.
Refill procedures must follow safe steps to restore water supply, open hot faucets to purge trapped air, and confirm the heater is refilling without leaks.
Establish a routine maintenance schedule—typically annual flushing and periodic anode checks—to minimize sediment buildup and extend tank life.
Inspecting drain valve, anode rod, and T&P valve
Once the tank is drained, the homeowner should inspect the drain valve, anode rod, and temperature-and-pressure (T&P) valve for wear, corrosion, or mineral buildup.
Check the drain valve for leaks or clogged openings.
Extract and examine the anode rod for heavy erosion; replace if largely consumed.
Operate the T&P valve gently to verify it moves freely and shows no calcification or leakage.
Steps to refill safely and purge air from the system
With the inspection complete and any faulty parts replaced, the refill and air-purge process can begin.
Close the drain, open a hot faucet nearby, and slowly open the cold-water supply to the tank.
Listen for steady flow; allow air to escape until water runs smoothly.
Restore power or gas only after the tank is full and the T&P valve shows normal pressure.
Recommended maintenance schedule to prevent heavy sediment buildup
Establish a regular maintenance schedule to minimize sediment accumulation and extend the heater’s lifespan.
Routine checks reduce corrosion, improve efficiency, and prevent clogs. Recommended cadence balances frequency with effort:
- Annual full drain and flush; inspect anode rod and tank interior.
- Semiannual visual inspection of valves, fittings, and pressure relief.
- Quarterly quick sediment checks and low-flow flushing as needed.
Cost and Time Estimates
A quick drain typically takes 15–30 minutes while a full flush can require one to two hours depending on tank size and sediment.
DIY supply costs are generally low—hose, bucket, basic tools—often under $50, though a replacement valve or hose can raise that.
Professional service should be budgeted when there are complications, older tanks, or comfort is preferred, with typical service fees varying by region.
Typical time to perform a quick drain vs. full flush
Quick drains typically take 15–30 minutes and address sediment near the tank outlet.
A full flush requires 45–90 minutes, depending on tank size, sediment level and water pressure.
Quick drains restore flow and reduce minor buildup; full flushes remove deeper deposits and improve long-term efficiency.
Frequency depends on water hardness and usage; heavier scales merit more frequent full flushes.
Expected costs for DIY supplies and when to budget for a pro
Following the time estimates for quick drains versus full flushes, homeowners can anticipate modest DIY supply costs but should know when to budget for professional service. Basic supplies (hose, wrench, bucket) cost $15–40; parts or complex issues push expenses higher. Hire a pro for leaks, faulty valves, or limited time.
| Item | DIY Cost | When to Hire |
|---|---|---|
| Hose | $10–20 | Persistent clog |
| Wrench | $5–15 | Valve failure |
| Parts | $10–60 | Leaks/uncertainty |
| Labor | n/a | Complex repair |
Quick Safety Checklist Before You Leave the Job Site
Before leaving the job site, the technician completes a concise safety checklist to affirm the hot water heater and surrounding area pose no hazards.
The list confirms systems are secured, fluids contained, and access clear before departure.
- Verify gas/electric supply is off and controls labeled.
- Confirm drain valve closed and no leaks.
- Remove tools, wipe spills, and restore safe access.
Conclusion
Draining a hot water heater quickly can be done safely with the right precautions, tools, and technique, and it need not be intimidating. Even homeowners worried about causing damage should know that following the outlined steps—shutting power/gas, using a proper hose, opening the drain valve, and flushing—minimizes risk. With basic care and patience, sediment is removed efficiently, prolonging tank life and restoring performance without costly professional intervention in most routine cases.