How to Access the Drain Pan on an AC Unit: Step-by-Step Guide for Homeowners
To access the drain pan on your AC unit, start by turning off the power and wearing gloves and eye protection. Here’s a step-by-step guide:
- Locate the Drain Pan:
- For split systems, it’s under the evaporator.
- In window or portable units, find it behind the front or bottom panels.
- For rooftop or packaged units, check beneath the service panels.
- Remove Panels: Carefully take off any necessary panels. Make sure to document any disconnected lines for reassembly.
- Clear Standing Water: Use a wet/dry vacuum to remove any accumulated water in the drain pan.
- Clean the Pan: Scrape away any biofilm and apply a noncorrosive cleaner.
- Inspect for Damage: Look for rust or cracks that may need attention.
Follow these steps to effectively access and maintain the drain pan of your AC unit. For additional preventive tips, continue with the detailed procedures provided.
What the Drain Pan Does and Why It Matters
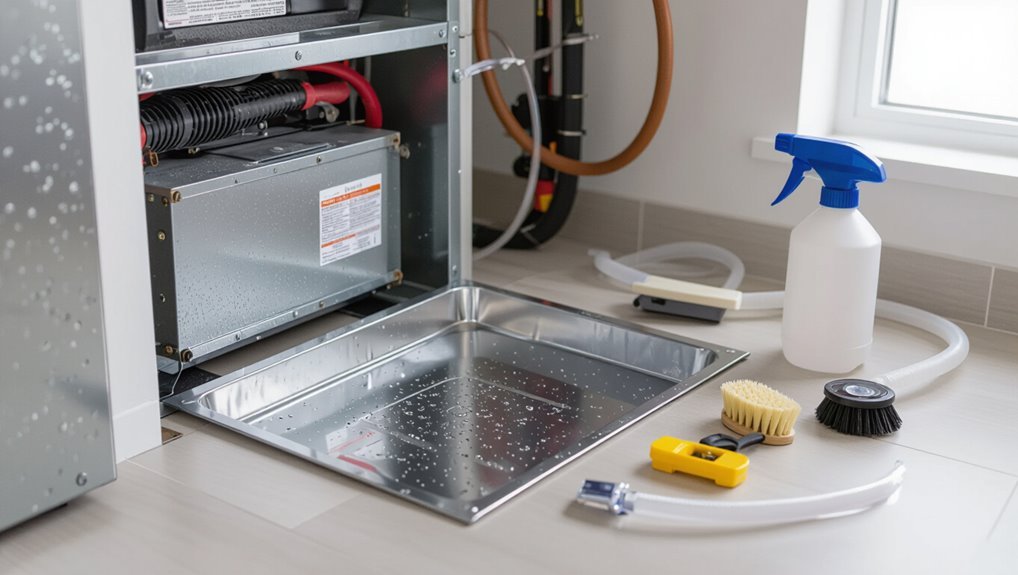
The drain pan collects condensate produced by the evaporator coil and directs it safely out of the unit to prevent water buildup.
When the pan becomes clogged, cracked, or corroded it can overflow, cause water damage, promote mold growth, and trigger system shutdowns.
Visible leaks, musty odors, standing water under the unit, or frequent condensate-related error codes indicate the drain pan should be accessed immediately.
Role of the drain pan in AC systems
Collecting condensate produced during normal operation, the drain pan prevents water from pooling around the air handler and directs moisture to the condensate drain line.
It also provides a monitoring point for leaks, supports proper airflow by maintaining system level, and helps prevent corrosion of nearby components.
Homeowners learning how to access drain pan on ac unit can inspect it for proper alignment and secure drainage paths.
Common problems caused by a clogged or damaged drain pan
Inspecting the drain pan for proper alignment and secure drainage helps prevent more serious issues when problems arise.
A clogged or damaged pan can cause water overflow, promoting mold and mildew growth, corrosion of nearby components, and weakened structural materials.
Persistent moisture may impair system efficiency, trigger condensate line blockages, and increase indoor air quality risks, potentially leading to costly repairs and shortened equipment lifespan.
Signs you need to access the drain pan now
When water pools, emits musty odors, or the HVAC system cycles irregularly, immediate access to the drain pan is warranted to prevent overflow and further damage.
Visible leaks beneath the unit, increased humidity, ice formation on coils, or frequent condensate overflow alarms also signal urgent inspection.
Prompt access allows cleaning, unclogging, and minor repairs to avoid mold growth, structural harm, and costly system failures.
Safety Precautions Before You Start
Before attempting to access the drain pan, the reader should assemble basic tools and appropriate protective gear such as gloves and eye protection.
They must also follow electrical lockout procedures and avoid disturbing refrigerant lines unless qualified.
If the unit shows signs of complex leaks, damaged electrical components, or unclear connections, a licensed HVAC professional should be contacted.
Tools and protective gear to have on hand
Gather basic tools and protective gear to reduce risk and speed the job: a flashlight, a screwdriver set (Phillips and flathead), needle-nose pliers, and a small basin or shallow pan for the drain pan itself.
Recommended items include:
- Work gloves for grip and contamination control
- Safety glasses to block debris
- Disposable rags or shop towels
- Mask to avoid dust and mold spores
Electrical and refrigerant safety steps
Any person working on an AC drain pan must first de-energize the unit and verify the absence of live voltage, then follow strict refrigerant-handling precautions.
Confirm power at the breaker and use a non-contact tester. Avoid opening sealed refrigerant lines.
Wear PPE, guarantee adequate ventilation, and keep refrigerant recovery equipment ready.
Document valves and tag disconnected circuits before proceeding.
When to call a professional instead of DIY
After verifying power is off and refrigerant procedures are in place, a homeowner should assess whether the drain-pan task falls within their skill and safety limits.
Call a professional if corrosion, visible refrigerant leaks, complex access panels, unfamiliar electrical components, persistent clogs after basic clearing, or mold contamination are present.
Also seek expert help when lacking proper tools, confidence, or local code knowledge to avoid injury or equipment damage.
How to Locate the Drain Pan on Different Types of AC Units
Locating the drain pan varies by unit type: in window and portable units the pan typically sits directly beneath the evaporator inside the housing, while split systems have a pan under the indoor evaporator coil within the air handler or wall cassette.
Packaged rooftop and central units usually require removal of service panels or rooftop access hatches to reach the primary pan. Technicians should also check for secondary pans and visible overflow drain lines that indicate additional protection.
Window and portable units: where the pan is located
When dealing with window and portable air conditioners, the condensate pan is typically found directly beneath the evaporator coil, often accessible from the front or bottom of the unit.
On window units, it sits inside the chassis behind the front grille, while on portable models it may be a removable tray at the base or a recessed sump inside the housing.
Access requires removing the grille or sliding the unit forward for inspection.
Split systems (indoor evaporator coil) layout and pan location
Because the evaporator coil in split systems is housed inside the indoor air handler, the condensate pan is typically positioned directly beneath that coil within the furnace- or blower-sized cabinet.
It may be a shallow tray under a coil cassette, a larger molded pan under a coil in a horizontal or vertical furnace unit, or a sloped drain pan leading to a condensate outlet.
Access often requires removing a service panel or filter.
Packaged rooftop and central units: access points and service panels
Split systems place the condensate pan inside the indoor air handler, but packaged rooftop and central units route drainage differently and require other access points.
Packaged units often hide pans beneath the unit; access occurs through rooftop service panels.
Commercial central units provide exterior service doors or removable panels near the coil section. Technicians lift panels to view pans, drains, and trap connections for inspection and maintenance.
Identifying secondary pans and overflow lines
Locate secondary pans and overflow lines by first identifying where condensate is routed and which components are accessible for inspection.
Technicians check beneath evaporator coils, near furnace cabinets, and under rooftop units for catch pans. Look for overflow switches, auxiliary drain lines, and visible corrosion or stains indicating past leaks.
Note pan material, drain exit points, and any temporary tubing or condensate pumps requiring service.
Step-by-Step: Accessing the Drain Pan Safely
The technician begins by preparing the work area and shutting off power to guarantee safety before any disassembly.
Next, access panels and housings are removed—differently for split and packaged units—and larger components like the evaporator coil or blower are taken out only if necessary.
Once the primary and secondary drain pans are exposed and inspected, panels are reassembled and power is restored after confirming proper condition.
Preparing the work area and shutting off power
Before any work begins, power to the air-conditioning unit should be turned off and the immediate area cleared of obstacles and trip hazards.
The technician verifies breaker and disconnect are labeled, uses a noncontact voltage tester, and waits briefly for capacitors to discharge.
Adequate lighting, a stable ladder or platform, and protective gloves and eye protection are arranged before proceeding to access the unit.
Removing access panels and housings (split and packaged units)
Once electrical isolation is confirmed and the work area is secured, access panels and housings are removed in a methodical sequence appropriate to the unit type.
For split systems, unscrew and lift the indoor cabinet panels, noting fastener locations.
For packaged units, unbolt exterior panels and hinge or slide them aside.
Store hardware and panels safely, maintaining clear access to the drain pan without disturbing sealed components.
Removing the evaporator coil or blower assembly if needed
Begin by identifying whether removal of the evaporator coil or blower assembly is necessary based on access, visible corrosion, or obstruction of the drain pan.
If removal is required, disconnect power and label electrical and refrigerant lines. Support heavy components, unfasten mounting bolts, and gently lower assemblies.
Keep fasteners organized and avoid bending coils or damaging insulation; use manufacturer diagrams for reassembly.
Inspecting and exposing the primary and secondary drain pans
If the evaporator coil or blower assembly was removed, the technician should have clear access to the drain area and proceed to expose the primary and secondary pans.
Carefully remove insulation and any obstruction, visually inspect pans for corrosion, standing water, debris, or mold, and note drain line connections.
Photograph findings, measure water level if present, and determine whether cleaning or repairs are required.
Reassembling panels and restoring power after inspection
Reinstall panels and restore power only after confirming the drain pan area is clean, dry, and free of tools or debris.
Tighten fasteners to manufacturer torque where specified, align seals to prevent gaps, and replace insulation removed during service.
Reconnect electrical power at the breaker, then test the unit for proper startup and drainage.
Document any issues and schedule follow-up if leaks or abnormal noises persist.
Cleaning, Inspecting, and Repairing the Drain Pan
The drain pan should be cleaned of sludge, algae, and debris using appropriate brushes and a mild detergent, then disinfected with a recommended solution to reduce future clogs.
The pan must be inspected for rust, cracks, and corrosion, with simple repairs like patching or sealants applied as temporary fixes.
If damage is extensive or persistent leakage occurs, replacement is necessary and the new pan should be chosen for proper fit, material durability, and corrosion resistance.
How to clean sludge, algae, and debris from the pan
Begin by removing standing water and loose debris from the drain pan using a wet/dry vacuum or a sponge. Then scrape away sludge and biofilm with a plastic putty knife or stiff brush to expose the pan surface for cleaning.
- Rinse with clean water to remove loosened material.
- Use a noncorrosive cleaner and scrub gently.
- Clear the drain opening and tubing.
- Dry thoroughly and inspect for damage.
Disinfecting the pan to prevent future clogs (recommended solutions)
Apply an appropriate disinfectant to the drain pan to kill remaining bacteria, algae, and mold that cause clogs and odors.
Use EPA-registered cleaners or a diluted bleach solution (1 part bleach to 10 parts water) applied with a brush, let sit five to ten minutes, then rinse thoroughly.
For ongoing prevention, install antimicrobial strips and schedule quarterly treatments.
Guarantee proper ventilation and safety precautions.
Inspecting for rust, cracks, and corrosion
Inspecting the drain pan for rust, cracks, and corrosion requires a systematic visual and tactile examination to identify areas that compromise drainage or cause leaks.
Check seams, corners, and mounting points for thinning metal, flaking rust, hairline cracks, or pitting.
Probe suspected spots gently with a screwdriver tip.
Note locations and severity, photograph damage for records, and determine whether professional assessment is advisable.
Simple repair options: patching, sealants, and temporary fixes
When minor damage is found in a drain pan, simple repairs such as patching small holes, using waterproof sealants, or installing temporary catch trays can extend service life and stop immediate leaks until professional replacement is possible.
These measures should be chosen based on the material of the pan, size and location of the defect, and whether the repair must withstand standing water or only occasional condensate.
Suitable options include epoxy patches, automotive seam sealer, waterproof tape, and a removable tray positioned beneath active leaks.
Verify surfaces are cleaned and dried before application and monitor repairs regularly for failure.
When replacement is necessary and how to choose a new pan
Determine replacement needs based on structural integrity, corrosion, repeated leakage, or damage that cannot be reliably repaired. A drain pan should be replaced if it has large cracks, extensive rust or pitting, warped sections that impede drainage, or prior temporary fixes that have failed repeatedly.
Select a replacement matching pan dimensions, material (stainless steel or corrosion-resistant plastic), drain alignment, and mounting configuration. Prefer OEM or high-quality aftermarket units.
Drain Lines and Condensate Management
Attention to the condensate drain line is essential for reliable AC operation, beginning with locating and clearing any clogs.
Technicians may use a wet/dry vac, appropriate bleach dilutions, or enzyme cleaners while taking safety precautions, and should inspect the condensate pump and float switch for proper function.
Finally, the drain run should have the correct slope and drip protection to prevent backups and water damage.
Locating and clearing the condensate drain line
Although often out of sight, the condensate drain line is an essential component that prevents water buildup and potential damage.
Technicians should first identify the line’s location by tracing the PVC or flexible tubing from the evaporator pan to its outlet.
Once located, inspect visible sections for kinks, disconnections, or algae buildup.
Clear accessible clogs mechanically, verify proper slope toward the outlet, and check that the termination drains freely.
Using a wet/dry vac, bleach, or enzyme cleaners safely
Begin by powering down the HVAC system and locating the condensate access point before using a wet/dry vac, bleach, or enzyme cleaner to avoid motor damage and chemical exposure.
Wear gloves and eye protection, use the vacuum on low suction, and avoid prolonged bleach contact with plastic.
Rinse lines with water after treatment.
Follow manufacturer instructions for enzyme products and ventilate the area.
Installing or checking the condensate pump and float switch
After clearing and flushing the drain lines, attention shifts to the condensate pump and float switch, components that actively remove condensate when gravity drainage is inadequate.
Inspect the pump for leaks, secure mounting, and unobstructed inlet/outlet.
Test float switch operation by lifting the float; it should trigger the pump or shut off the system.
Replace faulty parts and verify proper electrical connections and discharge routing.
Ensuring proper slope and drip protection
Proper pitch and reliable drip protection keep condensate moving away from the unit and prevent water damage or microbial growth.
The drain line should slope at least 1/8–1/4 inch per foot toward the exit. Use insulated, sealed fittings and a trap where required.
Install a secondary drip pan and overflow switch for safety.
Inspect and clear bends, low spots, or blockages regularly to guarantee flow.
Maintenance Schedule and Preventive Measures
A routine maintenance schedule specifies how often the drain pan and drain line should be inspected and cleaned to prevent blockages and overflow.
A simple seasonal checklist helps homeowners perform timely checks before heavy cooling periods and after winter shutdown.
Long-term upgrades—such as larger drain lines, access ports, or corrosion-resistant pans—can reduce future clogging and extend system life.
How often to inspect and clean the drain pan and drain line
Regular inspections of the drain pan and drain line should occur at least twice a year, with additional checks following heavy use or prolonged high humidity.
More frequent monthly reviews are recommended for older systems or units in damp environments.
Technicians or homeowners should clean or flush the line, remove debris, and dry pans when buildup, slow drainage, odors, or leaks are detected to prevent mold and water damage.
Seasonal checklist for homeowners
Building on biannual and as-needed checks of the drain pan and line, homeowners can follow a concise seasonal checklist to keep an AC unit running efficiently and prevent water damage.
Recommended steps include simple inspections, cleaning, and minor adjustments to avoid clogs and leaks.
- Inspect drain pan for standing water and corrosion
- Clear drain line with compressed air or vinegar
- Check condensate pump operation
- Replace damaged insulation or seals
Long-term upgrades to reduce clogging and corrosion
Several long-term upgrades can markedly reduce drain pan clogging and corrosion while extending system life.
Install a sloped, corrosion-resistant pan (stainless steel or polymer), add a secondary condensate safety switch, and fit a UV-C light to inhibit microbial growth.
Upgrade to a condensate pump with a trap primer and guarantee accessible access panels.
Schedule annual professional inspections for preventative maintenance and timely repairs.
Common Problems and Troubleshooting
The drain pan often reveals the cause when water appears inside the home, with common issues including blocked condensate lines, misaligned pans, or damaged seals. Recommended fixes are straightforward.
Persistent overflow, ice formation on evaporator coils, and frequent clogs can be diagnosed by checking airflow, refrigerant levels, and condensate drain condition.
Unusual odors or visible microbial growth point to biofilm or mold in the pan or lines and require cleaning, disinfecting, and sometimes component replacement.
Water leaking into the home: likely causes and fixes
Water entering the home from an air conditioning system typically signals a problem with drainage or condensate management that requires prompt attention.
Common causes include a clogged condensate drain line, a damaged or misaligned drain pan, disconnected condensate piping, or a blocked secondary drain.
Fixes involve clearing lines, replacing or realigning pans and pipes, and inspecting seals; call a professional for persistent leaks.
Overflow, ice buildup, and frequent clogs: diagnosis steps
Leaks into the home often stem from problems that also cause overflow, ice buildup, and repeated condensate clogs.
Diagnosing these symptoms together saves time and prevents recurring damage. Inspect airflow restrictions, dirty coils, and refrigerant levels; check drain line pitch, trap integrity, and blockages; verify float switch and secondary drain pan function.
Document findings and test after each corrective action.
Strange odors or microbial growth: remediation steps
Addressing strange odors or visible microbial growth requires prompt, targeted remediation to prevent health risks and equipment damage.
Inspect the drain pan, coils, and condensate lines for slime or mold. Wear protective gear, vacuum debris, and scrub surfaces with diluted bleach or EPA-registered biocide.
Flush and clear the condensate line, replace damaged insulation, and consider a UV sterilizer or professional mold remediation for persistent contamination.
Cost Considerations and When to Hire a Pro
Estimated DIY costs for cleaning or replacing a drain pan are typically limited to basic supplies and parts, while professional service can range higher depending on labor and diagnostics.
Choosing a qualified HVAC technician involves checking licenses, insurance, references, and clear experience with drain pan and condensation issues.
Before hiring, homeowners should ask about written estimates, warranty coverage, expected timeline, and whether the contractor will inspect related components like condensate lines and coils.
Estimated DIY costs vs. professional service
Compare expected outlays for a homeowner tackling drain-pan access versus hiring an HVAC professional to decide the most cost-effective route. DIY costs typically include basic tools, replacement tubing or sealant, and time; professionals add diagnosis, labor, and warranty. Minor clogs favor DIY; complex leaks or electrical issues merit a pro.
| Option | Typical Cost | Risk |
|---|---|---|
| DIY | $10–$75 | Low–Moderate |
| Professional | $100–$300+ | Low |
How to choose a qualified HVAC technician
When should a homeowner call a licensed HVAC technician rather than attempt a DIY repair?
Major leaks, electrical issues, refrigerant handling, persistent drainage problems, or unclear causes warrant professional help.
Choose technicians with valid licenses, insurance, and positive local reviews.
Compare written estimates and warranties; weigh service costs against potential damage or inefficiency.
Prioritize certified, experienced contractors for complex or risky work.
Questions to ask a contractor before service
After recognizing scenarios that require a licensed HVAC technician, homeowners should prepare by knowing which questions to ask before service begins, especially regarding costs and when professional work is warranted.
Ask for written estimates, itemized pricing, diagnostic fees, and warranty details.
Confirm licensing, insurance, expected timeline, parts vs. labor costs, and whether preventive maintenance or replacement is more cost-effective.
Quick Reference Checklists
A concise set of checklists helps guarantee safe, efficient access to the drain pan by listing pre-access safety steps and required tools.
A separate step-by-step checklist guides removal, cleaning, and reassembly to prevent errors or damage.
A third checklist highlights warning signs that warrant immediate professional attention.
Pre-access safety and tool checklist
Before opening the service panel, confirm a concise checklist: power to the unit is isolated and locked out, personal protective equipment (gloves, safety glasses) is worn, voltage tested, and area cleared of trip hazards and standing water.
Tools and items should be staged and verified:
- Multimeter for voltage checks
- Insulated hand tools
- Flashlight or headlamp
- Towels/containers for water collection
Step-by-step access and cleaning checklist
With power confirmed isolated and tools staged, proceed to access the drain pan following a concise step-by-step checklist.
The technician inspects, removes panels, clears debris, and confirms proper drainage. Follow these four actions:
- Remove access panel and shield carefully.
- Inspect and scoop debris; vacuum residue.
- Flush pan and drain with distilled water or mild solution.
- Reassemble, test drainage, and document condition.
Signs that require immediate professional attention
When the drain pan shows signs beyond routine dirt or minor standing water, the technician should flag the unit for immediate professional intervention.
Indicators include persistent overflow, foul odors suggesting microbial growth, visible corrosion or rust holes, and recurrent clogging despite standard cleaning.
All of these can signal serious leaks, mold, or compromised condensate management requiring skilled diagnosis and repair.
- Persistent overflow
- Foul, musty odors
- Corrosion or holes
- Recurrent clogs despite cleaning
Conclusion
Like a quiet reservoir beneath a house, the drain pan cradles the air conditioner’s hidden life. Inspecting it is akin to tending a small pond: clear the leaves, seal the cracks, and watch for new ripples of trouble. Regular care keeps the water flowing where it should, preventing storms inside the walls. When repairs exceed routine chores, a skilled hand can restore balance, returning comfort and calm to the home’s inner landscape.