How to Install an Outside Faucet: Step-By-Step Guide for Beginners With Tools, Parts & Tips
Installing an outside faucet allows you to easily access water for outdoor tasks like gardening and irrigation. To install one, you need to shut off the water supply, cut and prepare the supply pipe, add a shutoff valve or adapter, and attach the spigot using appropriate fittings. Essential tools include wrenches, a drill, a tube cutter, and safety gear, while materials consist of the faucet (consider frost-free or anti-siphon options), pipe, fittings, and insulation. Be sure to follow local plumbing codes, check for leaks, and ensure proper freeze protection. Continue reading for a detailed step-by-step guide and helpful tips.
What an Outside Faucet Is and Why You Might Install One
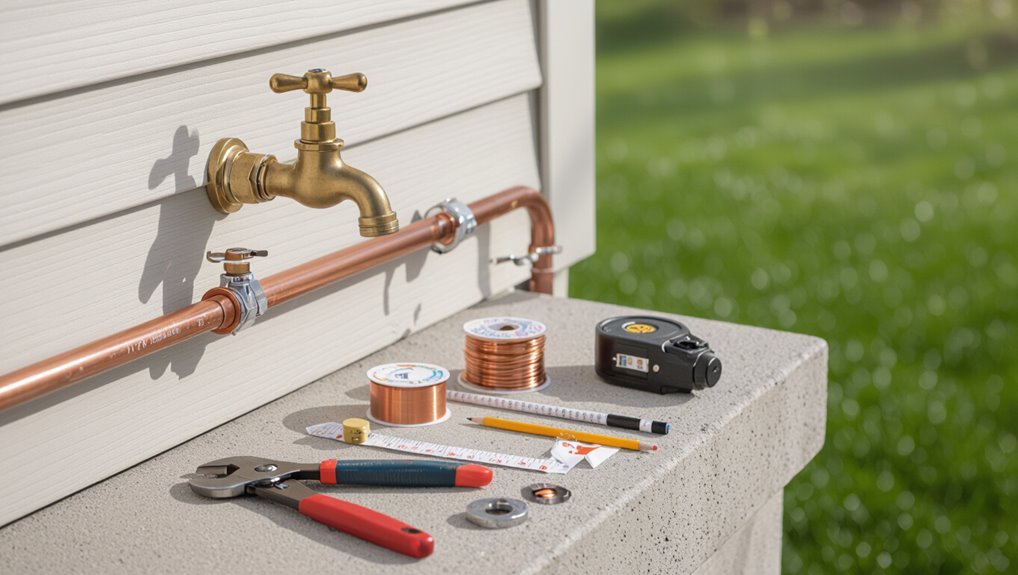
An outside faucet is an exterior plumbing fixture that comes in several types—standard hose bibbs, frost‑free models for cold climates, and anti‑siphon valves that prevent backflow.
Homeowners often install or replace them to add outdoor water access, fix leaks or freeze damage, or meet updated safety standards.
Basic plumbing practices and local code requirements, such as proper shutoff placement and freeze protection, should be considered before starting work.
Types of outside faucets (hose bibb, frost-free, anti-siphon)
Several common outside-faucet styles serve different needs: the simple hose bibb for basic watering, the frost-free model for cold climates, and the anti-siphon version to prevent backflow contamination.
Each type affects materials, placement, and installation steps, so selecting a suitable model is an early decision when learning how to install an outside faucet.
Match choice to climate, code, and usage.
Common reasons to install or replace an outside faucet
Choosing the right style of outdoor spigot often leads homeowners to contemplate why one is needed in the first place.
Typical reasons include convenient garden and vehicle washing access, adding water for irrigation or pets, replacing leaking or corroded valves, upgrading to frost‑free or anti‑siphon models for freeze protection and backflow prevention, and installing additional outlets to serve new landscaping or outdoor appliances.
Basic plumbing and code considerations to know first
A basic outside faucet, also called a hose bib or spigot, is a wall‑mounted valve that provides an accessible connection to the household water supply for outdoor use.
Installers must consider frost protection, shutoff location, pipe material, and slope for drainage.
Local codes may require backflow prevention, freeze‑proof models, permits, or licensed plumbing.
Compliance guarantees safety and avoids fines.
Quick Overview: Installing an Outside Faucet in Minutes (Direct Answer)
The installation consists of shutting off the water, cutting and fitting a supply line to the new spigot, securing the faucet to the exterior wall, and testing for leaks.
A straightforward replacement or new install typically takes 30–90 minutes for a homeowner with basic plumbing skills; novices may find it moderately challenging.
A professional should be called if the job requires rerouting main supply lines, working near a water meter, or when local code permits and permits are unclear.
One-sentence summary of the installation process
Install an outdoor faucet by cutting into the supply line, fitting a frost-proof bib or standard spigot with proper valves and pipe connections, securing the fixture through the exterior wall, and testing for leaks and proper drainage.
The process requires measuring and prepping the wall, assembling compatible fittings, soldering or tightening joints, insulating or slope-testing for winter, and confirming steady, leak-free flow before finishing exterior sealing.
Typical time, difficulty level, and skill required
With the basic steps outlined, an experienced DIYer can typically complete a straightforward outdoor faucet replacement or new frost-proof bib installation in about 1 to 3 hours.
A simple hookup to an existing supply line often runs closer to the shorter end, while running new piping through walls or foundations extends the job.
Moderate plumbing skills, basic tools, and attention to leakproof joints are required.
When to call a pro
Although a skilled DIYer can sometimes fit an outdoor faucet in under an hour, a professional should be called when access is limited, local code or freeze-proof requirements apply, the job involves tapping a main water line or modifying the home’s exterior or foundation, or when persistent leaks, frozen pipes, or complex shutoff arrangements are present.
A pro guarantees compliance, proper insulation, secure connections, and reliable shutoff functionality.
Tools, Materials, and Parts You’ll Need
The following list covers the tools, parts, and materials required to install an outside faucet, starting with an essential tools checklist.
It then outlines common faucet types, fittings, pipe options, and insulation, plus optional items that can simplify the job.
Practical choices—soldering kit versus compression fittings, caulk, and a vacuum or pressure test—are noted where they affect technique and reliability.
Essential tools checklist
Proper preparation reduces delays and mistakes: a concise list of required tools, materials, and replacement parts guarantees the outside faucet installation proceeds smoothly.
Essential hand and power tools plus safety gear streamline work. Select durable, correctly sized items and verify functionality before starting.
- Adjustable wrench
- Pipe wrench or basin wrench
- Drill with masonry bits
- Tube cutter or hacksaw
- Safety glasses and gloves
Parts and materials checklist (faucet types, fittings, pipe, insulation)
After confirming tools and safety gear are on hand, attention shifts to selecting the right parts and materials for the outside faucet installation.
The homeowner should choose a frost-resistant spigot, compatible fittings, correct pipe type and size, shutoff valve, and insulation to prevent freezing. Proper material selection guarantees leak-free, durable results.
- Frost-proof faucet
- Copper or CPVC pipe
- Threaded/adapter fittings
- Inline shutoff valve
- Pipe insulation
Optional items that make the job easier (soldering kit vs. compression fittings, caulk, vacuum test)
Consider adding a few optional items that simplify installation and reduce rework: a soldering kit or quality compression fittings (to match the chosen pipe), silicone caulk or plumber’s putty for watertight exterior seals, and a simple vacuum or pressure test kit to confirm leak-free joints before closing walls.
Also useful: pipe insulation, a deburring tool, flux, spare olives or compression nuts, and a small torch for soldering.
Safety, Permits, and Prep Work
Before any work begins, appropriate safety gear and precautions should be addressed, including eye protection, gloves, and strategies to avoid freeze or burn hazards.
The installer should confirm local plumbing codes and obtain any required permits to guarantee the new faucet meets regulations.
Finally, the water supply must be shut off and lines drained or relieved of pressure to prevent leaks during installation.
Safety gear and precautions
Adequate safety gear and basic precautions reduce the risk of injury and property damage when installing an outside faucet.
The installer should wear safety glasses, gloves, knee pads, and steel-toe boots. Use hearing protection for power tools and a dust mask when cutting or drilling.
Shut off water and electricity nearby, ventilate enclosed spaces, secure ladders, and keep a first-aid kit accessible.
Local code and permit checkpoints
While local building codes and permit requirements vary by jurisdiction, confirming applicable regulations is an essential step before installing an outside faucet.
Consult municipal code, plumbing standards, and permit offices to determine required permits, inspection schedules, backflow prevention, frost‑proofing mandates, and routing restrictions.
Document approvals and keep records.
Noncompliance risks fines, forced removal, and failed inspections; verify before beginning work.
How to shut off and drain the water supply before starting
Shut off the water main and relieve pressure in the line to prevent spills and water damage during the faucet installation.
Locate the nearest shutoff (main or branch), close it, then open an indoor faucet to drain residual water.
If replacing an outdoor spigot, open the existing valve and drain lines.
Use a bucket and towels; verify flow has stopped before cutting or disconnecting plumbing.
Step-by-Step Installation for a Standard (Non-Frost-Free) Outside Faucet
The procedure begins by locating and exposing the interior supply line and shutting off the water.
The installer then cuts and prepares the pipe, fits any required adapter or stop valve, and connects the exterior faucet using the appropriate threaded, soldered, or compression method.
Finally, the wall penetration is sealed and the exposed line insulated to prevent leaks and freezing.
Step 1 Locate and expose the supply line
Begin by identifying where the indoor shutoff or branch valve feeds the exterior wall; this is typically a 1/2″ or 3/4″ copper, CPVC, or PEX line running from the main supply toward the outside.
Trace the line visually or with a stud sensor, remove minimal drywall or sheathing to expose it, and clear insulation and debris to access a solid, unobstructed section for the faucet connection.
Step 2 Cut and prepare the pipe
Cut the supply pipe squarely and remove any burrs or crushed sections to guarantee a clean, reliable joint.
Measure and mark the final length, allowing for fittings and seating depth.
Deburr inside and outside with a round file or deburring tool.
Clean the pipe surface, then apply flux or primer as required for the chosen joining method.
Check alignment before proceeding.
Step 3 Install adapter or stop valve (if needed)
Install an adapter or shutoff valve next if the existing supply needs a threaded changeover or local control; this component allows a secure connection between the house plumbing and the exterior spigot and provides a means to isolate the line for winterizing or repairs.
Select compatible materials (brass for durability), apply thread sealant or tape, position valve for access, tighten securely, and test for leaks before proceeding.
Step 4 Attach faucet using threaded, soldered, or compression connection
With the adapter or shutoff valve in place, the faucet is attached to the supply line using one of three common methods—threaded, soldered (sweat), or compression—selected for compatibility with the existing plumbing and local codes.
Each method requires the correct fittings and tools, a clean joint surface, and a proper seal (thread tape or solder) to prevent leaks and guarantee a secure connection.
For threaded, apply tape and tighten; for soldered, flux, heat, and solder; for compression, insert ferrule and tighten nut to specified torque.
Test by slowly restoring water and checking for leaks, then retighten if needed.
Step 5 Seal wall penetration and insulate the line
After confirming the supply connection is leak-free, attention turns to securing the pipe where it passes through the exterior wall and protecting the exposed line from cold.
Insert a foam backer or pipe sleeve, center the pipe, and apply exterior-grade caulk or expanding foam to seal gaps.
Wrap exposed piping with closed-cell foam insulation and secure with tape or zip ties to prevent heat loss and moisture intrusion.
Step 6 Turn water back on and test for leaks
Open the house shutoff valve slowly and allow water to flow toward the new outside faucet while observing all accessible joints and the faucet body for any signs of leaking.
Inspect soldered, compression, or threaded connections, watching for drips or moisture.
Operate the faucet to check flow and pressure.
Tighten fittings if minor leaks appear; shut off and rework persistent leaks before finishing.
Step 7 Final checks and securing the faucet
Confirm that the faucet and surrounding plumbing are secure and functioning before finishing the job.
Inspect for leaks, tighten mounting screws, and guarantee the supply line and shutoff valve are firm.
Verify proper drainage and handle operation.
Apply pipe insulation or wrap for freeze protection if needed.
Anchor the spout to the wall or siding, clean the area, and document any follow-up maintenance.
Step-by-Step Installation for a Frost-Free Outside Faucet
Frost-free faucets differ from standard valves by locating the shutoff several inches inside the heated wall so water drains clear of the exterior thread.
Proper installation requires maintaining the manufacturer’s setback distance and a slight downward slope toward the interior to guarantee complete drainage.
The following steps cover securing the correct setback, making the interior connection, and adding insulation and tested drainage to prevent freezing.
Why frost-free faucets are different
Because they are designed to shut water back at the warm interior wall rather than at the exterior spout, frost-free faucets have a longer stem and valve mechanism that keep water inside the heated part of the house, preventing freezing and burst pipes.
Their installation requires aligning the extended stem through the wall to guarantee the valve seats inside, reducing maintenance and winter risk.
Proper setback distance and slope requirements
Proper setback distance and a slight downward slope are critical to guarantee the long stem of the frost-resistant faucet drains fully toward the interior shutoff and prevents water pooling in the pipe.
Maintain setback so valve seats inside heated space; typical minimum is 2–3 inches of wall thickness plus stem clearance.
Slope the riser about 1/8–1/4 inch per foot toward the interior for reliable drainage.
Step-by-step connection and insulation for frost-free models
One clear sequence guides the installer through fitting the long-stem valve, connecting the interior shutoff, and insulating the run to prevent freeze damage.
The installer secures the valve stem flush with the exterior wall, ties into the indoor stop with soldered or compression fittings, tests for leaks, then wraps the pipe with closed-cell foam and weatherproof tape, sealing wall penetration and leaving access for maintenance.
Installation Variations by Pipe Type
Different pipe materials require distinct connection techniques when installing an outside faucet.
Copper typically uses soldered fittings, while CPVC and PEX require the correct fittings and installation tools for solvent or crimp connections.
Galvanized or steel lines are usually adapted with threaded fittings or adapters to accept the faucet.
Copper pipe: soldering method
Begin by cutting and fitting Type L or M copper pipe to the faucet location, leaving access for a soldered joint between the supply pipe and the faucet adapter.
Clean and flux joint surfaces, assemble parts, then apply heat evenly with a propane torch until solder flows fully around the connection.
Cool, wipe excess flux, pressure-test for leaks, and insulate the line.
CPVC/PEX: using appropriate fittings and tools
After covering soldered copper connections, attention turns to CPVC and PEX, which require distinct fittings and tools.
CPVC uses solvent-cemented plastic fittings and cutters; guarantee cleaner and primer for secure joints.
PEX relies on crimp, clamp, or push-fit fittings and a proper crimp tool or expansion system.
Always match fittings to pipe type and operating temperature, and test for leaks before finishing.
Galvanized/steel: threaded adapter approach
For galvanized or black steel supply lines, installers typically use threaded pipe adapters to shift from rigid pipe to the faucet’s male or female thread pattern.
They cut and clean the pipe, apply pipe thread sealant or PTFE tape, and screw on a galvanized-to-brass or steel adapter.
Tightening requires two wrenches; verify alignment and test for leaks before burying or insulating the connection.
How to Replace an Existing Outside Faucet
When an outside faucet shows persistent leaks, corrosion, or internal damage, replacement may be more reliable and cost-effective than repeated repairs.
The process begins with safely shutting off and draining the supply, loosening and removing the old spigot without damaging the surrounding pipe or wall, and inspecting the connection for corrosion or threads that need attention.
Selecting a compatible replacement based on pipe material and connection type and following proper sealing and mounting procedures guarantees a durable reinstallation.
When replacement is better than repair
If persistent leaks, extensive corrosion, repeated failures, or obsolete valve designs make reliable performance unlikely, replacement of an outside faucet is usually the more practical choice than repair.
Replacement restores reliable sealing, modern freeze-resistant features, and compatible plumbing standards. It avoids recurring downtime and hidden damage, often proving cost-effective long term versus patching worn seats, stems, or compromised bodies.
Removing the old faucet safely
Shut off the water supply at the main or the isolated shutoff, then open the outdoor faucet to drain remaining pressure before beginning removal.
Wear gloves and eye protection.
Loosen connections with proper wrenches, cut soldered or corroded joints if necessary, and support piping to prevent strain.
Remove mounting fasteners, extract the valve assembly, and inspect surrounding pipe and wall for damage before cleanup.
Choosing the right replacement and reinstallation steps
Selecting the correct replacement faucet and following a proper reinstallation sequence guarantees a watertight, durable repair.
The technician verifies pipe type, thread size, and pressure rating, choosing frost-proof or compression models as appropriate.
During reinstallation, they apply thread sealant, torque fittings to spec, support the valve body, test for leaks, and insulate exposed piping to prevent freeze damage and prolong service life.
Common Problems, Causes, and How to Fix Them
Common problems with outside faucets include leaks at the connection, reduced or no water flow, and damage from freezing.
Each issue typically has a distinct cause—worn seals or loose fittings for leaks, blockages or closed/shut valves for low flow, and ice expansion for burst pipes—and requires different remedies.
The following sections outline how to diagnose each problem quickly and explain practical repair and prevention steps.
Leaks at the faucet connection and repair options
Leaks at the faucet connection often stem from worn seals, loose fittings, or corrosion where the spigot meets the supply line. Addressing them promptly prevents water waste and structural damage.
Inspect packing nut, hose bib threads, and supply adapter. Tighten fittings, replace degraded washers or O-rings, apply thread seal tape, or swap a corroded spigot.
Test for residual leaks and retighten as needed.
Low flow or no water: diagnosing blockages and valves
When water barely trickles or fails to flow at an outdoor faucet, the issue usually traces to a restricted passage or a closed/partially closed valve—both of which can be identified and resolved with a few diagnostic steps.
Inspect shutoff and isolation valves, open fully, then test flow.
Remove aerator or hose bib screen, clear debris, flush lines.
Replace faulty valve cartridges or corroded sections.
Frozen or burst pipes: emergency steps and prevention
Act quickly: frozen pipes can crack and burst as ice expands, turning a minor chill into major water damage.
Shut main shutoff, open faucets to relieve pressure, and gently thaw with hair dryer or warm towels—never open flame.
Inspect for leaks; if burst, call plumber and shut water.
Prevent by insulating outdoor lines, draining hoses, and closing indoor valves before freezing weather.
Cost Estimates and Time Expectations
A concise cost and time overview helps homeowners decide whether to attempt the project or hire help.
Typical DIY expenses are broken down into parts (faucet, fittings, pipe, sealant) and occasional tools, while professional installation commonly ranges by region and complexity.
Estimated duration varies from a couple of hours for an experienced DIYer to half a day or more for a beginner.
Typical DIY cost breakdown (parts vs. tools)
Budget clarity helps set realistic expectations: typical DIY installation of an outside faucet splits costs between consumable parts (valve, spigot, fittings, pipe, sealants) and reusable or infrequently purchased tools (pipe cutter, soldering kit, wrenches, trenching tools).
Consumables commonly total $20–$80; basic tools often add $30–$150 if not already owned.
Estimate modest extras for connectors and replacement parts.
Professional installation cost range
For homeowners who prefer hiring a pro rather than tackling the consumables-and-tools split themselves, expect a notably higher outlay that reflects labor, service calls, and contractor overhead. Typical regional ranges vary; basic installs run lower, complex replacements with trenching cost more. See concise comparison:
| Service Level | Typical Cost | Notes |
|---|---|---|
| Basic install | $100–$250 | Minimal work |
| Standard | $250–$500 | Includes seal/trim |
| Complex | $500–$1,200+ | Excavation, repairs |
Estimated time for beginner vs. experienced DIYer
Many projects take between one afternoon and a full weekend depending on skill level and scope: an experienced DIYer can often complete a straightforward outside faucet swap in 2–4 hours, while a beginner should plan for 6–12 hours to account for learning, measuring, and unexpected snags.
Time varies with access to pipes, need for insulation or new lines, permit requirements, and weather delays.
Maintenance, Winterizing, and Longevity Tips
Proper seasonal care and simple upkeep preserve an outside faucet and the connected exterior plumbing.
The section outlines steps to winterize spigots, a concise routine maintenance checklist, and practical tips on materials and usage that extend service life.
Following these measures reduces freeze damage, leaks, and premature replacement.
How to winterize an outside faucet and exterior plumbing
Winterizing an outside faucet protects exterior plumbing from freeze damage and costly repairs by draining water, insulating exposed components, and shutting off supply lines where available.
Close indoor shutoff, open exterior valve to drain, detach hoses, and drain spigots.
Install insulated faucet covers, wrap exposed pipes with foam or heat tape, and check for leaks.
Reopen and test in spring.
Routine maintenance checklist
After winterizing and confirming the exterior supply is drained and insulated, a brief routine maintenance checklist helps preserve faucet function and prevent future problems.
Inspect for leaks, test operation, clear aerator and spout, lubricate packing or washers, and check shutoff valve access. Perform these tasks seasonally and after freezes to catch issues early.
- Inspect for drips or corrosion
- Operate and listen for stiffness
- Clean aerator and spout
- Lubricate seals and packing
- Verify shutoff valve and drain access
Extending the life of your faucet (materials and usage tips)
Preserve an outdoor faucet’s service life by choosing durable materials and adopting mindful usage habits: opt for brass or stainless-steel fittings, install a frost-proof spigot where winters are harsh, use high-quality rubber or silicone washers, and avoid overtightening handles to prevent premature wear.
Regularly drain and insulate supply lines, lubricate valve stems annually with plumber’s grease, and replace corroded parts promptly to prevent leaks.
Common Mistakes to Avoid
Common errors include installing frost-free faucets with incorrect slope or setback, which compromises freeze protection.
Using incompatible fittings for the pipe material can cause leaks or corrosion.
Neglecting to insulate and properly seal wall penetrations invites heat loss and water entry.
Improper slope or setback for frost-free faucets
Improper slope or setback on a frost-free faucet installation can allow water to collect in the valve and freeze, defeating the faucet’s design and risking burst pipes.
Installers should guarantee the faucet pitches slightly toward the exterior and that the valve stem extends sufficiently into the heated interior.
Incorrect placement or insufficient setback negates frost protection and increases maintenance, repair costs, and leak risk.
Using wrong fittings for pipe material
Selecting incompatible fittings for the pipe material can compromise connections, cause leaks, and accelerate corrosion.
Installers who mix dissimilar metals, wrong-size threads, or inappropriate solvent-weld versus compression fittings risk failures.
Use fittings rated for the pipe type (copper, CPVC, PEX, galvanized) and match thread types and sizes.
Verify compatibility, follow manufacturer guidance, and test joints before burying or finishing the installation.
Failing to insulate or seal wall penetrations
Mistakes with fittings often lead installers to focus on visible joints while overlooking the hole where the pipe enters the wall. Leaving that penetration uninsulated or unsealed invites heat loss, drafts, moisture intrusion, and pest access.
Proper practice uses foam backer, expanding low‑pressure spray, or pliable caulk around the pipe, plus insulation wrap, to maintain thermal barrier and prevent leaks, rot, and vermin entry.
Comparison of Popular Outside Faucet Models and Features
A concise comparison of outside faucet models helps readers weigh freeze-resistance, backflow prevention, and handle type against budget. Recommended options span budget, mid-range, and premium tiers to match different needs and climates. The table below summarizes key features for quick reference.
| Model / Tier | Notable Feature |
|---|---|
| Budget | Basic freeze-resistant design |
| Mid-range | Integrated backflow prevention |
| Premium | Full freeze-proof, premium handle options |
| Bonus | Warranty and material notes |
Key features to compare (freeze-resistance, backflow prevention, handle type)
When comparing outside faucet models, three features most directly affect performance and longevity: freeze resistance, backflow prevention, and handle type.
Freeze-resistant designs reduce burst risk in cold climates.
Backflow prevention protects potable water from contamination and may be code-required.
Handle type (lever, wheel, frost-proof) influences ease of use, durability, and repair complexity; choose based on climate, code, and user needs.
Recommended models for budget, mid-range, and premium needs
Several reliable outside faucet models suit distinct budgets and priorities, grouped here as budget, mid-range, and premium options to simplify selection.
Budget: Frost-free spigots like the Mueller or Woodford economical models provide basic freeze resistance and solid value.
Mid-range: Signature Hardware and Keeney offer enhanced materials, backflow features, and better handles.
Premium: Watts and Rohl deliver superior freeze protection, durable finishes, and warranty support.
Troubleshooting Guide: Quick Checks and Solutions
For a dripping outside faucet, a concise checklist directs inspection of the packing nut, washer or cartridge, and supply pressure.
If the faucet will not shut off, the checklist prioritizes shutting the water at the stop valve, checking for damaged seals or stuck stems, and isolating the line.
Guidance also distinguishes temporary measures—like tightening or using a rubber washer for immediate control—from permanent repairs such as replacing the valve or cartridge.
Checklist to run if the faucet drips
Begin by isolating the source of the drip and confirming whether it is constant or only when the valve is partly open.
Check tightness of packing nut and handle, inspect washer or cartridge for wear, and examine seat and stem for corrosion.
Verify inlet shutoff is fully closed and supply debris is absent.
Replace worn seals, lubricate moving parts, then retest for leaks.
Checklist to run if the faucet won’t shut off
Diagnose the cause methodically when an outside faucet refuses to shut off:
Check whether the handle turns fully to the off position.
Confirm the inlet shutoff inside the house is closed.
Observe if water continues only under pressure or constantly.
Inspect handle linkage and packing nut for wear or debris.
Verify frozen pipe relief is closed.
Look for visible leaks at valve stem.
Confirm supply line integrity.
When temporary fixes are acceptable vs. permanent repairs
Weigh the urgency, safety, and expected lifespan of a fix before choosing between a temporary patch and a permanent repair.
Temporary fixes suit off-season, low-pressure leaks or emergency shutoffs to prevent water damage; they are not for structural failures, major corrosion, or frost-prone lines.
Permanent repairs are required for reliability, code compliance, and long-term cost efficiency.
Always plan timely replacement when risk persists.
Final Steps Before Calling a Professional
Before contacting a plumber, the homeowner should gather clear photos, note the pipe material, and record relevant measurements.
They should prepare a concise list of questions about experience, warranty, and estimated timeline.
Comparing written quotes and checking what each includes will help determine the best professional option.
What information to gather for a plumber (photos, pipe type, measurements)
Gather clear, specific information to help the plumber assess the job quickly and accurately.
Provide photos of the exterior wall, access points, and any visible valves.
Note pipe material (copper, PVC, PEX), diameter, and orientation.
Measure distance from interior supply, wall thickness, and height of desired spout.
Include any water shutoff locations and recent leak history for faster evaluation.
Questions to ask and quotes to compare
With photos, measurements, and pipe details in hand, the homeowner should prepare a concise list of questions to ask potential plumbers and a framework for comparing quotes.
Compare price, timeline, warranty, license/insurance, and materials. Ask about permits, unforeseen costs, exact scope, references, and cleanup.
Evaluate written estimates side-by-side for exclusions and payment terms before hiring.
- Price and materials
- Timeline
- Warranty and permits
- Licensing and insurance
- References and cleanup
Conclusion
A finished outside faucet stands like a small sentinel at the house’s edge, ready to tame summer gardens and winter chores alike. After careful prep, the new spigot should sit true and leak-free, its threads snug as a promise. If issues persist, a patient check of seals and valves often reveals the culprit; otherwise a seasoned pro can steady the scene. With routine care, the fixture will serve faithfully for years.