How to Drill Stainless Steel Tube: Step-by-Step Techniques, Tools & Tips for Clean Holes
To drill stainless steel tube effectively, use low speeds, maintain a steady feed, and utilize sharp cobalt or carbide bits along with continuous cutting fluid. This approach helps prevent work hardening and heat buildup. Secure the tube with rigid fixturing, and support thin walls with backing to ensure stability. Begin with a centered pilot hole, progressively increase drill sizes, or employ peck cycles for deeper cuts, and remember to clear chips frequently. Finally, deburr and inspect the holes for accuracy. Following these techniques will minimize tool wear and yield clean, leak-free holes.
Overview of Drilling Stainless Steel Tubing: What to Expect
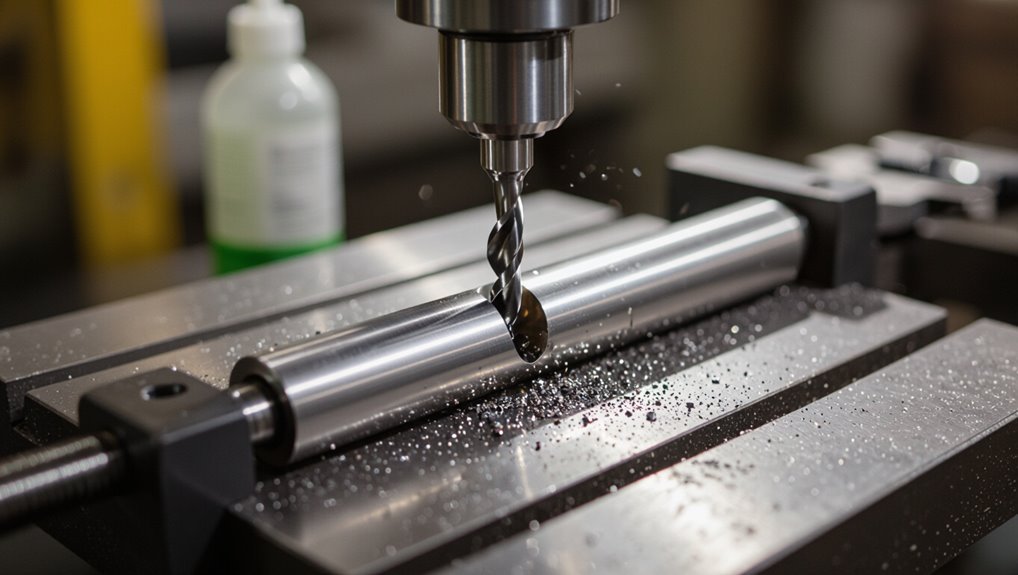
Drilling stainless steel tubing presents challenges due to the material’s hardness, work hardening tendency, and heat buildup that can blunt tools and distort holes.
It is commonly required in applications such as fluid lines, exhaust systems, and structural assemblies where clean, burr-free holes are critical for sealing and fit.
A safe, effective approach typically uses sharp, coated drills, controlled speeds with coolant, proper clamping, and step-drilling or pecking techniques to manage chips and temperature.
Why drilling stainless steel tube is challenging
Cutting through stainless steel tubing demands respect because its alloyed composition and work-hardening tendency combine to make holemaking unusually difficult.
Operators learning how to drill stainless steel tube face issues: rapid tool wear, heat buildup, chip welding, and surface work-hardening ahead of the bit.
Controlled speeds, rigid setups, proper lubricants, and carbide tooling mitigate problems, but patience and correct technique remain essential for consistent holes.
Typical applications and when you need clean holes
When strength, corrosion resistance, and dimensional precision are required together, stainless steel tubing is used in applications—from chemical processing and medical devices to aerospace and architectural projects—where clean, burr-free holes are critical for function and assembly.
Clean holes enable leak-free fittings, reliable fastener engagement, smooth fluid flow, and fatigue resistance in structural joints. Industries demand tight tolerances, repeatability, and minimal rework.
Quick summary of safe, effective drilling steps
Begin with careful preparation: select proper tooling (carbide or cobalt drills, pilot bits, and countersinks), secure the tube with a clamping method that prevents crushing, and mark hole locations precisely.
Use low speed, steady feed, and cutting fluid. Start with a pilot hole, increase to final size, deburr and countersink as needed, inspect for accuracy, and relieve stresses before installation.
Choosing the Right Tools and Materials
Selecting appropriate tools and materials is critical for clean, accurate holes in stainless steel tube.
Discussion will cover recommended drill bit types and coatings, the trade-offs between drill press and handheld drilling, suitable cutting fluids, and secure clamping and fixturing methods.
Safety considerations, including personal protective equipment and an organized workshop layout, will also be addressed.
Recommended drill bit types and coatings
Choose drill bits engineered for hardness and heat resistance to cut stainless steel efficiently and minimize workhardening. Recommended types and coatings optimize life and finish.
- Cobalt (HSSE) bits — withstand heat, retain edge for stainless.
- Carbide-tipped — superior for abrasive or thick sections; fragile if misused.
- TiN/TiAlN coatings — reduce friction and increase heat resistance for longer runs.
Drill press vs. handheld drill: pros and cons
After selecting bit types and coatings suited to stainless steel, the decision between a drill press and a handheld drill shapes accuracy, repeatability, and operator ergonomics. A drill press offers stable alignment, consistent speed, and safer clamping. A handheld drill provides portability and access to awkward positions but requires steady control and care to avoid wander or torque kickback.
| Drill Press | Handheld Drill |
|---|---|
| High accuracy | Portable use |
| Stable clamping | Flexible access |
| Consistent speed | Requires operator steadiness |
| Better repeatability | Risk of wander |
Required cutting fluids and lubricants
Proper lubrication is essential when drilling stainless steel to control heat, reduce workhardening, and extend drill life.
Recommended fluids include high-quality soluble oils, synthetic coolants, and heavy-duty cutting oils with extreme-pressure additives. Apply lubricant steadily at the point of cut, replenishing during pauses.
Avoid water alone; prioritize lubricity and corrosion protection. For small tubing, consider aerosol cutting compounds for precise delivery.
Essential clamps, fixtures and tube-holding solutions
A handful of reliable clamps, fixtures, and tube-holding solutions form the foundation for accurate, safe drilling of stainless steel tubing.
Proper restraint prevents slipping, distortion, and chatter while ensuring concentricity and repeatable results.
- V-blocks with soft jaws for round tubes.
- Collet-style tube clamps for precise centering.
- Adjustable angle fixtures for compound drilling.
Personal protective equipment and workshop setup
Several essential items protect the operator and preserve work quality when drilling stainless steel tubing: safety glasses or a face shield, cut-resistant gloves, hearing protection, and a respirator or dust mask suited to metal fines and coolant mist.
A well-lit, ventilated workspace, stable bench, bench vise or tube clamp, coolant supply, chip tray, and fire extinguisher complete a safe, efficient setup.
Preparing the Stainless Steel Tube for Drilling
Preparation begins with specifying tube wall thickness and alloy grade to set drilling speeds and tooling.
Accurate layout using templates and center punches guarantees hole placement, while secure clamping—v-blocks, soft jaws, or sacrificial supports—prevents distortion or movement.
For thin-walled tubes consider backing or reduced feed to avoid collapse; for thick-walled sections plan pilot holes and higher cutting forces.
Selecting tube wall thickness and material grades to anticipate
Many fabricators evaluate tube wall thickness and alloy grade together, because both factors directly affect drill selection, speed, and anticipated tool wear.
Thicker walls require more robust drills, slower feeds, and pecking cycles; thin walls risk collapse and require backing or support.
Austenitic grades (304/316) work-harden; ferritic and martensitic grades drill cleaner but may be harder.
Specify grade and thickness before tooling choices.
Marking and centering holes accurately (center punches and templates)
Before drilling, accurately marking and centering hole locations secures tool alignment and prevents wandering or off-center entries.
Use scribed lines, layout punches, or adhesive templates to transfer patterns. For round tubes, wrap paper templates and align seams; for multiple holes, employ center punches or automatic punches to create dimples.
Verify measurements with calipers and a square before drilling to confirm concentricity.
Securing the tube: v-blocks, soft jaws, and sacrificial supports
Once center marks are made, the tube must be held rigidly to prevent rotation, vibration, or movement that would ruin hole location and drill life.
Use hardened v-blocks for cylindrical support, soft jaws or aluminum fixtures to protect finished surfaces, and sacrificial backing plates to prevent burrs and exit deformation.
Clamp evenly, align axially, and verify stability before drilling to guarantee clean, accurate holes.
Pre-drilling considerations for thin-walled vs. thick-walled tubes
Different wall thicknesses require distinct preparation: thin-walled stainless tubes need support to prevent collapse or distortion, while thick-walled tubes demand greater force, slower feed rates, and heat management.
The operator should choose internal mandrels or backing, light pilot holes, and sharp, high-speed tooling for thin walls.
For thick walls use rigid fixturing, smaller step drills, increased coolant, and intermittent peck drilling to control heat and chip load.
Step-by-Step Drilling Process for Clean Holes
The section outlines a concise, practical sequence for producing clean holes in stainless steel tube, starting with pilot hole technique and recommended pilot sizes.
It then covers progressive bit sizing with peck cycles, suggested RPM and feed rates for common alloys, and the importance of cutting fluid and consistent lubrication.
Finally, it emphasizes heat control and strategies to prevent work hardening.
Step 1 Pilot hole technique and ideal pilot sizes
Begin by marking and centering the pilot point accurately. Then drill a small-diameter pilot hole to guide larger bits and reduce wandering and burring.
Use carbide or cobalt-tipped bits, low speed, steady feed, and cutting lubricant. For tubes under 6 mm wall thickness, start with 1.5–2.5 mm pilots; for thicker walls, 3–4 mm.
Deburr lightly after piloting.
Step 2 Progressive bit sizing and peck drilling cycles
Progressively enlarge the pilot with a sequence of increasing-diameter bits, advancing no more than one drill size at a time to minimize heat, vibration, and work hardening of the stainless surface.
Use carbide or cobalt bits, apply steady moderate pressure, and withdraw periodically to clear chips.
Employ peck cycles for deep holes: short advances, full chip removal, coolant refresh, and brief dwell to prevent clogging and overheating.
Step 3 Recommended speeds (RPM) and feed rates for common alloys
Because stainless steels vary widely in hardness and thermal conductivity, recommended spindle speeds and feed rates must be chosen specifically for the alloy and drill geometry to avoid work hardening and tool failure. Practical guidance follows: select lower RPM and higher feed for duplex and precipitation‑hardening grades; a moderate balance suits 304/316. Reference table for quick selection:
| Alloy | Suggested range |
|---|---|
| 304/316 | 50–120 SFM |
| 410/420 | 30–60 SFM |
| Duplex | 20–50 SFM |
| PH grades | 15–40 SFM |
Step 4 Applying cutting fluid and maintaining lubrication
Apply a suitable cutting fluid continuously to reduce friction and carry heat away from the drill, paying special attention to the point and lips where temperatures and wear concentrate.
Use high-quality soluble oil or synthetic coolant, apply via nozzle or brush, and replenish frequently.
Maintain a steady lubricant flow, prevent chip adhesion, and guarantee consistent coverage during pecking or steady feeds to prolong tool life and improve hole quality.
Step 5 Controlling heat and avoiding work hardening
Manage temperature carefully to prevent localized work hardening and preserve drill life.
Reduce speed, use pecking cycles, and apply consistent cutting fluid to dissipate heat.
Pause to allow cooling when chips glow or resistance increases.
Use sharp, carbide or cobalt drills and avoid excessive feed that work-hardens stainless.
Monitor progress and adjust parameters to maintain steady, low-temperature cutting conditions.
Step 6 Deburring and finishing inner and outer edges
Inspect the drilled hole and surrounding surfaces for burrs, raised lips, or torn edges before proceeding to finish; removing these imperfections promptly guarantees safe handling, accurate part fitment, and proper sealing.
Use deburring tools—rotary countersinks, hand reamers, or ceramic stones—working light passes to avoid enlarging the bore.
Finish edges with fine emery or Scotch-Brite for uniform radii and corrosion-resistant surfaces.
Variations and Advanced Techniques
The section compares through-hole and blind-hole approaches, noting when each is preferred for tubing wall thickness and access constraints.
It then outlines higher-precision options—boring and reaming—and practical tooling like step drills and hole saws suited to stainless tubing.
Finally, it covers bit maintenance: sharpening, restoring coatings, and techniques to extend drill life under hard-material conditions.
Through-hole vs. blind-hole strategies
Differentiate between through-hole and blind-hole approaches based on access, chip evacuation, and tolerance requirements:
Through-holes pass completely through the tube and simplify chip removal and coolant flow, while blind-holes terminate within the wall and demand strict control of depth, tooling engagement, and heat buildup.
For blind-holes, use peck drilling, rigid fixturing, and reduced feeds to prevent burrs, workhardening, and tool deflection.
Boring and reaming for precision diameters
Expand drilling practice into precision sizing by employing boring and reaming to achieve tight diameters and improved surface finishes.
Boring corrects hole position and enlarges to near-net size with rigidity and slow feeds.
Reaming follows for exact tolerance and smooth finish, using appropriate HSS or carbide tools, light cuts, lubrication, and minimal runout.
Inspect diameters and finishes with calibrated gauges.
Using step drills and hole saws on stainless tubing
Building on boring and reaming for tight tolerances, step drills and hole saws offer faster, practical alternatives for creating a range of hole sizes in stainless tubing where absolute precision is less demanding or where access and speed matter.
Use high-quality HSS or cobalt step bits, pilot drills with hole saws, low feed and steady coolant, backing supports to prevent collapse, and slow speeds to minimize workhardening.
Drill sharpening, coating repair, and extending bit life
Sharpening and restoring drill bits, repairing or reapplying coatings, and adopting wear-reducing practices greatly prolong tool life when drilling stainless tubing.
Proper flank and chisel sharpening restores geometry; inspect and remove heat-damaged metal before recoat.
Reapply TiN/TiAlN by localized thermal or shop recoating services.
Use lower speeds, steady coolant, peck drilling, and work-hardened metal monitoring to minimize wear and prevent premature failure.
Common Problems and How to Fix Them
Common drilling issues with stainless steel tubing include bit wandering and off-center holes, work hardening and bit glazing, tube collapse or deformation, and torn edges, burrs, or irregular hole shapes.
Each problem has specific causes—improper clamping or pilot holes, excessive heat or slow feeds, insufficient support, and dull or wrong-geometry tools—that require targeted fixes.
The following section outlines practical prevention and repair steps for each fault.
Preventing bit wandering and off-center holes
Preventing bit wandering and off-center holes requires controlling the drill’s entry point and stabilizing the workpiece; without that, even a sharp bit can skate across stainless steel before it bites.
Use a center punch or spotting drill, clamp the tube firmly with sacrificial pads, employ a drill press or guide block, and run slow speeds with steady feed to maintain alignment and accuracy.
Addressing work hardening and bit glazing
Work hardening and bit glazing are frequent obstacles when drilling stainless steel because repeated cutting or excessive heat transforms the surface into a tougher, work-hardened layer and deposits smeared metal on the flutes, reducing cutting action.
Remedies include using sharp carbide or cobalt bits, light pecking with frequent chip clearance, reduced spindle speed, ample cutting fluid, and occasional resharpening or tool replacement to restore effective cutting.
Dealing with tube collapse or deformation
Avoiding tube collapse requires controlling the forces and support conditions during drilling, because thin-walled stainless steel tubes will easily ovalize, fold, or crumple when the cutting thrust, clamping pressure, or unsupported span is excessive.
Use proper internal mandrels, backing blocks, and soft clamps to distribute pressure.
Reduce feed, use pilot holes, and peel-cut with sharp tooling.
Inspect and re-support before enlarging holes.
Fixes for torn edges, burrs, and irregular hole shapes
Repair torn edges, remove burrs, and correct irregular hole shapes by using a sequence of light reaming, deburring, and supported reshaping techniques tailored to thin-walled stainless steel.
Use a low-speed reamer with coolant, then gently file or use a carbide deburring tool.
Support the tube internally while reshaping with a mandrel.
Finish with a Scotch-Brite pad and inspect for roundness and burr-free edges.
Maintenance, Safety, and Best Practices
Proper maintenance and storage of drills and chucks extends tool life and guarantees consistent performance.
Safe chip handling and environmentally responsible coolant disposal protect personnel and facilities.
Regular inspection of hole quality and use of a concise checklist promote repeatable, high-quality drilling results.
Tool maintenance and storage to prolong life
Regular inspection and routine care preserve drill bits, chucks, and guides used on stainless steel, reducing wear and maintaining cutting performance.
Clean debris after each use, remove moisture, and apply light corrosion inhibitor.
Sharpen or replace dull bits promptly.
Store tools in labeled, padded cases or racks to prevent impact and contamination.
Log usage and maintenance to track lifespan and schedule servicing.
Safe handling of chips and coolant disposal
Manage metal chips and coolant with care to prevent injury, contamination, and environmental harm.
Operators should use brushes, chip hooks, and PPE when clearing swarf; avoid hands near cutters.
Collect chips in designated containers; segregate oily, stainless, and mixed waste.
Store used coolant in labeled tanks, filter, and recycle when possible.
Dispose of remaining coolant per local hazardous-waste regulations to guarantee compliance.
Inspection and quality checks for drilled holes
Inspect drilled holes immediately after machining to verify dimensions, surface finish, and absence of defects that could compromise fit or corrosion resistance.
Visual inspection, measurement, and documentation guarantee conformance to specifications and detect burrs, cracks, or wrong tolerances.
Use calibrated gauges and non‑destructive methods for critical parts, remove burrs, and record results for traceability.
- Visual and dimensional checks
- NDT for critical flaws
- Deburring and documentation
Checklist for repeatable, high-quality drilling operations
Having completed verification and documentation of drilled holes, attention turns to a concise checklist that guarantees repeatable, high-quality drilling operations through maintenance, safety, and best practices.
Verify tool condition and sharpen drills, confirm correct speeds/feeds, secure workpieces and fixtures, maintain coolant flow, inspect alignment, log parameters and outcomes, enforce PPE and guard use, schedule preventive maintenance, and review procedures after anomalies.
Comparison of Methods and When to Outsource
A brief comparison weighs cost, time, and expected quality between DIY drilling and hiring professional services.
For simple or occasional holes, shop tools may be economical, while complex geometries, tight tolerances, or high-volume runs often justify CNC machining or laser/punch services.
Outsourcing becomes preferable when precision, consistency, or throughput requirements exceed in-house capabilities.
Cost, time, and quality comparison of DIY vs. professional services
| Factor | DIY vs Professional |
|---|---|
| Cost | Lower vs Higher |
| Time | Slower vs Faster |
| Quality | Variable vs Consistent |
| Volume | Small vs Large |
When to use CNC machining or laser/punch services
Choose CNC machining when tight tolerances, complex 3D contours, or threaded features are required; opt for laser cutting or turret punching for high-speed, flat-part production with repetitive hole patterns and minimal secondary machining.
CNC suits prototypes, small runs, and mixed operations; lasers excel at intricate flat profiles and burr-free cuts; punching is fastest for large volumes with simple geometry.
Consider lead time, cost, and finish.
Quick Reference Cheat Sheets
The article presents compact cheat sheets that list recommended RPM and feed rates for common stainless grades.
It also summarizes drill bit choices by material and geometry for quick selection.
A final sheet gives troubleshooting steps and fast remedies for chatter, work hardening, and broken bits.
RPM and feed rate quick chart for common stainless grades
When drilling stainless steel, selecting appropriate spindle speed and feed per revolution is critical to balance tool life and hole quality; the quick-chart provides recommended RPM and feed rates for common austenitic, ferritic, and martensitic grades, indexed by drill diameter and tooling material. Recommended settings:
| Diameter (mm) | RPM (HSS/Cobalt) | Feed (mm/rev) |
|---|---|---|
| 3 | 3000 / 4000 | 0.02 |
| 10 | 900 / 1200 | 0.08 |
Drill bit selection quick guide
Several concise cheat sheets help match drill bits to stainless tube tasks by summarizing material grade, hole size, drill geometry, and coating in a single glance.
They guide quick choices between cobalt, carbide, and HSS, recommended point angles, and preferred coatings for corrosion-resistant alloys.
- Match grade to bit material and coating.
- Select point angle by hole size.
- Prefer split or parabolic geometry for chips.
Troubleshooting quick-action remedies
A concise troubleshooting cheat sheet follows the drill selection guide, pairing common drilling faults with immediate corrective actions so operators can restore cutting conditions quickly.
It lists concise symptoms, probable causes, and swift remedies for chatter, workhardening, and clogging to minimize scrap and downtime.
- Reduce speed, increase feed.
- Regrind or change geometry; pause to clear workhardened area.
- Clear chips, use coolant, back out frequently.
Conclusion
Drilling stainless steel tubing demands patience, proper tooling, and technique to avoid work hardening and poor finishes. One interesting statistic illustrates the challenge: stainless’s toughness means drill bit life can drop by up to 70% compared with mild steel if improper speeds and lubrication are used. Following the outlined preparation, feed, and cooling steps typically yields clean holes and longer tool life. When complexity or volume rises, outsourcing to a specialty shop often saves time and cost.