How to Replace an RV Waste Valve: Step-by-Step Guide for Beginners
Replacing an RV waste valve is essential if you notice leaks, sticking, or corrosion. To do this, gather a compatible replacement valve, safety gear, and basic tools. The process includes fully draining and flushing your tanks, accessing and removing the old valve, cleaning the flange, fitting the new valve with appropriate gaskets and sealant, snugging the clamps, and pressure-testing for leaks while cycling the valve. Regular maintenance and potential upgrades can enhance the valve’s longevity. This guide details each step for a successful replacement.
What an RV Waste Valve Is and Why Replacement May Be Necessary
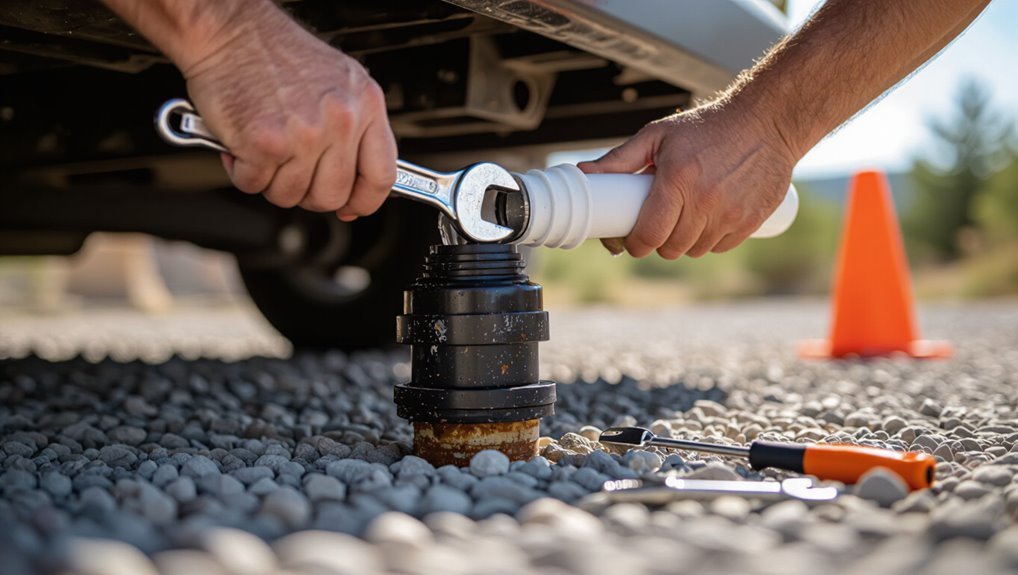
The RV waste valve controls flow from the holding tanks to the sewer connection and seals the system when closed.
Signs it may need replacement include leaks, difficulty opening or closing, foul odors, and visible cracks or corrosion.
Waste valves come in gate, ball, and rotary styles, which can be identified by their handle shape, orientation, and internal mechanism.
Function of the RV waste valve in the plumbing system
An RV waste valve is a gate or ball-style fitting installed at the base of the holding tank that controls sewage and gray water discharge from the vehicle.
It seals the tank during travel, directs flow to the sewer connection when opened, and prevents backflow into plumbing lines.
Understanding this function is essential when learning how to replace rv waste valve safely and correctly.
Common signs a waste valve needs replacement
How can an owner tell when a waste valve is failing?
Slow or incomplete draining, persistent leaks under the valve area, foul odors despite holding-tank chemicals, and visible corrosion or cracks indicate deterioration.
Difficulty operating the valve—stiffness, grinding, or slipping—or sewage backing into the RV signal internal failure.
Repeated seal replacement or frequent clogs also suggests the valve needs full replacement.
Types of RV waste valves and how to identify yours
Waste valves are the gatekeepers of an RV’s sewage system, controlling flow from black and gray tanks to the sewer or dump hose.
Types include sliding, rotary, and macerator valves; identification relies on handle style, rotation vs. pull, and presence of motorized components.
Choose replacement matching type, fittings, and tank outlet.
- Sliding
- Rotary
- Gate/pull
- Macerator
Tools, Materials, and Safety Preparations Before You Start
Before beginning a waste valve replacement, the technician reviews a concise checklist of essential tools and replacement parts plus optional items that can simplify the task.
Personal protective equipment, tank-emptying and sanitation procedures, and steps to drain, clean, and secure the RV and holding tanks are confirmed to reduce contamination and injury risk.
Clear preparation guarantees the job proceeds efficiently and safely.
Essential tools and replacement parts checklist
A concise checklist guarantees the job proceeds safely and efficiently:
- Replacement waste valve matching RV model, new gaskets/seals.
- Adjustable wrench set, screwdriver set, plumber’s grease.
- Hose for draining, bucket, gloves, safety glasses.
- Thread sealant/tape, cleaning brush, rags, flashlight.
Optional tools that make the job easier
Consider adding a few convenience tools to streamline the replacement: a torque wrench for precise tightening, a cordless impact driver to speed fastener removal, an inspection mirror and telescoping pickup for hard-to-see spots, and a small shop vacuum to clear debris and liquids.
- Flexible extension bits for tight bolts
- Hose clamp pliers for secure fittings
- LED work light with magnetic base
- Thread sealant tape and applicator tool
Safety precautions: PPE, holding tanks, and sanitation
Wear appropriate personal protective equipment—nitrile gloves, splash-resistant eye protection, and a respirator or mask rated for organic vapors—since handling RV waste involves exposure to pathogens and odors.
Verify holding tank access points are identified and remote from living areas. Use disposable covers for tools, sanitizer for surfaces, and a sealed waste receptacle.
Follow local disposal regulations and wash hands thoroughly after completion.
How to prepare the RV and tank for safe work (drain, clean, secure)
Begin by ensuring the RV is parked on level ground, the engine is off, and the battery is isolated to prevent electrical shorts while working near plumbing.
Empty all holding tanks, flush with freshwater and RV-safe tank cleaner, then rinse thoroughly.
Close water supply, open vented access to equalize pressure, secure vehicle with wheel chocks, wear gloves and eye protection, and have disinfectant and replacement parts ready.
Step-by-Step Guide to Replacing an RV Waste Valve
The replacement process begins with confirming valve compatibility and procuring the correct part, followed by fully draining and flushing both black and gray tanks.
Next, the RV should be positioned for safe access—underbelly or exterior—so the old valve can be removed by undoing typical fasteners and disconnecting plumbing.
Finally, the mounting flange should be cleaned and seals and fittings inspected before installing the new valve.
Step 1 Confirm compatibility and buy the correct replacement valve
Confirming compatibility and selecting the correct replacement valve prevents installation problems and leaks. The technician first checks the RV’s make, model, and valve type (e.g., single-slide, dual-slide, or gate valve).
They measure flange spacing and pipe diameter, and note mounting style and material to match OEM specifications or an approved aftermarket equivalent.
Then they verify pressure ratings, seal type, and hardware, sourcing a matched part with documented fitment.
Step 2 Drain and flush the black and gray tanks completely
Before removing the old valve, the technician fully drains both the black and gray tanks and flushes them until the effluent runs clear and odor is minimized.
They open each drain, use an approved sewer hose, then flush with fresh water and a tank-cleaning wand or built-in flush system.
After visual clarity and reduced smell, drains are resealed and fittings inspected for leaks before proceeding.
Step 3 Position the RV and access the valve (underbelly vs. exterior access)
Positioning the RV properly and deciding whether to work through an underbelly panel or an exterior access door sets the stage for safe, efficient valve replacement.
Park on level, stable ground, engage brakes, and use wheel chocks.
For underbelly access, raise stabilizers and remove panels; for exterior access, clear surrounding areas and open access doors.
Confirm adequate lighting and ventilation.
Step 4 Remove the old valve: typical fasteners and disconnection tips
With the RV secured and access panels open, the next step is to remove the old waste valve.
Fasteners are typically bolts, nuts, or hose clamps; use appropriate sockets, wrenches, or pliers.
Support the valve to prevent strain on fittings, drain remaining fluid into a container, and disconnect supply hoses and electrical connectors if present.
Keep hardware organized for reassembly.
Step 5 Clean the mounting flange and inspect seals and fittings
Scrape away old sealant and debris from the mounting flange using a putty knife or plastic scraper, then wipe the surface with a rag and a mild solvent to guarantee a clean, dry mating area.
Inspect the flange for corrosion, cracks, or warping.
Check gasket condition, replace if hardened or compressed, and verify fittings, hose ends, and bolts for damage or stripped threads before proceeding.
Step 6 Install the new valve: alignment, gaskets, clamps, and torque tips
After the flange is cleaned and seals inspected, the new waste valve can be set into place.
Position it squarely, ensuring gasket faces align. Hand-tighten mounting bolts in a star pattern, then tighten incrementally to manufacturer torque.
Install clamps on any hose connections, avoid overtightening, and check gasket seating.
Confirm smooth lever operation and proper valve orientation before final torque.
Step 7 Reconnect hoses and hardware; seal check procedures
Reconnect all hoses and hardware methodically, starting with the shortest lines and working toward the longest to prevent kinks and guarantee correct routing.
Secure clamps and fittings hand-tight, then snug with tools per manufacturer specs.
Inspect seals and gaskets for proper seating.
Perform a visual seal check for drips at connections and under the valve.
Tighten only if leaks appear; avoid over-torquing.
Step 8 Test the new valve for leaks and proper operation
Begin by cycling the valve through its full open and closed positions while observing all joints and seals for signs of leakage or abnormal movement.
Next, run water through the system and inspect connections under pressure, checking for drips or wetness.
Operate the valve several times to guarantee smooth action, confirm a tight seal when closed, and verify proper flow when open.
Step 9 Final sanitation, reassembly of skirting/doors, and documentation
With the valve confirmed leak-free and operating smoothly, attention turns to final sanitation, reassembly of any skirting or access doors, and documentation of the work.
Sanitize fittings and surrounding surfaces, flush briefly to clear residues, and dispose of waste properly.
Reinstall panels, secure fasteners, and test door seals.
Record date, parts used, and observations in maintenance logs for future reference and warranty purposes.
Troubleshooting Common Problems During and After Replacement
Common post-replacement issues include leaks at the seal, seized or corroded mounting hardware, misalignment or poor fitment with aftermarket valves, and valves that fail to open or close correctly.
The guide outlines checks for tightened fittings, gasket condition, and proper torque, methods for freeing or replacing corroded fasteners, and adjustments or adapters for fitment problems.
It also covers diagnosing internal mechanism faults and when to replace the valve versus attempt repairs.
What to do if the valve leaks after installation
If a newly installed RV waste valve begins to leak, immediate inspection of the seal points and hose connections is essential to locate the source and prevent further damage.
Tighten fittings gently, replace damaged gaskets or O-rings, and clean mating surfaces.
Test with water under low pressure.
If leakage persists, document the problem, shut system down, and consult the valve manufacturer or a qualified RV technician.
Dealing with stuck or corroded mounting hardware
Encountering stuck or corroded mounting hardware is a frequent obstacle when replacing an RV waste valve and requires a methodical approach to avoid damaging the hull or plumbing.
Apply penetrating lubricant, allow adequate soak time, and use penetrating-impact tools or heat cautiously.
Cut seized fasteners if necessary, protecting surrounding areas.
Replace corroded hardware with stainless or coated equivalents and inspect seals and flanges before reassembly.
Handling alignment or fitment issues with aftermarket valves
Address alignment and fitment issues promptly to prevent leaks, binding, or premature wear when installing aftermarket RV waste valves.
Inspect mating surfaces, gasket condition, and flange flatness.
Verify valve orientation and shaft alignment; shim or file mounting points sparingly.
Use correct gasket type and torque fasteners evenly.
Test for smooth manual operation and slow-pressure leaks before reassembling panels.
When the valve still won’t open or close properly
Begin by confirming that mechanical movement and seals are both functioning as designed: check that the valve shaft turns freely through its full range without binding.
Verify the gate or ball seats fully against seals with no visible gaps.
Inspect linkages, actuators, and fasteners for looseness, corrosion, or misalignment that can prevent proper open/close action.
If issues persist, replace damaged seals, realign linkages, and test under pressure.
Maintenance Tips to Extend the Life of a New Waste Valve
Routine flushing with fresh water after each trip and following manufacturer use guidelines helps prevent buildup and odors.
Periodic lubrication of moving parts and attention to seasonal care will keep the valve operating smoothly.
For winterization and long-term storage, drains should be emptied, antifreeze applied where recommended, and the valve left in a position that relieves stress on seals.
Routine flushing and use recommendations
Regularly flushing the waste valve with fresh water and a mild, RV-safe cleaner prevents buildup and reduces strain on seals and moving parts.
Routine practices guarantee reliable operation and odor control.
- Flush after each extended trip with large volume water.
- Use enzyme or non-corrosive cleaners weekly.
- Open valve briefly during flushes to clear lines.
- Inspect discharge flow for blockages.
Lubrication and seasonal care for the valve mechanism
A few simple lubrication steps and seasonal checks will greatly extend the life of a new RV waste valve by preventing corrosion, reducing wear on seals and linkages, and ensuring smooth operation during storage and use.
Apply a silicone-based lubricant to moving parts, inspect seals for cracking, tighten fasteners, and operate the valve periodically.
Replace degraded components promptly and document service dates for consistent care.
Winterization and long-term storage precautions
After lubrication and inspection are completed, prepare the valve for cold weather and long-term storage to prevent freeze damage and material degradation.
Drain all holding tanks and the valve assembly, remove residual moisture, and apply food-safe antifreeze per manufacturer guidance.
Protect exposed metal with a light corrosion inhibitor, cap openings to keep pests out, and periodically cycle the valve during extended storage to maintain seals and prevent sticking.
Cost, Time Estimates, and When to Call a Professional
Typical costs are summarized by parts, DIY time and effort, and full-service rates to help readers compare options.
Estimated replacement times vary by skill—novice, intermediate, and experienced—so realistic planning can be made.
Clear indicators such as persistent leaks, damaged seal surfaces, or inaccessible fittings suggest a technician should be contacted.
Average cost breakdown: parts vs. DIY labor vs. professional service
Cost considerations for replacing an RV waste valve hinge on three elements: parts, labor (whether DIY time or paid service), and potential ancillary repairs. Typical parts cost ranges $20–$80; DIY labor is opportunity cost; professional service adds diagnostic and warranty value. Decision depends on complexity and confidence.
| Item | Typical cost | Notes |
|---|---|---|
| Parts | $20–$80 | Valve type |
| DIY labor | $0–$50 | Time value |
| Pro service | $100–$300 | Includes warranty |
| Extras | $10–$150 | Seals, adapters |
Estimated time for DIY replacement by skill level
How long it will take to replace an RV waste valve depends largely on the person’s mechanical experience, available tools, and the specific valve type.
A novice should budget more time for preparation and troubleshooting. An intermediate DIYer can expect a straightforward swap in a modest window. An experienced technician will complete the job quickly while anticipating and addressing hidden complications.
Novice: 1.5–3 hours.
Intermediate: 45–90 minutes.
Experienced: 20–40 minutes.
Signs the job should be handled by a technician
Recognize obvious red flags—extensive corrosion, warped fittings, persistent leaks after repeated attempts, or sewage backup—that indicate the task should be passed to a technician.
Estimate repair costs ranging from modest parts and labor to several hundred dollars for complex replacements.
When time, tools, odor control, or access limitations exceed homeowner capability, scheduling a qualified RV technician prevents further damage and guarantees proper sealing and inspection.
Useful Accessories and Upgrades to Consider When Replacing the Valve
When replacing an RV waste valve, consider upgraded materials such as brass or reinforced polymers and quick-release options for faster, more reliable operation.
Additional accessories—support straps, improved seals, and inspection ports—can extend component life and simplify maintenance.
Choosing the right combination improves durability and makes future service quicker and safer.
Upgraded valve materials and quick-release options
Consider upgrading the waste valve material and adding quick-release fittings to improve durability and serviceability.
Durable materials like brass or reinforced polymer resist corrosion and abrasion. Quick-release couplings enable fast removal for winterization or replacement.
Choose compatible thread standards and clamp types to prevent leaks.
- Brass valve
- Reinforced polymer valve
- Stainless quick-release
- Thread adapters
Add-ons: support straps, better seals, inspection ports
Small accessories can make a big difference in the longevity and reliability of an RV waste valve installation.
Support straps stabilize piping, reducing stress and leaks. Upgraded seals—silicone or Viton—improve chemical and temperature resistance.
Inspection ports allow visual checks and easier cleaning without full disassembly.
Together these add-ons increase durability, simplify maintenance, and reduce the risk of unexpected failures on the road.
Step-by-Step Quick Reference Checklist
A concise quick-reference checklist guides the replacement process from start to finish.
It outlines pre-replacement preparations, step-by-step installation actions, and post-installation checks to confirm proper operation and leak-free seals.
This checklist serves as a practical tool to streamline the job and guarantee nothing is overlooked.
Pre-replacement checklist
Gather necessary tools and safety gear, verify the RV is parked on level ground with the water and power systems shut off, and confirm the holding tank is at least partially emptied to minimize waste flow during valve removal.
The technician confirms permits, inspects tank access, and readies containment supplies.
- Verify PPE and tools
- Confirm system isolation
- Partially empty holding tank
- Place spill containment
Installation checklist
Several concise steps guide the technician through installing the new RV waste valve to guarantee a safe, watertight fit and reliable operation.
Follow sequence, maintain cleanliness, and verify fittings before final torque.
- Align valve and flange; hand-thread bolts.
- Seat gasket; apply recommended sealant sparingly.
- Torque bolts evenly to spec in crisscross pattern.
- Reconnect hoses and supports; check for proper movement.
Post-installation checklist
With the new valve seated and bolts torqued to spec, inspection begins immediately to confirm leak-free operation and proper mechanical function.
A concise post-installation checklist guarantees safety and reliability.
- Verify seals and fasteners; tighten as needed.
- Operate valve through full cycle; listen for binding.
- Pressure-test with water; watch for drips.
- Reconnect hoses, clean area, log date and notes.
Conclusion
Like a weathered gate finally unlatched, the new waste valve stands ready to guard the RV’s hidden stream. Hands that once wrestled with grit now rest; tools hum their quiet farewell. The trailer exhales, seams sealed, journeys resumed. Routine care becomes the gentle tide that keeps the mechanism true. With each turn and check, the valve anchors confidence—small craft steady beneath an open sky, charting clean, unfaltering courses ahead.