How to Change Out a Gas Stove: Step-by-Step Guide for a Safe Replacement
To safely replace a gas stove, start by shutting off and capping the gas supply. Then, remove the old unit and inspect the gas lines, vents, and clearances. Once prepared, unpack the new stove, level it, and connect it with the appropriate connector and sealant. After reconnecting the gas and power, conduct leak tests using soap bubbles and electronic methods, ignite the burners, and check the flame quality and ventilation. Always follow local codes, use an anti-tip bracket for safety, and consult a professional for complex installations. Detailed steps and precautions will be provided in the following sections.
Overview of Replacing a Gas Stove Safely
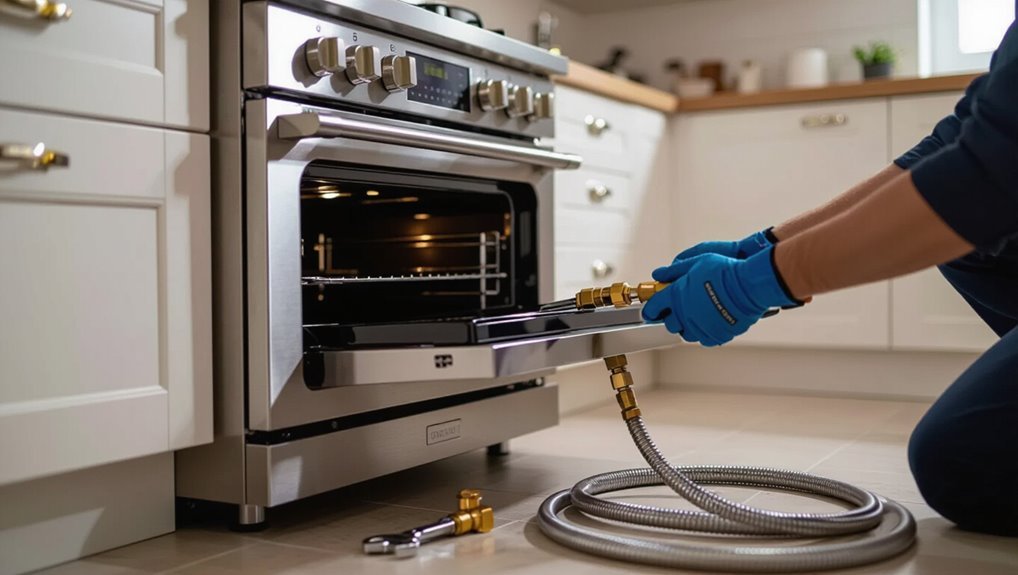
A concise summary outlines steps for disconnecting fuel, removing the old range, verifying fittings, and installing the new unit with proper seals and leak tests.
Guidance distinguishes minor faults suitable for repair from structural, safety, or performance issues that justify full replacement.
The task requires basic mechanical skills and understanding of gas connections; complex situations or any uncertainty should prompt hiring a licensed professional.
Quick summary of the replacement process
Begin by shutting off the gas supply and disconnecting the appliance according to local codes.
Then remove the old stove and inspect the connection and venting areas for damage.
The technician prepares the new unit, verifies fittings and flexible connector compatibility, sets proper clearances, reconnects gas, tests for leaks and burners, and confirms ventilation and appliance leveling.
This outlines how to change out a gas stove safely.
When to replace versus repair
After completing the physical replacement steps and confirming safe connections and ventilation, the decision to repair or replace the stove depends on factors beyond immediate installation tasks.
Consider age, frequency of breakdowns, cost of parts versus replacement, efficiency and safety improvements, and compatibility with current kitchen layout.
If repairs approach replacement cost or safety remains uncertain, replacement is generally recommended.
Required skills and when to hire a professional
Assess the job’s demands before attempting a gas-stove replacement: the task requires basic mechanical aptitude, familiarity with gas fittings and shutoff valves, competency with hand tools, and the ability to follow manufacturer instructions and local codes.
Hire a licensed plumber or gas technician when unsure about connections, when modifications to gas lines or ventilation are needed, or to obtain permits and guarantee code-compliant, leak-free installation.
Tools, Materials, and Preparations
A concise checklist of tools and replacement parts is presented to guarantee the job proceeds efficiently and without unexpected trips to the hardware store.
Required safety gear and specific precautions are outlined to minimize risk during disconnection and installation.
The text also highlights the need to verify local codes, permit requirements, and any gas company procedures before work begins.
Tools checklist
Before beginning the swap, gather the essential tools and materials so each step can proceed without delay.
The technician should verify readiness and access safety equipment before starting. Core items simplify removal, connection, and testing.
- Adjustable wrench, pipe wrench, and pliers
- Leak detector solution or soapy water and a flashlight
- Screwdrivers, utility knife, and torque-compatible fittings
Materials and replacement parts checklist
Replacement parts and consumables should be confirmed and staged before any disconnection to prevent delays or unsafe improvisation.
The installer verifies model-specific fittings, seals, and connectors, and keeps spares for common failures.
- Flexible gas connector sized to code
- Compression fittings, pipe thread tape, and replacement shutoff valve
- Burner caps, igniter, and gasket sets ready for immediate swap
Safety gear and precautions
Several essential items and procedures are required to guarantee safe handling of gas stove removal and installation.
Protective equipment, ventilation, and emergency readiness reduce risk. Isolation of the gas supply and power and using a gas detector are mandatory before work begins.
- Protective gloves, safety glasses, and knee pads
- Audible/visual gas detector and ventilation plan
- Fire extinguisher and emergency shutoff knowledge
Verifying local codes, permits, and gas company requirements
Many jurisdictions require verification of local building codes, permit obligations, and gas company protocols before any gas stove work proceeds; checking these requirements guarantees compliance and prevents costly delays or safety violations.
Contractors or homeowners should contact municipal permitting offices and the gas utility to confirm permit needs, inspection schedules, approved appliance types, pipe sizing, shutoff procedures, and any licensed installer requirements.
Inspecting the Existing Installation
Before removing the old range, the installer inspects the gas line to determine whether a flexible connector or rigid pipe is present and whether the connection meets local codes.
They measure the width, depth, height, and required clearances to guarantee the replacement stove will fit and operate safely.
Finally, they verify the location and type of electrical outlet, assess ventilation and range hood compatibility, and note any modifications needed.
Assessing the gas line type and connection (flex line vs. rigid)
When inspecting a gas stove installation, the technician should first identify whether the supply uses a corrugated stainless steel flex line or a hard-piped rigid connection, since each requires different tools, fittings, and safety checks.
They should note connector length, thread type (NPT or flare), presence of shutoff valves, visible corrosion or damage, and any labels indicating material or pressure rating before planning removal or reconnection.
Measuring space, height, and clearance for the new stove
After confirming the type and condition of the gas connection, the technician should measure the opening and surrounding clearances to verify the replacement range will fit and meet code and manufacturer requirements.
Measure width, depth, and height of the cavity, distance to combustible surfaces, and required side and rear clearances.
Record cabinet overhangs and floor levelness to ascertain proper alignment and safe installation.
Checking electrical outlet, ventilation, and range hood compatibility
One important step is verifying that the existing electrical outlet, ventilation system, and range hood are compatible with the replacement range’s requirements.
Inspect voltage, outlet type, cord/power specifications and grounding.
Confirm vent type (ducted vs. recirculating), duct size, direction, and clearances.
Guarantee range hood mounting, exhaust capacity, and make-up air needs meet local codes and the new stove’s installation manual.
Step-by-Step Removal of the Old Gas Stove
The removal begins with shutting off the gas supply and confirming there is no flow, then switching off electrical power and unplugging the unit.
Next, the gas connector is disconnected safely before the stove is slid out of its installation position.
Once removed, the gas valve, connector, and surrounding area are inspected for damage or leaks.
Shutting off the gas supply and verifying no flow
Begin by locating and closing the gas shutoff valve that supplies the stove, typically found behind the appliance or at the meter. Make certain the handle is perpendicular to the pipe to indicate a closed position.
Next, open a nearby burner or disconnect fitting to relieve residual pressure. Sniff and use a detector to confirm no gas odor, and observe zero pressure or flow before proceeding.
Turning off electrical power and unplugging unit
Power should be cut to the stove by switching off its dedicated circuit at the home’s breaker box and, if present, flipping any local appliance disconnects.
After confirming the breaker is off, unplug the stove from the wall outlet or remove its plug from a junction box.
Secure cord away from workspace.
Leave power off until removal and reinstallation are complete to prevent shocks or accidental activation.
Disconnecting the gas connector safely
With electrical power secured and the cord stowed, attention shifts to the gas connection.
The person verifies the gas shutoff valve is closed, opens a nearby window for ventilation, and places a bucket or towel under the connector.
Using an adjustable wrench, they loosen the connector nut counterclockwise, then remove the flexible line, capping the supply port with an approved plug and checking for leaks.
Removing the stove from its installation position
They slide the stove straight out from its cavity, keeping hands on both sides to control movement and watching for snags at the back where the gas connector and any venting meet.
With steady, even force they clear countertop edges, pause if resistance occurs, and tilt slightly to negotiate thresholds.
Once free, they set the appliance on protective pads for inspection and transport.
Inspecting the gas valve, connector, and surrounding area after removal
Inspect the exposed gas valve, connector, and surrounding area immediately after the stove is moved to a safe work surface.
The technician checks for dents, corrosion, loose fittings, frayed flex lines, and lingering odor. Surfaces are cleaned, threads wiped, and any corrosion documented.
If damage or leaks exist, the technician isolates supply, tags the line, and arranges certified repair before proceeding.
Preparing the New Stove and Gas Connection
The new stove should be unboxed and inspected for shipping damage before any work begins.
Components such as burners, grates, and leveling feet are then assembled and adjusted to guarantee the unit sits plumb and stable.
Finally, the correct gas connector and fittings are selected, sealed with an appropriate thread compound, and prepared for a secure connection to the supply.
Unboxing and inspecting the new stove for damage
Begin by opening the packaging carefully and removing all protective materials to reveal the new stove, keeping an eye out for dents, scratches, loose parts, or crushed corners that could indicate shipping damage.
Inspect burners, knobs, glass, and vent openings.
Check accessory bags against the parts list.
Photograph any defects, retain packaging, and report damage to the retailer or shipper immediately with serial and order numbers.
Assembling components and leveling the unit
Unpack and organize all included parts and tools on a clean, level surface, confirming the presence of burners, grates, terminal blocks, gas connector, and any installation hardware against the parts list.
Attach burners and grates per manufacturer instructions, secure control knobs and backguard, and install leveling legs.
Adjust feet until the range sits squarely and stable, confirming doors and drawers operate smoothly.
Selecting and preparing the correct gas connector and fittings
Select a gas connector and fittings that match the stove’s inlet type, local code requirements, and the household supply—typically choosing between flexible stainless steel, corrugated stainless steel tubing (CSST), or rigid black iron with approved fittings.
Verify connector length, diameter, pressure rating, and certification. Inspect for damage, confirm compatible adapters, and gather necessary shutoff valve and mounting hardware.
Label and stage components before installation.
Applying thread sealant and proper connectors for gas lines
Apply thread sealant and choose connectors with care to guarantee a gas-tight, code-compliant connection between the household supply and the stove inlet.
Use approved gas-rated pipe dope or yellow PTFE tape on male pipe threads; avoid tape on flare fittings.
Select listed flexible connectors or black iron with properly sized fittings.
Tighten to manufacturer torque, inspect for leaks, and follow local code and inspector guidance.
Installing the New Gas Stove: Step-by-Step
The installer sets the new range into the cabinet opening and adjusts the leveling feet until the appliance is flush and stable.
Next, the gas line is reconnected following a stepwise procedure with proper fittings and leak checks, and the electrical cord is restored while verifying outlet function.
Finally, the gas supply is turned back on and controlled ignition tests are performed to confirm burners and oven light and heat correctly.
Positioning and leveling the stove in the opening
Careful placement of the new gas stove into the kitchen opening secures proper alignment with countertops and safe operation.
The installer slides the unit forward, centers it, and checks front-to-back and side clearances.
Adjustable feet are extended or retracted with a level placed on the cooktop.
Final adjustments confirm even weight distribution and gap consistency before securing anti-tip brackets and testing stability.
Reconnecting the gas line: stepwise connection procedure
Begin by confirming the gas supply is shut off at the appliance shutoff valve and the home’s gas meter or main valve.
Then verify all burners and controls are in the off position.
Apply pipe thread sealant or approved tape to the regulator or flex connector threads.
Hand-start the fitting, tighten with a wrench to manufacturer torque, align without strain, and cap or test with soapy water for leaks.
Reconnecting electrical power and testing outlets
Reapply electrical power only after confirming the gas connection is secure and all fittings have been checked for leaks.
The technician then restores breaker or plug power, verifies stove lights, fans, and clock receive power, and checks outlet voltage with a multimeter.
Grounding continuity and GFCI functionality are tested.
Any abnormal readings prompt power removal and professional inspection before proceeding.
Restoring gas supply and performing initial ignition tests
With the gas line confirmed secure and electrical power restored, the technician slowly opens the gas shutoff valve and observes the connector and joints while applying a leak-detection solution to verify there are no bubbles indicating a leak.
He then ignites each burner and oven, checking consistent ignition, steady flames, proper pilot operation and control responsiveness, correcting malfunctions before finalizing installation and documenting results.
Leak Testing and Safety Verification
After installation, the technician conducts leak testing using soapy water at fittings and an electronic gas sniffer to detect any escaping gas.
Any bubbling or sensor alerts are investigated immediately, with fittings tightened or reworked and the supply shut off until repairs are verified.
Burners, oven ignition, and flame quality are then checked for proper operation.
Finally, ventilation is confirmed and carbon monoxide precautions are reviewed to guarantee the appliance is safe for use.
Methods to test for gas leaks (soapy water, electronic sniffer)
Detecting leaks requires simple, reliable techniques that provide clear confirmation before restoring gas service.
Two common methods are described succinctly for verification and safety.
- Apply soapy water solution to joints; watch for steady bubbles indicating escaping gas.
- Use an electronic combustible gas sniffer, sweeping around fittings and connections.
- Combine both methods for increased confidence prior to re-energizing the supply.
Interpreting test results and addressing leaks
Interpret test results by looking for consistent, repeatable indicators of a leak: steady soap bubbles at a joint, a sustained high or increasing reading on a calibrated gas sniffer, or an audible hiss near fittings.
If detected, shut off gas, ventilate, and do not use ignition sources.
Tighten connections or replace faulty components; retest.
For persistent leaks, contact a licensed gas professional before restoring service.
Checking burners, oven ignition, and flame quality
Begin by visually inspecting and then igniting each burner and the oven to verify proper operation and flame characteristics.
Observe flame color, stability, and size: blue, steady flames indicate correct combustion; yellow, flickering, or lifting flames signal adjustment needs.
Confirm ignition reliability, consistent heat output, and absence of delayed ignition or popping.
Document anomalies and shut off gas if unsafe conditions persist.
Ensuring proper ventilation and carbon monoxide precautions
Guarantee adequate ventilation and verify carbon monoxide (CO) safety before using a gas stove by confirming clear airflow paths, functioning exhaust systems, and performing systematic leak and CO checks.
Inspect range hood and vents, secure exterior exhaust discharge, and test for backdrafting.
Use a calibrated CO detector, perform soap-bubble gas fitting tests, and address any leaks or ventilation failures before regular operation.
Final Adjustments and Calibration
With the appliance plumbed and tested, attention turns to final adjustments and calibration to guarantee safe, even operation.
Leveling the range and setting appropriate gaps to cabinets prevents stress and misalignment, while oven temperature and burner output are calibrated for accurate cooking.
The installation is completed by securely mounting the anti-tip bracket and fastening the range to the floor or wall.
Leveling and gap adjustments for counters and cabinets
Leveling the stove and adjusting gaps between the appliance, countertop, and cabinets guarantees safe operation, proper burner performance, and a finished appearance.
The installer uses adjustable legs, shims, and a spirit level to align height and tilt.
Side and rear clearances should match manufacturer specs, protect adjacent cabinets with heat shields if required, and confirm seals or filler strips close visible gaps.
Calibrating oven temperature and burner output
Begin by verifying that the oven and burners produce accurate, consistent heat before regular use.
Use an oven thermometer at multiple temperatures and run test cycles, adjusting the thermostat calibration screw per manufacturer instructions.
Check burner flame color and size; adjust air shutter or regulator for blue, steady flames.
Record settings and recheck after several uses to confirm stable performance.
Installing anti-tip bracket and securing the range
After confirming burners and oven calibration, attention turns to securing the range by installing the anti-tip bracket and making final adjustments.
The installer locates wall studs, mounts the bracket at specified height, slides the range until it engages the bracket, then levels using adjustable feet.
Tests stability, verifies gas connection and clearance, and documents measurements for safety compliance before concluding the replacement.
Troubleshooting Common Issues
The installer then addresses common problems that may appear after swap-out, including ignition failures or intermittent sparking and weak or yellow flames.
Attention is given to persistent gas odors, which require immediate inspection and possible shutoff, and to electrical faults that can trip breakers or affect controls.
Each issue is diagnosed methodically to determine whether repairs, adjustments, or professional service are needed.
Stove won’t ignite or ignition is intermittent
When a gas stove refuses to light or the ignition sparks inconsistently, cooks face frustration and potential safety risks; diagnosing the problem requires checking the igniter, gas supply, and burner alignment in a systematic order.
Inspect the electrode for cracks or debris, guarantee the gas valve and supply line are open and leak-free, clean burner ports, verify proper cap seating, and test ignition after each corrective step.
Weak or yellow flames
If ignition issues have been ruled out, attention turns to flame quality, since weak or yellow flames indicate combustion problems that affect efficiency and safety.
Inspect burner ports for clogs, clean with a soft brush and compressed air, check correct air shutter adjustment, guarantee proper gas pressure and correct orifice size, and verify venting.
If unresolved, consult a qualified technician for diagnosis.
Persistent gas odor after installation
Detect lingering natural gas smell after installation warrants immediate, precise action to rule out leaks and guarantee safety.
The installer should shut off the gas, ventilate the area, and avoid flames or electrical switches.
Use a soap solution to inspect joints, listen for hissing, and call the gas company or a licensed technician if any leak is suspected.
Do not resume use until cleared.
Electrical issues and tripped breakers
Lingering gas odors demand immediate attention to gas lines and fittings; once those risks are cleared, attention can shift to electrical problems that affect a gas range.
Technicians should check the breaker panel for tripped breakers, reset safely, and inspect the range’s cord and outlet for damage.
Persistent trips require a qualified electrician to assess wiring, grounding, and internal appliance faults before reuse.
When to Call a Professional
Warning signs such as a persistent gas smell, hissing noises, or repeated pilot failures indicate dangerous system problems that warrant immediate professional attention.
Situations involving complex work—like converting a stove between natural gas and propane or relocating a gas line—should be handled by a qualified technician.
Additionally, permit inspections and jobs requiring certified installers are legal and safety requirements that homeowners should not attempt alone.
Signs of unsafe gas system problems
If unusual odors, hissing sounds, or persistent pilot light problems occur, they indicate potential gas system hazards that require immediate professional evaluation.
Other warning signs include repeated unexplained carbon monoxide alarms, visible corrosion or soot around fittings, fluctuating gas pressure, and unexplained health symptoms like headaches or nausea.
Any suspected leak, damaged flexible connector, or appliance malfunction warrants shutting off supply and calling a licensed technician.
Complex installations: converting fuel type or relocating gas line
Complex conversions—such as switching a stove between natural gas and propane or moving a gas line to a new location—require specialized knowledge, permits, and tools beyond routine DIY work.
A licensed technician guarantees proper fittings, correct pressure regulation, leak-free joints, and code-compliant materials.
Attempting these tasks without expertise risks gas leaks, carbon monoxide, fire, and voided warranties, so hire a qualified professional.
Permit inspections and required professional certifications
Following guidance on conversions and line relocations, attention must turn to the permits and professional certifications that govern such work.
Local codes often require permits, inspections, and licensed gas-fitters or plumbers for conversions, relocations, or new connections.
Homeowners should verify jurisdictional requirements, hire certified professionals, obtain permits before work begins, and secure final inspection approval to guarantee safety, code compliance, and insurance validity.
Maintenance and Safety Tips After Replacement
After replacement, the homeowner should establish a routine maintenance schedule for burners, connections, and ventilation to preserve performance and safety.
Ongoing monitoring for gas leaks and carbon monoxide—using detectors, periodic inspections, and awareness of symptoms—helps detect problems early.
Clear safe-cooking practices and rehearsed emergency procedures guarantee rapid, effective responses if an incident occurs.
Routine maintenance schedule for gas stoves
Establishes a clear, regular maintenance schedule to guarantee a replaced gas stove remains safe and efficient over time.
Recommended intervals and tasks are outlined succinctly for homeowners and technicians.
- Monthly: clean burners, check igniters, remove debris.
- Quarterly: inspect hoses, tighten fittings, test controls.
- Annually: professional inspection, deep clean, replace worn parts as needed.
How to monitor for leaks and carbon monoxide long-term
Monitor gas and carbon monoxide hazards continuously by combining routine visual checks, functional tests, and reliable detection devices.
Inspect fittings, hoses, and pilot flames monthly; smell for odorant and listen for hissing.
Test and replace CO and gas detectors per manufacturer timelines, maintain battery backups, and log results.
Schedule professional inspections annually and address any irregularities immediately to prevent accumulation and exposure.
Safe cooking practices and emergency procedures
Adopt clear, consistent kitchen habits to minimize risks and guarantee a rapid response if a gas-related emergency occurs.
Maintain burners and ventilation, never leave cooking unattended, keep flammable items distant, and use timers.
Know how to shut off the gas supply and electrical power.
Install detectors, keep a fire extinguisher accessible, and rehearse evacuation and emergency contact procedures periodically.
Comparison of DIY vs. Professional Replacement Considerations
When weighing whether to replace a gas stove as a DIY project or hire a professional, the primary considerations are safety risks, code compliance, and the homeowner’s experience with gas and ventilation systems. A professional guarantees permits, leak testing, and warranty; DIY may save money but increases liability and inspection needs.
| Factor | DIY | Professional |
|---|---|---|
| Cost | Lower upfront | Higher upfront |
| Risk | Higher | Lower |
| Compliance | Owner responsibility | Contractor responsibility |
| Time | Variable | Predictable |
| Warranty | Rare | Common |
Conclusion
After replacing a gas stove, the homeowner stood back like a captain after steering through fog—recalling that 1 in 5 DIY gas projects encounter fitting issues. That statistic became a lighthouse: careful inspection, correct tools, and respect for gas work keep the kitchen safe. The clear takeaway: methodical steps and knowing when to call a professional turn a risky task into a routine chore, ensuring meals and memories continue without interruption.