How to Reset a Condensate Pump: Quick Step-by-Step Guide to Fixing Common Issues
To reset a condensate pump, first power it down. Inspect the inlet and outlet lines for clogs, ensuring the float and switch move freely. Then, press the reset button and restore power, listening for the motor to engage. If issues continue, check electrical connections and motor functionality with a multimeter, and consider replacing faulty floats or valves. This guide offers further diagnosis, repair, and preventative maintenance tips.
What a condensate pump is and why resetting may be necessary
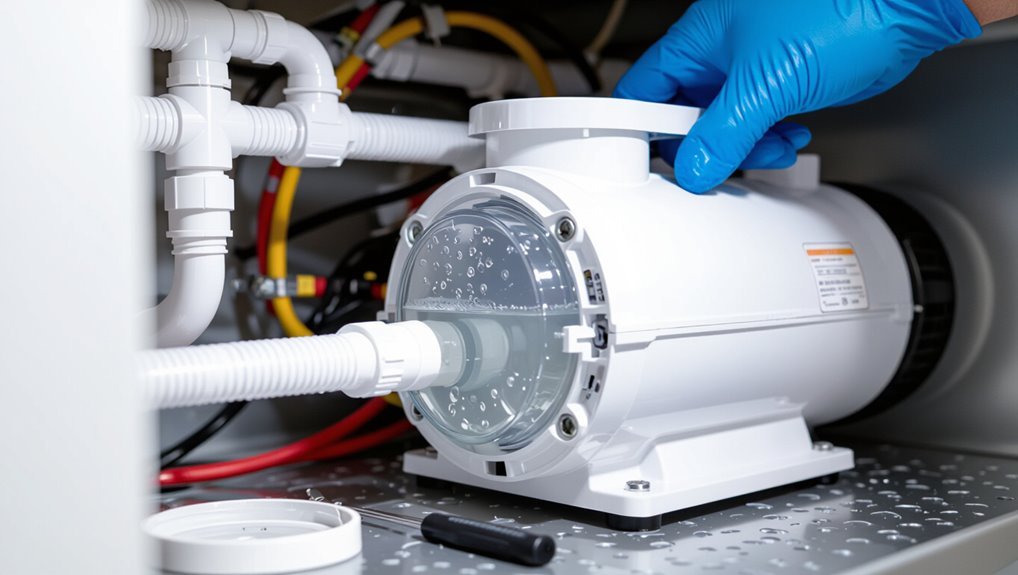
A condensate pump removes collected water from HVAC and dehumidification units by activating a small motor and switch when a reservoir reaches a set level.
Common signs that the pump may need resetting include the unit not running, frequent short cycling, audible alarms, or visible water backup.
Before attempting a reset, power to the unit should be switched off and basic safety checks performed to avoid electric shock or equipment damage.
How condensate pumps work in HVAC and dehumidification systems
Explains the role of a condensate pump in HVAC and dehumidification systems: it collects condensate produced by cooling coils or dehumidifiers and automatically pumps the liquid to a drain when a float switch reaches a set level.
The unit uses a reservoir, float or sensor, and a small motorized pump.
Routine resets clear simple faults; guidance on how to reset a condensate pump guarantees safe restarts and inspection.
Common signs that a condensate pump needs resetting
Recognize a failing condensate pump by its behavioral cues: frequent overflow or water around the unit, persistent alarm activation, unusual noises such as grinding or humming, and repeated cycling that indicates the float or sensor isn’t triggering correctly.
Additional signs include slow drainage, visible corrosion or leaks, and intermittent operation after power interruptions—symptoms suggesting electronic, float, or blockage faults that a reset may temporarily remedy.
Safety precautions before attempting a reset
Before attempting a reset, technicians should understand that a condensate pump is a small electric device that collects and removes condensate (water) produced by HVAC systems, dehumidifiers, or refrigeration units.
Resetting may be necessary when sensors, floats, or control electronics behave erratically, causing alarms, backups, or continuous cycling.
Technicians should disconnect power, wear PPE, guarantee dry workspace, verify proper ventilation, and consult manuals to avoid electrical shock or water damage.
Quick step-by-step reset procedure for most condensate pumps
A concise, safe reset typically follows the same basic steps across most condensate pumps and can be completed with a few common tools.
The technician should cut power first, access the pump and reset switch, check for visible clogs, then actuate the reset while listening for the motor to engage. Following a consistent sequence reduces risk and speeds troubleshooting.
- Tools and materials to have on hand
- Step 1: Turn off power to the unit
- Step 2: Locate the condensate pump and access the reset switch
- Step 3: Inspect inlet/outlet lines and clear visible blockages
- Step 4: Press the reset switch and listen for motor engagement
Tools and materials to have on hand
Several basic tools and a few common materials streamline most condensate pump reset procedures. A multimeter, screwdriver set (flat and Phillips), needle-nose pliers, and adjustable wrench handle electrical and mechanical tasks.
Include a flashlight, shop towels, a small bucket, and replacement fuses or a resettable breaker if applicable.
Have distilled water, tubing cleaner, and rubber gloves for safe, effective maintenance.
Step 1 Turn off power to the unit
Shut off the condensate pump’s power to prevent electrical shock and protect the equipment during the reset.
The technician confirms power is disconnected at the unit’s switch or the HVAC breaker, then tags or notes the power-off status.
Verification with a non-contact tester or multimeter guarantees no live voltage.
Proceed only after confirming a safe, de-energized condition.
Step 2 Locate the condensate pump and access the reset switch
Locate the condensate pump by following the drain line from the air handler or furnace until the small plastic pump housing is reached, usually mounted on or near the furnace cabinet, in a utility closet, attic, basement, or crawlspace.
Once located, verify power is off, remove the cover or access panel, identify the small red or black reset button, and press gently until it clicks.
Step 3 Inspect inlet/outlet lines and clear visible blockages
After the reset button has been pressed and power verified, the technician should inspect the pump’s inlet and outlet lines for visible blockages or kinks that prevent proper drainage.
Examine connections, remove debris, clear algae or sludge with a soft brush or compressed air, and straighten any bends.
Confirm tubing is seated securely and slopes toward the pump to promote consistent flow before proceeding.
Step 4 Press the reset switch and listen for motor engagement
Press the reset switch firmly and listen closely for the motor to engage; a distinct hum or brief click indicates the pump has restarted.
The operator should hold the switch for the manufacturer’s recommended duration, then release. If noise is absent, repeat once.
Persistent silence suggests internal failure or blown fuse; note condition and prepare for further diagnostics or professional assessment.
Step 5 Restore power and verify proper operation
Reapply power to the condensate pump circuit and observe the unit for normal startup behavior.
Confirm motor runs smoothly without unusual noise or vibration, and that the pump draws current within expected range.
Ascertain intake and discharge flows resume, no leaks appear at fittings, and the reservoir level drops when the pump operates.
Document the restart time and any anomalies for follow-up.
Step 6 Test safety float and alarm functions
With the pump running and system stability confirmed, attention shifts to testing the safety float and alarm functions to secure proper overflow protection.
The technician manually lifts the float to simulate high water, verifying pump cutoff and alarm activation.
Release guarantees reset and normal operation.
Confirm alarm audibility/visibility, float movement free of obstruction, and wiring secure; document results and corrective actions if failures occur.
Troubleshooting when reset doesn’t fix the problem
If a simple reset fails, a systematic inspection of the condensate system is required to identify the underlying fault.
Technicians should check for clogged drain lines and frozen pipes, verify float switch operation and replace it if faulty, and test the pump motor and electrical connections.
Continuous cycling also warrants investigation into causes such as stuck floats, air leaks, or control faults and the corresponding corrective actions.
Diagnosing clogged drain lines and how to clear them
When a condensate pump continues to trip after a reset, a clogged drain line is a common culprit and should be inspected next.
Technicians should visually inspect visible piping, disconnect and flush lines with warm water, use a wet-dry vacuum to extract blockages, and apply a mild bleach solution for biological buildup.
Reassemble, test flow, and repeat if restrictions persist.
Checking and replacing faulty float switches
Inspect the float switch next: it is the component that detects condensate level and triggers the pump, and a faulty switch can cause repeated tripping even after resets and cleared drain lines.
Visually inspect for corrosion, debris, or stuck movement. Disconnect power, remove and bench-test continuity as float moves.
Replace with identical-spec switch if intermittent or failed, then retest operation.
Testing pump motor and electrical connections
Begin by cutting power to the unit and confirming that the condensate pump is accessible and safe to work on.
Testing the motor and electrical connections requires both visual inspection and electrical measurement to isolate failures not corrected by resets or float-switch replacement.
Inspect wiring for corrosion, loose terminals, or burned insulation.
Use a multimeter to check supply voltage, continuity, and motor winding resistance; replace or repair defective components.
Handling frozen condensate lines in cold environments
Cold-weather environments can freeze condensate lines, causing backups and preventing resets from resolving drainage issues. Diagnosing this requires confirming ice formation along the piping and at low points where water can pool.
Temporarily thaw frozen sections with a hair dryer or heat tape, insulate exposed lines, guarantee proper slope, and clear low-point traps.
Recommend professional help for persistent or hard-to-reach freezes.
When the pump cycles continuously causes and fixes
After addressing frozen lines and ensuring proper drainage, persistent continuous cycling of a condensate pump points to other underlying faults that a simple reset will not cure.
Possible causes include a stuck float switch, blocked check valve, air lock, or a failing motor.
Inspect and clean the float, clear valves and lines, bleed trapped air, and test motor and wiring; replace defective components as needed.
Quick reference checklist for a successful reset
A concise checklist helps guarantee a condensate pump reset is safe, effective, and verifiable. The following items summarize the essential pre-reset safety steps, the reset procedure itself, and the post-reset checks that confirm normal operation.
Refer to each point before attempting the reset to reduce risks and repeat work.
- Confirm power is isolated and wear appropriate PPE.
- Follow the manufacturer’s reset procedure step by step.
- Inspect float switches, tubing, and drain paths after reset.
- Record outcomes and monitor the pump through one full cycle.
Pre-reset safety checklist
Confirm power is off and the area is safe before attempting a condensate pump reset; this checklist lists the essential safety steps to avoid electrical shock, water damage, or equipment harm.
Verify circuit breaker off, unplug pump if accessible, and lockout/tagout where required.
Clear surrounding water, wear PPE (gloves, eye protection), inspect wiring and hoses for damage, and guarantee proper lighting and ventilation.
Reset steps checklist
Proceed through the following concise checklist to reset the condensate pump safely and efficiently:
power off unit;
unplug pump or switch off circuit breaker;
locate reset button or float switch;
drain reservoir if full;
clear visible debris from float and inlet;
press and hold reset per manufacturer timing;
restore power;
observe audible motor startup briefly;
secure access panel and document action taken.
Post-reset verification checklist
Verify system stability immediately after reset by checking key indicators:
the pump runs briefly without unusual noise,
the float moves freely and returns to rest,
the condensate line drains steadily with no backups,
the safety switch resets and allows normal operation,
and any service lights or alarms are cleared.
Confirm electrical connections are secure,
test auto-cycle with simulated condensate,
inspect for leaks,
and note time/date of verification.
Parts, replacement options, and basic maintenance to prevent future resets
The section outlines common replacement parts, estimated lifespans, and cost-effective options for DIY or professional replacement. It also presents a preventive maintenance schedule with clear best practices to reduce future resets. The table below summarizes key parts, maintenance actions, and guidance on when to call a professional.
| Component | Maintenance Action | When to Call a Pro |
|---|---|---|
| Pump motor (5–10 yrs) | Inspect monthly; clean float and inlet | If motor hums or fails to start |
| Float switch (3–7 yrs) | Test quarterly; free movement check | If switch sticks or is intermittent |
Common replacement parts and estimated lifespan
Several key components commonly require attention when a condensate pump fails: float switches, check valves, inlet screens, tubing, and the pump motor or impeller.
Float switches often last 3–7 years, check valves 5–10 years, screens and tubing vary with environment (2–10 years), and motors/impellers typically last 5–15 years.
Replace with OEM or compatible parts to guarantee fit and reliability.
Preventive maintenance schedule and best practices
When maintained on a regular schedule—quarterly inspections with annual part replacements as needed—condensate pumps perform reliably and require fewer emergency resets.
Recommended tasks include cleaning reservoirs and float switches, inspecting tubing and check valves, testing pump operation, and replacing worn seals or motors per manufacturer intervals.
Keep records, use compatible OEM or approved aftermarket parts, and address corrosion or buildup promptly to prevent failures.
When to call a professional vs. DIY replacement
Regular quarterly checks and annual part replacements reduce failures, but some pump issues exceed routine upkeep and require professional attention.
Minor clogging, float switch cleaning, and simple impeller swaps suit competent DIYers with basic tools.
Call a licensed HVAC technician for persistent leaks, electrical faults, motor failure, or warranty-covered parts.
Use OEM or equivalent replacements and document maintenance to prevent repeat resets.
Cost and time estimates for common condensate pump issues
Typical DIY condensate pump repairs, such as clearing a clogged float or replacing a small component, usually take 30–90 minutes.
Parts for common fixes often cost $10–$75, while professional service calls and labor typically range from $100–$300.
These estimates help readers weigh time and expense when deciding between self-repair and hiring a technician.
Typical DIY repair timeframes
Estimate repair time and cost by matching the symptom to the likely cause:
Simple fixes like clearing a clogged inlet, cleaning the float switch, or resetting a tripped pump typically take 15–45 minutes and cost under $25 for basic tools or replacement parts.
In contrast, replacing a faulty pump motor, installing a new check valve, or repairing a cracked discharge line usually requires 1–2 hours and $75–200 in parts.
Typical DIY timeframes:
- 15–45 minutes for minor issues;
- 1–2 hours for replacements or moderate repairs.
Average cost ranges for parts and professional service
After matching symptom to likely cause and gauging DIY time, cost expectations can be refined by looking at parts and service fees.
Replacement pumps typically run $40–$200 depending on capacity and brand. Small components like float switches or check valves cost $5–$40.
DIY saves labor; professional service visits generally add $80–$200 for diagnostics and basic repairs, higher for complex jobs or emergency calls.
Real-world scenarios and solutions
Technicians encounter several common situations that affect condensate pump performance and require distinct responses.
One involves an alarm after prolonged heavy use.
Another presents as abnormal noise following a reset.
A third is characterized by the need to reset the unit repeatedly in short succession.
Each scenario suggests different diagnoses and corrective actions to explore.
Scenario 1 Pump alarm triggered after heavy use
When heavy use causes a condensate pump alarm to trigger, the unit typically needs a quick inspection and basic reset rather than immediate replacement.
The technician checks the reservoir, float switch, and inlet for debris, clears clogs, and verifies power and wiring.
After confirming safe conditions, they perform a manual reset and observe several cycles to guarantee proper recovery before returning the system to service.
Scenario 2 Noisy pump after reset
Inspectors often encounter a condensate pump that grows noisy immediately after a reset, a symptom that can indicate trapped air, a failing motor bearing, misaligned mounting, or residual debris in the impeller.
Technicians should check for airlocks by cycling the float, inspect and lubricate bearings if serviceable, tighten or realign mounts, and remove obstructions from the impeller.
Replace worn motors promptly.
Scenario 3 Repeated resets required within short intervals
A pump that needs frequent resets within short intervals often signals an underlying fault rather than a one-off glitch; unlike a noisy unit, repeating trips point to persistent issues such as chronic float switch failure, leaking condensate lines, rapid sump refill from excess condensate production, or intermittent short circuits.
Inspect float for wear, clear lines, check for excessive condensate sources, verify wiring and control board for shorts or corrosion.
Tips to extend condensate pump life and avoid frequent resets
Extending a condensate pump’s service life and reducing the need for resets depends on a few straightforward preventive measures.
Emphasis on correct installation, routine seasonal checks, and simple daily habits can prevent common failures like clogs, corrosion, and freeze damage. Following a concise maintenance routine reduces downtime and repair costs.
- Verify proper installation: correct slope, secure mounting, and appropriate electrical protection.
- Schedule seasonal inspections and winterization to prevent freeze-related failures.
- Adopt simple habits: flush the drain, keep the area clean, and check for leaks regularly.
- Use corrosion-resistant fittings and clean or replace traps and filters on a set schedule.
Proper installation practices that reduce failures
Several straightforward installation practices greatly reduce condensate pump failures and the need for frequent resets.
Install pumps level and on vibration-isolating mounts, guarantee correct drainage slope and unobstructed venting, and use properly sized piping and check valves.
Protect electrical connections with GFCI and secure condensate lines to prevent kinks.
Follow manufacturer placement, maintain accessible service space, and test operation after installation.
Seasonal checks and winterization tips
Routine seasonal checks and targeted winterization steps markedly reduce condensate pump failures and minimize resets by preventing freezing, blockages, and electrical faults.
Inspect and clean float switches, drain lines, and condensate pans; verify heater or insulation on external lines; test pump operation and alarm function; replace brittle tubing and worn seals; secure electrical connections; schedule professional service before cold snaps to guarantee reliable winter performance.
Simple habits that prevent clogs and corrosion
After completing seasonal inspections and winter prep, small everyday practices further reduce clogging and corrosion that lead to reset cycles.
Regularly flushing condensate lines with a vinegar solution, keeping drain pans clean, installing a simple inline filter, ensuring proper slope and secure fittings, and checking discharge tubing for algae or scale prevent build-up.
Periodic visual inspections catch early issues before pump failure.
Conclusion
A condensate pump reset can feel like performing tiny surgery on a household engine, yet it usually restores normal operation quickly. Following the step-by-step reset and basic troubleshooting often resolves clogs, float failures, or power glitches without professional help. If problems persist, inspections, parts replacement, or a technician’s intervention will be required. Regular maintenance and timely part swaps prevent repeat issues, saving time, money, and headaches in the long run.